DIY frame bath photo construction report
And so we have already looked at what inexpensive foundations for frame buildings there are.
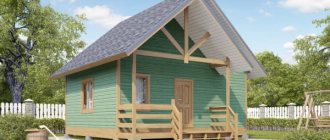
Now we will look at a photo report on how to build a frame bathhouse with your own hands. In our difficult times, not everyone can afford a house with the use of explosion-resistant technologies that can withstand a direct hit from an atomic bomb. And so let's get started.
Constructing a frame bathhouse with your own hands is a completely feasible task. It still needs to be properly insulated and insulated from moisture penetration. It is easier and faster to erect a frame structure than a similar structure made of logs or bricks.
Any home craftsman will be able to cope with such work, since he will not need to order drawings, will not need to equip a serious foundation and will not need to purchase expensive building materials.
The frame bathhouse in the photo has a significant advantage - the structure is light in weight, which means it will not shrink during operation. Among the disadvantages, it should be noted that during precipitation, moisture penetrates through the cracks of the frame and then accumulates inside it. This problem should be solved in advance.
Ceiling design made of OSB boards and its finishing
A clean ceiling surface with an OSB texture does not look very attractive, so to enhance the decorative qualities, varnish coatings, overlays made from slats and remnants of lining material are used. How successful the decorative finish will be depends on the desire and imagination of the master.
How can you decorate an OSB ceiling?
The easiest way to improve the appearance of your ceiling is by painting. To make the ceiling look more attractive, the seams are sealed, and the surface is puttied and sanded. All that remains is to paint it with acrylic varnish or paint.
OSB ceilings are often simply varnished in dark colors or paintwork materials of different colors are used, as in the photo.
You can enhance the decorative qualities of an OSB ceiling with ordinary coffered beams.
Examples of OSB ceilings in a wooden house
Despite the nondescript appearance of the panel, with due diligence it is quite possible to make the ceiling, if not beautiful, then interesting in design.
Designing a future bath
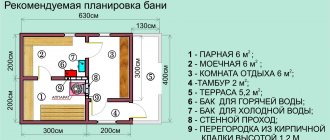
A frame bathhouse project can involve the construction of either a small building consisting of a steam room and a dressing room, or a two-story building on a suburban site. The choice depends on the wishes and financial capabilities of the owner.
When building a modest-sized frame bathhouse with your own hands, a simple strip or column foundation will be sufficient. You will need to purchase dry timber with a cross-section of at least 20x20 millimeters and an edged board. If the future bathhouse must have at least three rooms, then a more serious foundation will be required.
To save materials, you can install an attached veranda under the dressing room, and then inside the small bath building there will be enough space for a washing room and steam room.
When building two-story frame baths, you need to remember that they are the most fire hazardous and in the event of a fire, the fire will spread very quickly, and getting down from the top floor will become problematic.
How to sheathe OSB outside and inside the house, tips and instructions
Today OSB panels are so popular that they are often used in repairs and construction for both interior and exterior decoration. Of course, with the right approach, it is even possible to paint OSB, or plaster on OSB, or stick wallpaper, but all this is not very reliable, and the result will even be costly. If you try hard, you can even lay tiles on this material, but how long it all lasts may depend on many factors, and such finishing is not at all applicable for exterior work.
Creating a wooden base
Self-construction of a small frame bathhouse, as a rule, does not require the construction of a foundation due to its lightness. But to prevent the walls from becoming damp, you need to make a foundation.
In the case where you plan to build a bathhouse no larger than 3x4 meters in size, and the walls and roof are light, then it is enough to create a simple wooden foundation, which is secured along the edges with stakes. Such a foundation is considered a particularly good solution when carrying out construction on clayey, seasonally mobile soils that do not have excessive levels of moisture.
How to make a ceiling from OSB
The most difficult stage of filing the ceiling is the correct marking and calculation of the number of sheets. It is necessary to take into account the distance between the walls and the structure of the ceiling. If the hemming is planned on beams in a narrow and long room, then the OSB sheets are cut into squares - rectangles in such a way that the seams are spaced apart. This approach will ensure maximum strength of the binder.
OSB slabs are laid on a concrete ceiling in such a way that the worst joints are hidden away from view. Sometimes the last pieces have to be cut into equal parts and hemmed symmetrically.
Preparation for covering the OSB ceiling
First of all, the supporting surface for laying the slabs must be measured with a level to check for a slope and the highest and lowest points must be determined. If finishing the ceiling from OSB is planned along beams, then all preparation comes down to processing the wood, filling the leveling strips and gluing the film vapor barrier.
For concrete ceilings, in addition to priming, markings are usually applied under the sheathing; each plank has to be cut and adjusted individually in order to achieve maximum adherence of the slab to the supporting frame.
Installation of the frame on the ceiling under OSB boards
After the sheathing slats have been cut and more or less adjusted to size, you can assemble the frame. If insulation is carried out at the same time, a vapor barrier will need to be stretched under the slats.
The installation diagram is very simple:
- Drill along the marking lines and hammer in plugs for self-tapping screws. Usually, fasteners are selected of such a length that the threaded part is wrapped into the cork by at least 35-45 mm;
- The next stage is that the sheathing strips are attached with self-tapping screws to the plugs, while the frame parts are pulled together so that there remains a small gap between the lath and the concrete slab;
- Next, you need to, by unscrewing or screwing in the screws, try to align all the planks as much as possible in one plane.
Typically, the adjustment operation is performed manually with a screwdriver, guided by the readings of the building level bubble placed on the slats. After the sheathing has been assembled, the remaining cracks are wedged out with wood chips or simply blown in with foam.
For your information! It is very important not just to nail the sheathing to the concrete ceiling, but to align it horizontally. In this case, the OSB panel will be fixed without deformation or “swinging” on the supports.
Option for installing lathing on a concrete ceiling
Otherwise, the edges at the joints may end up at different levels, or you will have to nail the OSB board around the perimeter, as in the video:
How to attach OSB to the ceiling
First of all, the OSB sheet needs to be lifted onto the ceiling; the easiest way to do this is with an assistant, but you can try it yourself. In this case, the slab is lifted onto a stepladder and fixed to the ceiling with additional supports installed in the center or along the edges of the panel.
The plate is secured with self-tapping screws, starting from the center and then along the perimeter. In the places where the self-tapping screw is screwed in, holes are drilled in advance and fasteners are installed. All that remains is to align the OSB according to the markings, press the panel to the sheathing and tighten the fastener.
When the frame is properly aligned, the ceiling is smooth and even.
If the temperature and humidity in the room can vary over a wide range, then compensation gaps will need to be left between the joints.
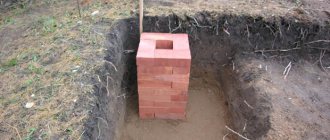
Construction of a columnar foundation
This type of foundation for a frame bath is made in the presence of high groundwater. They build a columnar version of the foundation without the involvement of special equipment and a team of workers (for more details: “How to make a columnar foundation for a bathhouse - types of construction options”). You need to have a drill, plastic or asbestos pipes at your disposal and be able to mix cement mortar.
If you are building a frame bathhouse with your own hands, step-by-step instructions for arranging a columnar foundation look like this:
- Level the land.
- Mark the locations for installing the pillars.
- Holes are drilled and waterproofing is placed at the bottom.
- Gradually pour the concrete solution and raise the pipe, which is fixed at the 20-30 centimeter mark. When the concrete hardens, it is reinforced.
- If the base is ready, the pipe is filled with solution to the end.
- Using a strong beam, a grillage is formed.
We suggest you read: How to create a reliable foundation for a bathhouse
Strip foundation
Such a foundation is installed when there is heaving soil on the plot.
The work on its construction is carried out step by step:
- Markings are made on the site and a trench is dug, the width of which is 40 centimeters and the depth is approximately 50 centimeters.
- The hole is filled with sand layer by layer until the ground level is reached, compacted each time and watered with water to ensure compact shrinkage.
- They construct formwork 50 centimeters high and 30 centimeters wide. For greater strength, it is reinforced using rods and metal pipes.
- Pour the concrete solution in several approaches (without allowing the previous layer to dry) or at a time.
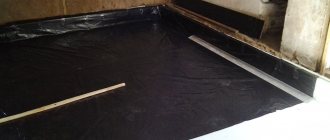
- Roofing felt is laid on top of the concrete to waterproof the frame walls.
Projects and drawings of a two-story frame bathhouse provide for the provision of the most reliable support on any type of soil, with the exception of floating ones. The base is a prefabricated strip foundation.
Internal insulation and vapor barrier
Bars with a cross-section of 5x5 centimeters are nailed to the bottom of the logs in the main rooms of the bathhouse building. Rough coating boards are mounted on top of them, then roofing felt (for waterproofing), followed by mineral wool slabs 10 centimeters high or expanded polystyrene. Before laying the final finishing material for the floor, glassine is laid (to provide a vapor barrier).
The floors in the washing area can be arranged differently:
- To ensure that the floor surface is warm in any weather and dries quickly, a separate foundation should be created around the perimeter of the room.
- The soil is removed to a depth of 50 centimeters and a 10-centimeter layer of gravel and sand is poured into the resulting trench. If water enters such a drainage hole, it will go into the ground and a pit will not be required.
- For this floor, it is advisable to use asbestos-cement pipes with a diameter of 10 centimeters. They are laid directly on the foundation and filled with concrete so that they do not move.
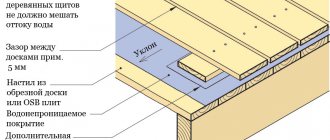
- Then a 4-5 cm thick edged round board is laid on the pipes, maintaining a gap of 6-7 millimeters and using rubber gaskets, which are fixed with nails.
- Then the floor material is pressed down with baseboards.
Improvement of the bathhouse premises of a frame bath from the inside involves carrying out work to prevent the accumulation of moisture as a result of temperature changes. The fact is that it is very hot inside the structure in the winter, and the weather outside is cold. Hence the need to install a vapor barrier. The simplest solution to this problem is to lay polyethylene film under the interior trim with clapboard.
You should approach the work of covering the steam room room responsibly. In this case, you will need a high-quality vapor barrier made of glassine, aluminum foil, polyethylene film, etc.
It is not recommended to use materials such as roofing felt or roofing felt in a steam room, since under the influence of high temperatures they will begin to emit an unpleasant specific odor. Experts recommend using Ursoy roll material 50 millimeters thick for internal insulation of frame baths.
It is laid out between vertical posts, secured with nailed slats. In some places, the heat insulator can be fixed to external boards, but using special nails with a rubber washer above the head.
As a result of the work done, you should get some kind of cake for the walls of the bathhouse from the following layers:
- external lining;
- glassine;
- insulation;
- polyethylene film;
- internal lining.
The main point that should not be forgotten is the need to leave a 5 cm air gap.
Particular attention is paid to the steam room, where it is important to ensure the “thermos effect”. For this reason, it is recommended to place the heat insulator with foil inside the room. On the ceiling you need to use not only foil Ursa, but also regular insulation, laying it in a layer of 5 centimeters.
We invite you to familiarize yourself with: Water containers for a private home
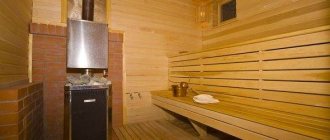
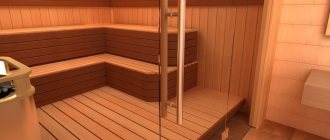
As for the walls and ceiling of the steam room, it is advisable to use aspen lining, which has healing properties, for finishing. Boards, namely poplar or tongue-and-groove linden, are also suitable.
Applying plaster to pox boards
The plaster coating extends the service life of the slabs and also prevents the walls from catching fire. High humidity causes oriented strand boards to change in size and can also become deformed due to temperature changes. Applying the plaster mixture directly to OSB is prohibited, as the coating may crack and chip after some time.
To prevent this from happening, builders use two application methods: • intermediate; • layer-by-layer.
Plaster is applied to OSB board
For intermediate application, polystyrene foam (gas-sprayed material) or glassine (cardboard impregnated with petroleum bitumen) is used. Expanded polystyrene helps to insulate wall floors from moisture and additionally provide thermal insulation. Glassine is not expensive and is available to everyone.
To prepare the base, the first step is to seal the joint gaps between the OSB panels. Then cover with an intermediate layer using polystyrene foam or glassine coating. A reinforced mesh sheet is fixed on top of it and covered with a plaster mixture.
When the plaster layer is applied directly to the oriented strand board, the work is performed in several passes. Initially, prepare the base, similar to the previous method. Afterwards, the first layer of plaster mixture is applied.
Without waiting for it to harden, a reinforcing mesh fabric is laid. As soon as the plaster mixture has dried, apply a second layer of plaster mixture. After the second layer has dried, the last leveling layer is applied. Without an intermediate layer, it is not reliable, because after three years of service, or even less, it begins to delaminate and fall off.
Installation of decorative stone on osb boards
Decorative stone of artificial origin looks aesthetically pleasing and rich, but it is difficult to install, and not everyone can afford its price. However, it is worth noting its durability and resistance to external factors, which will definitely pay for the exotic coating.
It is necessary to install a facade made of decorative artificial stone in several stages:
• filling the seams between OSB boards with a sealed mixture with a frost-resistant effect;
• priming the entire surface of the walls;
• putty with frost-resistant putty mixture;
• applying glue in 2 layers, embedding the reinforced mesh in the first;
• fastening of decorative facade stone to the second adhesive layer;
Type of finishing of OSB boards with decorative stone
It happens that the stone is fixed without an intermediate layer. This can lead to unreliability; after 3 years the coating may fall off.
Fastening siding to OSB boards
Facing the facade with siding sheets is a universal method. It is applicable to various surfaces. The material is affordable and has an aesthetic appearance. On uneven facade surfaces, siding is laid on a pre-installed sheathing. If the walls are smooth, then the siding can be attached directly to them.
In order to keep the OSB panels in unchanged condition, it is necessary to install a membrane between the siding sheets and the wall, which will prevent the penetration of water and drafts.
Decorative facade panels
Decorative panels for decorating the façade of a house are widely used. They are made from building materials such as metal, glass, plastic, wood.
Such panels are fastened in several ways:
Installation of decorative panels on the walls of an OSB house
All fastening options have their advantages and disadvantages. Everyone chooses what is more suitable and convenient for themselves. The most important thing is to strictly follow the technology and recommendations of professionals.
Methods for finishing osb outside
Walling
If we are building a frame bathhouse, after the foundation is prepared, we can begin building the walls. Before doing this, make sure that the wood is well dried. The type of wood used is not particularly important, with the exception of birch, since it will quickly rot. The main thing is that the wood has low thermal conductivity.
When choosing materials for external cladding, preference should be given to pine and larch, while aspen is best suited for interior finishing. After completion of construction, the outside of the building is covered with an antiseptic, for example, Texturol.
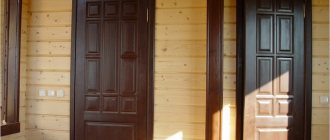
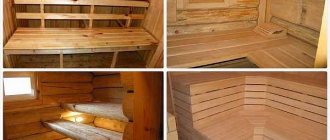
Inside, a do-it-yourself bathhouse made from boards, when finishing the walls with clapboard, is sanded and coated with furniture varnish in several layers. The wooden lining inside the steam room and washing room is treated with a special impregnation.
Is it worth doing it at all?
In most cases, this question does not arise when a person is thinking of separating a piece of a recreation room or utility room with a wall - such ideas usually come for a specific task. But dividing or not dividing the common territory of the steam room and washing room is more complicated; here you need to evaluate the pros and cons from different points of view.
Therefore, we will limit ourselves to the question of what the partition between the steam room and the wash room gives and what it deprives.
The partition can be already existing or just being designed. The pros and cons will be different.
Also different conditions are the bath regimes that one or another family prefers.
We can immediately say this: for the Russian bath with low temperature and high humidity, the presence of those washing next to those steaming has no effect, but in a sauna, where the regime is low humidity and high temperature, a partition with a washing compartment is more than necessary. And here's why: if you increase the humidity at high temperatures, the body puts a strong strain on the heart.
Bath thermometer-hygrometer, measures air temperature and humidity
Therefore, in a sauna combined with a washing room, there is no other option but to steam together, then lower the temperature by ventilating, and only after that begin hygiene procedures together.
CONCLUSION 1: a partition is necessary in a sauna, but it may or may not be necessary in a Russian bath.
But this is about the regime. There are other factors too. You probably know that if you cover several meters of polyethylene between the trees, and light a fire inside, heat the stones and pour water on them, then you can get a bathhouse in the forest. Therefore, the box is the main thing for obtaining bath conditions. And in a box, size matters.
Why are they important? They are related to the required furnace power and the required amount of steam. But it’s good when you don’t have to heat the sink. But if we take the task of heating a washing room, it turns out that the partition weakens the heat exchange between the rooms, and something needs to be done to make it heat up.
If the partition is completely heat-insulating, then you need to make channels and install forced ventilation in them, removing part of the heat from the steam room to the washing room. You can solve the problem in another way - place a hot water tank in the washing room, it will work like a heating radiator (in addition to providing hot water). You can a warm floor or any other heat source independent from the steam room and its stove.
CONCLUSION 2: The partition interferes with heating the washing room. You need to find the optimal solution for your case.
Here we will consider the option when you already have a working bathhouse with a combined steam room and sink. If everything is good, then your furnace has enough power to heat the volume of this common room. But if you put a partition in this bath, the balance will change, the power will become excessive for the steam room.
ADVICE! Heat removal using forced ventilation or, for example, heating water outside the steam room can help here too. Otherwise you will have to change the stove.
CONCLUSION 3: a decision on the need for a partition must be made based on the preferences of the regime and calculation of the balance between the cubic capacity of the steam room, the power of the stove, the heating of the washing room (here is the calculation of ventilation), we hope it is clear what is meant.
Here it should be added that partitions also differ in their thermal conductivity and vapor permeability. For example, a glass partition is very thermally conductive and does not allow either steam or liquid water to pass through. But we are talking about a frame partition. So it can be different, but more on that below.
The MAIN thing is to know that in search of the balance mentioned above, you can vary the thickness of your partition, including completely abandoning the insulation. But the selection will still be experimental, albeit with an eye on the characteristics of the materials.
Construction of the truss structure
Typically, boards with a section of 15x5 centimeters are used for floor beams and rafters in frame baths. They are placed on the edge and fastened together. As a result, a distance of 10x12 centimeters is obtained between the rafters. In a vertical position they are fixed with “kerchiefs”, and on top they are combined with a ridge beam of a similar section.
The beams extend outward approximately 40 centimeters. The sheathing is made from boards 25 cm thick, it is laid in the direction from the ridge.
To fasten the rafter forms, special metal plates are used. It is much easier to assemble such a structure on the ground next to the building, and then lift it up and install it there ready-made.
Of the materials for roofing, the best choice would be soft tiles (if a light bathhouse is being built on a conditional foundation) and metal tiles (if a large building is being built). When it is not planned to build an attic, then external roof insulation is required.
Exterior wall decoration
As practice has shown, the construction of frame baths is best done from OSB boards. The fact is that they are multi-layered and do not move or warp, as happens with natural wood. But a bathhouse made of OSB or other materials needs external finishing. One option is plastering or painting.
The modern construction market offers a huge selection of finishing materials, and therefore it does not matter how simple the design of the bathhouse is from the outside, since it can be given an expensive appearance.
The most popular and in demand of them now are:
- Lining. This decorative finishing material is the most accessible and easy to install for external upholstery of frame baths. Such buildings look very solid. On the external wall, the lining is placed horizontally after waterproofing has been made from glassine, the sheets of which are fixed overlapping and the edges are taped. If the work is done efficiently, unnecessary moisture will not be able to penetrate inside the bathhouse.
- Thermal panels. Often the construction of a frame building requires wall insulation, which can be done with their help. Thermal panels have a three-layer structure. It contains thermal insulation material (mineral wool or polystyrene) between two polyvinyl chloride layers. The surface of thermal panels, as a rule, looks like masonry and is sprinkled with compressed stone chips on top. The panels have mutual grooves, and after they are laid, a monolithic pattern is obtained, reminiscent of brick or stone walls. The finishing of the façade of the bathhouse is carried out using ordinary self-tapping screws - they will fix the material to the profiles.
- Facing brick. Brickwork fits perfectly into the landscape of any garden or summer cottage on which a frame bathhouse is being built. An even row always looks beautiful on a bathhouse building. The cost of facing a frame structure with brick will be much cheaper than building an entire bathhouse from it. In addition, additional insulation can be laid between the brick trim and wooden walls.
- Vinyl siding. This is the most popular modern cladding material used for cladding frame bath buildings. Siding has an affordable price and is easy to install. In addition, the market offers a wide selection of textures, colors and thicknesses of products.
- Block house. A frame bathhouse, the façade of which is lined with this latest material, looks like a log structure. It is almost impossible to distinguish such a building from a real log house.
We invite you to familiarize yourself with: Do-it-yourself aerated concrete bathhouse
Finishing the gable of the bathhouse
The cladding of the pediment is carried out depending on its design and the material used to decorate the facade. It is also important what the pediment itself is made of:
- A wooden pediment can be sheathed with any material, but it must first be waterproofed using a membrane material.
- For concrete gables, the surface is first leveled and the sheathing is installed. The sheathing is attached to the sheathing.
Finishing the gable of the bathhouse will give the facade a finished look and additionally protect the structure from moisture.
In order not to disturb the unity of the ensemble, the gables of the bathhouse with finished imitation or siding are sheathed with the same material. For brick and concrete structures, stucco can be used in the form of various relief elements. Iron sheets are well suited for finishing the gables of a bathhouse, but due to the high cost, this option is rarely found. The easiest and most inexpensive way to cover a gable is with siding panels.
In the photo on the right you can see the pediment of the roof of the bathhouse with an attic, trimmed with plastic lining. It goes well with the siding that was used to cover the facade. If you take lining in a contrasting color, you can give the structure a unique design.
There are several ways to attach the material to the pediment:
- Using aluminum posts that are mounted on the gable.
- On a wooden gable, siding or imitation timber can be sewn directly onto the surface.
- Using wooden slats, which are pre-attached to the pediment.
When covering the gables of the bathhouse, it is necessary to use a level and fasten the planks on the same plane. If this is not observed, the integrity of the structure will be compromised.
After covering the outside of the bathhouse, it is necessary to take care of additional protection. A drainage system is installed on the roof, and wastewater is drained. This is all easy to do with your own hands.
Do-it-yourself panel bathhouse
The bathhouse has become a desirable attribute for residents of cottages and dachas. A simple wooden structure gives people health and unique sensations. For those who cannot afford to build a bathhouse from logs, there is an alternative option - a frame-panel bathhouse.
This design is a frame made of wooden beams. sewn with insulated shields. This type of construction is different:
- low cost of materials;
- short period of construction of a bathhouse;
- rapid heating and low thermal conductivity of the material;
- minimal shrinkage;
- ease of doing the job.
The disadvantage of the design is the joints between the panels, which must be carefully sealed using mineral insulation and vapor barrier.
A small do-it-yourself panel bathhouse includes three rooms: a washing room, a steam room and a relaxation room. This is an optional arrangement; the number of rooms can be increased or decreased as desired. You can make a room design yourself or use a ready-made one. On the drawing it is necessary to note the location of windows, doors, stoves, communications.
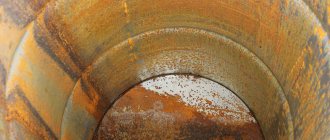
Columnar foundation from the inside
On the site chosen for the construction of a bathhouse, markings for the foundation are carried out using pegs and twine. For light frame construction, a pile base made of asbestos-cement pipes is most often used. These supports will last a long time, they are durable and do not collapse under the influence of moisture. The work does not require special skills or the use of special equipment.
The underground part of the pillars is buried below the depth to which the soil freezes in winter in your region. Their diameter is chosen taking into account the weight of the planned building; for a bathhouse, pillars of 20 cm will be required. Asbestos-cement piles are placed in each corner of the building and at the intersections of walls. All places for pillars are marked with pegs.
Pits for pipes are dug from 1 to 1.5 m, a sand cushion of 20 cm is placed at the bottom. The pillars are leveled, and if there is groundwater, they are coated with mastic for waterproofing. The base of the pipes is filled with concrete. The outer side is wrapped with roofing felt and covered with sand. 2-3 iron rods are placed inside the pillars and concrete is poured.
Finishing the bathhouse with wooden clapboard
The traditional material for exterior finishing is wooden lining. This facade has an aesthetic and modern appearance and fits well with any architectural style.
Finishing the outside of a bathhouse with wooden clapboard has the following advantages:
- environmental safety;
- durability;
- high noise and heat insulation;
- low thermal conductivity;
- accessibility of installation.
Before decorative finishing, the outer walls of the bathhouse are treated with fire retardants and antiseptics, which do not contain hazardous components.
The sequence of cladding with wooden lining involves the preliminary preparation of a frame made of thin wooden slats. The lathing is fixed to the bath strictly according to the level to prevent possible deformation of the finishing material. The outer boards are installed first, then the central part is filled.
The lathing is mounted on screws or nails. Additionally, each slatted structure is treated with an antiseptic compound to protect against rotting. The gaps between the slats are filled with wooden inserts or wedges.
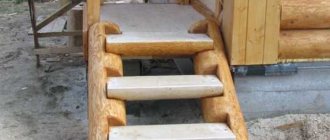
Base trim
A layer of roofing material must be laid on the installed pillars as waterproofing. Next, the base piping is installed. To do this, take a 120x120 mm beam and soak it with an antiseptic. It is better to use softwood such as pine or cedar. The beam is laid around the entire perimeter and fastened using the “half-log” method - half of one beam is sawn off from the top, and from the second from the bottom. When connected, a flat plane is formed. The piping, checked using a level, is attached to the pipes with anchors.
Tags: bathhouse, inside, possible, sheathing
« Previous entry