As for the water in a homemade pond, it can be used for irrigation, or you can periodically add cleaning agents to prevent algae blooms. In this case, it is unacceptable to saturate the plants with it.
Flowerbed
The Internet is full of ideas on how to make a flowerbed from a variety of things that have lost their value - beds, carts, shelves and even shoes. It’s not difficult to follow the same path with a bathtub - just fill in the soil and plant the plants. The advantage of using an old font in creating a flower bed should take into account its strengths:
- ability to withstand heavy weight;
- corrosion resistance;
- strength of shape and walls.
These advantages come in handy when creating a weighted structure, for example, not just a flower bed, but a greenhouse flower bed that has a lid
. It is practical to plant capricious, heat-loving varieties of flowers, seedlings or strawberries in such a mini-greenhouse.
Design Features:
- the cover can be made removable;
- There is no need to plug the drain hole
so that excess water can drain freely.
The main amount of work in this option falls on the creation of an arc dome on a wooden frame. Attach it to the bath using door hinges.
Fireplace
The benefits of using an unwanted bathtub as a fireplace are:
- no need to make a special foundation and hood;
- minimum dirty construction work;
- easy installation;
- stability and durability of the structure.
Basic steps to get a home fireplace:
- Protect floors and walls at the installation site layer by layer with materials for thermal insulation, waterproofing, and reinforced cement screed.
- Make a base for a cast iron fireplace from non-combustible materials with thermal insulation properties - brick or foam concrete blocks.
- Cut off 1/3 of the tub from the drain side and work with the remaining 2/3. At a height of 20 cm from the cutting line on the bottom side, cut out a door for storing firewood. Place on the hinges and attach the handle.
- If the fireplace is installed in the corner of the room, then weld 2 sheets of iron on the back side at right angles to each other and to the sides of the trough, leaving space for installing the chimney.
- After installing the ventilation, perform finishing work - plaster, veneer.
conclusions
Despite the fact that cast iron bathtubs of the last century are considered obsolete, a number of their qualities - durability, resistance to rust and stress, heat retention and strength - can be used to obtain objects with unique properties. The result of converting a used font into various ovens, a pond, a greenhouse, a flower bed or country furniture will become a source of pride and envy for your neighbors.
Craftsmen, of whom there are plenty in every city with an average population, have long mastered the production of solid fuel boilers and stoves from steel or brick. Moreover, most of their products function quite reliably and efficiently. And only cast iron, as a material for homemade heaters, remained on the sidelines until recently. But there is already an initiative here, and in this article we are ready to present it and discuss the question of how to make a stove from a cast-iron bath yourself.
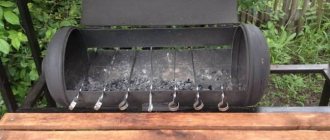
Homemade garden stove made of cast iron
Previously, it was not without reason that craftsmen ignored cast iron, although it is in high demand as a material for the manufacture of heating equipment. The fact is that gray cast iron is difficult to process mechanically, and manufacturers of heating equipment use industrial casting to give it the required shape. These technologies are not available at home, so to make a stove you can take some kind of cast iron product and remake it, which was done by one of the home craftsmen. An old cast iron bathtub, of which there are still plenty left from the Soviet era, was suitable for this purpose.
Since this material is extremely hard and fragile, processing it requires not only a lot of patience, but also good metalworking skills. The garden stove made from an old cast iron bathtub shown in the photo above is a good example of such skills and patience, and our task is to explain how it is made. The first thing you should do is take an angle grinder with a working diameter of 250 or 300 mm and stock up on cutting wheels for metal, then carefully measure half of the tub and draw a cutting line. The width of the cutting wheel must be taken into account.
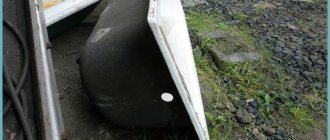
Pond from an old sunken bathtub
The location has been chosen, now let's get to work. You will need the following tools and materials:
- old cast iron bathtub;
- crushed stone, pebbles, facing stones and bricks;
- cement, sand and clay; wheelbarrow;
- container for mixing the solution;
- Master OK;
- shovel;
- tin sheet;
- waterproof glue;
- roulette;
- level;
- paint or film.
Arrangement of a reservoir at the dacha with your own hands begins with the preparation of the most important participant in the program - with a bath. Cement the side drain. If desired, the surface of the bathtub can be made of a more natural color - paint it in any natural tone from a mixture of tile adhesive and pigment, or, if you want to imitate the color of sea water, lay a film of the corresponding color.
Stages of building a pond from a bathtub
Now we are preparing a place for the foundation pit. Make a mark on the ground and dig a hole 25 cm deeper than the height of the bathtub. Dig another hole under where the drain will be located. This pit should have dimensions of 60x60 cm. Insert a rolled sheet of tin into it so that it is 25 cm higher than the level of the main pit. Fill the small hole with gravel up to the edges of the sheet and remove it after filling the sand bed. The sand layer should be 25 cm. It's time to install the bath. When installing, make sure that the location of the water drain corresponds to the location of the small hole. Add wet sand into the void between the walls of the bathtub and the bowl of the pit. At the same time, you can fill in water according to the level of the sand being poured. The earth will settle, and if you plan to add plants to your mini-pond, drain the water through the drain hole and prepare everything for the future inhabitants of your pond.
Bath pond in practice (video)
Procurement work
The next operation is to cut the cast iron bathtub in half, strictly along the line. The work is hard and long, but quite doable. When there are 2 halves of a product, they must be fastened together. Again, welding cast iron parts at home is not possible, so the halves are bolted together, and a steel sheet is laid between them, separating the firebox from the oven.
For this purpose, the master took corrugated sheet metal about 8 mm thick, you can follow his example. If you have regular smooth metal of this thickness or a little more, it will also work, although it is better not to use a sheet thicker than 10 mm, this will affect the heating time of the oven. It is better to cut the blank from the sheet in advance, but if the available metal is slightly larger than the size of the bathroom, then this can be done later, on site.
Another step towards the goal is marking and drilling mounting holes in the cast iron bathtub and metal gasket. Let’s make a reservation right away that you will need high-quality drills and the ability to sharpen them, because cast iron will not just give up to you without a fight. To make 4 through holes, you will need to patiently sharpen the drills several times, while maintaining the working edge angle of at least 120º. We drill with different tools, from small to large diameters, at low drill speeds, periodically lubricating with machine oil.
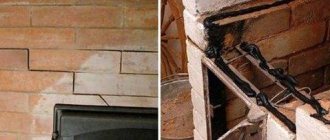
And the last labor-intensive operation is cutting a hole for the chimney pipe. While it is not very difficult to make it in a metal spacer 8 mm thick, then you will have to tinker with the bathtub. It is best to cut through the place where the bathroom drain used to be; it must be expanded to a diameter of 100 mm. When this operation is completed, you can begin assembly. First, the chimney pipe must be welded to a metal sheet.
Any knowledgeable stove maker will tell you that this place is the weakest in the entire structure of any steel heater; this joint burns out first. A cast iron stove from a bathtub is no exception, so it would be more correct to pass the pipe through a sheet and scald it on both sides.
Assembling the furnace body
When the element is ready, it is installed on the lower part of the bathtub, and the second part is placed on top. The craftsman used a special sealant at the joint as a seal, but asbestos or basalt cardboard can also be laid. Then the holes are aligned, the bolts are installed and tightened. At this point, the stove body can be considered ready.
In order for a homemade stove from an old bathtub to acquire a finished look, you need to cut out and attach a metal front panel; a sheet thickness of 5-6 mm is sufficient here, and then make doors and a grate. This entire structure should be installed on a pedestal made of brick. In order not to heat the street, the metal surfaces of the combustion chamber and oven must be insulated with a layer of basalt fiber and lined with any convenient material.
Since the bathroom can be used to make not only garden stoves, but also heaters for different rooms, in the latter case, insulation of the body is not required so that the walls can freely transfer heat to the air environment of the room. Then the front panel will take on a different look, and the brick base will have to be refined with finishing materials. At the same time, there is no need to build brickwork in front and behind the stove so that the firebox is freely washed with air. However, another craftsman can replace the brick support with a metal one, here everything is in your hands.
Alternative uses
If you live outside the city or have a dacha, do not rush to part with your old plumbing fixtures, because you can make many necessary, useful things that simply give you a good mood from an old bathtub.
Some of them may even sway you in your decision to restore it, and you will prefer to install a shower cabin or a new bathtub in the apartment, and give the old one another life.
Option 1 – watering container
The first thing that comes to mind is to use a bath to collect and settle water. Many garden crops cannot tolerate watering with cold water from a well or a water supply system, so they allow it to stand in the sun.
But just an old rusty bathtub standing on the property looks terrible and spoils the mood, so it is advisable to dress it up at least a little.
The simplest thing is to paint it. And creative and creative people will like this idea that can be developed:
A cow or a hippopotamus, an airplane or a car - a cast iron trough can be turned into anything
Option 2 - artificial pond
If you're not into gardening or just don't need an extra container for watering, make your own pond out of your bathtub. It can become the center of a landscape composition or a place for relaxation, the arrangement of which will not have to be spent, since all the necessary materials for its decoration can be found on site.
It’s hardly worth going into detail about how to make a pond out of an old bathtub, but some advice from those who already own their own mini-pond will certainly be useful to you.
I had to spend a lot of time on thematic forums to understand all the pros and cons of this element of landscape design, and the secrets of its design:
- To prevent water from leaking out, the drain holes must be closed and sealed.
- The bathtub must be dug into the ground just below its level - this way the pond will look more natural, and the sides of the bathtub will be completely covered with stones, grass or other chosen decor.
Pond in the making
- Over time, the white walls of the bathtub will darken due to plaque formed by plant debris and dirt entering the water. It will look quite natural - some people specifically paint the container a dark color. But if you want to maintain whiteness, but do not want to regularly clean the pond, populate it with river mollusks , they will cope with this task perfectly.
- To prevent a pond from an old bathtub from turning into a swamp, fill it with water from a natural reservoir, already populated with microorganisms. If this is problematic, pour at least a couple of buckets of river water into it.
- The “shores” can be decorated with small or large pebbles, ceramic tiles, wooden flooring, or simply plant suitable plants around the perimeter. They will look great in the pond itself, and for this it is not necessary to pour soil into it. It is easier to install pots with water-loving crops on stands or directly on the bottom.
Homemade pond in the country
- For the winter, you don’t have to drain the water, but simply put several plastic bottles half filled with sand into it.
In the pictures, such miniature ponds look wonderful. But I still cannot help but talk about those factors that confuse me. Firstly, these are mosquitoes, for which a reservoir from an old bathtub with your own hands with stagnant water will become a cozy maternity hospital.
And secondly, small animals, such as hedgehogs, often drown in them. Falling into the water, they cannot get out because of the smooth steep walls.
Option 3 – flower bed, bed or mini-greenhouse
In such a large and deep container you can grow anything you want. For example, a bathtub can become an original flower bed, you just need to find a place for it and decorate the outer walls.
To make the plants feel good, water them more often, do not close the drain, and lay drainage made of pebbles, crushed stone or expanded clay at the bottom .
Flowerbed from the bath
It will also make it possible to get a harvest of cucumbers earlier than many neighbors. To do this you need to do the following:
- Paint the outer walls of the bath black so that they attract the sun's rays;
- Place the container near the fence or build it next to one of the walls of the support;
- Drill several additional holes in the bottom to remove excess moisture;
- Pour drainage into the bottom, then lay compost and a layer of fertile soil on top of it. You can use mowed grass, leaves, tops, straw, etc. as compost;
- Sprinkle the prepared bed with a solution of fertilizer and potassium permanganate.
The next step is to plant cucumber seeds directly into the bath. This can be done already at the beginning of May, but the crops must be covered with lutrasil before the onset of stable heat.
You can water directly through it. You will get a mini-greenhouse. The sun will warm up the walls of the bath, and the rotting compost will release additional heat , which is quite enough for these capricious plants.
Already a month after the emergence of seedlings, the first harvest can be harvested
When the seedlings grow up and the nights become warm, the lutrasil is removed and the cucumber lashes are directed to a fence or supports. Although you can do it differently: place the bath higher so that the lashes hang down.
Option 4 – pool for children
Inflatable pools for small children are short-lived and impractical - they are difficult to drain and clean. If you have an old cast iron, steel or acrylic bathtub, you can make a DIY pool out of it.
The principle of the device is the same as with an artificial reservoir, but under the drainage point the hole must be deepened and filled with drainage material or a container without a bottom must be inserted. This will allow you to drain dirty water without bailing it out.
Option 5 – garden furniture
The smooth curves of the bathtub walls are very reminiscent of the backs of sofas and armchairs, so why not use it as a frame for upholstered garden furniture? This task is not as simple as the previous ones, because only a person who knows how to work with an angle grinder can make a sofa.
You need to use it to cut out part of the wall along a previously marked line, and then sand the edges so that they become smooth and safe .
The design can be anything: the bathtub is painted, lined with mosaics or broken tiles, covered with burlap, etc. And inside, a mattress made of foam rubber and decorative fabric is placed as a seat.
These homemade legs will turn your bathtub into a rocking sofa
It’s even easier to make two chairs and a table, for which the container is cut into three parts.
The table will be the middle part with the tabletop attached to it
Such furniture can be placed in the shade of a tree or on the terrace of a house; it is not afraid of natural disasters. Only pillows and mattresses will have to be brought into the house during bad weather.
About the advantages and disadvantages
The main advantage of a homemade cast iron bathtub stove is its almost zero cost. The main investment is your work, and you will have to put in a lot of it. The second advantage is durability, it directly depends on the service life of the welded joints of the chimney and the front panel with doors, and the tightness of the main elements. As for the bathroom, even the enamel on it will not burn out right away.
For reference.
In Soviet times, enamel based on silicon (quartz sand) was used for baths and kitchen utensils. It was applied to metal products in 2 layers (a primer and a glossy layer) and heated to a temperature of 860 ºC so that the quartz sand melted, and then cooling was carried out using a certain technology. This kind of coating, which protects cast iron, served for decades and was destroyed only by strong impacts with a heavy object.
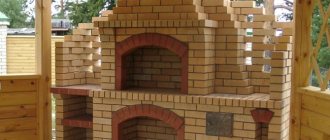
From the point of view of heating engineering, the operating efficiency of a homemade stove is unlikely to exceed 40% due to the direct release of flue gases from the firebox to the outside; they transfer only part of the heat to the oven, and the rest goes into the atmosphere. For this reason, a similar design is used as a sauna stove, where efficiency indicators are not so important, the main thing is temperature. True, only one half of the bathtub is taken and placed on a brick-lined base, and then the side walls are erected and the heater is installed.
Half of the bathtub serves as a reliable and durable firebox, which will not burn out very quickly, and will give off heat to the heater perfectly. As a result, construction will require less red ceramic brick, which will significantly reduce the cost of the steam room as a whole. The only caveat is to correctly join two materials with different coefficients of thermal expansion in a sauna stove - brick and cast iron. For this purpose, expansion joints are provided where asbestos or basalt cardboard is laid.
Master class: step-by-step production of a stove from an old cast-iron bathtub
Hello, dear readers, garden lovers. I am glad to see you again on the pages of the Site about the dacha.
Have you ever had a situation where you have nowhere to store old junk and feel sorry for throwing it away? I wish I could adapt it for something useful. Similar thoughts swirled in my head when I had to replace the old cast-iron bathtub with new acrylic (my wife insisted).
Well, it’s true, I didn’t dare to take as much good-quality metal as scrap metal, but to put it in the closet until better times... In general: “Either you do something with it right now, or throw it away” - once again I didn’t want to argue with my beloved .
And then I remembered that in some Soviet magazine, I read how craftsmen made crafts from unnecessary things with their own hands, photos of which I was still interested in because people were able to come up with such a necessary and functional use of an old cast-iron bathtub. I should have thought of making a stove out of it! I remember it like it is now. True, the diagrams and descriptions have completely disappeared from my mind, but the main thing is the idea, and I’ll come up with the rest myself.
But recently I came across this video and I definitely decided to build such a stove.
How to properly cut a cast iron bathtub?
This operation must be approached with full responsibility. You need to act very carefully so as not to damage the cast iron product. For cutting you will need a grinder and several metal discs. If possible, it is better to carry out work not indoors, but outdoors, doing it in a respirator, safety glasses and construction gloves. The following sequence of actions must be followed:
- First of all, the future section is marked;
Sawing the bathtub carefully to avoid chipping
- then, along the entire intended line, a layer of enamel covering the cast-iron base of the bathtub is first cut to avoid chipping along the edges;
- after this, they begin to saw the cast iron itself with cuts of 10-12 cm, taking breaks when the tool overheats;
- Having cut about half of the bathtub, you need to put supports under each of the parts, otherwise at the end of the work they may close and damage the tool.
Advice. It is advisable to cut the cast iron base at an angle. In this case, as a result of the reverse motion of the disc, the enamel will not peel off, and the cut itself will be smooth. With a good tool in hand, the job of cutting a cast iron bathtub into pieces can be completed in about an hour.
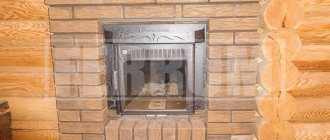
A stove for a bath from a cast iron bath: how to make it yourself?
Building a sauna stove is much more difficult than installing an ordinary garden stove on a site. After all, it must be not only effective, but also safe. Therefore, you need to take a responsible approach to installing a stove indoors. And in order to quickly navigate the process of necessary actions, you can look at the photo or get acquainted with the corresponding video material.
Attention! The construction of a sauna or any other stove requires compliance with fire safety rules. To properly equip it, you need to have at least minimal knowledge and experience. It is better, even before starting work, to first consult on this issue with a specialist, finding out all the subtleties and nuances.
The stove structure in the bathhouse must meet the following parameters:
- sufficient thermal power with the possibility of changing it;
- ability to accumulate heat and produce steam;
- the ability to regulate convection currents.
A cast iron bathtub of standard sizes is suitable for building a
stove. After cutting the bathtub, you can begin building the stove structure. In this case, you can use only one half of the cast iron container for the combustion chamber equipment. But bath stoves are also made from two parts of the bath. The second half can be used to build a heater or to add a compartment for heating water.
Those who love to make things with their own hands can build such an unusual sauna stove on their own. To do this you need:
- Pour the foundation for the furnace structure from concrete mortar with or without filler. You can use, for example, broken brick as a filler.
- Place half of the cut bathtub on the foundation with the curved part up. With a cut, the cast iron container must be built into the wall and removed to another room from where the furnace will be fired. On this side, the hole is blocked with a brick wall and a combustion and blower door is installed in it.
- Around the installed half of the bathtub, at a distance of about 10 cm, red brick walls are also erected, equal in height to the cast-iron container. The resulting space is filled with stones, which, when heated, will heat up, then giving off heat to the steam room.
Construction of a stove
A fairly simple sauna stove can be built in two tiers. Heat will accumulate in the upper chamber. The principle of operation is this: the gas, passing through the bath, warms up the stones, goes to the opposite side, then goes down, and then up, after which it exits the pipe.
Such a non-standard solution as a sauna stove from an old bathtub is not only original, but also quite simple. Its construction does not require the use of any special materials. A stove structure made independently will last as long as a purchased product. In addition, this option requires a significantly smaller investment than purchasing a ready-made stove.
Video description
About interesting ideas in the following video:
Bath-flower garden
Many owners of suburban areas have long appreciated the design potential of the bathtub, turning it into a spectacular flower bed. The technology for organizing a flower bed from a bathtub is no different from arranging beds; the search for a suitable location and external decoration come to the fore. Often an emphasis is placed on such a flower bed, for which the walls are covered with bright, eye-catching paint. There are several developments in the design of a flowerbed bath:
- Broken tiles are well suited for the spectacular decoration of a flowerbed from a bathtub in the country. A mosaic made from broken tiles will cost a penny, but will turn a cast-iron flowerbed into a work of art.
- The bath can be left white and then, depending on the flowers planted, the composition will have a distinct style, for example, ethno or Provence.
Charming Provence Source pinterest.com