Advantages and disadvantages of penofol
An important and significant point when using the component is its minimum thickness, due to which in the final stage the space practically does not lose its useful volume and area. The material can be applied as separate thermal insulation from the inside, or used in combination with elements of another design.
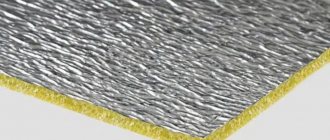
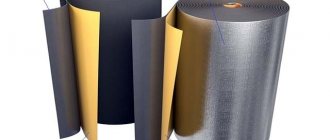
The structure of the product is three-layer. On the outside there is aluminum foil, and polyethylene is used as an intermediate layer. Typically the thickness of the finished product is no more than 10mm. The operating principle of insulation is not to absorb energy, but to reflect it. Great for keeping warm and cold.
Penofol insulation
Penofol is great for:
- Insulating the house's piping system.
- Thermal insulation as the main component of the design of the floor, ceiling or walls.
- Soundproofing the room.
- Waterproofing and vapor barrier of steam rooms, baths and saunas.
- Protection of ventilation ducts.
- Insulation of all types of floors.
- As reflectors for heating radiators.
Among the main advantages of penofol it should be noted:
- Easy to install, easy to cut and apply to any type of surface.
- Environmentally safe and harmless, since it is based on food foil and polyethylene.
- Flame resistant.
- Minimum thickness (only 4mm of material is equivalent in properties to 100mm of mineral wool).
- Ability to absorb noise.
- Low level of vapor permeability, due to which when insulating a house there is no need for a vapor barrier.
- Not of interest to small rodents and microorganisms.
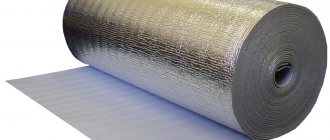
- It is supplied in the form of rolls, which has a positive effect on its transportation and installation.
- Complies with all sanitary standards and requirements.
The disadvantages include:
- It cannot be used as an independent insulation material for the outside of the house, so it is often used as waterproofing.
- It is difficult to fix with an adhesive solution, so alternative methods have to be used. At the same time, installation with nails is strictly prohibited, since the integrity of the penofol will be compromised.
- Poor workability for plastering, since the component is quite soft and does not hold its shape.
Foam insulation
Proper thermal insulation of walls or floors with foil penofol can only be carried out in compliance with the following rules:
- the best effect can be achieved with guaranteed air space between the material and the surface of the wall of the house;
- It is recommended to seal the joints with aluminum tape;
- the reflective side should be facing the inside of the room;
- The material should not be overlapped, since its thermal insulation qualities are noticeably reduced.
Violation of at least one of the listed points in the near future may lead to an unplanned premature rework of the entire insulation.
Nuances of foam installation technology
Foil penofol is one of the best materials for home insulation. With its help, you can provide high-quality thermal insulation of both the interior and exterior of the building. At the same time, the entire installation process is not particularly difficult, and you can do the insulation yourself.
Tools and materials
To insulate a residential building, it is enough to use penofol grades “A”, “B” and “C”. To install it you need to select the following tools:
- chancellor's knife;
- construction stapler;
- hammer;
- screwdriver;
- roulette
The following materials will be used during the installation process:
- penofol in rolls;
- wooden slats with a thickness of 1.5 to 2 centimeters;
- staples;
- adhesive composition;
- self-adhesive aluminum tape.
Fixing the insulation can best be done using staples, but self-tapping screws are also well suited for these purposes.
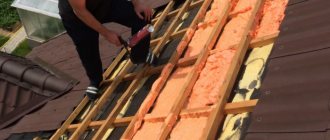
Insulation of house walls from the inside
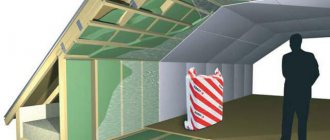
Internal thermal insulation of walls with penofol will not only keep the house warm, but will also protect against the formation of moisture. Installation of the material is carried out in the following sequence:
- Fix the slats vertically on the wall surface. It is recommended to maintain a distance of 60 centimeters between wooden elements, since the width of the insulating material is 1 meter 20 centimeters. Such parameters ensure convenient use of foil fabric.
- Place penofol on the wall between the wooden frame. Thermal insulation sheets should be positioned with the reflective side facing the inside of the room. Laying is done so that the edges of the material are in the middle of the installed slats. Each subsequent panel is mounted end-to-end with the previous one. The material is fixed to the staples.
- Ensure seams are sealed. All joints should be taped with special self-adhesive tape.
Insulating the walls of a house from the inside with penofol.
A frame of wooden slats is placed on the insulated surface of the wall. Its design depends on the type of future finishing.
External wall insulation
External thermal insulation of the walls of the house allows you to provide reliable protection from precipitation and wind. At the same time, external insulation creates good sound insulation.
Installation of penofol on the outside of the wall should be done in dry weather. It is done quite simply:
- the surface cleaned of dust and dirt is impregnated with antiseptic agents;
- slats are vertically fixed to a dry wall;
- sheets of penofol are spread between the wooden frame;
- laying of the material is carried out end-to-end;
- insulation sheets are secured using a stapler with staples;
- All seams are covered with special tape.
To fix the facing material, a wooden frame is built on top of the heat-insulating coating.
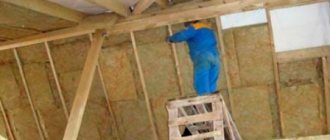
Ceiling insulation
For thermal insulation of ceilings, several layers of penofol are used:
- Initially, the surface is glued with foil material of the minimum thickness;
- slats are fixed on top;
- a second, thicker layer of insulation is attached to the wooden base.
A special tape is used to connect the joints. The material is fixed with screws or staples. To finish the ceiling, a wooden base is used, on which plasterboard is subsequently mounted.
Insulation of the room from the inside
It is possible to carry out construction work even on your own; for this you need:
- foil penofol;
- stapler or mounting adhesive;
- wooden sheathing;
- hardware;
- insulation of electrical wiring;
- Decoration Materials.
Execution technology
- A wooden frame is knocked down from beams, maintaining an air gap of 20mm.
- Using an adhesive composition, the material is fixed to the frame. The use of a stapler is allowed.
- Electrical wiring is insulated, if necessary. This is necessary, since foil is an excellent conductor, which can lead to serious consequences in the event of a short circuit.
- A second wooden frame is installed, the thickness of which is 20 mm, which serves as the basis for applying finishing components.
Insulation of walls with penofol
Let's sum it up
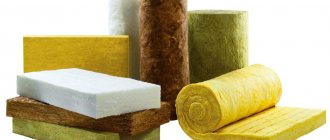
So, we found out that there are several types of foil insulation:
- polystyrene foam in sheets for flooring;
- mineral wool in sheets and rolls;
- penofol;
- shells for insulating pipes made of foam plastic and mineral wool.
All types of insulation, except shells, with a reflective layer are intended for internal insulation. The foil should be placed in the middle of the room. Such materials are suitable for external insulation, since the concept of reflecting IR radiation is reduced to nothing. Therefore, there is no point in paying for something that will not bring results.
Foam and mineral wool slabs must be glued using a special plaster-adhesive mixture from trusted manufacturers. The latter include the same Knauf or Ceresit. Laying on the walls is carried out from the bottom up, the sheets are additionally secured with dowels. And the most important thing is the presence of a ventilated gap in front of the reflective surface. If it is not there, then instead of reflecting heat you will get even more heat leakage and, in addition, mold on the finish.
The latest thermal insulation materials help to significantly reduce the cost of heating rooms. Covering walls with foil insulation is an economical solution for homeowners who are ready to install thermal insulation on their own.
External insulation of the room
Protecting walls from the outside differs significantly from the technological process of insulating a room from the inside. To work, in addition to the list presented in the previous section, you also need waterproofing and materials for the external cladding of the building. Strictly speaking, our experts do not recommend using penofol for external insulation or using it as an additional heat insulator in combination with another, for example, mineral wool.
Execution technology
- Before applying thermal insulation, the walls of the façade of the building are thoroughly cleaned and treated.
- The steps for applying the material are similar to how it is done from the inside. The difference lies in the construction of an additional frame to which the waterproofing is fixed.
- The facade cladding is mounted on top of the waterproofing on a wooden frame.
How to insulate walls with foil insulation
To do this you will need the following materials and tools:
- insulation with foil;
- construction stapler;
- small nails;
- hammer;
- foil tape;
- wooden slats;
- dowels
Foil insulation on the balcony
The process of insulating apartments and houses is somewhat different. You need to put slats on the walls of a private house for more convenient installation of insulation. This creates a ventilation space between the thermal insulation layer and the outer wall. The slats are mounted using dowels in increments of about a meter. The material is overlapped and attached to the slats. Foil insulation is best secured with self-tapping screws or construction brackets. The joints are taped with foil double-sided tape. Penofol is placed with the foil surface inward, and then drywall is attached to it. If you decide to get rid of the gap between the insulation and the wall, before installing the penofol, additional slats are installed to which the drywall is fixed.
This material can be used not only for insulating private houses, but also for thermal insulation of walls in apartments, especially if the room is located high and it is impossible to insulate the walls from the outside. Another case that requires the use of internal insulation with penofol is the presence of unheated rooms, an elevator shaft or a corridor behind the wall. Before starting work, check the walls for cracks and cracks. If they are found, they must be eliminated. Walls in apartments are insulated in the same way as in private houses.
You can insulate not only residential premises with foil insulation, but also garages, bathhouses, and balconies.
At the first stage, such premises must be freed from excessive humidity. Then the walls are cleaned and leveled. Insulation of a balcony usually starts from the corner. The first layer is waterproofing. Then you can begin laying penofol. All seams in the waterproofing layer must be sealed with foam. Using a special glue, the insulation is attached to the wall.
Dowels will help make the fastening more reliable. In this case, it is not recommended to overlap the material; this will reduce the heat-saving properties. It needs to be laid end to end, the seams need to be sealed with foil tape. The walls of the verandas are insulated in the same way.
Thermal insulation of the floor using penofol
Without floor insulation with penofol, it is difficult to achieve a comfortable and favorable atmosphere in your home. It is usually used as an additional insulating layer.
The key material is often expanded clay or foam. To carry out the work you will also need:
- foil penofol;
- basic thermal insulation;
- wooden or metal sheathing;
- assembly plumbing tools;
- hardware or adhesive solution;
- wooden logs.
Execution technology
- The floor is leveled using a concrete screed to ensure a level surface. Additionally, it is recommended to lay the main insulation under the insulation.
- Penofol is fixed to the screed, ensuring a cutting tolerance of at least 100mm near the walls.
- A metal or wooden frame is mounted. In the case of a wooden floor, experts advise replacing the frame with lags, impregnating them with an antiseptic solution.
- Penofol is attached to the slats.
- A wooden frame is laid on top of the insulator.
- In the final phase, the sheathing is laid.
It is worth noting that work on insulating the floor using this method will lead to a decrease in the height of the room. In this regard, it is better to make the frame from timber with a thickness of no more than 15mm.
Insulation brands
According to markings, penofol is divided into A, B, C, ALP, AIR, M, R, NET. The characteristics of each can be seen in the table:
| Brand | Characteristic | Purpose |
| A | It has a thickness of polyethylene foam from 2-10 mm, a foil layer on only one side. | Used to insulate walls, floors, ceilings from the inside of a wooden house or outside together with foam plastic. |
| IN | The thickness of the foam is from 2 to 40 mm, foil-coated on both sides. | Insulation of any part of a wooden house from the inside and outside, both with other insulation materials and independently. |
| WITH | The thickness of polyethylene foam is from 2 to 40 mm, it is foiled on one part, and on the other there is a sticky base made of moisture-resistant glue. | Suitable for insulation from inside the house, easy to install without additional fasteners. |
| A.L.P. | Thickness from 2 to 40 mm, foiled on both sides, on one side polyethylene is welded onto the foil, called laminated. | Used to insulate any parts of a building in a slightly aggressive environment. |
| AIR | Thickness is from 2 to 10 mm, the foil part has increased strength. | Used to insulate ventilation systems and pipes. |
| R, M | Thickness from 2 to 10 mm, foiled on one side, textured surface. | Suitable for insulating wooden walls outside and inside. |
| NET | Thickness 2-10 mm, foil on both sides is especially durable. | Used for insulation of communication systems in a wooden house: electrical network, wells, pipelines, sewerage. |
If the brand is chosen correctly, then the thermal insulation will be easy to do yourself. For wooden walls, you can use corrugated insulation and A, B, C. The latter is easier to attach to a vertical surface, but if the walls are old, it will not adhere well.
You can find Penofol 2000 in hardware stores. This brand is made from lower quality materials, so the price is lower. But it is not recommended to use it for insulating the walls of a wooden house, since the strength of the insulation is low. You can find a combination of several brands at once; it is not difficult to find out about the characteristics of a heat insulator if you know the main ones listed above. Purchase material based on the size of the walls.
Ceiling insulation
Penofol allows you to insulate the ceiling in the best possible way, since the material is thin and light in weight. In addition, its installation will require minimal effort.
Ceiling insulation with foam insulation
Before insulation, you will need to ensure that you have:
- penofol;
- wooden slats;
- hardware;
- metalworking tools;
- cladding.
Execution technology
- Thermal insulation of the ceiling surface is provided in two steps. The initial layer is fixed to the ceiling by means of slats in the longitudinal direction. The next layer is similar in the transverse direction, with the material extending onto the walls within 100mm. The slats are secured with self-tapping screws.
- A cladding made of plastic, foam, or other lightweight component is installed on top of the installed layers.
Types of material
Let's look at what types of insulation are called:
- With foamed polyethylene, it looks like a roll of self-adhesive material, similar to film with foil. Scope of application in various equipment, lining of pipes, shafts, roofs, since it has a high temperature range from -160 to +160 degrees, it is fire resistant.
- Mineral wool with foil coating can have the form of a plate or cylinder. It also has a high degree of fire resistance.
- Expanded polystyrene, coated with foil on both sides. It also has a wide temperature range, the diameter can be 5mm, 10mm, 15mm.
- Basalt, just like the materials described above, is made on the basis of foil material, however, thanks to its unique technology, it can withstand temperature fluctuations from -200 +600 degrees, and is resistant to aggressive chemical environments.
How to put insulation on pipes
As a rule, such material has the form of a pipe “cocoon” made of mineral wool (withstands high temperatures) or polystyrene foam (moisture resistant). And how to insulate them, the question disappears in itself, since they have the appearance of a “cocoon”, which is put on top and fixed. There are main ones for chimneys of various diameters and temperature conditions.
However, if you decide to purchase sheet insulation, you may be faced with the question of how to glue it to metal? Aluminum tape will come to your aid, which is wound onto the insulation over the pipe. And, as in the options described above, you need to wear it with the shiny side facing you.
Is it possible to insulate the walls from the outside?
To insulate the walls from the outside, perforated foil insulation is used. This is a material that, among other things, has soundproofing qualities, can protect your home from moisture and wind, and also does not prevent moisture from leaving the room. This option is ideal for those who do not have the opportunity to perform such work indoors. However, such activities can only be carried out in the warm season and in dry weather.
To do this you will have to do the following:
- If you had any covering on the wall, you need to get rid of it. Then treat the surface with an antiseptic solution. It is better to do this in hot weather so that everything dries well; treat the lower part of the building especially carefully. Within two days the surface will dry completely.
- Next, build a frame from timber, secure it with self-tapping screws. Lay Penafol, then leave an air tunnel, glue the joints, then install the outer frame.
Features of insulation of wooden houses
It is easier to insulate wooden houses from the inside than from the outside. And it’s much more profitable to do it. The facade of such buildings is created from figured logs with a beautiful pattern.
Covering them with insulation means hiding the natural beauty of the building, which you spent money on creating. But insulating a wooden house inside can even be beneficial.
The fact is that the internal surfaces of wooden houses will be finished in any case. The only exceptions are very expensive buildings made of impeccable wood.
Internal insulation of a wooden house makes it possible to combine business with pleasure. Indeed, in addition to the external design of the walls or ceiling, you can improve their thermal insulation, which is never superfluous.
Before insulating a wooden house from the inside, you need to start sealing all the cracks, seams and joints between the wood. Large cracks are sealed with polyurethane foam. Smaller ones are treated with sealant.
Previously, tow or jute was used for these purposes. Your task is to stop the leakage of warm air between the logs. Moreover, it is necessary to process all holes without exception, since wood tends to shrink.
Don't forget to also treat the wood with compounds to increase fire resistance. It will not be superfluous to use antiseptics. It is necessary to carry out this work.
Thermal insulation of a wooden house from the inside involves the installation of a special frame, which will not give you the opportunity to get to the load-bearing structures and assess their condition.
Rules for installing foil insulation
The peculiarity of installing foil insulation is that the shiny side with a metal coating should always be directed into the room. Incorrect installation will result in loss of reflection effect, i.e. reduction of thermal insulation.
It is recommended to maintain an air gap of up to 1.5 cm between the finishing of the wall and the layer of foil insulation for additional thermal protection, the effect of a thermos.
To install insulation, a home handyman will need:
- nails with large heads;
- hammer and nail puller;
- construction tape;
- acrylic or rubber glue;
- construction stapler.
You can cope with the work alone, but installation together, with an assistant, will go faster.
Sealing gaps with aluminum tape
Insulation of walls indoors
The main stages of laying insulation:
- Preparing the wall. Insulating walls with old wallpaper from the inside requires preliminary cleaning and coating with an antiseptic.
- Fastening the insulation. It is allowed to stick rolled sheets on the wall or construct a sheathing in the cells of which the slabs are attached. The first installation option is more common.
- Additional fixation of insulation with a construction stapler or nails.
- Treating cracks with aluminum tape.
- Fastening the slats to create an air gap before the final cladding.
Thermal insulation of the basement with foil insulation from the inside
*
When installing insulation inside a room or home, you should consider:
- laying mineral wool should be in dense rows without gaps between the slabs;
- material foiled on both sides needs two air pockets - from the outer wall, from the finishing;
- sheets of rolled insulation are never attached to overlap each other;
- The fastening of self-adhesive mineral wool with a foil layer must be reinforced with nails around the perimeter to reduce the risk of delamination.
Insulating the garage from the inside
If the room is completely covered with insulation, then work should start from the ceiling, then move on to the walls, laying floor insulation - last.
Ways to insulate a house from the inside
Wooden houses are insulated from the inside by constructing strong frames. Mastics and glue are practically not used. They are replaced with logs, dowels and drywall.
Wall insulation
Insulation of walls inside a wooden house is done using a vertical frame. You can insulate walls only after you have calculated the thermal insulation characteristics and found the dew point.
This is a very important point. The dew point is where condensation collects in the wall. He will appear in any case. Even with the most serious insulation, condensation will form, albeit a little more slowly.
For walls, it is advisable to use natural insulation made from stone wool. Basalt TechnoNIKOL or glass wool are perfect. Although, products made from Carbon polystyrene foam are also suitable.
In addition to them, you can also use penofol. This is a special heat insulator that can reflect heat waves. By itself, it is ineffective, but in combination with stone wool its properties are significantly improved.
The frame should be made of strong and reliable wood. A vapor barrier film must be laid on top of the insulation. Insulating a wooden house from the inside with penofol eliminates the need to install additional insulation.
If you do not intend to use penofol, then any other vapor barrier will do.
Penofol and cotton wool insulation need an air layer, so additional strips 2-3 cm thick are stuffed on top of the main frame elements, which form the required space.
Sheets of plasterboard are installed even higher, which can already be finished at your discretion.
Advantages of wall insulation:
- Significant improvement in the thermal insulation of the house;
- Relative ease of operation;
- The ability to create an excellent surface for further work.
The disadvantage of such insulation is that it reduces the volume of the room.
Ceiling insulation
Ceilings in wooden houses are finished using the same technology as walls. True, there are certain differences. Ceilings have to be protected with waterproofing.
For such work, glassine is used. It is attached under the ceiling, and then the insulation is installed.
The frame elements also have their own nuances. It is more difficult to install insulation on the ceiling, so for convenience, planks are placed on the joists in increments of 20-30 cm. They support the insulation, which is then secured with dowels.
Vapor barriers or penofol are used in the same way. It is advisable to insulate the ceiling after 1-2 years of operation. During this time, all structures will settle down, and you will not have to worry about possible deformations.
Insulating a wooden house from the inside with mineral wool is best suited when it comes to the ceiling.
Advantages of ceiling insulation:
- Elimination of warm air leaks;
- Insulation of premises from the attic and cold floors;
- Additional waterproofing of structures;
- Improving the sound insulation properties of the ceiling.
The disadvantage is the same as in the previous paragraph: you will have to “sacrifice” 10-15 cm of the room’s height;
Floor insulation
The floor in a wooden house is insulated in combination with the installation of the coating itself. Sanded boards are chosen as the covering. As a result, it is possible to create a durable and beautiful floor that will look natural in a wooden house.
A more durable frame with transverse and longitudinal joists is made for the floor. This is necessary since serious loads are applied to the floor. Any available material can be used as insulation.
However, mostly builders choose foam plastic or penoplex. Mineral wool is also good, but it reacts too seriously to moisture.
Insulating a wooden house from the inside with penoplex allows the owner to save on insulation. Penoplex is made by extruding polystyrene foam.
It is not affected by moisture. A PVC membrane is laid over the insulation and joists, and floorboards are carefully placed even higher.
Advantages of floor insulation:
- Elimination of cold air currents that come from the ground;
- Increasing the soundproofing properties of the floor;
- Surface waterproofing.
Disadvantages of floor insulation - as in the previous method, you will have to give up another 10 cm of space.
Tips for choosing
Insulating wooden walls from the inside with mineral wool is the most effective and simplest way. It is worth considering that mineral wool is capable of allowing air to pass through, which is very useful for a wooden house.
And in general, the insulation inside a wooden house should be natural. That's what all professional builders say.
Expanded polystyrene is best used on ceilings. It does not allow steam to pass through, which has a positive effect on the floors.
Penoplex or extruded polystyrene foam is excellent for working with floors. It is durable, does not react to moisture and is too solid to become a home for rodents or insects.
Almost an ideal material for floor insulation, if only it could effectively insulate sound. But penoplex has problems with this. Mineral wool copes with this task several times better.
A thin layer of penofol can be laid on top of the insulation on the walls and ceiling. It will reflect heat waves, and what it does not reflect will be absorbed by the main layer of insulation.
Polyethylene or special one-sided membranes are used as a vapor barrier.
It is advisable to finish the surface of the frame with the same material. If there is plasterboard on the walls, then it will look good on the ceiling.
Stages of work
In terms of the general installation system, the technology for insulating wooden houses is largely similar. But still, there are certain differences that are worth considering.
For the frame, the logs are installed in one position in increments of 30-50 cm. The insulation is attached to the frame using a stapler. The insulation is inserted between the structural elements and additionally secured with disc-shaped dowels.
- We seal the cracks in the walls and treat the wood.
- We install the frame.
- We install the insulation and secure it with dowels.
- Lay a layer of vapor barrier or penofol.
- We fill the transverse lathing.
- We install and finish plasterboard slabs.
- We install the frame elements.
- We finish the inner surface with glassine waterproofing.
- We stuff the support strips.
- We install the insulation and secure it with dowels.
- We install a vapor barrier layer.
- We attach the facing material to the frame.
- Clean and prepare the surface.
- We mount the frame with transverse joists.
- We attach a waterproofing film to the base of the floor.
- We install insulation.
- We lay a PVC membrane.
- We create a floor covering from boards or thick plywood.
Stages of work (video)
Prices for materials and labor
Insulating walls with mineral wool will cost you 6-8 dollars per 1 m2. The master will ask for another 4-6 dollars per 1 m2 for the work.
Ceiling insulation with polystyrene foam is cheaper. The price of materials is 3-5 dollars per 1 m2. But the cost of work starts from $5 per 1 m2.
Floor insulation is considered the most difficult and expensive process. You will have to pay extra for high-quality boards and extruded polystyrene foam.
The price of flooring materials starts from $10 per 1 m2. The cost of installing a floor is 5-7 dollars per 1 m2.
Types of foil insulation
Products are produced with different densities of the foil layer and types of heat-insulating base.
Penofol
Universal insulator (second name: isolon, ecofol) based on polyethylene foam. Foil coating is allowed both one-sided and two-sided. One of the types of products is a self-adhesive sheet with an adhesive layer under a protective film - which greatly facilitates the installation of the heat insulator. Foam fiber is supplied in rolls. Some types of material are reinforced within the structure with fiberglass mesh reinforcement. Penofol is known as an environmentally friendly and safe heat insulator.
Penofol foil self-adhesive
Layer thickness 3-8 mm. Thermal conductivity 0.038 W/(mK), moisture absorption within 0.35-0.7%. The vapor permeability of the material is 0.001 mg/m*k.
Penofol is fixed to the walls behind central heating radiators to retain heated air through reflective thermal insulation. It is recommended to maintain approximately 2 cm of free space between the wall and the battery. The material serves not only as cladding for the interior walls of the room. Foil penofol is used to finish floors, roofs, and insulate pipes. The high water resistance of insulation with foil justifies its use in the construction of saunas.
The cost of a roll of penofol is influenced by the thickness of the heat-insulating base of the insulation.
Foiled mineral wool
The product is produced in the form of slabs, mats, and rolls with an insulating layer thickness of 5-10 cm. The foil coating is present only on one side.
Fiberglass and stone basalt wool are used as insulation. The use of the second material is limited to the external decoration of building walls or use in non-residential buildings. The reason lies in phenol emissions that are dangerous to human health. Additional insulation of foil plates with a protective film is carried out where increased resistance to high temperatures is required.
According to technical characteristics, basalt wool can withstand temperature fluctuations from – 200 to +300°C. Thermal conductivity up to 0.07 W/(mK). Aluminum protection provides hygroscopic material against high humidity. The products are highly durable, do not attract rodents, and are not susceptible to fungal infections. An important factor is resistance to fire, so the material is often used for cladding wooden buildings and bathhouses. A long service life allows the use of basalt insulation in non-residential buildings with an aggressive environment.
Fiberglass wool with a waterproofing layer of foil is often used in the internal thermal insulation of walls of saunas and showers.
Styrofoam
A foil product based on the fusion of polystyrene granules is in demand for “warm floor” systems. The markings made by the manufacturer are intended for routing the cable system. Material thickness 3-5 mm. Thermal conductivity indicators do not exceed 0.035 W/m2, density – up to 45 kg/m3.
*
Foil insulation for underfloor heating
Increased strength ensures safe use in places with mechanical stress and high humidity. Retains properties in the temperature range from -180° to +180°C.
Pros and cons of insulating walls with Penofol from the inside
The material has more than enough advantages - it’s not for nothing that it has become so widespread. Let's name the following positive qualities:
- Saving usable space
. This became possible due to the small thickness of Penofol compared to other insulation materials. At the same time, it can replace heat insulators with a thickness tens of times greater.