Main types of furnaces
Before you start laying a stove yourself, familiarize yourself with the features of existing varieties of such units. The stoves are:
- heating. Designed exclusively for heating. Such ovens have an extremely simple design and can be installed in the shortest possible time and with the least effort compared to other types of structures;
- heating and cooking systems. The most popular and sought after option. At the same time they heat the house and allow you to cook food;
There are also improved varieties of heating and cooking stoves with a built-in stove or even a full-fledged oven.
Do-it-yourself Dutch masonry
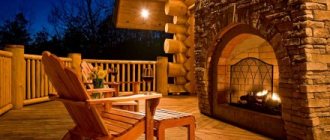
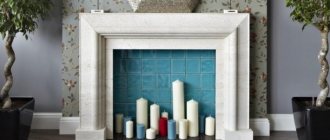
Fireplace stoves belong to a separate category. This is an excellent option for a modern private home. Such designs do an excellent job of heating rooms and have an attractive appearance. A properly laid out and finished fireplace stove will be a worthy addition to the interior of both a small country house and an expensive private villa.
This is what heaters are like
The diagrams of modern stoves distinguish them not only by their purpose, but also by their shape. Most often, rectangular and square-shaped units are installed in private homes. But if you wish, you can lay out a round oven. Select a specific option taking into account the characteristics of the room and your own preferences.
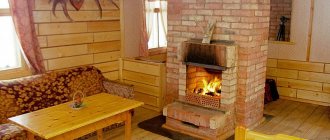
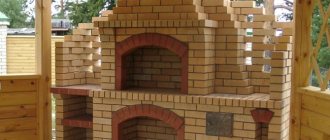
The picture shows a simple brick oven for heating and cooking
Of course, you can lay out the oven yourself, and numerous diagrams will help you do this in the shortest possible time. However, when performing such work, remember that any stove, regardless of its purpose, shape and other characteristics, must fully comply with current fire safety standards.
How to choose a stove for a Russian-style home
“Russian House” is a very multifaceted concept, one might say vague. This style of interior design is suitable for a house “a la russe”, a Russian hut, a Russian tower, as well as noble nests, Russian estates and other variations on this theme. The most striking style of home decoration using a stove is manifested in the first three directions. Let's stop at them.
Russian stove in a house “a la Russe”
“A la Russe” does not recreate the exact furnishings of a Russian home. It is based on decorating the home with traditional Russian elements: samovars, brooms, spinning wheels, skins, towels. Someone will call this style primitive, popular print, since it “collects” things that are associated with Russia all over the world.
Stove in the style “a la russe”
It is worth noting that the “rich” stove refers more to the “Russian tower” style, which will be discussed a little later. “A la Russe” should not be overloaded with bright tiles. Regular white is sufficient. But you definitely need to decorate the stove: hang bunches of dried herbs and berries, embroidered towels, amulets, wicker figurines of a brownie, etc. If you still have an old balalaika or bast shoes, do not rush to throw them away. They will find a second life as decorations for a Russian stove. Believe me, no one will pass by!
Stove in a Russian Izba style house
A Russian hut begins with a tree. Everything is made from it, from floors to windows. No plastic. This style differs from the previous one in that each item in it has its own practical value and is actively used in the household. The same cannot be said, for example, about the towel on the stove in the “a la russe” design. It has only a decorative function.
Russian stove. Photo from the site radikal.ru
However, even in the “Russian hut” the queen of the interior is the stove. It can be plain or lined with brick. Tiles are also acceptable, but not variegated or too bright. It is best to use white or blue, diluted with gold.
Important: In a modern interior, the stove can be left as a symbol or decoration. That is, make the structure in the form of a furnace
Place a fireplace and a niche for firewood in it. Throw a blanket and a couple of pillows over the place where the bed is traditionally located. Place kitchen utensils on top. And on the other side of the “stove” a modern hob is installed and a workplace for cooking is set up.
Stove in a Russian Terem style house
To understand what a house in the “Russian tower” style is, remember the illustrations for children’s collections of fairy tales. The tower pleases with bright colors and original carvings. The stove should be the same: with motley, even tacky tiles. The brighter the tiles, the “richer” the stove looks.
Stove with colored tiles. Photo from firepic.org
Interesting: In the village of Gorskoye near St. Petersburg there is a house that is a clear example of how the love for everything Russian is reflected in the interior. This is not a museum at all, but a private residential building. The owner is an antiques collector, originally from France. In this house, every little thing, every little thing is imbued with the owners’ love for our culture. Their special pride is their luxurious Russian stove. It was made by a ceramist and teacher at the St. Petersburg State Academy of Arts and Industry named after. A.L. Stieglitz Larisa Vyacheslavovna Zakharova. Decorated with magnificent tiles, this stove seems to have been transported from a fabulous Russian tower.
Important: In order for the stove to fit organically into any interior and the whole composition to look elegant, do not allow excesses. Even a small kink can cause your home to turn into a tacky mess.
If the stove is large, then the doors in the room should also be bulky, the windows should be wooden with heavy swing shutters, and the curtains should be “lighter”: made of chintz or thin linen.
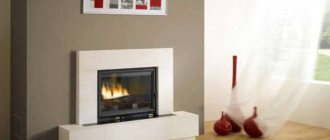
English fireplace arrangement
The design of an English-style fireplace has a number of distinctive features. This type of fireplace is always made with a straight chimney, while other types are often built with a chimney built into a wall niche. Another distinctive feature is the design of the fireplace insert. When viewed from a horizontal plane, it has a trapezoidal shape. In this way, a predominantly frontal direction of thermal radiation is achieved and the efficiency of the fireplace in terms of heating the room in which it is installed increases.
The use of an inclined back wall, the so-called fireplace tooth, in the design of a fireplace originates precisely from classic English fireplaces. Since these fireplaces are predominantly open, the issue of preventing smoke from entering the room in which they are built becomes acute.
The inclined rear wall of the firebox, due to the narrowing of the combustion space upward, can significantly increase the rate of smoke exit. It is this effect that prevents gaseous combustion products from entering the room.
An English fireplace is always made with a straight chimney
In addition to counteracting smoke, the chimney tooth helps to increase the heat transfer efficiency of the fireplace. Due to its inclination, this structural element reflects a significant part of the thermal energy in the direction of the room. If it is absent, this heat will simply go out.
Another distinctive feature of an English fireplace is the absence of a vent and grate. All ash and unburnt coals are removed from it directly through the combustion opening. Therefore, the design of the fireplace provides for the placement of a protective platform below the level of the firebox, which should protrude from the front of the fireplace.
A general recommendation for the construction of all fireplaces is to use fireproof (fireclay) bricks when laying out the internal space of the firebox. Its cost exceeds the cost of a ceramic one, but it will pay off by increasing the service life of the fireplace.
It is also highly recommended not to use bricks that have cavities when constructing heating structures. When exposed to high temperatures, it is prone to rapid destruction.
How much does a fireplace weigh?
Before building a corner fireplace, we need to calculate the entire mass of bricks that will be used to make it. If we are installing a stove structure in a finished room, then we must take into account that a fully finished fireplace has quite a lot of weight. Some specimens weigh about a ton. Probably shouldn't arrange it high. After all, such a load will not be able to withstand the overlap between floors. The weight of a small model will be about 400-500 kg.
Photo of a corner fireplace in a wooden house:
Even such a small model weighs half a ton
Color palette
Quite often, bright fireplaces are installed indoors, which can lift your spirits and make you forget about the cloudy weather outside. The combination of different shades allows you to create a certain emotional background. Warm tones promote activation, while cold tones have relaxing properties. The fireplace greatly enhances the effect of colors, the interior is instantly transformed.
Thanks to the installation of a real fireplace, apartment owners have many options for interesting design solutions.
Foci of all shades of glaze are in great demand (finishing with tiles, ceramics). Models with portals and metal casings have also gained a share of the market. Such designs differ from tiled ones in their mobility, lightness, and modern appearance.
Technologies make it possible to create fireplaces of different colors and shades; powder coating and finishing are used in the manufacture of models.
Choosing the shape and size of the fireplace
Before you make a fireplace in your house, you need to decide on its location, shape and size. It is advisable to resolve these issues at the stage of designing a house, since in an already constructed building this will be much more difficult: you will have to dismantle the floors for the foundation and ceilings for the chimney outlet, take into account the existing roof truss system so that the chimney does not disturb it and is separated from the load-bearing elements at a safe distance.
When passing pipes through floors and roofs, it is important to insulate them from the hot surfaceSource ytimg.com
Depending on the shape and location of installation, home fireplaces can be island, wall, corner, or built into the wall. For self-construction, it is better to choose fireplaces attached to a wall or an inner corner of the room. And fireplaces built into interior walls can heat two rooms at once. At the same time, they should be positioned so that they do not stand in the way of drafts from an open door or window.
It is very important to determine the optimal size of the fireplace, which depends on the area of the room in which it is installed. If it is too large, there will not be enough air flow for smoke draft, and smoke will escape into the room, or, with the doors open, draw heat from other rooms
A small fireplace will not be able to heat the entire volume.
When choosing dimensions, you need to focus on the following recommendations:
- the vertical cross-sectional area of the firebox should be about 1/50 of the area of the room;
- the depth of the combustion chamber should be 1.5-2 times less than its height in the opening;
- the cross-section of the chimney is made 9-10 times smaller than the cross-section of the portal opening.
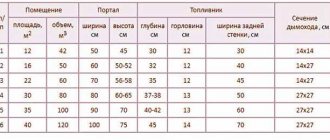
Table indicating the optimal ratios of fireplace dimensionsSource ibb.co
Size calculation
Before you go for materials and start laying a brick fireplace, you need to calculate its dimensions and decide on the shape. First of all, you should make calculations of the combustion chamber - the power of the fireplace, and therefore the dimensions of the remaining components, will depend on it.
In rooms with standard ceiling heights, the ratio of the area of the combustion chamber opening to the area of the room will be about 1:50. If the area of the room is 15 m², the area of the portal will be 0.3 m², if the room is 20 m², the portal will be 0.4 m², etc. It should be taken into account that the height of the portal should be 1/3 less than its width.
In the image below you can visually assess the correct proportions of the fireplace insert:
Smoke from the firebox rises into the hailo (smoke collector) and passes through a pass that prevents smoke and soot from entering the room. A special damper is located above the smoke compartment to block the access of cold air from the street through the chimney when the fireplace is not in use.
Think carefully about where the future brick corner fireplace will be located. The dimensions of the structure must fit harmoniously into the interior or even influence its formation. So, you can put armchairs and a coffee table around the fireplace, organize a workspace nearby, or simply lay a warm carpet. When choosing a location, determine where the chimney will pass through the ceilings to the street. An outer corner of the room or an inner one is suitable for this - it’s a matter of taste and depends on the layout.
Fireplace drawings
When the location and dimensions are finished, all that remains is to decide on the sequence of work. Fortunately, there is such a useful thing for this as order. It is impossible to build a corner fireplace made of brick, like any other, “by eye”. An effective result is possible only if the instructions are strictly followed.
Ordering is needed not only in order to see each step, but also to calculate the required amount of building materials. It shows in detail how many bricks are needed at each stage of work, so all that remains is to add up all the data and do not forget to add 10% to it in reserve (in case of repairs, defects or battle). At the very end of the article you will find a detailed order of one of the options for corner fireplaces.
Fireplace materials
For laying fireplaces, you can only use solid fired clay and fireclay bricks. In addition, you will need clay masonry mortar. It is made from sifted fine sand (preferably quarry sand, not river sand) and clay (ideally blue). For strength, Portland cement of at least M300 is added to the solution. To build a solid foundation you need crushed stone, fireclay or brick chips. The grate will be made of reinforcement, and the portal lintels will be made of steel corners.
The firebox must be lined only with fireclay bricks, and the body and chimney must be lined with red clay bricks. If the fuel compartment is separated from the fireplace body by a “warm seam”, perforated brick can be used to lay the latter, saving on materials. For laying that part of the chimney that is located outside (above the roof), you can use finishing bricks, since they have high weather resistance.
When mixing the solution, first sift the sand through a 1.5 mm sieve, and then add it in small portions to achieve the ideal consistency - the solution should slightly stick to the trowel. The proportions of clay and sand depend on the fat content of the clay. Approximately they are taken in a ratio of 2-2.5 parts clay and 1.5-2 parts sand.
How to make a rough oven with your own hands
The oven consists of the following parts:
- A firebox is a working chamber into which fuel is loaded. Equipped with a door.
- Blower is a chamber attached below the firebox. Serves to improve traction. A door is also attached here to regulate the air supply. A grate is installed between the firebox and the blower.
- A chimney is a pipe for removing carbon dioxide from a home. Equipped with a soot cleaning door and a damper.
- Smoke circulation (convector) - vertical (sometimes horizontal) channels through which hot gases from the firebox pass. They connect the firebox to the chimney and accumulate thermal energy.
Basic design of stoves with an oven
A detailed guide to self-laying gives a complete description of the steps, down to the location of each brick. But for better quality work, each master must be theoretically aware of the purpose of the main elements of the furnace. In simple words, he must understand what he is doing. For this purpose, there are schematic diagrams or descriptions of the device.
Good to know: How a fireplace stove feels in the interior of a house, how it is finished
A fireplace stove with an oven is a combination of two devices in a single design.
- A fireplace differs from a stove in that its purpose focuses on the hearth, its appearance, visibility and ease of use. Heating qualities are given secondary attention. Hence the more primitive structure of the fireplace chimney.
- The purpose of the stove is to heat a room or an entire house. All technical features are aimed at converting the energy released during the combustion of solid fuel into useful heat as efficiently as possible. To do this, it is necessary to use certain materials, select the optimal dimensions of the firebox and chimney, arrange a chimney channel with the largest area, and provide the necessary draft for air circulation. All these tasks are implemented in the design of the furnace.
The idea of combining a fireplace with a stove is not new. It is successfully used in many proven models. The structure of the fireplace hearth differs from the firebox, but can be adapted, since the stove firebox is only supplemented with a grate.
Ready-to-use furnace system
The operation of the oven is ensured by the niche being surrounded by channels through which hot air passes. But in some designs, the temperature inside the oven increases from the immediate proximity to the firebox in which combustion occurs.
The design of the furnace can be considered in individual points:
- The firebox is made in the form of a chamber lined with fireclay bricks. If the design includes a hob, the fire chamber is zoned by a partition. Firstly, the top part of the flame has the highest temperature. Secondly, firewood or other fuel should not interfere with dishes placed on the stove with open views. Therefore, combustion occurs in one zone, and the flame, due to draft, is drawn into the second zone where the stove is located.
- There is an ash pan at the bottom of the stove, under the firebox. Its door acts as a blower. The draft directly depends on the amount of incoming air, so using the blower you can regulate the intensity of combustion. In stoves intended for heating, the fireboxes are usually closed. They are known to increase the efficiency of the device. But the function of the fireplace requires visibility, so the firebox door is made of transparent glass, resistant to high temperatures.
- The chimney, due to its complex structure, has several cleaning doors that allow the channel to be serviced in sections.
Good to know: Long-burning wood stoves with a water circuit
Types of outdoor Russian stoves. Design diagram
When choosing your project, think about what functions the structure should perform: fry, steam, cook, smoke. In accordance with this, make your choice of an outdoor Russian stove:
- with barbecue;
- with barbecue;
- with space for a cauldron;
- only with hob;
- with smokehouse;
- with a bed.
The stove design can be either the simplest or the most complex; it can include elements traditional for a Russian stove:
- a place for drying firewood - an oven;
- a place for storing dishes and other utensils - a stove;
- a place for hot pots removed from the oven - a hearth;
- the chamber under the pole is the overpipe;
- the surface in the cooking chamber where the cooking utensils are placed - under;
- the chamber itself is a crucible;
- covering the chimney to preserve heat - a view;
- a window leading to the chimney - a choke;
- draft regulator - damper.
Photo 1. Diagram of the structure of an ordinary Russian wood-burning stove, all the main structural elements are indicated.
A design with a couch is also possible, but in the outdoor version it is not very appropriate or serves other purposes.
Important! The diagram and drawings of the furnace should include everything you plan to build
An ordinary Russian stove for the street
The simplest outdoor stove consists of a frame, a one- or two-burner stove, and a tunnel firebox, which is divided into flame and smoke chambers by a smoke tooth. The scheme of such masonry is relatively simple and does not require special knowledge or the use of technology. It is suitable for outdoor use because:
- thanks to the smoke tooth there is no dependence on the strength and direction of the wind;
- cooking becomes possible at any temperature;
- You can cook even with the lowest quality fuel.
The cooking surface can vary from one to two square meters. m or more - depending on the chosen scheme. The height of the crucible according to the standard version can be 70 cm.
The Russian-style mini-oven measures 100 cm by 130 cm. But it is multifunctional and allows you to cook any dishes, bake bread and has a number of advantages:
- low-cost financially;
- convenient and easy to use;
- quickly built;
- prepares dishes quickly;
- does not require a large amount of fuel;
- environmentally friendly
You can build an outdoor mini-oven in one day.
Advice.
Do not start building a mini-oven if there is no drawing, project, or developed design. Get qualified advice from specialists.
Outdoor device with barbecue
The structure of a self-made barbecue includes a tray with fuel and a grate with meat at a height of 10-15 cm.
The hot air after heating the stove will act as an open flame. Food is cooked not over an open fire, but inside a crucible. The firebox can be located either away from the inserted grills for cooking meat or under them. Different stove designs with barbecue imply different construction options. When choosing a project, focus on your culinary preferences.
Note! Meat cooked in a Russian street oven has more beneficial properties. In the oven, cooking takes place in a niche fenced off with partitions.
Thanks to less draft and the absence of wind and temperature changes, the meat is cooked in its own juices
In the oven, cooking takes place in a niche fenced off with partitions. Thanks to less draft and the absence of wind and temperature changes, the meat is cooked in its own juices.
Russian stove in a gazebo under a canopy
Such a project involves the development of a specific design, which should harmoniously fit into the overall interior of the site and fit well with the architecture of the house.
When choosing a design for such an outdoor Russian stove, you immediately think through the gazebo in which the new structure will be located. The project must comply with:
- the size of the area allocated for construction;
- fireproof materials from which it is planned to construct both the gazebo and the stove;
- other characteristics of the gazebo, allowing you to place a structure with a firebox and flame under its arches.
The gazebo should be spacious and beautiful. If desired, it can be designed with closing windows or rollable blinds.
Important! Before building a gazebo, check out all the interesting and modern projects
Design Selection Factors
Among the many presented projects, not every one is suitable for use in certain conditions. In addition, not everyone is able to fulfill all the requirements of the residents of the house. Therefore, you should familiarize yourself with the basic technical criteria that must be adhered to in order to ensure the functional and safe operation of the device.
- The first factor will be the size of the oven, since a discrepancy in dimensions will not only lead to disruption of basic functions, but also to inappropriate use of free space. When determining the dimensions, it should be remembered that heat transfer is carried out not only due to the rear and front walls, but also due to the side walls.
- Any fireplace stove with stove and oven performs several functions. The main task that the design sets for itself is to ensure unhindered operation in all intended modes, which means that the installation of the stove must be done so that the side walls face the room requiring heating, and all cooking devices are located on kitchen.
- The shape of the stove is selected in accordance with the layout of the house. For independent construction, the most suitable design will be square stoves, rectangular or made in the shape of the letter “T”. Some models have protrusions for separate placement of an oven or stove bench.
- Any model is characterized by such a parameter as power. It shows the possibility of heating a room of a certain area. When choosing a project, you should make basic calculations of the required power.
Large fireplace and stove complex
Some indirect factors are related not to the device, but to the construction, but they will also have to be taken into account. This is the material from which the building is made, the degree of insulation of the house, wind rose, etc.
Good to know: How to build a brick barbecue oven, step-by-step methodology for beginners
Making a stove with your own hands
Selecting a location
To build a good heating structure, you need to choose the right place. The following standards must be taken into account:
The distance from the smoke duct to the wooden structures should be more than 37 cm. The minimum distance of the pipe from the ridge is one and a half meters. The height above the ridge is half a meter. If there is 1.5-3 meters from the pipe to the ridge, it can be placed flush with it.
It is best to put the stove in the middle of the house. This will ensure uniform heat distribution and ease of use.
Materials and tools
In addition to bricks, you will also need a number of other materials to build the stove. These include:
clay, sand, reinforcement.
These are the basic materials without taking into account the components, but you also need to take care of the vent doors, the vent, the firebox, and so on.
To build a good stove you need to mix the right solution. It is best to use special refractory clay; in extreme cases, red clay can also be used. Sand grains should be no more than 1 mm. The optimal ratio is achieved experimentally. Usually it is 1 to 1 or 1 to 2. Plus 25 percent of water from the total volume of clay.
Metal objects play a fundamental role in the construction of the furnace. To put together a decent structure, you need doors and half-doors, grates, cast iron dampers, latches and views. If necessary, all these elements can be made with your own hands, but you will need to purchase iron sheets.
Of course, you won’t be able to build a stove without good tools; you will need:
a hammer-pick specially for the stove, a trowel, a rule-rule, a washbrush, a tape measure, a plumb line, a level.
With this simple toolkit you can build any stove.
The process of building a stove
For the foundation, a pit is dug, backfill and a reinforced frame are made. The resulting structure is filled with concrete. Before you put the stove together, make sure you have diagrams of the bricks in front of your eyes.
It is very important to maintain order when working. Otherwise, you won’t be able to build a high-quality stove
The slightest deviation in the design will lead to one of the channels being blocked. The result is more than disastrous. Instead of coming out through the chimney, the smoke will go indoors.
The first row is laid along the cord. Each subsequent masonry is checked using a level. Angles are controlled by body kits. After the masonry is completed, stove equipment, for example, burners, is installed. The pipe comes out at the very end. To find out in more detail how to fold the oven, watch the video below:
In order to fold the stove in accordance with current standards, the distance from the inner wall of the chimney to the nearest structure must be at least 38 centimeters. When installing a cast iron stove, the gaps on the sides must be at least 5 millimeters.
Arrangement of a traditional fireplace
The classic design of a fireplace with a direct chimney that is not built into the wall to which the fireplace is adjacent is the simplest. However, such a structure is outwardly unsightly. You can achieve it to look, albeit not luxuriously, neatly through smooth masonry and subsequent finishing. For laying the body of the fireplace, it is better to use a type of solid ceramic brick, such as facing brick. It has a geometry close to ideal and allows you to make the rows of masonry as even as possible.
The ordering diagrams do not take into account the foundation, so we will not talk about it. But it is worth noting that its presence is mandatory for heavy brick structures. So, the 1st row of the classic fireplace masonry is made continuous. It plays the role of thermal insulation to protect the foundation from high temperatures. Its necessity is justified by the low heat resistance of cement mortar, the use of which predominates in the construction of foundations.
Starting from the 2nd row, an ash pan and a ash pit are laid, which are necessary to collect solid combustion products and unburned fuel residues, as well as to create draft that stimulates the combustion process. When laying the 3rd row, an ash pit cover is constructed. This row is made almost continuous, with the exception of the channel through which the ash will fall off and air will flow into the firebox.
The 4th row is similar in shape to the 3rd, but will have a different orientation of the bricks. This technique should be used throughout the entire masonry to increase the strength of the structure. Also, at the stage of laying the 4th row, a grate is installed.
Rows 5 through 7 will be identical except for the orientation of the bricks. They form the firebox of the fireplace. From the 8th to the 13th row, the formation of a fireplace tooth occurs, narrowing the space of the firebox upward.
On the 12th – 13th rows, an overlap of the firebox opening is formed. Cast iron corners can be used as supports; this material is less susceptible to thermal expansion than steel.
When laying the 14th - 15th rows, an opening is created on the back wall of the fireplace for installing the door. It serves to clean the internal walls of the fireplace from settling ash. In this regard, the required distance of the fireplace from the wall of the room should be taken into account.
From the 15th to the 16th row, the internal opening is narrowed on the inside of the front wall of the fireplace. Thus, a smoke collector is formed, which passes into the chimney.
From the 17th to the 20th row, a chimney is formed, the cross-sectional area of which is equal to the area of one brick.
A smoke damper is installed between the 20th and 21st rows to regulate the draft in the fireplace.
For laying the body of the fireplace, it is better to use solid-faced ceramic bricks
Digital symbols for figure “b”:
- Chimney damper
- Grate
- Ash pan
- Cast iron corners
- Chimney cleaning hole
The roots are the same, the sprouts are different
Considering heating and cooking stoves, we notice that the arrangement is similar to the layout of a Russian stove with separate fireplace elements. This is not surprising, because the stoves used in our country only have a Western name - “Swedish”, and they are adapted primarily for use in an ordinary Russian hut.
Construction of a Swedish heating and cooking stove
To build a stove with our own hands, we will need an order of brick stoves for the house. In addition to arranging the heating and cooking stoves, we will naturally need materials. We will not focus our attention on this, since on the pages of our Internet resource it is written in sufficient detail about choosing bricks for laying stoves and fireplaces with your own hands, preparing solutions for stoves, and making a stove foundation.
Standard oven order:
- Row 1 is the most important. The bricks are laid with your own hands strictly according to the level, the control of the angles is measured using a construction square.
- Our heating and cooking stove has a ash pan, the arrangement shows that opposite it, in the front part of the stove, a three-quarter brick is used. For convenient removal of ash, the inner sides of the brick are squeezed into a cone in the direction of the chamber.
1st row
- The blower door is installed and the laying of the 2nd row begins.
2nd row
- The heating and cooking stove is placed in the 3rd row as indicated in the order. The configuration of the blower is achieved by chipping both sides of the brick. The height of the row coincides with the height of the door.
3rd row
- 4th row. Starts to lay out on the left side. First, the cleaning door is installed. Do-it-yourself masonry is done in order, while the ash door is closed. The hole above the ash pan is made in a square shape. This is achieved by chipping the brick.
4th row
- In the 5th row, the ash pan opening narrows even more. The whole row is very similar to the 4th.
5th row
- For the 6th row, you will need a refractory brick, the placement location of which is indicated by shading. But if there is no fireproof brick, you can also use ordinary brick. The brick in front of the grate is chipping. This ensures better placement of fuel on the grate. The grill itself rests on the 5th row.
- Do not forget to leave a gap between the bricks of the 6th row and the grate within 10 - 15 mm. The gap is filled with ash or sand, it compensates for the expansion of the grate metal when heated.
6th row
- 7th row. The U-shaped channel is closed in such a way that three new channels are formed. The combustion chamber door is installed, which rests on the 6th row.
7th row
- The 8th and 9th rows are identical to the 7th. The height of the 9th row is at the level of the height of the combustion chamber door. The bricks of the 9th row, covering the partition of the combustion chamber and the left channel, are pressed together on both sides for a smooth transition of flue gases from the firebox to the channel.
8th row 9th row
- The 10th row is made of refractory brick. The entire row is carried out strictly vertically with control by the building level. This is done because the order in which heating and cooking stoves are installed requires that a cooking floor be laid on them.
- The combustion door is closed. In this row there are only two channels left, strictly square in cross-section.
10th row
Cooking-oven chamber - the main difference
- The 11th row is made of ordinary brick. The combustion chamber is covered with a cooking floor. On the left there are two channels with a square cross-section. The edge of the brick in contact with the cooking floor is cut down in such a way that a gap of 20 mm is formed between them. The flooring itself rests on the 10th row. Here you can install a large door for the cooking chamber. In this case, if necessary, it can be successfully used as an oven. It is best to install a metal frame and make a separate damper. Everything is your choice. The heating stove does not have this element; its order is different.
11th row
- The 12th row is laid according to the order. The two left square channels are connected into one rectangular one.
12th row
- 13th row: the rectangular channel is overlapped in such a way that two channels with a square cross-section are again formed.
13th row
- The 14th row is similar to the 13th. A damper is installed in it, allowing you to use the hob without heating the entire oven. Very convenient in the summer. This arrangement with an open damper allows the unit to work like a regular heating stove.
14th row
- In the 15th row the valve is closed.
15th row
- 16th row. The cooking chamber door is closed. The door is mounted on the left. It acts as ventilation for the cooking section and serves to remove odors, steam and burning during cooking.
16th row
- In the 17th row the ventilation door is closed. The laying is carried out according to the order. At the top, above the cooking chamber, steel strips are laid. In the future, they will be used to close the cooking chamber. The arrangement of a heating furnace in most cases does not imply such an overlap; a dome-shaped layout is usually performed there. But here the requirements are somewhat different.
17th row
- In the 18th and 19th rows the cooking chamber is blocked. On the left there are two channels with a square cross-section.
18th row 19th row
- 20th row. On the left there is only one channel with a square cross-section. A door is installed for the samovar pipe and for cleaning. Two bricks are installed on the covered surface of the cooking chamber. In this case, they are laid on the edge. The distance from the back wall to the laid bricks should be 40 mm.
20th row
- The 21st row is laid in the same way as the 20th.
21st row
- 22nd row. All installed doors overlap. On the left, two channels with a square cross-section are again formed. Three longitudinal channels are formed above the cooking chamber. The middle one has a width of 50 mm, the extreme ones are 110 mm each.
- In the 23rd row, the left square channels remain. The long channels above the cooking chamber overlap crosswise. The brick is placed on the edge at a distance, as in the 20th row.
23rd row
- The 24th row repeats the 23rd.
24th row
- Rows 25 and 26 are performed in the same way as row 22.
25th row
26th row
- 27th row. Three bricks are installed on the ribs, installed at the same distance from each other and from the walls of the furnace. Again, there is only one channel with a square cross-section.
27th row
- The 28th row is identical to the 27th. Pay close attention to the dressing of the stitches.
28th row
- Row 29. On the left is one channel with a square cross-section. Lay a couple of bricks on the front side. They are laid close to the front wall, recessed to half their thickness and rest on bricks laid on edge.
29th row
- In the 30th row, the thermal chamber is completely blocked. There remains one smoke channel in which a valve is installed.
30th row
- Rows 31 and 32 are performed in order. Thus, three rows are formed above the thermal chamber, thereby ensuring excellent fire safety.
31st row 32nd row
The oven is ready, now it needs to be decorated, how to do this? Our article Finishing stoves will help you. When doing the finishing yourself, make sure that the chosen option matches the interior of the house.
Chimney - completion of work
An important part of any stove for a home is the chimney; we recommend reading about which chimney to choose in the article Choosing a chimney. All subsequent rows form a pipe with a smoke channel. Observe ligation of stitches.
1. Poryadovka - heating and cooking stove 2. Poryadovka - heating and cooking stove 3. Poryadovka - heating and cooking stove 4. Poryadovka - heating and cooking stove
5. Order - heating and cooking stove
For an English fireplace
An English wall-mounted fireplace has a specific hearth with a straight chimney. In addition, in the drawing or project of such a fireplace, a trapezoidal cut should be made so that the heat flows directly into the room.
To start ordering, it is advisable to use ceramic bricks. The first row must be done with the side of the brick. Further and in subsequent stages, the brick should be laid flat. Do not forget that the arrangement of an English fireplace does not include a vent and grate. Most often, stoves with a blower should be designed for large rooms. You can use various sheets of metal as elements for fasteners.
The English version assumes that the stove is located open. The firebox must be lined with fire-resistant building material. In addition, many people forget about the peculiarities of water absorption by brick, so it is recommended to soak the brick before laying. Upon completion of construction work, you should wait several weeks until the brick is completely dry. And only after drying can the fireplace be put into operation.
Construction and preparation of materials
The stove, the order of which allows you to assemble a high-quality structure, is the basis and frame for such a heating unit. At the first stage, you need to decide on the room for installing the stove and select or implement the most suitable project for yourself, taking into account all the features of the house and your personal wishes and preferences.
Next, the amount of materials and accessories needed to assemble the fireplace stove is calculated. Also, to assemble the stove we will need certain materials and tools. So, we need to get:
- Fire brick and boiler;
- Clay and mantel;
- Door, grate and smoke damper.
Since brick fireplace stoves have a large total mass, they will require the construction of an additional foundation. At the first stage, the formwork part is formed and a foundation pit is dug, the size and depth of which depends on the dimensions of the heating structure itself.
After assembling the formwork part, the bottom of the pit is filled with reinforcing bars, after which the whole thing is fixed with a concrete-based solution. Before complete drying, the surface of the foundation is covered with plastic film. This will allow the top layer to remain smooth, even and not crack.
After the top layer has completely hardened, we continue to form additional support for our fireplace. To do this, we lay another formwork on top and again form another layer for the foundation using concrete mortar and rubble stones.
Scheme of the Kuznetsov bell furnace
The operating principle of Kuznetsov’s devices takes into account the natural properties of hot air and gases released during fuel combustion. The design of a brick stove is different in that the smoke is kept inside the stove itself. For this purpose, a so-called hood is equipped - a combustion chamber, which is a closed dome, into which the hottest air rises, displacing the cooling air through the lower side outlet.
Photo 1. Diagram of the Kuznetsov bell furnace, showing the features of the movement of gas flows in the device.
The ventilation hole under the bottom of the firebox provides a constant flow of cold air. Due to the fact that hot air is retained in the stove for as long as possible, the heat transfer efficiency increases three times compared to other similar devices.
Designers also tried to achieve such results in the case of traditional stoves - for this purpose, models with a system of chimney ducts were developed. In them, hot air is also retained inside the device, but lengthening the chimney naturally worsens the exhaust, so the heating efficiency does not increase much.
In the case of Kuznetsov’s devices, the draft is not disrupted, and hot air is not retained by increasing the length of the channel. This occurs due to the natural properties of hot gases to rise and displace colder ones. The dimensions of this type of stove can vary depending on the required power and the area of the room that needs to be heated. Models with one hood are usually compact and suitable for arranging a small country house.
Fireplace with oven
These stove models are installed in the kitchen area or dining room, where a large number of people gather. The type of oven can be portable made of metal or stationary made of brick. Depending on the size of the room, it is possible to manufacture a custom-made structure. For information! Compliance with basic building codes when constructing the fireplace part will save the owner from smoke (SNiP III-G.11-62).
Metal fireplace stove with oven