Variation from discs
The metal variation can be created using an even simpler principle.
Car wheels are used for this. For a summer residence this is a very convenient and fast way. Especially when you don’t have a lot of time to create complex structures. Stages of creating a variation from rims: 1. Identical rims are selected. On one of them, the partition is sawed off (a grinder is used). It looks like this:
2. One disk is placed on the second, the partition of which is at the bottom. The function of the oven falls on it. The discs are fastened by welding.
3. The door is cut out. Handles-stand are mounted to the finished stove.
The stove can be heated a little by adding firewood.
Empty cylinder design
Widespread gasification has left us with a gift of memories of the past in the form of empty gas cylinders, which every owner of a country house can find. The cylindrical shape of this cylinder can be used to make homemade items.
Construction from an old cylinder
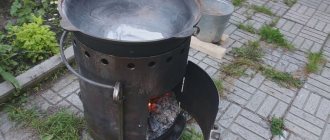
The upper part of the cylinder is cut off with a grinder; a cauldron will be installed on the end. Naturally, the idea will be realized if the dimensions of the cauldron and the diameter of the cylinder are compatible with each other. The total height of the stove should be three times greater than the planting depth of the cauldron. A hole is cut in the lower part of the cylinder wall for the firebox door. This door should be made from the freed piece of metal by welding hinges and a handle to it.
As a grate, you can use a bottom with drilled holes or install a separately made grate. The entire structure, if it does not have an ash pan, must be mounted on legs. This algorithm can be used when constructing a furnace from a piece of pipe of suitable diameter. The result will be a portable device with which it will be convenient to install a cauldron and cook various dishes in it.
How to install and use
When choosing a place to place the stove, you need to focus on ease of use, but take into account fire safety rules. An open space away from wooden structures is required. It is also important that there are no flammable items nearby. Keep sand or water nearby to quickly neutralize a fire.
Before the first use, clean the fireplace from machine oil with a sponge and soapy water. Then the product is calcined without utensils. After which the body is cleaned with a metal brush.
Before cooking, put the firewood in a container and leave it to burn out a little. Only then do they install the cauldron. In addition to firewood, you can use charcoal. When igniting the flame, make sure that it does not rise above the level of the brazier above 20 cm. It is advisable that the stove has a high chimney, then the smoke will not get into your face and will not spoil the taste of the food being cooked. Upon completion of cooking, you need to remove the coals and clean the stove from carbon deposits.
Do not allow small children or pets near the oven. The portable structure may tip over. In addition, a brazier with a fire should not be left unattended for a long time. It is not recommended to move a portable stove from one place to another with burning coals.
Also interesting: Afghan cauldron – what is it, how to cook in it
Making a stove for a cauldron from sheet steel
This is also one of the simplest options for making a stove, which will require:
- the cauldron itself to measure the diameter of the combustion chamber;
- welding, electrodes for it;
- steel sheets - the thicker they are, the better for the structure;
- hammer;
- corners for making handles and supports;
- electric drill;
- Bulgarian.
Note! Work should be done outdoors, near a source of electricity. At the same time, you must also follow safety rules
Step 1. Measure the circumference of the cauldron - according to the obtained size, further work will be carried out.
Step 2. Using a grinder, cut a rectangle from a sheet of steel, the length of which would be equal to the circumference of the cauldron. Make a hole in the rectangle.
Step 3. In the upper part of the future structure, mark and make several vertical slits so that the smoke can subsequently escape freely. Next, cut a rectangular hole at the bottom for loading firewood.
Step 4. Roll the sheet into a cylinder. To do this, use the appropriate form, wrap the steel around it and achieve extreme precision with a hammer, or (if possible) use special sheet bending equipment.
Step 5. Cut out supports and handles for the structure from the corners.
Step 6. Using welding, connect the sheet into a cylinder, then weld the bottom, handles and support elements to the structure. Although the latter can be screwed using ordinary bolts, having previously made holes in the steel.
Note! To protect the stove from corrosion, paint it with heat-resistant paint in several layers. That's it, you can put the cauldron in, load fuel and start a fire! Let's improve the design
Let's improve the design
For this purpose, we equip the stove with a chimney pipe, grate, ash pan and doors. The manufacturing procedure is the same as described above, but you will have to add a few points.
Step 1. Cut not only the firebox hole, but also another, smaller one located below, for the blower. At the top, cut a third hole for the chimney.
Step 2. Install a grate between the combustion and blower cutouts by welding supports - pieces of corners - inside the housing. To make a simple grate, you can use steel wire - fold the pieces of the required length and connect them together by welding. There is no need to attach the grate to the supports.
Step 3. Weld the chimney to the corresponding hole in the housing
It is important that the height of the chimney exceeds human height, otherwise smoke will get into the eyes
Step 4. Equip the chimney with a spark arrester - a tin can with numerous holes made in it.
Step 5. You can cut the doors from the same sheet steel, although you can purchase ready-made ones.
As a result, you will get this kind of stove for a cauldron with your own hands, which is convenient to clean from soot and where it is convenient to load fuel. Smoky gases will be discharged into the chimney, and draft adjustment will be carried out by the blower door. Although it is not so convenient to transport such a structure, since it is larger.
Mobile ovens for cauldrons
They are made exclusively of metal, preferably stainless steel, or in extreme cases ordinary steel painted with heat-resistant paint!
The simplest mobile version of a cauldron stove is a cylindrical firebox made of sheet metal with a hole for adding fuel and slits for smoke to escape. The cauldron is placed on top of the stove, with two-thirds of the bottom located directly above the fire.
But the lightest structure is a tripod. It is made from a metal tube bent in the shape of a circle and legs are attached to it (by welding or bolts). This “stove” is very convenient for hiking, but does not allow the walls of the cauldron to warm up evenly.
Stove for cauldron tripod
The size of each oven is individual and depends on the cauldron in which the cook will prepare the dish.
In order to make a simple stove for a cauldron with your own hands you will need:
- the cauldron itself (for measuring the diameter of the firebox);
- sheet steel (the thicker the metal, the more reliable and durable the structure) or a piece of thick-walled pipe (a used gas cylinder or even the body of an old cylindrical washing machine);
- metal corners or tubes (from which we will make the legs of the stove and handles for its transportation);
- machine for cutting metal - grinder (or its replacement - hacksaw, file);
- drill;
- hammer;
- welding machine with a set of electrodes.
We will carry out the work outdoors in close proximity to electricity and with mandatory observance of safety rules (protective suit, leggings and mask for working with a welding machine).
- We measure the circumference of the cauldron, according to this value we will carry out construction.
- Using a grinder (we use a cutting wheel for cutting metal), we cut out a rectangle from sheet steel. The long side of the rectangle should be equal to the circumference of the cauldron. Next, cut out a circle - the bottom of the oven.
- On one of the sides, which will be the top of the stove, we make markings and make several slits for the free exit of smoke. At the bottom of the stove we cut out a rectangular window for loading fuel.
- We roll the steel into a cylinder. We use either a suitable form, winding metal around it and achieving accuracy with hammer blows, or using a special sheet bending machine.
- Along the way, we cut out handles and supports for the future stove from corners (pipes, etc.).
Using a welding machine, we connect the steel into a cylinder, weld the bottom, then the supports and handles to the finished structure. However, the last parts of the structure can be bolted on by first drilling holes in the metal.
Reamer for cauldron stove
The simplest oven for a cauldron is ready. To protect it from corrosion, we apply several layers of heat-resistant paint. All that remains is to place a cauldron on top, light a fire in the firebox and prepare the food, everything is as simple as one, two, three!
An improved version of the cauldron stove
We supplement the design with a smoke exhaust pipe, doors, a ash pan, and a grate.
The manufacturing process is similar to the first option, but a few points will be added.
- You will have to cut not only the combustion hole, but also the blower hole located underneath it and the hole for installing the chimney.
- Instead of chimney slots, it is advisable to attach a metal rod to the top of the stove to strengthen the structure.
- A grate must be secured between the combustion hole and the blower. To do this, we weld small pieces of metal corners – supports – inside the furnace. The simplest grate is made from thick metal wire (laying out its segments in the form of a grid and connecting them by welding). There is no need to attach the grille to the supports.
- We weld the chimney pipe from the back of the stove. The height of the chimney should be higher than human height (to prevent smoke from getting into the eyes).
- We equip the chimney with a spark arrester - a tin can with many holes drilled in it.
- We make the doors from those metal pieces that remained after cutting out the holes for the vent and firebox, or we cut out new ones from steel.
Ready-made oven doors are also suitable. We attach them to the canopies by welding or bolts, and equip them with metal latches.
Thus, we get a model of a stove for a cauldron, into which it is convenient to put fuel and clean out combustion products, the smoke is discharged into the chimney, and the draft can be easily adjusted using the blower door. But this stove is less comfortable for transportation, as it takes up more space.
Stove for a cauldron example
Furnace design for working with a cauldron
This design is not very complicated. It resembles a barbecue, but round. The cauldron is always used for cooking, only with an open flame. Therefore, this option is taken into account in the design of the stove.
The optimal design for working with a cauldron would be a special system equipped with removable legs. A sufficiently large area allows you to install dishes and cook right in your garden. Transport the stove to any place thanks to its collapsible design. With the onset of cold weather, she can be taken home.
The stove on which the cauldron is placed resembles a metal cylinder. It is supported by massive legs. The bottom is made at the bottom, the top part is missing. If a special desire arises, it can be equipped with a chimney, but this is not at all necessary. In such furnaces, special cutouts are made at the top of the cylinder. They play the role of a smoke exhaust.
When food is cooked, there is an economical consumption of heat, since the flame is well protected from strong winds. In this design, the dishes are completely closed from the wind, therefore, they warm up much faster.
Cast iron stove for cauldron
Cast iron is one of the best materials for a stationary system. Massiveness and strength contribute to a long service life. Moisture does not affect cast iron. A huge advantage of using this metal is its flexibility.
Any shape can be cast, any size, appearance can be any. The chimney can be made permanent or removable. The body is placed on the ground. Possibly on legs. Heat in a cast iron stove is distributed evenly.
The simplicity of the design allows you to make a small oven. In this case, the oven becomes mobile. To put it simply, this is a piece of metal pipe, similar in shape to a potbelly stove, only without a top (if it is missing, a cauldron will replace it). The oven dimensions are arbitrary. The diameter of the cauldrons that are placed on the stove can be adjusted using adapter rings. Rings are added or removed depending on the diameter of the cauldron.
It is best to take cast iron stoves with the thickest possible walls. The system will keep warm for a long time, and most importantly, it will last for many years. The uniformity of heat distribution also becomes a big plus when choosing a cast iron stove.
Pipe cauldron stove
The thickness of the metal firebox wall is an important factor that determines the service life of the product. Thick sheet metal will last significantly longer than thin sheet metal.
The powerful wall perfectly accumulates thermal energy and then transfers it to the cauldron with food. Metal heat generators are similar in their properties to cast iron bodies. Metal has only one drawback, compared to cast iron, and that is susceptibility to corrosion. Therefore, it is best to coat the metal surface with a protective compound.
Mobile stoves are needed by people who often travel outdoors. These are hunters, fishermen, fishermen, gas workers, oil workers, geologists, tourists, summer residents (at the beginning of the season it is brought to the country house, and in the fall it is taken away). Of course, there is not a wide variety of materials for mobile options. The list of mobile ovens is limited to metal models.
The main advantage of such a stove will be mobility and durability. Mobile stoves differ from stationary ones in the thickness of their walls. If the system is stationary, the wall thickness is 3 mm, and the mobile structure is made of steel 2 mm thick. There are mobile installations made of powerful hardware.
A simple do-it-yourself stove for a cauldron made from a pipe
So, this is perhaps the simplest and at the same time reliable design of a mobile stove for a cauldron in the country. There is no need to be clever here at first glance - a pipe is a pipe - on one side is the furnace of the firebox, on the other is a tightly welded hole. The pipe is a pipe in both Africa and Asia.
But, this is only at first glance, and, alas, purely amateurish. Indeed, the design does not take into account many vital points simply necessary for working with such a stove:
- First, cooking in the traditions of eastern peoples is not limited to only pilaf, but meat, but traditional minced meat, but a rich broth with spices and the smell of smoke. And all this abundance will be prepared on one stack of firewood? Of course not, firewood and other fuel must be constantly added to the firebox. That is, a firebox door is needed.
- Secondly, since the stove for a cauldron made from a pipe is designed as a mobile structure, which, if desired, can simply be taken and put into a closet, it requires that after the food is cooked it leaves behind a normal green lawn. This means that the bottom must be welded with sheet metal and have an ash pan.
- Third, since the design is mobile, it requires handles and possibly wheels to move the stove around the area.
- Fourth, when wood or pallets are burned, smoke is generated, so so that the smoke does not interfere with working with meat and rice, you need to take care of the chimney pipe. Small, but quite functional and creating sufficient draft for burning wood.
- And of course, the grate is just like without it.
This is how it turns out that even the simplest design begins to take on quite tangible forms of a real oven.
So, what do you need to build a stove? First of all, the most important element is the Tatar cauldron. It is its displacement and size that determines what diameter the pipe will need to be looked for. For small dishes, it is recommended to take a closer look at thick-walled pipes with diameters of 450 mm or more. For small containers of 5-10 liters this is quite enough. For larger products, for example 20 liter volume, you need to look for a pipe with a diameter of 500 or even 650 mm.
It is recommended to select additional accessories and elements for the stove from thick, durable iron. For example, it is advisable to make the bottom from sheet metal 3-4 mm thick. Such a bottom will already weigh down the multi-kilogram structure, but in this situation you can be sure that it will not burn out for at least 10-15 years.
Handles, locks and other elements can be made of square or reinforcement with a diameter of 6-10 mm. Well, as for doors and awnings, here you can already use your imagination and use both ordinary door hinges and make something exclusive and unusual yourself.
Types of stoves for cauldrons
Depending on the material of manufacture:
- metal stoves (factory-made and home-made);
- stationary brick structures.
Brick stoves vary depending on the method of installing the cauldron:
- in classical designs, the cauldron is placed almost completely in a brick recess;
- in modified versions, the cauldron is installed on a specially mounted burner.
Ovens are also divided according to the method of cooking:
- specialized devices only for using the cauldron;
- universal (multifunctional) devices in which food can be cooked using a cauldron and other devices (for example, a grill for frying meat or a portable hot smoker).
The choice of one type of design or another depends on personal preferences.
Features of brick stoves
There are two types of schemes for a brick oven - classic and multifunctional or universal.
A classic oven looks like this:
- steel plate for fixing the cauldron;
- metal corners for securing the plate;
- firebox with door;
- blower;
- smoke channels and chimney;
- external walls that frame the entire structure to achieve a better thermal insulation effect.
If we are talking about creating a universal oven, its design has a number of differences:
- plates for fixing cooking utensils;
- for each device (for example, for a cauldron, a grill for frying meat and a smokehouse) its own firebox is created, because it is necessary to achieve maximum efficiency from each surface;
- in order to combine all the created surfaces into one chimney, it is necessary to erect an arch above them, in which the outlet to the chimney will be made.
Brick stove for cauldron
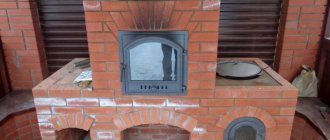
Brick and stone are durable building materials. Their use in masonry is practical. A stove for a brick cauldron can be built by an ordinary worker who has a technical mind and can read the order drawings. And if you know a stove maker, then the issue is easily resolved.
You can find many detailed instructions on the Internet. The design of the system is simple. No heavy, dirty work on foundations is required. Simple masonry is used.
There are several types of brick stoves. The main task is to promote strong, uniform heating of the boiler walls. What stove layers don’t do to ensure uniformity of heat supply to the boiler.
Classic versions of combustion boilers, a vase-like shape, and an inverted pyramid are the main tricks that craftsmen go to in order to obtain even heat.
Product made from wheel rims
Aesthetics are not always important in stove design. There are cases when the bet is made only on the functionality of the device. An example of folk art is a device consisting of two wheels. The disc septum is usually shifted to one side. The lower disk is positioned so that its partition is as low as possible. At the top disk it is completely removed.
933be4d84c9335b98f4b033ec62920bd.jpe Cut part of the diskThe discs are aligned coaxially and connected by welding. The lower partition plays the role of a grate. The cavity of the two disks is the firebox. All that remains is to cut a hole in the side for the door, weld the handles and legs, and you can use the homemade device.
Simple and clear design
conclusions
To cook food in a cauldron according to canonical recipes, you need a special oven. You can buy a ready-made one, but it will either be expensive or pointless, you can weld it yourself “from what you have,” you can lay it out of brick with your own hands - it’s not that difficult.
We offer our article, which tells in detail how to build a universal brick structure with a stove for a cauldron, a barbecue and an analogue of a Russian stove. Read how to make a brick barbecue with a stove for a cauldron. Look at the options for metal cauldron stoves. And in the video there is a street complex with an ancient Aryan oven.
Subscribe to our Telegram channelExclusive posts every week
How to make a stove from gas cylinders?
A fireplace for heating a cauldron made from a gas cylinder is a portable device that can be installed in any convenient place and can even be used in camping conditions. To make it you will need the following materials:
- gas cylinder;
- fittings;
- grate;
- Door hinges;
- other related materials.
In the process of assembling a stove from a cylinder, the following consumables will be used:
- cutting discs for grinders;
- grinding wheels for angle grinders;
- sandpaper;
- drill;
- welding electrodes.
Minimum set of required tools:
- welding machine;
- Bulgarian;
- electric drill;
- hammer;
- measuring instruments (tape measure or ruler);
- other related tools.
The gas cylinder is installed on its base. At a distance of 60-70 cm from its lower part, a mark is placed indicating the location of the cut. A circular line is drawn through the mark
It is important that it is drawn strictly parallel to the surface on which the cylinder is installed. Along this line, using a grinder and a cutting wheel, the balloon wall is cut
The top sawn part is removed.
Vertical triangular cuts are made in the cutting edge of the cylinder. Their number and depth are determined by the individual design of the future furnace. These cutouts are necessary to maintain stable draft after installing the cauldron on the stove. The absence of draft holes will create a vacuum inside the oven, causing the flame to go out. A rectangle is marked on the side wall of the cylinder. Sawing is performed along the contour line of the rectangle. The resulting hole will serve as the entrance part of the future firebox, and the cut piece will serve as the stove door.
A rectangular section of the cylinder wall is welded to its original place using hinge hinges. On the side of the combustion hole opposite the hinges, a piece of metal is welded from the inside.
Its location should be such that it prevents the door from opening into the cylinder and at the same time does not interfere with loading firewood into the firebox. For convenience, a handle is welded to the surface of the door, which can be made from fittings. In order for the door to close securely, a movable valve is equipped on its edge adjacent to the cylinder body.
Below the main hole, a hole for the blower is cut out. Its width should correspond to the width of the firebox opening, and its height should not exceed 10 cm. The rectangle of metal obtained after the cutout is used to construct a door, which helps regulate the amount of oxygen entering the firebox.
A grate is installed between the combustion door and the blower - a grate that prevents fuel material from entering the ash collector. To arrange a grate inside a round furnace, you can use reinforcing rods, the length of which will vary depending on the round shape of the internal space of the balloon furnace.
To install a grate, it is better to use reinforcement with a diameter of at least 20 mm. This is explained by the presence of high temperatures inside the oven at the time of its heating. Reinforcement with a smaller diameter can quickly burn out.
At a distance of 15-20 cm from the upper edge of the stove, U-shaped handles are welded, with the help of which this stove can be transported. These handles are made from reinforcement with a diameter of 12 mm. To ensure the stability of the balloon furnace, special spacers can be welded to its lower part. The number of spacers is determined individually, depending on the operating conditions and the size of the cauldron that will be installed on the hearth.
A stove for a cauldron, made with your own hands from a cylinder, is a multifunctional device. It can be installed in the country house, and with some modifications it can be used as a barbecue on which you can fry meat. A balloon stove can be used as a heating stove installed in a garage or some other utility room.
429954a20277025c961a0a6075d9403c.jpeTypes of gas cylinder stoves
You can organize several types of stoves , differing in their operating principles and features. They can use different types of fuel.
There are several types of stoves:
- heating and cooking structure used in residential buildings;
- heating stove, which serves to heat a room or several rooms;
- a home-made cooking structure, which is usually used only in the summer;
- The emergency stove is universal, compact and portable, therefore it is used when the main heating breaks down or any malfunction occurs in it.
Making a metal stove from a cylinder
As noted earlier, the easiest option for creating a stove is a tripod. We will not consider it, since in this case everything is extremely clear.
And we’ll talk about a portable metal stove, which is advisable in cases where people do not live at the dacha permanently, but, for example, only on weekends. An excellent option for this is an unused, but still usable gas cylinder with a volume of 50 liters. At one time, such cylinders were extremely popular in the village, but not so long ago they were replaced by electric stoves and natural gas. In addition to the cylinder itself, prepare a grinder for work.
The sequence of actions is as follows.
Step 1. Empty the gas cylinder - open the tap and wait at least a week.
Step 2. Mark the cut line. For our design we will need the part of the cylinder with the bottom. Step back about 25 centimeters from the bottom and draw a straight line.
Step 3. Make a neat cut with a grinder, then try on the cauldron. As noted, it should go in about two-thirds of the way. If the cauldron is too large, then make several 5-centimeter cuts on top in increments of about 15 centimeters.
Step 4. Cut a window 20 centimeters from the bottom for loading fuel. The width of the window should be large so that no difficulties arise in the future.
Step 5. Try it on again to make sure that the cauldron fits tightly enough.
Step 6. Next, you should calcine the stove for the cauldron with your own hands. To this end, remove the cauldron, load the firewood and heat until the odors completely disappear.
That's it, the design is ready, and you spent a minimum of materials and tools to make it!
Advantages of a stove made from a gas cylinder
A stove from a cylinder can be moved from place to place.
A metal stove is almost impossible to manufacture without welded seams, which during operation are quickly destroyed under the influence of external climatic factors and heating of the walls to high temperatures. Therefore, for such structures, empty gas cylinders are most often used, which have suitable geometric dimensions and are practically ready-made containers for the firebox. After a little modification, the gas cylinder becomes an ideal stove for cooking in a cauldron. If you have certain skills, such a stove can be made in an hour.
A self-made stove for a cauldron from a gas cylinder has a number of advantages:
- guarantees a tight fit and uniform distribution of heat (heat) along the walls of the cauldron;
- ensures complete combustion of wood and the most efficient use of heat;
- allows you to easily move the product from place to place.
Making a stove for a cauldron does not require virtually any financial costs - you only need a gas cylinder, and the summer resident will find everything else in his own workshop.
When choosing a gas cylinder for a stove, we focus on 2 parameters: volume and diameter. It should be taken into account that part of the volume will be occupied by the ash pit of the stove and the bottom of the cauldron itself. Of the entire range of cylinders (5-50 l), the most suitable is a 50 l cylinder. It can accommodate a large firebox and a convenient ash pan.
Sequence of work
We make a step-by-step oven for a cauldron with our own hands. Using a grinder, a partition is cut out in one disk, with holes made for mounting bolts. It is better to cut along the border of the holes, this will reduce the labor intensity of the work.
We find places for spot welding that holds the partition and rim. At this point the metal is cut straight to the rim. The operation must be done carefully so as not to damage it.
Cutting the partition should be done at a distance of 1.5–2 cm from the location of the weld spot. The cut off partition can be easily removed. Just pry it out with a flat screwdriver.
It is very important to preserve the remaining part of the partition directly at the welding point. It forms a gap between the stove and the cauldron
As a result, strong draft occurs and the cauldron is evenly heated.
Then welding work is carried out. The prepared disks are placed on top of each other, and the disk with the partition cut out should be at the top.
The entire fastening partition of the lower disk will play the role of the bottom of the stove. Welding of evenly installed disks is performed along the entire circumference. Then the door is made. In well-welded discs, a vertical cut is made corresponding to the dimensions of the door. You need to leave a small metal strip at the bottom. You will get a kind of threshold that does not allow the coals to fall out of the oven.
1cfa14b5944e00aa051822d85c852f1f.jpe
1170eb1a7b51aacfb0d989ec3b7ecea0.jpe
Bolts and nuts are inserted into the cut made. These parts will become loops. Bolts are welded to one side of the cut and nuts to the other. Then a hole is cut for the door. A long bolt is welded. It will act as a strong handle. The ends of the opening and the sharp edges of the door are cleaned of burrs. To do this, you can use an ordinary file or an electric grinding disc.
The next step is to make handles for transporting the stove. The wire is taken, inserted into a vice, where it is bent into the desired shape. To work with such wire you will not need much effort. Right angles can be easily made with a regular hammer.
Nuts are placed on the handles. They are welded to the walls on opposite sides. To make it easier to work with such handles, you need to bend the small tails at a right angle. You will get a reliable stop that prevents the handle from touching the stove body.
The legs are welded to the bottom. The length of such supports should not exceed 30 centimeters. A hole is welded into the disk through which the wheel hub passed. To do this, you can use any piece of metal of a suitable configuration. The stove is loaded with wood. It needs to be well calcined. During this time, the paint will all burn out. Then it will need to be repainted with good heat-resistant paint.
To create such a design, an experienced craftsman will need 2-3 hours. The appearance will have a compact appearance. Thanks to its light weight, it is easy to transport in a car. Such dimensions fit freely in the trunk.
Doors are used to adjust the draft. Its strength changes when opening or, conversely, closing the door. It is better to use wood briquettes as fuel.
Based on materials: https://topkvadrat.ru/interior/article/kak-sdelat-pech-dlya-kazana-iz-kolesnyh-diskov-svo-38043
Sheet steel furnaces
You can truly show your creativity by making a structure from sheet steel. A metal stove will last longer the thicker the material is selected. However, this type of work requires the ability to operate a welding machine.
The size of the rectangular sheet, especially its width, depends on the size of the cauldron. We measure the cauldron around the circumference in the part where it will be held in the stove body, and cut off a sheet of iron with a width equal to the readings taken. The height of this sheet will correspond to the height of the oven. Despite the fact that the distance from the core to the bottom of the cauldron will be adjusted when installing the grate, the height of the entire structure must be selected based on convenience and common sense.
An assistant will be needed to perform further manipulations. The sheet of metal must be rolled up to form a cylinder with a height equal to the height of the sheet. The structure is welded at the seam and is completed with handles, a grate, a stand and a chimney.
Laying a stove for a brick cauldron
The cauldron truly reveals its capabilities in a brick oven. The services of professionals are highly valued. In our version, we will consider a simple design that does not require significant costs.
The advantages of the design are as follows:
- The design can withstand any weight of dishes;
- Uniform heating of the cauldron;
- Short cooking time;
- People around you are not affected by the smoke;
- The burnout process is controllable;
- Low fuel consumption;
- Can be heated in any weather;
- The risk of fire is minimal;
- Costs are minimal;
- Durable design.
We build a stove for a cauldron
To start building a barbecue with a brick stove for a cauldron, you need to select a design and prepare a drawing indicating the dimensions and order. See the order below. The laying of fireplace stoves is carried out by specialists, but it is expensive.
We will place the firebox at a height of slightly less than a meter. Separately, we will draw a metal chimney, in all general dimensions, and in individual parts. It is important to find a place on the site that was convenient for you and did not disturb your neighbors with smoke. At the same time, the stove must fit into the landscape of your site.
Brick version
All the different designs of furnaces can be divided into two main types.
- The simplest stove for a brick cauldron is represented by a firebox, in the upper part of which the cauldron is attached. The system is complicated only by the presence of a chimney. However, such a structure leads to the fact that the flame acts directed towards a certain area of the vessel, and the walls heat up unevenly.
- The second option involves complex flows of hot air, from which heating occurs, and the flame itself is somewhat removed from the surface of the cauldron.
Both methods of building a furnace are accompanied by the construction of a foundation. But in this case, due to the fact that the simplified brick structure has a relatively small mass, there is no need to build a full-fledged foundation. A reinforced concrete slab is also suitable. If this is not possible, then the slab is poured independently.
System for cauldrons of different sizes
A pillow is installed in a pit 30 cm deep. In order for the slab to be strong, when pouring it is necessary to reinforce the solution with any suitable available means (rods, stacks, sheets). One of the important conditions for pouring the foundation is the creation of a horizontal layer in the form of a flat plane.
The design for a brick cauldron with your own hands in a simplified form is made in 13 rows according to the established pattern. It is advisable to use time-tested projects, especially for novice craftsmen.
Order for a small stove
The first row is laid out as a continuous base. In rows 2 and 3 there is an ash pan with a door. Its purpose is to collect ash and provide air flow. The 4th row is covered with fireclay bricks, and a grate is mounted in the center, on which the firewood will be burned.
The whole difficulty of laying out 5-11 rows lies in the fact that the firebox is laid out in a cylindrical shape. To do this, the brick is processed with a grinder. This is a rather labor-intensive process, but you should not try to avoid it. The fact is that some craftsmen lay out the circle with untreated brick, adding more mortar in the seams. But the requirements for masonry in places where high temperatures occur is to minimize seams, especially in the case of fireclay bricks. A larger amount of solution will cause the masonry to rupture.
In the 12th row there is a hole for the chimney. Let us immediately note that in such structures the chimney has an initially horizontal direction. Then it must be turned exactly at an angle of 90°. After the overlap, a slab with a cutout for a cauldron is installed in row 13. If it is not possible to purchase such a stove, then having sheet metal, a grinder, a file and some imagination will allow you to get out of the situation.
A more professional approach is implemented in a scheme with lowering channels. Here the walls of the cauldron are heated by moving streams of hot air.
Furnace with sink channels
Despite the complexity of the idea, building such a stove for a cauldron with your own hands is also not difficult.
How to choose a cauldron with an oven
A cauldron is a thick-walled cast iron cauldron with a semicircular bottom, convenient for cooking food over a fire.
The spherical bottom is made in such a way that the flame heats all the walls of the container, and not just the bottom of the cauldron, and food does not get stuck in the corners of the dish. Thick cast iron walls prevent food from burning, and all ingredients simmer slowly.
It should be noted that nowadays a cauldron is mistakenly called for dishes that are not related to its varieties, for example, a cast iron pot, a duck pot, a cauldron. Although they are similar in their properties and appearance to a cauldron, they do not meet the main requirement - a rounded bottom.
Modern types of cauldrons can have a non-stick or ceramic coating, and be made of aluminum or steel. However, a thick-walled cast iron cauldron is still considered the best. It can be placed on a special tripod (tagan), under which a fire is lit, or placed above the hearth - a stove for a cauldron.
The cauldron is intended for:
- Cooking soups, stewing, boiling water.
- Preparation of traditional dishes “with smoke”: triple fish soup, grenadier kulesh, tourist konder, etc.
- Cooking traditional oriental dishes.
The cauldron has thick walls and a spherical bottom. Naturally, don’t expect stability on a flat surface from it.
The round shape implies a ring-shaped stand. Do not try to install it on a regular grill grate, or on an outdoor barbecue grill.
If a cauldron with a flat bottom heats up faster from below than along the walls, then the heat spreads evenly throughout the cauldron. Moreover, the material used for its production is thick steel or cast iron.
For various dishes and cooking methods, it is advisable to use cauldrons of a specific shape.
The depth is equal to the largest diameter of the container along the edge (Asian dishes in stone ovens). The ratio of depth to diameter is about one to three (Asian dishes in factory-made metal ovens). Almost a cylinder with a rounded bottom (thick tourist dishes with smoke). A shallow container with sloping walls and a small plane at the bottom (cooking, boiling).
As for sizes, there are no restrictions. But based on the materials – very much so. Cast iron is ideal. Due to its massiveness and heat capacity, it provides uniform heating; the pores of its walls “self-heal” over time with a fat layer. Products in such a cauldron glide and do not burn.
Material for making the cauldron:
- Cast iron is ideal.
It is massive and has a high heat capacity. Due to this, the food is heated evenly. As it is used, “self-healing” of the pores on the walls occurs due to the fat layer.
Due to the layer of fat, the products in the cauldron do not burn. In the East they say that in an old family cauldron, the taste and aroma are transferred from one dish to another.
- The only alternative to cast iron is thick-walled aluminum.
- Copper, stainless steel, and modern products with non-stick coatings are not suitable. It is unlikely that a traditional oriental dish will turn out in such a cauldron.
A cauldron stove is an indispensable item in everyday life for lovers of delicious foods cooked in a cauldron for a number of reasons:
- Firstly, of a technical nature: a cast iron cauldron most often has a convex bottom.
- Secondly, it is the cauldron oven that ensures uniform heating of the cauldron from all sides.
- Thirdly, and no less important, nothing can replace an open, live fire - dishes prepared in this way have a unique taste and aroma.
Such an oven will comfortably accommodate not only a cauldron, but also a pot and a frying pan - enough to throw a real holiday and cook many magnificent dishes right at the place of rest.
Thanks to its collapsible design, the stove is indispensable for fishing, at the dacha, on a hike or in nature; it can easily be placed in a gazebo or outdoors.
It does not take up much space in the trunk and is easy to assemble (the firebox, or the “body” of the stove, the legs, the “tongue” - holds the ash, ensuring order in the area, and helps when cleaning the stove, and the pipe - removes smoke from food).
The design of a cauldron stove may be similar to any other stove, but its main difference will be the hole in the cast iron plate where the cauldron itself will be placed.
The fact is that, according to the rule, this hole should have such a width that the cauldron fits 2/3 below the level of the stove. If the hole is made wider, the cauldron will be inconvenient to take out. If you do it narrower, the surface of the cauldron will not heat up evenly.
Today there are special plates with rings of different diameters, thanks to which you can use dishes of any size. But the main purpose of such a stove is to cook food in a cauldron.
We also note that the stove for the cauldron is multifunctional, because you can not only cook various dishes in it, but even boil water or fry shish kebab.
For the latter, by the way, an iron rod is laid across the slab on which skewers are hung. As a result, the hot coals will cook the meat as evenly as possible.
The oven can be of several types:
- made of brick;
- converted from another metal device;
- sculpted from clay.
Before you begin, complete the following preparations:
- draw on paper all your thoughts regarding the design of your cauldron stove;
- determine the exact dimensions of the structure;
- decide on the form;
- Decide what material you will build the stove from - metal (pipe) or bricks. It is worth noting that a brick-based structure will be safer; this is an important characteristic if you have children;
- Decide whether the oven will be portable or stationary.
Like a regular barbecue, these stoves come in two types. The portable one will be convenient and transportable, and the stationary model will fit perfectly into the exterior of your site.
In addition, a stationary oven-barbecue under a cauldron will work more efficiently and is economical in terms of maintenance. If you plan to organize gatherings mainly on the site, then it is better to choose this option.
At the preliminary stage, it is important to decide what kind of cauldron stove you want to have on your site.
The stationary option is suitable for those who often use such a device and have the opportunity to allocate a large area for it.
Moreover, it should be distant from the main buildings. In this case, a solid brick foundation is laid for the cauldron, or more precisely, for the stove, on which the huge vessel stands as if on a pedestal.
For a mobile version, you can make a stove out of metal.
Its design is extremely simple. The role of the pedestal in this case will be played by the upper part of an ordinary iron cauldron. A large cast iron pipe or a heat-resistant steel pipe will be suitable as the main material.
A mobile oven creates conditions for rare culinary forays and allows you to make the most of the possibilities of a compact outdoor patio.
Both options are easy to assemble with your own hands.
If you are planning to build a barbecue stove for a cauldron made of brick, then the work ahead will be very difficult. However, if you choose a metal pipe structure, the work will be much easier.
If you have a ready-made grill, but you want to adapt it for cooking dishes in a cauldron, then place a special stand on it in the form of a mini-stove, which you can assemble with your own hands or purchase in a store.
No special fuel is required, but the maximum amount of coals should be raked under the cauldron. However, it is worth noting that on the grill oriental dishes like pilaf will not have the traditional “zest”, but dishes with smoke in a cauldron on the grill will turn out excellent.
