What can it be made from?
You can build a stationary summer shower for your dacha from almost any material. The most common structures are made of wood, polycarbonate, corrugated sheets, brick or concrete blocks.
Tree
It is no accident that boards have become one of the favorite building materials of summer residents. On the one hand, they are environmentally friendly, aesthetic, easy to process and inexpensive. On the other hand, they are capricious. For use in “wet” areas, the wooden frame and sheathing must be treated with impregnations against mold, mildew and pests.
But if you are willing to spend additional money, effort and time on preparation, the result will be a durable summer shower that fits perfectly into the natural landscape.
Polycarbonate
The lightweight material with a honeycomb structure is similar to plastic panels: easy to process, cheap, hydrophobic. If you look from a practicality point of view, polycarbonate is an ideal option for a shower. Its advantages:
- Not afraid of water.
- Easy to install without special tools.
- The sheets bend well (you can make a round cabin).
- Withstands temperatures from -40 to +120 degrees.
If you look from the aesthetics side, the shortcomings are revealed:
- Inexpensive look. You can’t hide the plastic, although if there is a polycarbonate greenhouse on the site, the summer shower will go with it.
- Transparency. The shower room will have to be supplemented with curtains or a second layer of panels inserted so that the people inside are protected from prying eyes.
- Fragility. With prolonged use and exposure to the sun (the latter is required to provide heated water in the tap), the coating begins to crack and collapse.
The photo shows polycarbonate on a metal frame
Corrugated sheet
Preparation, deciding on the design of the summer shower
You can design a summer shower for your dacha with your own hands by using many materials. This is metal for the base of the building or wooden beams. To fill the walls of the cabin, cellular polycarbonate, tarpaulin, corrugated sheeting, siding, blockhouse and even polyethylene film are ideal.
What simple designs can you choose:
- The most basic solution could be a regular tank of a suitable size with a built-in watering can. This type may be comfortable in some cases, but for certain reasons it is not aesthetically pleasing.
The second option is a shower made of wooden materials (rustic style). It is attractive in appearance, practical and does not require a lot of time to construct. It is enough to use a few boards, a tank or barrel and the shower is ready.- A type of shower stall made from profiled sheets and metal profiles can be very practical. These foundations have earned the popularity and trust of people. Construction does not require much time or special skills, and the finished structure will be durable and convenient.
If you need aesthetics, then you cannot find a better shower cabin than one made of polycarbonate. Such a shower is easy to organize, and the material used in construction is not deformable, which makes it possible to use it for almost any type. It is not afraid of fungal formations, mold, and does not require treatment with antiseptics.
How to do it yourself?
Making an outdoor shower is not a difficult task, but even it requires preliminary preparation and development of a construction plan. It's time to understand the process of creating a summer shower step by step.
Step-by-step instruction
In order to correctly calculate the costs of labor and financial resources, and also not to miss anything important, we will conditionally divide the process into 7 stages.
Planning
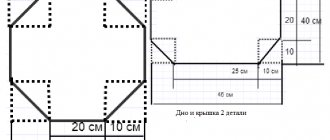
As the famous saying goes - measure 7 times, cut 1 time. First, the dimensions of the shower cabin are calculated, after which the optimal placement location and the amount of materials can be determined.
The minimum width and depth are 80 cm, the optimal dimensions are 100*100 centimeters. The height to the tank is 200-210 cm. In such a shower it is comfortable to bend over, stretch your arms up, and move them to the side. For greater comfort, equip not only a washing compartment, but also a locker room: its dimensions can be more modest - 60-70 by 100 cm.
Important! Based on your dimensions, calculate the required amount of timber (it is recommended to use timber with a cross-section of 10 cm) and sheathing. Purchase lumber, treat it with impregnation and dry it before use.
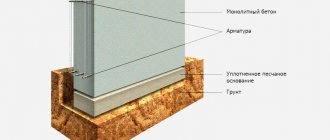
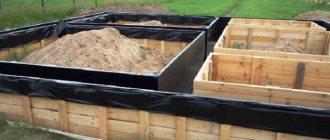
Foundation
Use a profile pipe (100-160 cm high) as the base.
- Dig the required number of holes around the perimeter of the future shower;
- dig the pillars in such a way that 20-30 cm remains outside, and 70-100 cm is dug into the ground;
- cover with crushed stone and fill with cement;
- wait until it dries completely.
Important! Hereinafter, calculations and recommendations will be given for creating a shower in the countryside with your own hands from wood (pictured). For brick and concrete buildings, all stages, starting from the foundation, will be different. If you are planning to build a shower on a frame made of a metal profile, go to the “Video” section and watch detailed instructions there.
Frame
You can assemble the frame on the finished piles. Start with the bottom trim (bottom), attaching crossbars around the perimeter at a level of 20-30 cm from the soil. Next comes the fastening of the main supports; the upper trim is already assembled on them.
The frame is reinforced with partitions (slopes) - keep in mind that the finished grille will have to withstand a heavy water tank installed on the roof.
Water supply and drainage
Based on the conditions of the garden plot, choose 1 of 2 possible water supply options:
- Connection to the water supply system. In this case, you will have to bury the supply pipes at least 50 cm, insulate them, and install a special pump (if you are going to pump water from a well or well).
- Installing a tank above the shower. Thanks to the top position, the water will flow thanks to normal gravity: a pump will only be needed if you need strong pressure. In general, you can get by with just capacity.
Water drainage causes more problems. In order for the outflow to be effective and the water not to erode the soil next to the summer shower, a special drainage system is required. There are 2 ways to organize drainage: drainage + waterproof layer or septic tank.
- In the first case, the water is essentially “sucked” into the ground. To do this, the floor is made in the form of a grid, through the holes in which moisture will escape. And under the drain in the open ground, they organize a drainage hole, filling it with various stones, large branches, etc. This shower is comfortable in warm weather - the grille provides not only water drainage, but also ventilation. When it gets cooler outside, it will start blowing from the holes and it will simply be cold to wash.
- In the case of a drain hole, you need to choose where it will be placed - directly under the cabin or away from it. A pallet is placed on the floor: ready-made or created independently from concrete and tiles. Read more in the “Pallet” section.
Container for water
A summer shower is only a summer shower, to be used exclusively during the warm season. And in the summer there is a lot of sun, which warms the water in the tank with its energy. But the water in the sun warms up mostly from above, and gets into the watering can from below, so it turns out that during bathing, cold water flows first. To fix this, you will need a few tricks:
- Dark color. A black or blue tank with walls of sufficient thickness will not only strongly attract heat, but also retain it.
- Upper fence. For this, various devices are used, the simplest is a hose with foam plastic, needed as a float, which will hold the nozzle at the top edge and supply heated water to the shower.
- Additional coil. If you assemble a simple structure of pipes on the roof between the container and the watering can, the water will be heated directly in them. A more affordable, simpler way is to roll up a long hose in several layers and place the shower on top.
Finishing
Interior finishing is not always required; for example, shower stalls lined with polycarbonate or special fabric do not require additional protection. The wooden shower room also does not need to be decorated.
If the walls still need to be decorated, choose lining pre-treated with impregnation, PVC panels, tiles (for brick and concrete showers).
Pallet
If you don’t want to bother with calculations and cement mortar, buy ready-made ones in the store. Didn't find a suitable one? Fill it with your own hands, but observe the main condition - the slope towards the drain is 1-2% of the total length. The drainage is done as in a regular shower - using a siphon and pipes.
Video for beginners
Watch all the secrets of creating a summer shower from corrugated sheets in the video:
Making a shower stall
Organizing a summer shower for your dacha with your own hands is very simple - select a container, install the base behind the house and you can practice water procedures. This is everyone's opinion until the construction process begins. And then a number of questions begin to arise regarding parts, drainage, water outlet, and cabin dimensions.
We will tell you all about the intricacies of the structure and teach you how to make a summer shower for your dacha with your own hands with photo examples.
It is necessary to consider what features the buildings have:
- Before starting construction, you need to choose a place that will be fully illuminated during the daytime. Thanks to this placement, the water in the tank will heat up as much as possible during the day and its temperature will be pleasant for swimming.
- The area should be hidden; swimming is still a hygienic procedure. Be sure to take care of a thick curtain or door.
- As noted above, you need to take care in advance of a high-quality drainage and drainage system; how convenient it will be to use the shower and the stability of the structure depend on them.
Carefully consider the process of heating water; will it be natural or artificial through the use of an electric heating element? Please note that using natural water heating is more economical, but it is unlikely that you will be able to take a shower in bad weather. Artificial heating will not depend on weather conditions.
Modern models of containers made of plastic allow you to always have heated water available, so in the summer there is no need to install additional heating elements. If you have to use a shower during the demi-season periods, then you need to think about installing a heating element first.
Once the nuances are taken into account, you can think about a suitable design option.
Let's consider the process of constructing showers made from:
- wood;
- polycarbonate.
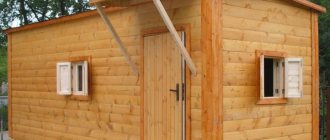
Wooden buildings are the most common, wood is easy to process, its use does not cause difficulties, and the material itself holds its shape well and retains heat, which makes it possible to use the shower even in bad weather.
How to build a booth:
- To construct the frame you will need wooden beams. For racks located in the corner, blanks with a cross section of 100x100 mm are used. A container for liquid is placed on top. Based on the parameters of the timber, the ideal volume would be 200 liters.
- Several additional racks are added to the front of the structure; a size of 50x50 mm is suitable. This parameter is enough to hang the door.
- The corner posts at the front are installed 20 cm higher than those at the back. Thanks to this, the slope of the roof is achieved. If a water container is used instead of a covering, then each rack is placed at the same level.
The racks are attached to the frame below using special hardware and mounting angles made of metal. Repeat similar steps on top.- A door is installed on the finished structure. For the door structure, boards are used, which are knocked down with several lintels and one slatted slant so that the door does not warp.
Finally, the finished structure can be coated with paint or varnish, and the inside can be covered with film so that the wood does not begin to swell after use.
Now let's look at the popular version of a summer shower, which is decorated with polycarbonate.
To make such a structure, you will also need a frame; it is not advisable to use wood here; it is better to use metal profiles with cross-sectional parameters of 40x60 mm. The principle of operation is practically no different from the previous wooden version. Stands with jumpers are also used here, but here they will have to be welded.
Please note that the manufacture of this shower is different. You can make a frame and then place it on a poured base, strengthening it with anchors. You can do it another way - concrete the racks in the created foundation and then tie the spacers and lintels.
To sheathe such a shower you need:
- cut out fragments of the required size from polycarbonate with a thickness of 10 mm;
- attach the material to the profile using hardware and gaskets;
- weld the frame for the future door structure from the profile and secure it to the stand, then cover it with polycarbonate.
Why shouldn't you use wood with polycarbonate? Firstly, these materials do not combine well; they can change under the influence of temperature. Secondly, wood can change due to humidity, which is not desirable in polycarbonate showers.
Regardless of what material is chosen for the work, showers made of both wood and polycarbonate can be equipped with natural and artificial heating of water; this is everyone’s personal approach. High-quality sealing of the structure is important. Only in a shower where there are no cracks and the door closes tightly can you bathe at any time of the day.
Of course, indoor showers are more popular than summer showers; they are called beach showers. It is thanks to the closed structures that a person can comfortably take a shower and not be afraid of a draft or prying eyes. If you need comfort, take care of building a closed model.
Inspirational ideas
Finally, we want to share original ideas and show that an outdoor shower is not necessarily a functional box with walls and a tray.
For example, if you choose an unusual material for construction, such as untreated logs, you can get an unusual eco-shower.
The photo shows an original log shower
Wood in general is a universal material. It can be used to achieve a fresh modern design, as well as a traditional or rustic one.
Dreaming of something more unusual? Pay attention to the open showers in the greenery - such a shower looks like a tropical one. Stands made from scrap materials look original - in the photo there is a surfboard, but you can choose something more suitable for a country theme.
When designing an outdoor shower, remember: it should be comfortable for all family members! To avoid mistakes and plan everything, first create a project, and then gradually implement it.
Types of summer shower
Various materials and technologies are used to make a modern shower. When choosing, you should rely on financial capabilities and other equally important factors.
Wooden shower
A wooden cabin is a popular and common option. This is due to the fact that it is very simple to implement. For construction, environmentally friendly material is used, which has many advantages. The only drawback is low resistance to moisture and insects. Therefore, wooden elements are treated with antiseptics. Timber and boards are used for construction. The best option would be coniferous wood, as it is highly resistant to humid environments.
Combination options are often offered - shower plus toilet. Source seattlehelpers.orgA wooden shower in the country is performed in the following sequence:
- The shower is a frame structure, which consists of racks of a certain section. When choosing timber, it is worth considering the load that will be created by the storage tank.
- Holes are dug under the posts, the depth of which is 80 cm. A cushion of crushed stone and sand, 10 cm thick, is made at the bottom.
- To protect the timber from rotting in the ground, it is coated with bitumen and wrapped with roofing felt. After this, they are installed in the hole and leveled. Additional racks are installed in the places where the doors are mounted.
- The racks are connected at the bottom and top by horizontal bars. Bolts or angles are used to fasten them together.
- The sides of the cabin are finished with sanded boards. After this, all elements, including doors, are treated with paints and varnishes.
During construction, it is worth considering a method for draining waste water. As for its supply, storage tanks are installed on the roof, which have different shapes and volumes.
You can order the construction of a full-fledged open-air bathroomSource emupauto.ru
Polycarbonate construction
This design is somewhat simpler to construct. To perform the work you will need a welding machine. This is necessary for the construction of a metal frame. A profile with a cross-section of 40x60mm is used as racks. Smaller products are used for strapping.
Installation of the frame is carried out in the same way. The racks are concreted in pits. Jumpers are attached between them, which will add rigidity to the structure and will also be used to fasten the polycarbonate. A durable frame is welded on top on which the water tank will be installed. After this, the entire structure is covered with waterproof paint.
For finishing, opaque polycarbonate sheets are used, the thickness of which ranges from 6 to 10 mm. A circular saw is used to cut the material.
A polycarbonate shower warms up like a greenhouseSource prosamodelki.ru
Corrugated shower
As a summer shower, you can also use a structure made of corrugated sheets. This material is lightweight and distinguished by its durability. To construct the frame, wooden blocks and a metal profile of a certain cross-section are used.
The construction of the shower follows a similar pattern. The racks are connected by a transverse profile, which will add rigidity to the structure. To fix the finishing material, galvanized self-tapping screws equipped with sealing washers are used. The doors are made of a profile frame, which is sheathed with corrugated board. To cut the material, use metal scissors or a grinder with a toothed disc.
Neat booths made of corrugated sheetsSource tltext.ru
Brick shower
To build a shower stall from brick, you need to make a shallow foundation. To do this, dig a trench 20 cm wide and 40 cm deep along the perimeter. To save on the construction of the foundation, broken brick or stone is thrown into the concrete solution.
When the concrete has hardened, laying is done with cement mortar. At the same time, a doorway of the required dimensions is arranged. The door can be made of wood or a metal frame covered with corrugated board. Bars are laid on top of the masonry, which will serve as the basis for the roof and the installation of a water tank.
Brick is a capital buildingSource ydachadacha.ru