From the first days, you want to surround your child with everything that is best, safe, reliable, and most importantly, something that will serve faithfully for many years until the baby grows up. For this purpose, as a rule, they choose natural materials that are not capable of laying a “mine” for future oncological diseases, thereby protecting the child from the first days.
Parents always want their children to grow up in a healthy atmosphere.
Why is it better to do it yourself?
A crib is a baby's first fortress. It is there that he sleeps, enjoys life, begins to explore the world, studying everything that surrounds him. But how can you be sure that the coating and materials of the baby bed are safe? Only by making it with your own hands.
It is very important to protect the fragile body from the harmful influences of the external environment.
Smart dads who have their hands in the right place know very well that you can be confident in something only when you have tried it and done it yourself. This is the main advantage of the product. Why is that? Let's do a little comparison.
| Factory | Homemade | ||
| Advantages | Flaws | Advantages | Flaws |
| Don’t waste time - go, buy or order | Not always high quality material | Do you know what it's made of? | Manufacturing is labor-intensive and time-consuming |
| No guarantee of design reliability | Reliable design - tested it myself | ||
| The coating is not always of high quality | High-quality coating - I selected it myself | ||
| Often the surface of the product is not treated | The surface is thoroughly cleaned - after all, the child will “crawl” on it | ||
If you have certain skills, you can make a bed with your own hands.
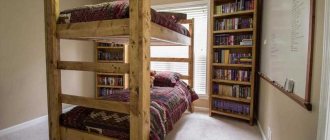
Loft bed
Extremely popular beds for teenagers, they take their inspiration from cribs with additional drawers and compartments for storing toys. For an older child, this will not be enough - in addition to sections for storing bed linen and clothes, the sleeping place should contain a work space for a teenager.
Teenage years are a time of active study, which means that the child needs the most comfortable combination of a bed and a place where leisure and study will be carried out with maximum convenience and will not interfere with each other in any way. Teenage loft beds are equipped with work sections, shelves for storing books, equipment, your child’s favorite toys or decorations.
Bright and varied colors will allow even the most picky teenager to choose a sleeping place, and their stylish combination with the material creates a model that is attractive to a child in every sense. The beds are made of environmentally friendly materials, do not have corners or protrusions that are dangerous for a teenager, are easy to clean and are very convenient to use.
Design and construction of a baby crib
The appearance of a child’s bed determines the comfort of the room, how the child will like it, its comfort and rational distribution of living space.
Thus, design and construction are interrelated.
We all want something original and unusual, unusual for everyday life. But let's be realistic. Why complicate life with an elaborate design of a children's bed in the shape of a car, airplane, baby elephant or steamship, if they are difficult to make? Moreover, what if there is no specialized tool such as a surface planer, CNC router, band saw, etc.? By choosing such a design, you can ruin all the wood without achieving what you want.
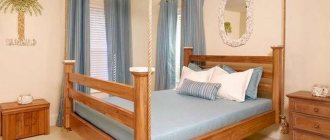
Let's focus on a classic crib without frills and tricks, which, although difficult, is quite possible to make from solid wood with your own hands.
Manufacturing stages
Before work, you need to think through all the steps to minimize the possibility of error. When making furniture, it is important to follow the sequence of actions; this will help create a high-quality, unique product.
| Stage | Description |
| Marking | Use a carpenter's pencil to mark the details on the canvas. Marks can be easily removed with an eraser. Repeatedly check the correct dimensions, angles, thickness |
| Working with a saw | Using a jigsaw or saw, cut out all the previously marked parts. To avoid confusion, they are numbered in pencil. Often, for convenience, parts are laid out according to their belonging to the elements of the bed. |
| Preparation of fasteners | Joints for seamless connections and sockets for self-tapping screws are prepared before assembly begins. |
| Preparing parts | Using sandpaper, the surfaces and corners of the parts are processed. A sander will make this process easier. It is unacceptable to leave roughness or unevenness |
| Treatment | The parts are varnished and painted if desired. If the raw materials have not been pre-treated against deformation, then impregnation is also performed before assembly |
| Assembly | Step-by-step connection of parts and elements of the bed. The diagram will help you avoid mistakes |
Preparing parts
A wooden bed must be strong and can withstand the weight of even an adult. The bars and slats are chosen to be durable. At home or in the workshop, they lay out raw materials, tools, and begin preparation:
- Mark the edges of the parts with a pencil;
- elements are numbered and laid out;
- mark the joints;
- drill sockets for self-tapping screws, check symmetry;
- grind surfaces, corners, grooves.
How to choose children's beds from 3 years old, popular models
When everything is ready, the parts are coated with a protective compound. Safe water-based varnishes are better. The sawn bars must dry well so as not to have any foreign smell, sticky layer, or roughness. Assembly can begin only after complete drying.
The assembled parts must be able to withstand the weight of the child and the increased load. Children are restless, this is taken into account when developing a drawing. For a bed with drawers, at this stage the components themselves are assembled and the handles are attached from the inside.
Assembling the frame and base
It is more convenient to assemble a wooden frame first. Check the correctness of the corners of the parts, install the side posts at the required distance, and mark the places where the side panels are attached. Next, they are fixed from the inside at an angle to increase strength. A base of wooden planks is attached to the lower frame from the inside.
When the frame is assembled, the mattress is placed on it for testing.
After assembling the frame, add side boards and install a bed limiter, if necessary. It is cut out in advance from a thin sheet of material, shaped, sanded, and varnished. Be sure to check the strength of the foundation joists.
Next, insert the drawers into the compartments and check that they can be easily pulled out. The handle should be comfortable, the contours of the container should tightly fill the space. They should not form cracks, dangle or sag. It is more difficult to assemble a bed with drawers yourself; you need to take into account the overall strength of the structure with cavities.
Manufacturing and installation of the backrest
According to the drawing, the headboard of the bed is cut out and fitted to the assembled frame. It must fit exactly to size. If errors are found, check:
- mark the correct position of the back;
- draw an edit line with a pencil;
- The excess is sawed off and the edge is sanded.
If the back fits perfectly, it can be decorated with sawn elements, stucco molding, and carvings. It is convenient to carry out manipulations before it is attached to the frame. Using the prepared holes, attach the backrest and screw it to the frame. If you plan to make a canopy, now is the time to secure the slats for it.
Canopy stands should be strong and lightweight and not reduce the functionality of the main structure.
Before final finishing, a piece of furniture is checked for stability, strength, and smoothness. Any possibility of getting a splinter, getting hurt, or hitting yourself must be excluded. Dimensions and dimensions must correspond to the drawings. The bed is almost ready, all that remains is decoration.
Popular bed models for three children, useful additions
Final finishing and decoration
A homemade bed is a reason to be proud. Don't neglect the decorating stage. The product is decorated with drawings, carvings, burning of ornaments, using stencils and stucco molding. The main thing is to comply with the condition - the safety of the baby is more important than design. Bed decor should be made using materials that are harmless to health.
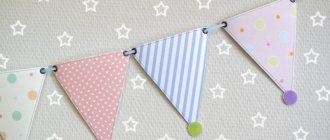
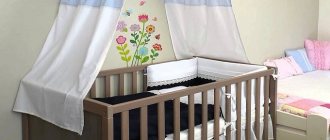
The canopy is the most common decoration element. A light, durable frame is installed above the bed, to which the fabric is attached:
- muslin;
- veil made of silk or cotton fabric;
- organza;
- chiffon;
- other translucent materials.
Often a table or bookcase is placed close to the bed. The one-piece design looks modern and practical. The appearance is influenced by bed linen, which is also easy to sew yourself. For a pillow, it is preferable to choose a filling made from microfiber, bamboo fiber or holofiber. Natural feathers and down can cause allergies.
Tools - a reliable assistant to the master
The complexity of the work depends not only on the design of the product and materials, but also on the availability of tools. Having a real carpentry workshop in your arsenal, you can easily make any product. But what if there is nothing except a garage and a workbench? Can I start working?
No problem! Every man has everything he needs. And we need:
- Drill, with a set of wood drills;
- Planer for cleaning wooden blanks;
- Hacksaw for cutting;
- Set of files for grooves.
A necessary set of tools, without which the entire work project would be impossible.
Having a manual milling machine will greatly facilitate the work of assembling a crib, but if you don’t have one, we’ll make do with the above.
Using a hand router makes the job easier.
Materials and tools
Master classes from experienced specialists contain useful tips on how to properly make a children's bed. Traditionally, the process begins with the selection of materials. Furniture must be safe and comfortable, so the most popular raw materials are:
- natural wood;
- metal;
- plastic;
- chipboard;
- MDF.
Models made from natural wood are environmentally friendly and safe. They do not have a specific odor or toxic elements in their composition. MDF boards are similar in performance to natural wood. Chipboard is somewhat worse, since it contains formaldehyde-based resins. When properly processed, the slabs are safe and cost less than other materials.
A wooden bed is the best choice, but this option will be quite expensive. Very beautiful colored models of different shapes and shades are assembled from plastic, but this material is toxic. It is difficult to choose high-quality synthetic raw materials.
In addition to materials, the master will need:
- special glue;
- self-tapping screws;
- drill;
- roulette;
- sandpaper;
- accessories;
- stain;
- brush.
Types of built-in children's beds, tips for parents on choosing
Depending on the type of crib, other tools may be required. By the time the drawing is completed, everything you need should be at hand. This will make the assembly process much easier.
Natural wood
Metal
Chipboard
MDF
Tools
Some features of joinery
To make the furniture reliable, special joinery joints are used in its manufacture. Unlike conventional nail or self-tapping fasteners, such fasteners are more resistant to loosening, do not “fall apart,” and are resistant to mechanical damage.
The main task of choosing a connection method is decorativeness, the desire to make it beautiful and invisible.
Such a connection consists of a blind or through groove and a shank that fits freely into the groove. They are fastened with wood glue. The size of each groove and shank is selected individually, based on the thickness of the wooden workpiece (slats, beams, boards).
When such a connection is made taking into account the arrangement of wood fibers and its texture, it gives the impression that the product is made from a single piece of wood.
First, mark the boundaries of the groove or shank with a pencil. Then an incision of the required depth for the shank is made with a hacksaw, and the groove is drilled out with a drill. Use a chisel to remove excess wood. The edges of the product are smoothed with needle files. If you have a router, set the cutting depth and mill the necessary parts. In addition, using the copying ring that comes with the machine, you can easily make grooves of the desired size.
Crib house - a cozy fairy tale
We all remember the unique feeling and mystery of huts made from blankets. So why not pamper your baby and improve his crib by “building” his own house for him, in which he can sleep so comfortably?
To do this, during the manufacture of the back of the crib, we will make some adjustments.
Namely, by making the railings a little larger, first cutting off their tops at an angle of 75° using a hacksaw or a miter saw. We attach the base of the “roof” of our house to them. It is better to secure the connection with tenons, but given the complexity of such a product, self-tapping screws are also suitable, the main thing is not to forget to glue it.
The last step will be to attach the ridge beam, which will connect the base of the frame of our “house”.
Thus, the baby will receive a personal “fairy tale” made by the caring hands of his father, and the blanket thrown by his mother will serve as a reliable roof.
Put maximum effort, care and love into your product, and such a bed will give your child good dreams, and you – joy and satisfaction from the work done.
Of course, what we have described does not reflect all the subtleties of the process of making a children’s bed with your own hands. During your work, you will encounter many obstacles, and you will have to figure out the nuances more than once. However, we hope that the instructions for making simple furniture that can increase paternal authority to a new level will be useful to both the young father and the head of a family with many children.
Finishing work
The moment the crib is assembled with your own hands, you can begin decorating it. You don't need any special tricks for this. Natural wood is absolutely harmless to the health of the child. To ensure that its surface is well preserved and has a smooth surface, the wooden parts must be coated with a non-toxic varnish. If the design includes bright colors for the crib, it can be painted with acrylic paint.
You cannot paint the crib in a residential, unventilated area where there are children.
Children's beds made of wood - 50 photo ideas:
PreviousBedsIkea children's bed for children from 3 years old
Next
BedsDouble bed. Types and features of designs