15630 0 28
Mullvatt September 6, 2016Specialization: Capital construction work (laying a foundation, erecting walls, constructing a roof, etc.). Internal construction work (laying internal communications, rough and fine finishing). Hobbies: mobile communications, high technology, computer equipment, programming.
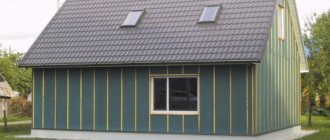
A cinder block house cannot be used in winter without proper insulation.
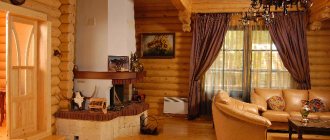
A dwelling made of cinder blocks, in its appearance and strength, strongly resembles the castle of a medieval baron or duke. And in order to convert it into a cozy and energy-efficient country residence, you need to know how to insulate a cinder block house.
Today I want to tell you how to insulate such a building with your own hands. And do this with minimal effort, money and time.
Curtain facade
At its core, a curtain facade is a false wall on a metal frame, which is located at some distance from the main wall.
It is on this false wall that the finishing material is subsequently hung. The positive aspects include the fact that you can insulate the walls of the house from the outside, without thus taking up the space of the room. Also, such insulation options are very relevant for cinder block houses.
. In addition, there are a large number of finishing materials on the market, which is also a positive aspect.
When cladding, metal and vinyl siding are most often used; these are the most popular finishing materials
. Ceramic panels and porcelain tiles are used much less frequently.
Despite the fact that vinyl siding is an inexpensive and very practical way to give the facade of a house a decent look, it should be said that plastic has an electrostatic property that attracts dust. In addition, metal or vinyl siding will not help you create an aesthetically pleasing home, as the striped appearance of this siding does not look good enough.
The market for fiber cement and ceramic panels offers you a wide range of textures and colors, various imitations of the structure of wood, timber or decorative plaster. You can find all this on the building materials market. Some varieties of metal siding and porcelain tiles are not far behind in this race. In this case it is not possible to provide any specific recommendation. In some situations, it is worth proceeding from the guarantees offered by the manufacturer and from personal choice.
Internal and external insulation
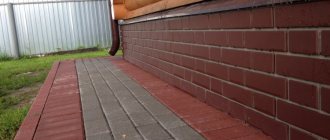
It would be more correct to decide on the method of insulation in advance, even before the start of construction. A wide foundation is the best solution to the problem. It will make it possible to effectively work with any insulation materials, subsequently laying them with a layer of finishing bricks.
If the design did not previously provide for a sufficient width of the foundation, then there is only one way out - to cover the outside walls with plaster or decorate them with siding. When using any of these methods, thermal insulation made of foam or fiber insulation is required.
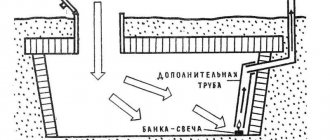
Diagram of a wall insulated with foam plastic.
Experts have calculated that high-quality exterior finishing of a cinder block house guarantees heat savings of 70%, so internal insulation can be neglected. Especially if the house has been standing for more than one year, and the owners have only now decided to start finishing it and insulating the walls. It is quite troublesome to begin major work on internal insulation when plaster has already been applied or the walls are sheathed with plasterboard or wallpaper.
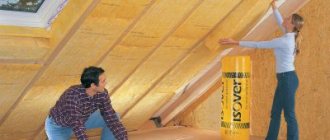
And yet, if you do everything in a timely manner, it would not hurt to use vapor barrier material inside the house. First the vapor barrier, and then the drywall. This should be done not only with the walls, but also with the ceiling and basement.
Insulation of a slag-filled house. External insulation
We will begin to consider methods of insulating a cinder block house with external thermal insulation. Experienced specialists, whose field of activity is the insulation of buildings, claim that external finishing of cinder block walls with thermal insulation materials increases the ability to retain heat by 70%. Therefore, it is precisely this solution to the problem, which can reduce the thermal conductivity of the building frame, that will achieve a good result.
In most cases, the exterior of cinder block walls is finished with foam. The purchase of material implies a minimum level of costs (if you take into account the cost of polystyrene or penoplex), in addition, its thermal conductivity allows you to achieve a high thermal insulation effect.
Please note that if the ability of the walls to let air through (breathe) is important to you, then it is better to replace polystyrene foam with mineral wool. External thermal insulation with such material has another great advantage - ease of work.
It is enough to attach the foam to the wall surface using dowels. The length of the latter must be selected based on the thickness of the sheet. The length of each dowel should be equal to twice the width of the foam
External thermal insulation with such material has another great advantage - ease of work. It is enough to attach the foam to the wall surface using dowels. The length of the latter must be selected based on the thickness of the sheet. The length of each dowel should be equal to twice the width of the foam.
Insulation scheme with mineral wool or polystyrene foam on glue
It should be taken into account that insulation with foam plastic from the outside requires that each sheet fits as tightly as possible to the wall surface. If the latter has some unevenness, then you can simply use additional glue during installation, which will help compensate for this deficiency. If damage appears on the cinder block wall before insulation, the surface must be puttied.
Conventionally, the entire insulation process can be built in the following algorithm:
- Leveling the surface (putty).
- Fastening insulation sheets.
- Installation of reinforcement mesh.
- Second alignment.
- Primer.
- Preparation before painting – finishing with “Finish”.
Insulation with mineral wool under siding
If you plan to paint the walls after insulation, you should use acrylic or silicone plaster to level the surface.
Insulation of the outside of a cinder block house can be done with mineral wool, but this will require additional financial investments - it is difficult to prepare such a surface for painting, so this means covering the walls of the house with siding or other facing elements.
Insulation of a cinder block house
When preparing to build a house, select in advance the material with which you will insulate the structure. To use any insulation, lay a wide base. This will give you the opportunity to work with any material, which can then be hidden under the finishing brick.
If you could not foresee this, then the only way out is to decorate the walls with plaster or install siding on them. Do not forget that when using these materials, thermal insulation must be made from sheets of foam plastic or fiber insulation.
Experienced craftsmen claim that exterior finishing, done according to all the rules, guarantees an economic effect of 70%, so in some cases interior finishing is not necessary.
Note!
If you are insulating a cinder block house immediately after its construction, then you should not neglect installing a vapor barrier layer indoors. Moreover, they need to insulate not only the walls, but also the ceiling.
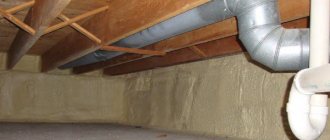
Install a vapor barrier layer and insulation on the outside of the ceiling. To do this, use polystyrene foam or mineral wool. The finishing of the external walls of the house does not require the installation of vapor barriers.
Note!
If you have built a house with a basement or basement, then their walls and ceilings also require the installation of vapor barrier and insulation layers.
Mineral wool is attached to the walls using plastic or wooden slats.
Choice of insulation
Usually, options are considered that allow installation of a heat insulator in a minimum amount of time. An important role in the choice of material is also played by its price. The greatest demand is:
- Various types of foam;
- Glass wool – mineral wool and fiberglass.
Each of these thermal insulators has low thermal conductivity, ensuring heat retention in the premises. They are not fire hazardous because they do not support combustion.
When some types of foam are exposed to high temperatures, toxic substances are released from it, which causes poisoning. This drawback did not prevent polystyrene foam from becoming a popular insulation material. The reasons for its popularity were ease of installation, low price, and moisture resistance.
There is a danger of damage to the foam by rodents making their nests in it. Therefore, penoplex is more often used in construction. It costs more, but rodents ignore it.
The peculiarity of glass wool is its composition, which includes absolutely non-flammable materials. This insulation protects against low temperatures and street noise, having a high noise insulation rate.
A significant disadvantage of glass wool is its sensitivity to moisture. Wetting the material worsens its physical properties, which makes additional installation of waterproofing necessary.
How to properly insulate buildings
When talking about the insulation of any buildings and structures, the possible thermal insulation options are always divided into two types - insulation outside and inside.
For cinder block houses, it is usually recommended to insulate the walls from the outside, this is due to the fact that when insulating the walls from the inside, the dew point located between the building structure and the thermal insulation may shift. Due to a shift in the dew point, moisture can accumulate on the walls, causing mold and mildew to develop.
Internal insulation of buildings also has other disadvantages, in particular, due to the large thickness of the thermal insulation layer, the area of the interior will be reduced, which is especially unpleasant for owners of small cinder block houses, where there is already a lack of living space.
For these and other reasons, it is customary to install a layer of thermal insulation on the outside.
- Send topic by email
- print version
How to insulate a cinder block house?
- Complaint
- Quote
Posted by Albert » May 15, 2021, 12:20 pm
How to insulate a cinder block house?
- Complaint
- Quote
Post by Funtik » May 15, 2021, 2:33 pm
How to insulate a cinder block house?
- Complaint
- Quote
Post by Semyon » May 15, 2021, 10:13 pm
The strength of cinder block walls guarantees their durability. However, its thermal insulation properties do not allow one to do without additional insulation.
In a cinder block house, the walls should be at least 200-250 mm thick. These figures depend on the climate of the region where construction is taking place.
The only way to reduce the consumption of building materials is to use thermal insulation. It is better to install a heat insulator on the outside of the building, since insulation material laid inside the room shifts the dew point. The consequence of its displacement is the accumulation of moisture on the walls, which contributes to the appearance of mold.
When building a house from cinder blocks, most owners prefer to insulate it from the outside. The insulation installed outside reliably protects the walls of the house from fluctuations in air temperature. The absence of exposure to temperature changes on the wall material (freezing and subsequent thawing) significantly increases their service life. Placing thermal insulation on the outside of the wall changes the location of the dew point so that moisture does not condense in the inside of the wall, but evaporates from the surface of the material. The decorative finishing of the thermal insulation layer becomes an additional protection for the walls from the effects of negative external factors (snow, frost, rain and ultraviolet radiation). External insulation helps the walls accumulate heat received from heating the room. This property of cinder blocks makes it possible not to use additional heating during a short-term drop in temperature. Installing insulation on the outer surface of cinder blocks preserves the usable area of the premises.
Wall insulation with polystyrene foam
Laying foam plastic is carried out in almost the same way as installing mineral wool.
The first stage is surface preparation. Elimination of defects and application of primer. Next, after preparing the adhesive solution, we proceed to installing the insulation sheets.
After laying the insulation boards on top of them, you need to fix the reinforcing mesh. Next, this entire cake is carefully primed and puttied, after which you can proceed to the final stage - applying a decorative coating.
When a house is insulated from the inside, the interior space of the room is significantly reduced. However, this fact is not critical for abandoning insulation completely and suffering from low temperatures outside during cold seasons or throwing money down the chimney to heat the house.
Before answering the question of how to properly insulate a cinder block house from the inside, you need to understand the materials that construction stores offer. Today the market offers insulation based on foam plastic and mineral wool. Installation of both one and the other does not require any specific skills from the performer.
We insulate a cinder block house with polystyrene foam
The difficulty of installing this material lies in the preliminary alignment of the walls on which they will be glued. In the case of a brick wall, plastering and puttying will be required. Wallpaper must be removed from the walls and paint residues must be removed.
Every owner of an apartment or house undoubtedly has a dominant desire to preserve the final result for as long as possible. That is why the use of a waterproofing underlay, even inside the house, should be indispensable. For what? In order to thus prevent the accumulation of condensate that destroys the foam.
To work you will need:
- five-centimeter foam;
- comb or notched spatula;
- glue (usually Ceresit).
Installation work is extremely simple. Insulation plates purchased from a building materials store are attached to the prepared wall using diluted glue. Then they are tapped thoroughly to remove any possible air bubbles from under them. In this matter, an important point is to apply the adhesive mixture directly to the wall and in no case to the foam sheets themselves. They should always be dry.
Next, for optimal insulation of the house, all cracks and loose fits of the material should be treated with polyurethane foam. This must be done in order to isolate the glued layer from changes in humidity in the room.
In the process of fastening foam boards, you can also use special fastening dowels. However, an adhesive solution will be sufficient. The final step will be the front finishing of the walls and their possible painting.
Quite a fast and practical way. Its most important advantage is the elimination of the stage of preliminary leveling of walls. The thing is that mineral wool slabs are installed in a specially created metal structure. Then, step by step, the entire frame is covered with plasterboard slabs, which will give your wall a perfectly flat surface.
So, a special structure is assembled from metal or wooden profiles - lathing. Plasterboard slabs are installed on it. Next, the joints are puttied and the wall is either painted or wallpaper is applied to it.
How to insulate a cinder block house?
How to insulate a cinder block house from the outside? External finishing can be done with polystyrene foam. This material is easily glued using a special mixture. First, it is worth leveling the wall under it and priming it so that moisture does not seep through. So how to insulate a cinder block structure correctly?
To create thermal insulation inside, preparatory measures will be required. To do this, the surface is leveled and then primed. Such work can be done using plaster or putty mixture. The walls must first be cleaned of dirt or dust.
Is it necessary to insulate a cinder block house?
Construction of walls of the required thickness significantly increases the estimated cost due to the need to strengthen the foundation and increased consumption of cinder blocks. This method of heat conservation worsens the appearance of the building and increases the cost of its construction.
Door and window openings, deeply recessed into the walls, look very strange. An insufficient amount of daylight penetrates into the house through the windows, which causes not only increased energy consumption to illuminate the interior, but also discomfort for the people in them.
Insulating walls allows you to reduce their thickness. After installation of thermal insulation, decorative finishing is carried out, giving the building individuality.
Why is external insulation better?
Qualified craftsmen advise insulating a cinder block house from the outside, since this option has many advantages:
- Extends the service life of the main structure. External thermal insulation must be protected from external influences. The trim not only becomes a barrier to the insulation, but also to the cinder blocks.
- Saves usable space in living spaces.
- Protects against the formation of dew on the walls of the house, and therefore prevents the appearance of fungus or mold.
- Allows you to save up to 70% of heat. Internal walls accumulate heat and release it back when the air temperature in the room drops.
Difficulties and possible errors
The main mistakes that can be made when arranging the insulation of external walls with your own hands are as follows:
- Working with low-quality materials. The heat insulator will not perform its functions, and all costs for consumables will be in vain. You need to buy insulation only from trusted manufacturers working with a range of Russian industrial products. The manufacturer must provide a quality certificate.
- Working with an unprepared surface. A dirty wall, covered in dust and remnants of masonry mortar, will contribute to poor adhesion of the insulating material to the adhesive. The adhesive composition will be detached from the surface. Therefore, high-quality cleaning of the panels and mandatory primer (double) are necessary here.
- Using wet insulation or working with a damp surface. A dry surface and the same material are required, otherwise it will not be able to adhere well to the panel.
- Applying insulation to plaster. It is best to use polyurethane glue, since the plaster composition will experience stress from the products during temperature changes, expand and contract due to condensation, and fall off.
Knowing about possible mistakes in construction, you need to try to avoid them. If you work according to the technology of GOSTs and SNiPs, then no difficulties will arise in the process.
Materials and tools used
Before selecting a set of tools, the master will have to decide on the material for insulation. Let's look at everything that might be useful:
- hardware;
- screwdriver;
- hammer;
- sharp knife;
- saw;
- laser level;
- pencil;
- roulette;
- set of spatulas;
- brushes or roller.
As for materials, they are selected depending on the technology for laying insulation.
To work, you need to prepare various tools.
Insulation methods
Try to insulate the house externally. If this cannot be done, then you will have to install thermal insulation from the inside.
From the inside
For these purposes, the same materials are used as when carrying out similar work outside the house.
Insulation with polystyrene foam is simple and quick, but the use of such material has a number of disadvantages:
- the interior space of the room decreases;
- During the combustion process, hazardous substances are released.
Mineral wool is more preferable for indoor use. It has low flammability and does not contain substances harmful to the health of the body.
Its disadvantage is high vapor permeability, but this can also be an advantage. If you insulate the walls on both sides with mineral wool, they will breathe and provide the correct microclimate in the house, but this will negatively affect its thermal insulation characteristics.
The foam inside the building is fixed in the same way as outside, the mineral wool is fixed with special brackets.
Internal insulation of the house.
Spray insulation
Polyurethane foam simultaneously acts as a thermal insulation material and a protective coating for walls. It can be used both inside and outside the house.
A small amount of polyurethane is applied to the insulated surface (inside the house), which does not take up useful space). The surface is smooth, which simplifies the process of further finishing.
Application technology:
- 2 components are supplied to the sprayer in a given dosage;
- under the influence of compressed air they are mixed and thrown to the surface through a nozzle;
- the material is applied in a thin layer, and after a few seconds it begins to increase in volume and hardens.
Depending on the chemical composition of the components, polyurethane foam with a density of 15 to 70 kg/m³ is obtained.
Sprayed polyurethane foam.
External insulation
Insulating a house from the outside can increase its thermal insulation qualities by up to 70%.
To do the work yourself, it is better to choose foam boards. They are not only cheap, but also easy to work with. The sheets are fixed to flat walls with dowels, the length of which should be 2 times the thickness of the insulation. If there are small irregularities, the slabs are glued with a special solution and then fixed with dowels.
If such a characteristic as the ability to pass air is important, then it is necessary to insulate it with mineral wool. It is difficult for a beginner to prepare its surface for painting, so siding or similar materials are often used as cladding.
Insulation options
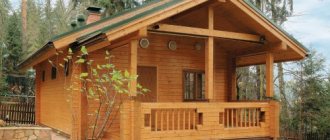
This is not to say that cinder block is a completely ideal material. It is characterized by some disadvantages. For example, the material does not tolerate dampness, especially if the insulation is of insufficient quality. The structure freezes, and then, when it thaws, the cinder block can crumble. That is why it must be insulated. Today, there are several technologies that answer the question of how to insulate a cinder block house from the inside or outside.
Cinder block house requiring insulation
Before starting work, you need to clearly understand: it’s just cold in the house, or the walls of the house are really freezing and damp. The process of insulating the outside of a building can be carried out using the methods described below.
Ventilated facade
The ventilated system consists of stacked elements connecting to a single façade structure. A high-quality system is characterized by ideal placement of existing finishing elements located in the same plane with the facade .
In this case, the gap that forms between two adjacent panels can be minimal or pronounced. Installation of panels with gaps will allow you to hide various flaws in the work, as well as, if necessary, adjust the finishing elements.
Some types of systems provide 3D adjustment, thanks to which you can perfectly align the plane of each element relative to the adjacent one.
Insulation layers of a ventilated facade
Using a special material, façade sealant, you can seal the joints between ceramic tiles yourself. After this, the seams must be covered with ceramic chips.
It is especially important to correctly calculate the thickness of the ventilation gap.
Note! Different types of systems are able to provide gaps of different thicknesses.
This parameter directly depends on the thickness of the insulating material used. However, the limit norm is considered to be 100 mm; otherwise, too much traction occurs in the formed space. It is extremely undesirable in case of fire.
Advantages of installing a ventilated facade
Note! The minimum gap width that can provide effective ventilation of walls is 20 mm. In the case of a one-story building, it is better to increase the gap to 4 cm, then the required volume of ventilation will be ensured.
The instructions for most systems for installing facades imply the following procedure:
- surface marking;
- fastening guides;
- installation and fixation of insulating material;
- installing a windproof membrane on top of the insulation;
- installation of sub-cladding structure;
- laying facing material.
Note! The insulation material must be securely fixed, otherwise the insulation boards are likely to slip, which will lead to the formation of cooling sections of the wall.
Two-layer mineral wool insulation materials are fixed with the harder side of the building, which ensures an excellent fit of the slabs with the soft side to the surface of the building wall. At the same time, the outer side of the structure will retain some rigidity.
Layered masonry
You can also insulate a cinder block house from the outside using the layered masonry method . This technology involves the creation of a three-layer structure using an effective insulating material between the surface of a load-bearing or self-supporting wall and the facing material.
Layers of well masonry
Since you can even insulate a cinder block house from the outside using this method with your own hands, such a three-layer construction is very popular.
In addition, it has a number of advantages:
- small thickness and weight;
- fire resistance;
- unique appearance.
Layered masonry during insulation work often has no external differences from monolithic brickwork. Therefore, experts consider such walls to be reliable and durable.
The most interesting thing is that apartments in houses whose facades are made of facing bricks are always in demand, because not many people understand that this house is not actually built of brick.
The layered masonry method stands out from other existing techniques:
- simplicity of the set of materials;
- standard installation method;
- as well as the opportunity to carry out work year-round.
Warm facade
Facade systems as a method of performing thermal insulation work for buildings are a multi-layer structure and at the same time a structural element of the structure.
The process of installing a warm facade
- How to insulate a house made of foam blocks from the outside
The purpose of using “warm facade” thermal insulation systems is:
- bringing buildings to energy and heat saving requirements;
- optimal microclimate characteristics for living and working;
- preservation of building envelopes for a long time;
- and environmental protection.
Don't forget about the aesthetic function.
The system provides for the following structural layers:
- glue used to install insulating material;
- insulation material (it can be façade grade polystyrene foam or mineral wool insulation for “warm facade” systems). Installation of insulation material using disc-shaped dowels after the glue has hardened (here it is important to choose the correct size of dowels, taking into account the thickness of the insulation and the thickness of the adhesive layer;
Layers in the context of a warm facade device
- glue with reinforcing alkali-resistant fiberglass mesh;
- a decorative plaster layer, characterized by a wide range of colors and a variety of textures (the price of plaster can vary significantly);
- facade paint used as an additional protective layer.
How to insulate a cinder block house with polystyrene foam: features
The method of laying polystyrene foam is in many ways similar to the method of insulating walls with mineral wool. The sequence of actions is as follows:
- First of all, the wall must be properly prepared. As in the first case, the surface is completely cleaned, puttied and primed.
- Next, glue is prepared according to a similar scheme and according to the instructions on the package. It is also necessary to take care of waterproofing, as it will provide protection from water.
- The wall of the house is covered with overlapping material, without allowing any cracks.
- After the wall is ready, it is reinforced with mesh. Next, give it time to dry and prime.
- The last stage is puttying the cinder block walls. Then you can start painting.
The insulation procedure is important from the point of view of the comfort of life in the house, and also helps to save on heating.
Laying insulation on cinder block walls
Insulation of cinder block walls with mineral wool
Before insulating cinder block walls with mineral wool, the walls must be primed and cracks and cracks must be plastered, if necessary. The most common option is laying mineral wool with a ventilated facade and the “wet method”. We will consider the latter option in this article.
1
. Prepare the surface - plaster the cracks on the wall, prime the surface. Installing the first row of supports on the base will additionally protect the insulation from rodents.
2
. Preparing glue for attaching insulation. Then we apply glue to the slab and glue it to the wall. It is worth remembering that there should be no gaps between the plates and it is better to make the joints close together or fill the gaps with an adhesive solution.
3
. We apply glue to the insulation and attach the reinforcing mesh. Carefully coat the mesh with glue and let it dry completely within 24 hours.
4
. All that remains is to apply a primer and plaster the surface of the insulated façade with putty.
Insulation of cinder block walls with foam plastic
Sheets of foam plastic on walls should be laid without seams. The insulation method is similar to the “wet method” of laying mineral wool. Before insulating cinder block walls with penoplex, it is also necessary to prepare the façade of the house for work. Read on for detailed instructions.
1
. We prepare the wall surface - clean and plaster the cracks. We prime the walls and prepare the adhesive solution.
2
. We glue the foam sheets onto the façade in a checkerboard pattern. There should be no gaps - we seal them with glue or foam after installation.
3
. After finishing laying the foam sheets, we prime the surface and attach the reinforcing mesh to the glue, completely embedding it in the layer of glue.
4
. After the glue has dried, prime the mesh and putty it with regular or decorative putty.
After all the work, you should have a smooth surface that can be painted in any color. Insulation will help you significantly increase indoor comfort and reduce home heating costs. Thanks to external works, you can give the facade an attractive appearance. And in the video presented, you can learn more about the issue under consideration.
Mineral wool insulation scheme
Mineral wool or fiberglass should only be laid on a previously primed surface. The best option in terms of speed is the so-called “wet” installation method.
First you need to prepare the surface - remove existing defects (cracks, chips) and prime it. You also need to build a base that will serve as a support for the first base row.
The next step is preparing the glue
In this case, it is important to follow the instructions on the package. After the glue is prepared, you can begin installing the insulation.
Thermal insulation is glued in a checkerboard pattern, like brickwork. Using a building level, we check the evenness of the masonry. Thermal insulation sheets are additionally secured to the wall using umbrella dowels. After the mineral wool has covered the entire wall, you need to lay a layer of glue, drowning the reinforcing mesh into it.
Mineral wool
In order to insulate a house using mineral wool, you must first make a frame, after which it can subsequently be sheathed with plasterboard. At the same time, it becomes obvious that during preparatory work there is no need to level the walls. Lathing for plasterboard sheets must be assembled using metal profiles or wooden slats. They are fixed vertically in 60 cm increments, and mineral wool must be placed in the resulting space between them. Next comes sheathing with sheets of plasterboard and further finishing.
Which GOST standards establish the requirements?
According to current legislation, it is not required that the cinder block exactly meet the requirements of GOST. However, many manufacturers issue a certificate of conformity for their products, since such cinder blocks are in greater demand among buyers. Manufacturers undergo this certification in a certification laboratory, which checks the compliance of products with established standards.
Current standards according to GOST regulating the production of cinder blocks:
| № | Document registration | The year of publishing | Name | Note |
| 1 | GOST 4.233 | 1986 | Masonry mortar | Requirements for indicators |
| 2 | GOST 6133 | 2019 | Concrete wall stones | Basic specifications |
| 3 | 2003 | Dry mixes | Basic specifications | |
| 4 | 2007 | Dry mixes | Release Requirements | |
| 5 | 2007 | Autoclaved concrete | Basic specifications | |
| 6 | 1985 | Wall materials | Methods for establishing strength indicators | |
| 7 | 2016 | Concrete building blocks | Basic specifications | |
| 8 | 1999 | Concrete wall stones | Basic specifications |
Tools and materials
Before work, you need to prepare your tools. Since the installation of the heat insulator is carried out with additional fastening with dowels, you will definitely need a hammer drill to drill holes for fasteners. To prepare walls for installation, you need to have a set of tools, which usually includes trowels, floats and rules.
When installing insulation, you will also need the following materials:
- Primer for treating walls before installation. It removes dust from wall blocks while reducing glue consumption;
- An adhesive composition that is used to attach insulation boards and perform their surface reinforcement;
- Fiberglass mesh for external reinforcement;
- Profiles securing the outer corners of the insulating layer and window slopes;
- Galvanized starting profile, which serves as support for the lower part of the thermal insulation layer;
- Umbrella dowels with a plastic core;
- Decorative facade plaster – finishing of thermal insulation.
Features of thermal insulation of cinder block buildings
Cinder block walls are highly durable and durable.
Therefore, a house built from this material will resist external negative factors well and have a long service life. However, if we consider a cinder block from the point of view of thermal insulation properties, then its thermal conductivity coefficient will not be enough to effectively retain heat indoors and protect rooms from the summer heat.
Cinder block walls 1 block thick do not retain heat indoors well.
According to SNiP number 23-02-2003, in order to ensure a comfortable microclimate for living, it is necessary to erect cinder block walls with a thickness of 150 to 200 cm (depending on the region of the Russian Federation).
Naturally, enclosing structures of such thickness will have many disadvantages:
- the estimated cost of construction increases;
- the weight of the house increases, which forces you to make a stronger foundation;
- the appearance of the house deteriorates (window and door openings look especially strange).
The way out of this situation is quite simple - insulate the wall made of cinder blocks using some kind of heat-insulating material. I’ll talk about choosing the latter a little later, but now is the time to decide on which side the insulation needs to be installed - from the inside or the outside.
I’ll answer right away that I prefer to insulate a cinder block wall from the outside, since this method has several important, in my opinion, advantages:
- A wall made of cinder blocks, in contact with the warm air of the room, when heated, is able to accumulate thermal energy, and then, when external conditions change, release it. Consequently, the thermal inertia of the home increases and during short-term frosts there is no need for additional heating.
- Insulation installed outside protects the cinder block from temperature fluctuations. The material will not constantly experience successive cycles of freezing and thawing, which has a positive effect on its service life.
- The outer thermal insulation layer shifts the dew point so that moisture does not condense inside the wall. Excess water vapor collects on the surface of the material and evaporates.
- Insulation protected by external decorative material (cladding or plaster) additionally prevents damage to the enclosing structures as a result of exposure to external destructive natural factors (snow, rain, ultraviolet radiation, frost, and so on).
- An insulating layer installed on the outer surface of cinder block walls does not reduce the usable area of the rooms.
It is better to insulate cinder block walls from the outside.
I can give many more similar reasons, but I think that the ones listed above are enough for you to come to the same opinion as me regarding the choice of location for installing insulating material.
In the meantime, I will move on to choosing a suitable heat insulator.
Preparing the walls
The following operations are performed:
- Leveling the surface by removing protruding parts and filling depressions;
- Filling through joints with mounting solution;
- Repairing chipped cinder blocks with cement mortar;
- Cleaning cinder blocks from debris and dust;
- Two-stage treatment of cleaned surfaces with a penetrating primer.
Installation of the starting profile, carried out by attaching it to the facade along a pre-marked horizontal line. The profile is secured with screws and dowels inserted into pre-drilled holes.
The starting profile is attached at the junction of the walls and the base of the building, becoming a support for the insulation, while simultaneously protecting it from rodent infestation. Its installation becomes the final stage of preparing the surface of cinder blocks for insulation.
The installation of each type of insulation is carried out differently, so it is worth getting acquainted with the technologies of each of them separately.
Installation technology
Regardless of insulation from the outside or the inside, some materials will be useful for the job. For all types of insulation you will need:
- creating a sheathing from timber with a cross-section of 40 mm;
- membrane vapor barrier material;
- deep penetration primer.
To work with polystyrene foam, you will need an adhesive composition for this type of material, reinforcing tape for sealing joints and putty for leveling walls. If you plan to make insulation from mineral wool material, then you need a reinforcing mesh and an adhesive composition of moisture-resistant mastic.
The technique itself is simple: the wall is leveled, primed, then you need to install sheathing, vapor barrier, lay insulation, sew up with waterproofing, and decorate with finishing. But when working outside with mineral wool, you can simplify the process by gluing the sheets onto uneven walls. Insulation from the inside also allows for gluing squares of polystyrene foam, foam boards, but with preliminary careful alignment of the walls and additional fixation with dowels with large heads.
Gluing penoplex to a wall indoors
Now let’s look at how to finish cinder block walls on the outside and insulate them on the inside in more detail.
Outside
So, we insulate the cinder block house from the outside with mineral or glass wool (the specifics of the work are the same). The “wet” option is considered the simplest; the operating algorithm is as follows:
- Clean the surface of the house from debris, dirt, cracks and cracks, seal with plaster, let dry, then prime the surface 2-3 times, drying each layer before applying the next, and let dry again.
- On the base, install a support made of timber with a cross-section of 60x60 mm for insulation sheets, thanks to which the materials will not fall onto the foundation, even if they peel off from the base. Knock the block into a line, on which the sheathing frame then rests. This is a starting profile, the evenness of the placement of which determines the evenness of the laying of sheets of material. You can work not with a wooden beam, but with a metal profile, from which a frame is formed for laying out insulating materials.
- Now you need to prepare moisture-resistant mastic - dilute it according to the instructions. Then coat the sheets of insulating material with mastic and glue them to the wall. The butt laying is as dense as possible. If there are any seams left, seal them with sealant or adhesive solution.
- The surface of the thermal insulation is also covered with glue, on which a reinforcing mesh is laid out. On top of the mesh there is again adhesive mastic.
- Allow the structure to dry for at least a day and then you can begin decorating the wall with plaster or putty.
Wall insulation with mineral wool
When working with slab insulation, the elements are placed in the cells of the sheathing. If work is carried out with rolled insulating materials, then the rolls are glued along the entire length, then pressed with steel tapes, however, rolled materials are rarely used for insulating a cinder block house.
If it is not possible to buy a mesh, the work is carried out as follows:
- Using quick fastening (on nails with a long leg), a sheathing of timber with a cross-section of 40 mm is assembled.
- Sheets of mineral wool are laid out and secured with dowels with a large head.
- You can lay steam and waterproofing on top of the mineral wool - this will protect the material from moisture.
- Cover with clapboard, board or siding.
This type of insulation takes very little time and will last at least 5-7 years.
Working with polystyrene foam and polystyrene foam is not much more difficult; careful leveling of the walls will be required. Let's also consider the simplest “wet” method. What to do:
- Clean the walls, plaster cracks and seams. Then prime the base several times and let it dry.
- Dilute the glue (mastic) and prepare the foam sheets. Apply the adhesive composition to the surface of the insulation, press the panels to the walls with bandaging, that is, shifting the seams relative to the row of the layout. Laying is done end-to-end, the cracks are filled with glue or foam.
- Press the sheets so that the adhesive layer sets. Once all the sheets are glued, they are additionally secured with dowels with a large head.
- Then the material must be primed, adhesive and reinforcing mesh applied. Then a layer of plaster is already laid out on the mesh.
It should be borne in mind that polystyrene foam boards or penoplex can only be laid with glue on perfectly flat walls. At the slightest deformation of the plane, the sheets will snap off. Fixing with dowels will help to avoid this. You can lay a sheathing of thin lath on top of the insulation and additionally protect the materials, for example, with sheets of foil insulating material - this will increase the energy efficiency of the entire “pie.”
Ordinary high-density polyethylene film is used as waterproofing for mineral wool. As for vapor barrier, any membrane with one-way action will do.
We invite you to read: How to insulate a brick bathhouse from the inside with and without wood upholstery
Inside the house
To insulate a house from the inside, experts suggest spending a little more money and buying foil insulation and penoplex. Thin slabs will not take up much usable space, and the foil will serve as a reflective layer.
Foil insulation
All materials can be used, including mineral wool insulation. The operating algorithm is as follows:
- Form a sheathing from a wooden beam. It is better to make the cell size 60x60 cm or according to the size of the insulation (if sold in sheets).
- Lay sheets of mineral wool between the guide beam (it is not recommended to use glass wool inside the house). Lay out the mineral wool sheets in such a way that the edges are tightly adjacent to the frame bars. If necessary, the sheets are laid in two layers, but here you need to monitor the displacement of the seams inside the cells - the seams should not coincide.
- Lay a layer of foil insulation (penofol) on top of the sheathing. Then stuff it again
- Sew up the sheathing frame with clapboard or plywood, on top of which finishing materials are laid.
Insulating the wall from the inside
This method is suitable for insulating a bathhouse, where a foil layer is required - it knocks down IR radiation and does not allow steam to pass through.
When working with polystyrene foam, the technology is the same, but instead of mineral wool insulation, polystyrene foam slabs are placed in the sheathing cells, then a layer of foil insulation, which can be fixed to dowels with a large head on the sheathing frame - a second frame on top of the insulation is not needed here.
When choosing an option to reduce heat loss, you should remember that only external insulation gives a high-quality result. Internal work is carried out if the cinder block cladding needs protection from moisture. It is also important to consider all possible options for arranging layers. If winter with a piercing wind is normal in the region, then it is better to make 2-3 layers of insulation on the outside, covering the materials with a windproof membrane - this approach will increase energy efficiency several times.
Technology of insulation of cinder block walls.
However, each of these steps consists of many sequential stages, which I will try to describe in as much detail and detail as possible.
https://www.youtube.com/watch?v=sFDuvaLuFu8
I recommend starting with carefully preparing the walls of the house for further insulation. This is done as follows:
- I level the surface of the cinder block masonry. It is necessary to remove protruding parts and seal cavities with cracks:
- Using a chisel or hammer drill, remove pieces of the mortar that was used to lay the cinder block.
- Then you need to fill the through seams in the cinder block masonry with mounting mortar.
- Large chips in wall blocks must also be leveled flush with the surface using a cement repair compound.
- If significant defects are found (cracks, distortions), it is necessary to get rid of them before installing the heat-insulating layer.
The cracks indicated in the photo not only lead to heat loss, but also threaten the integrity of the entire house.
- I clean the surface of cinder block walls from dust and debris. To do this, you can use a regular brush. If you do not clean the walls, difficulties may arise during the subsequent priming of the enclosing structures.
Cinder block masonry, ready for insulation.
- Prime the surface of the walls with a penetrating primer. To work in the case I am describing, I used the MajsterGrunt composition. The work is performed in the following sequence.
- First, you should pour the primer composition into a bucket, and then dilute it with clean water in a ratio of 1 to 1. With this solution, I pre-treat the walls to reduce the absorbency of the surface.
It is better to dilute the primer for the first layer with water.
- I apply the first layer to the walls of the home using a sprayer. Thus, the time for processing cinder block masonry is significantly reduced. After this, you need to give the primer 2-3 hours to partially dry.
- Then I prime the walls a second time using a paintbrush, with which I carefully rub the liquid into the cinder block. A deeply penetrating primer improves wall adhesion, evens out the absorption capacity of slag blocks, strengthens the base and removes dust from the wall.
- I mount a starting profile on which the entire insulating layer will rest. It is a perforated galvanized metal piece that is installed at the junction of the base and the walls of the house and supports the polystyrene foam during its gluing. Another purpose of the strip is to protect the insulating layer from damage by rodents. It is installed as follows:
- Using a laser or water level, a strictly horizontal line is drawn around the entire house along the wall, which will serve as a guide for installing the starting profile for the insulation.
- The profile is attached to the wall with screws and dowels, which are inserted into pre-drilled holes.
Setting up a starting profile.
- There is no need to join adjacent parts closely. There should be a gap of 2-3 mm wide between the individual elements of the starting profile to compensate for possible thermal expansion of the metal.
- After installation, I recommend once again checking the correct installation of the part using a long water level.
Checking the correct placement of the starting profile.
Preparing the walls
The following operations are performed:
- Leveling the surface by removing protruding parts and filling depressions;
- Filling through joints with mounting solution;
- Repairing chipped cinder blocks with cement mortar;
- Cleaning cinder blocks from debris and dust;
- Two-stage treatment of cleaned surfaces with a penetrating primer.
Installation of the starting profile, carried out by attaching it to the facade along a pre-marked horizontal line. The profile is secured with screws and dowels inserted into pre-drilled holes.
The starting profile is attached at the junction of the walls and the base of the building, becoming a support for the insulation, while simultaneously protecting it from rodent infestation. Its installation becomes the final stage of preparing the surface of cinder blocks for insulation.
The installation of each type of insulation is carried out differently, so it is worth getting acquainted with the technologies of each of them separately.