A little about stretch ceilings
Constant attempts to decorate your home, as well as premises intended for receiving people (restaurants, cafes, etc.) leads to the emergence of new finishing materials. This applies to all components of the room, including the ceiling.
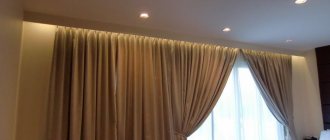
Many different materials are used to decorate the ceiling. One of the popular ones now is a suspended ceiling.
It is a thick film, tightly stretched over the entire area of the room.
This allows you to create a perfectly flat flow surface without any transitions or joints. It looks really beautiful.
But the film itself is not placed on the surface of the ceiling; it is fixed to a special frame fixed to the walls of the room, at a short distance from the main ceiling.
In a way, a suspended ceiling can be called a false ceiling that hides the main one.
This ceiling decoration looks aesthetically pleasing and beautiful, but there is a small nuance - the film cannot be load-bearing; trying to attach anything to it will lead to it stretching or tearing. This leads to the need to think in advance about mounting lighting equipment - chandeliers, shades, etc.
A suspended ceiling involves the installation of chandeliers, but this operation has its own characteristics, which we will describe.
So, it was decided to decorate the room with a suspended ceiling. You won’t be able to stretch the film yourself, but you can do the preparatory work to secure the chandelier.
Also read: How to find hidden wiring in the wall.
Connecting the chandelier to the electrical network
After completing the preparatory work, it is natural that before attaching the chandelier to the suspended ceiling, it is necessary to connect the lighting device to the electrical network of the house, apartment or office. In order to perform this work efficiently, correctly and comfortably, the help of a partner is desirable. It is also necessary, in addition to following some of the recommendations that we give below, to follow basic electrical safety rules.
As already mentioned, it is advisable to place the wiring in a plastic corrugated tube. When working, it is very important to use high-quality insulating tape and perform all operations with the power supply turned off. The most common way to connect the wires of a lamp and a household electrical network is twisting.
With this method, it is necessary to well insulate the joint and hide it in a corrugated tube. High-quality insulation will prevent damage to the ceiling not only by wiring, but also by possible sparks.
Sometimes it happens that the electrical wires are aluminum, but the lighting fixture is copper. In this case, the twisting method cannot be used, as this increases the chance of a short circuit. For different wire materials, you need to use special terminal blocks or adapters made of brass.
When installing the lighting device and connecting it to the network, it is recommended to use rubber gloves. This will protect against electric shock and protect the ceiling from damage. When drilling into a concrete ceiling, use a special indicator that will help identify hidden wiring and avoid damage.
Features of choosing a chandelier for a stretch ceiling
First you need to decide on the chandelier itself. When choosing, you need to take into account several parameters to avoid problems in the future:
- You should not select chandeliers with a small height (you need to ensure a sufficient distance between the chandelier lamps and the ceiling film to avoid the possibility of sagging of the film due to the heat generated by the light bulbs);
- It is advisable that all lamps be placed in separate shades (they will additionally protect the captivity from overheating);
- It is better to choose a chandelier that uses several lamps, the more of them, the better (with a large number, even low-power lamps will provide good lighting, and they will not affect the film);
- When choosing, you should pay attention to the protective cap that will cover the wiring, as well as the chandelier fasteners (this cap needs to be large enough. This will primarily facilitate the installation of the chandelier);
- The protective cap should not have sharp edges (to avoid the possibility of cutting the film);
- You need to decide in advance on the fastening method.
Installation of a chandelier on a suspended ceiling
How to hang a chandelier on a suspended ceiling? The main problem with installing lighting fixtures on suspended ceilings is that the PVC film used to create the structure is a relatively fragile material. It can be easily damaged by sharp metal edges or high temperatures from lamps. Since it is impossible to attach a chandelier directly to the canvas, it is necessary to think about the mounting method, placement location and type of the lamp itself before installing the ceiling structure.
If, when installing ceilings, a decision is made in favor of a PVC tension structure, then LED or energy-saving lamps should be chosen as lighting fixtures, which not only save energy, but also do not heat up the decorative fabric as much.
It is preferable to use energy-saving lamps with a power of up to 35 W or incandescent lamps up to 40 W, while it is advisable to direct the shades downwards or choose chandeliers in which the lighting elements are located 20÷25 cm from the ceiling surface. Also, when installing chandeliers on a suspended ceiling, the type of fastening is important, which largely depends on the height of the structure.
Basic requirements for fastening
Attaching a chandelier to a suspended ceiling should be not only durable, but also aesthetically pleasing. Suspended devices mounted on a hook or mounting strip are suitable for suspended ceilings. Overhead chandeliers that are attached tightly to the ceiling on an overhead panel are not suitable.
As an option, you can consider placing the hook for fastening below the level of the PVC film, but then this point must be foreseen in advance, even before the tensioning procedure. Not all owners of suspended ceilings are aware that not every chandelier is suitable for mounting on just such a ceiling.
- There are certain requirements for chandeliers:
- Location of lampshades. We recommend only those chandeliers whose shades are directed downwards and to the sides. You cannot use chandeliers with shades facing upwards, since the heat from the lamps will cause stains on the ceiling (the property of polyvinyl chloride is to change when heated).
- Base length. Preference should be given to structures whose base is not metal. The fact is that with prolonged use of a chandelier, the metal can heat up and lead to deformation of the ceiling upon contact, which manifests itself in the form of streaks and blurry spots.
- Universal lampshade. The choice of modern chandeliers is varied, but the most practical option is still universal lampshades. For such lampshades, energy-saving lamps are suitable, which do not heat up and are unable to have a negative impact on the condition of the stretch ceiling.
- Lamp depth. It is best to buy chandeliers whose shades completely hide the lamp, which will protect the ceiling from exposure to artificial light. If there is no lampshade (made in the form of a decorative base), only low-power energy-saving lamps should be used.
- Distance from the ceiling to the lampshade. This distance should not be less than 20 cm, otherwise the ceiling will not last long, and defects caused by heating the material will quickly appear on its surface.
It is necessary to take into account that the canvas is a PVC film - elastic, but quite thin. It can be easily damaged by sharp objects, so the chandelier should be as streamlined as possible.
In addition to the chandelier, attention is also paid to the incandescent lamps themselves. You can use lamps of no more than 40 W, otherwise the increased temperature will lead to rapid damage to the ceiling.
Before purchasing lighting fixtures for a suspended ceiling, you need to pay attention not only to the decorative part, but also to the type of fastening. The reliability of mounting the chandelier on a suspended ceiling largely depends on the method of fastening.
- There are several main types of fastening:
- using a hook (the oldest and most proven method of fastening, even for the heaviest lighting fixtures);
- by means of a mounting plate;
- using a cross-shaped platform;
- using a butterfly dowel.
Tools
- Before starting work on installing the chandelier, you need to prepare the following tools and accessories:
- sharp knife;
- roulette;
- ruler;
- pencil or marker;
- screwdriver or screwdrivers - flat and Phillips;
- soldering iron;
- flux and solder;
- electrical tape;
- self-tapping screws;
- step ladder.
When installing a chandelier in a suspended ceiling, the most reliable way to fasten the wires is to connect them using soldering.
How to choose dowels for mounting a chandelier
For interior work, plastic dowels are used. Considering the possible external temperature effect of the lighting device, it is preferable to use nylon-polyamide inserts. If the ceiling in the room is concrete, then spacer elements will be required. In cases where the ceilings are multilayer structures with voids, it is better to use anchor dowels.
The thickness of the element depends on the expected load. The suspended structure tends to pull the dowel out of the wall, so it is important that it has spacer tendrils and notches that additionally hold the fastener in the thickness of the material.
To more securely secure the element in the hole, you can use construction adhesive; lubricate the dowel with it before driving it in. Do not try to screw in a screw that is thicker; it may split the liner. It is considered correct to use screws for spacer inserts.
Methods of fastening and decoration
Let's look at some mounting methods:
- On the hook: one of the most proven. This is done using an anchor hook. When constructing a building, it is passed through the entire ceiling (through the end-to-end method).
- Mounting plate: this method is suitable for durable mounting of small chandeliers. Often, the plate is already included in the kit with fasteners or clamps (screw) and side threads.
- Cross-shaped mounting strip: almost always included with the lamp, suitable for mounting small models of various configurations.
- I-beam mounting strip: suitable for fixing heavy and large lamps.
Installing a chandelier on a suspended ceiling is not all; it is necessary that after installation the surface of the coating remains beautiful and neat.
- The installation location of the lighting fixture can be decorated in the following ways:
- use a polyurethane rosette, which is in no way inferior to a classic plaster rosette;
- The material remaining after installation can be used to decorate the installation site well, but its diameter should be larger than the lamp platform;
- You can use special decorative stickers, which are now on sale in a wide range.
Methods for attaching a chandelier
The last point mentioned, fastening methods, is the most important for the correct installation of the chandelier on a ceiling covered with film.
Since chandeliers can have several types of fastening, you need to immediately decide on the fastening in order to carry out the preparatory work correctly.
At the moment, three methods of fastening a chandelier are used.
The first - fastening to a mounting hook is the simplest and most common.
It can be used for many lighting devices and can provide both small and fairly large chandeliers.
The second method is fastening to a mounting plate. A small wooden beam is used as a mounting strip, which is attached to the main ceiling, and a chandelier is already attached to it.
Usually used for not very large chandeliers.
The last method is usually used for large chandeliers that have significant weight - mounting on a cross-shaped bar.
Cross bar mounting
Mounting a chandelier on a suspended ceiling using a cross-shaped strip is intended for wide chandeliers consisting of several light elements. To fix the plank, you need to prepare a piece of plywood 10-13 mm thick. And then proceed according to the instructions below:
Using self-tapping screws and dowels, we fasten the plywood with metal hangers at the same level as the suspended ceiling. In the center of the plywood sheet, you need to make an opening for the wires to come out.
After stretching the fabric, you need to glue the plastic ring. But there may be several options here. Most often, I make separate openings for each end of the plank, and the wiring is released into one of them. Sometimes a separate hole is made in the center for the wires. But the simplest solution is to glue one large ring. In this case, it is most convenient to secure the bar, and it is also much easier to connect the lighting to the main wiring.
All further actions are identical to the methods discussed above. And fixing an I-beam is similar to a cross-shaped plank. The only difference is how the chandelier is attached to the base.
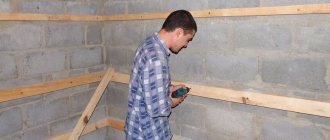
Preparatory work
Now about the preparatory work itself. They are carried out even before the film is stretched, but already with a frame mounted on the walls for it. You should immediately decide on the location of the chandelier.
If the room was already habitable, and there was a chandelier in it, there is nothing special to invent, unless, of course, a decision was made to move its location.
The selected installation location must have suitable wiring for powering the chandelier.
If it will be installed in place of the previous one, you should estimate the length of the protruding wire - it should be long enough to ensure easy connection of the chandelier.
If the installation location is moved, or the room is new and there is no wiring yet, you should ensure that the wiring is laid to the place where the chandelier is attached.
Moreover, it is not necessary to hide the wire, because it will be hidden by the film. It is only important to secure it to the main ceiling so that it does not sag.
To ensure that the base for installation does not protrude beyond the level of the film, and at the same time is not far enough from it, you need to stretch a fishing line across the entire room so that it passes through the place where the chandelier is attached.
The ends of this fishing line must be secured to the film frame, and the line itself must be taut. This will allow you to determine the position of the film after it has been stretched.
Next, the base for installation is fastened to the main ceiling. It depends on the chosen fastening method.
Installation of the mounting base
Attaching the mounting hook is, in principle, simple. It is enough to make a hole of the required diameter in the main ceiling using a hammer drill, and then screw the mounting hook itself into it.
A stretched line will allow you to correctly select the length of the hook that should protrude. The hook should not reach the fishing line by about 1-2 cm.
Installation of a base made of wooden beams is done a little differently. First you need to decide on the length of the beam itself - it should be the same length or slightly longer than the mounting metal strip that comes with the chandelier.
To secure the beam to the ceiling, a metal construction profile is used.
First, the height at which the beam will be located is measured, and the pieces of the profile required in length are cut off. There must be at least 4 of them to secure the timber.
A stretched line will help determine the level of the film. The lower edge of the beam should not reach the fishing line by 0.5-1.0 cm.
If necessary, the profile can be used as a suspension - this is if the distance from the main ceiling to the film level is significant.
Using dowels, the profile sections are attached to the main ceiling, and the timber is attached to them with self-tapping screws.
Before fixing the beam in the center, you need to make a hole in it for the wiring to come out.
After all installation work, you need to pull the wiring through the hole and secure its ends so that they do not interfere with further work.
If the fastening is using a cross-shaped mounting strip, you will need plywood with a thickness of 10-12 mm.
From it you need to cut a square, identical in size to the cross-shaped bar.
In the center of this square you need to make a hole for the wiring.
Installation of a plywood square is similar to installation of a wooden beam.
First, the position of the square is replaced, all measurements are taken and, using pieces of metal profile, the plywood is fixed to the main ceiling.
Fixation on mounting strips
- There are 3 ways:
- Regular plank - only for light structures. Its kit includes studs, screw brackets, they are used to fit it to the profile:
- Cut out a wooden circle, it will be the basis of the profile. The thickness needed is 3 mm less than in the gap between the floor slab and the ceiling.
- Next, use self-tapping screws and dowels to secure the plank to the block within the boundary of the thermal ring.
- The base of the chandelier is placed on a bar and secured with studs and nuts.
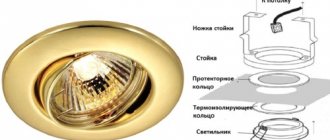
- Screw the supporting platform to the main ceiling. It should be proportional to the size of the cross. A hole for electrical wiring should be drilled in this platform. To adjust the platform to the height of the canvas, use metal “legs”.
- Make 5 holes in the ceiling fabric - 4 smaller ones and one larger one for wiring. Reinforce them with plastic rings. Connect to the wiring and attach to the crosspiece.
Attaching the chandelier to a hook
The first step is to find the location of the hook. You can press lightly on the film to find the hook.
You need to glue a heat-resistant ring to the place where it is located. Its diameter must be selected depending on the size of the hole that will be needed to access the mounting platform.
During further work, it will not damage the film sheet.
The ring is glued with superglue, and you need to make sure that the glue is on the entire surface of the ring, which will be pressed against the film.
Omissions are unacceptable, as they can lead to tearing of the fabric.
After gluing the ring, you need to check the tightness of its fit. Then, using a construction knife, a hole is cut in the film to access the hook.
The wiring is pulled out through the hole. Afterwards the chandelier is hooked onto the hook and the wiring is connected. The sagging wire is hidden under the film.
All that remains is to lift the protective cap to hide the hole and fasteners of the chandelier.
Installing a chandelier on a mounting plate
Installing a chandelier on a beam is done a little differently. First you need to find the location of the timber, and stick a heat-resistant ring in this place.
In this case, its diameter should be such as to ensure ease of access to the beam, but it should not be larger than the size of the protective cap.
Then the mounting strip of the chandelier is secured to the beam using self-tapping screws. When tightening the screws, it is important not to press them in completely so as not to bend the plate.
Next, the wiring is connected, and then the chandelier itself is attached to the mounting plate.
All that remains is to hide the wiring and cover the hole with a protective cap.
Fixing the chandelier on the mounting plate
How to install a chandelier on a suspended ceiling using an installation plate? To do this, you need to cut two bars with a length of 30 cm and a cross section of 5X5 cm. After this, you can proceed directly to the lighting installation itself:
- The bars must be attached to the main roof using dowels and anchors. If the distance from the base to the stretch ceiling is too large, the bars can be secured to metal hangers;
- You need to drill holes for wiring in the fixed bars;
- Now you need to put a mark so that after stretching the ceiling you know the exact location of the chandelier installation. The mark can be made on the floor using a vertical plumb line or laser level;
- When the film is fully stretched, after 24 hours, work can begin. Using the mark on the floor, we determine the location of the opening, marking it with a marker;
- We glue a ring made of heat-resistant material to the marked place, and after the glue hardens, we make an incision, freeing the hole from the film. Then we bring all the wires out;
- We remove all roughness on the plank with sandpaper, make round corners;
- Next, you need to attach the bar so that it does not protrude beyond the boundaries of the ring;
- The last step is to attach the lamp itself.
If you do not have installation skills, it is better to first consult with a specialist.