It is known that the combination of laminate and tiled flooring for the kitchen has proven itself to be the best. It turns out beautiful and practical. The only problem remains is the transition of tiles to laminate in the kitchen. It is the junction line that causes the most inconvenience and complaints. In addition, you have to look for options for combining tile and laminate flooring in the kitchen, so that it is comfortable and at least does not “hurt the eye” with the transition line.
A practical solution for the kitchen
Features of creating a transition between tiles and laminate in the kitchen
The simplest solution to the problem is to use a specially shaped joint filled with sealant. But a simple combination of laminate and tiles in the kitchen with a protruding side running somewhere in the center of the room turns out to be not very convenient, quickly wears out and loses its appearance, although technically it turns out to be the most reliable and affordable to implement.
In order to correctly combine two completely different floor coverings, it is necessary to take into account three basic requirements for the joining line:
- The transition from tiles to laminate must compensate for the expansion and shrinkage of the lamellas under the influence of moisture and temperature, and ensure the tightness of the seam;
- The location and shape of the separation line between tiles and laminate in the kitchen is chosen in such a way that when moving around the kitchen you do not have to step on the seam once again;
- The design and decoration of the side separating the laminate and tiles must fit into the overall interior of the kitchen.
Advice! Ideally, a beautiful line is always as thin as possible and almost invisible. In this case, finishing the kitchen floor with tiles and laminate looks more stylish and does not depend on the interior or furniture layout.
Sometimes the transition between tiles and laminate on the floor in the kitchen - living room is simply vital to highlight with a special edge. This is required by zoning rules, the combination of tiles and laminate in the kitchen, photo, visually ensures the conditional division of one room into two separate areas.
Two parts of the room
Features of tiles, their advantages and disadvantages
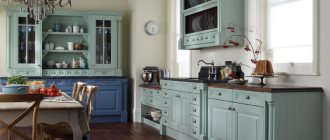
Regardless of which residential property is undergoing renovation work, you can always use the technique of combining different floor coverings in a room. In the case of a kitchen unit, tiles and laminate are used simultaneously to define target areas in the room.
Zoning with tiles and laminate is suitable for kitchens of 12 sq. m and above. Zoning works well in studios and kitchen-dining rooms. In this case, the work area is decorated with tiles, and the dining area is decorated with laminate.
Thanks to the variety of shades and textures, you can combine materials that are similar in color and thickness. In this case, you can do without contour inserts and thresholds. This option is good when the task is to use tiles that match the color of the laminate.
Floor tiles are a durable material. If you follow the rules for its installation and operation, then repairs will not be needed for a long time.
There are several types of tiles: ceramic, vinyl, tile, porcelain tile, imitating wood. This material has advantages and disadvantages.
The tile has the following advantages:
- Has high strength and wear resistance.
- Reliably protects the floor from moisture. Neighbors below are not at risk of flooding if the leak occurs on the ceramic floor.
- Does not absorb dirt and is easy to clean. Such floors can be washed when dirty using household detergents.
- The finishing material is heat resistant.
- Tile floors in original colors transform the room.
The market for construction and finishing materials offers a wide range of tiles from which you can lay out any design on the kitchen floor.
Despite all its advantages, tiles have the following disadvantages:
- It is a cold finishing material, so it is worth considering insulation options (warm floor system), which can be installed when installing the coating.
- Expensive material.
- There are many nuances when installing, so it is best to entrust this matter to the masters, and this is an extra expense.
READ MORE: Waterproofing the floor under the screed, choosing a coating, proper installation
For the floor, you need to choose non-slip tiles to avoid the risk of injury.
Laminate tiles in the kitchen are used both as an independent option and in combination with other types of finishes. The coating contains synthetic and natural materials. The types of laminate depend on the action of the top protective layer. According to the degree of strength, the material is divided into several types.
| Strength (class) | Scope of application |
| 21-23 | For small rooms with little traffic |
| 31-33 | For offices, public places, industrial premises, apartment rooms, houses with high traffic (kitchen, hallway). |
| 34 (water resistant) | In rooms with a high humidity coefficient. |
High-class laminate is expensive, but the costs are recouped by long-term use. In some cases, high-quality coating should not be replaced throughout its life. It does not change, does not wear out. Properties of a good laminate:
- Warm, pleasant to the touch material that you can walk on barefoot.
- The range of finishing materials is very wide, so the coating fits into any style from classic to high-tech. Laminate comes in all sorts of colors. Imitations of natural materials are produced. The floor can be made to look like brick, stone, metal, leather, glass, plastic, wood.
- Laminate panels are easy to install as they have fastenings.
Disadvantages of this coating:
- Laminate is afraid of water and becomes unusable within 6 hours of contact with liquid. Water getting into the grooves during wet cleaning leads to deformation of the material.
- The service life of a material that does not have a moisture-resistant coating does not exceed five years.
- Some contamination requires replacement of panels.
- Unresistant to mechanical damage.
- Does not have soundproofing properties.
There are combination options for finishing materials with different technical properties. Tiles and laminate flooring in the kitchen can create an original combination if you follow the recommendations for choosing colors and installation methods. Small rooms are decorated with laminate and light-colored tiles.
The combination of coatings is carried out according to design rules. The tiled side should be bright. You can create drawings from ceramics:
- various colors and sizes;
- with the addition of mosaic elements.
For modern kitchens, it is recommended to select large tiles; small options are used in classic and country styles. If glossy and matte tiles are installed, different sizes are selected.
The laminate plays the role of background in such a composition. In a small room there should not be a contrast between laminate and tiles, an abundance of colored inserts, or patterns that visually reduce the space.
To achieve a unified floor effect, one of the elements must exactly match the shade of the laminate. These can be very small tiles, harmoniously introduced into the ornament of the floor covering.
The shape of the joint depends on the characteristics of the interior: it can be in the form of a zigzag, wave or straight line. The wavy pattern is repeated in interior design, curved furniture facades or the wave of a two-tier ceiling. It is easier to create a zigzag by laying the tiles in a checkerboard pattern.
Pros and cons of combining tiles and laminate in the kitchen
The idea of using two types of coating has significantly more positive aspects than negative ones. If the former are taken for granted, then it is better to take a closer look at the negative consequences before starting work.
The main negative from the combination of tiles and laminate in the kitchen comes down to the following:
- Technological complexity. On one base it is necessary to lay two coatings that require bases with different properties;
- Special operating conditions. The kitchen is always a place of high wear and tear. Most people move around in the kitchen room. In addition, high humidity, spilled water, regular cleaning and sanitization of the floor;
- The need for proper planning of the location of the tile and laminate area. It is necessary to find a balance in the ratio of tiles and slats to provide a complete sanitary area and comfortable soft laminate flooring in the rest of the kitchen.
Just 15-20 years ago, a successful combination of two types of coating was hampered by the limited range and design of slats and tiles. Today there are much more possibilities for floor design; you can use ready-made design solutions or try to look for your own options and combinations.
Features of connecting zones
There are a large number of options for joining tile and laminate areas:
- in a straight line;
- zigzag;
- curvilinearly (in arcs);
- with inlay elements - when a fragment of a tile is placed in the laminate sheet and vice versa;
- at the same level or threshold (up to the height of the podium).
Let's talk separately about the inlay. This may be a continuation of the selected area or separate decorative inclusions. For example, part of a room can be separated from another if a strip of narrow ceramic tiles with a pattern is placed between them - for example, in the style of Morocco or Provence. Such elements will add zest to the interior.
Which floor tiles are best to choose?
The choice of flooring during renovation is dictated by the combination of the required design and performance properties of the material, especially when it comes to tiles.
At the same time, the variety of assortments on the market can confuse and confuse even those who have a clear idea of what they would like to see. Which floor tiles are best to choose? Let's define the main criteria. The area where the materials meet requires special careful consideration, even at the level of floor preparation and precise adjustment of the substrate. Some repair teams are not careful enough about this, so there may be gaps between the coatings, the panels are cut inaccurately, and they try to disguise this with thresholds that cover the joint. However, in this case, the effect of flow of one coating into another is lost, in addition, profile thresholds are applicable only for connections at right angles.
Precise fit of all elements is the key to success. It is also necessary to pay special attention to sealing the connection.
The combined floor tiles + laminate is not a whim or an invention from the desire to be original. This is a practical and simple way to divide a room into functional zones and place textural and color accents. The Lanskoy shopping mall stores offer a variety of flooring options from which you can create your own unique composition. Experienced specialists will help you select the best materials to implement your ideas.
#Laminate #Tiles #Lifehacks #Ergonomics
How to choose tiles and laminate flooring in the kitchen
The process of selecting material largely depends on the complexity of the future combined coating. The more intricate the pattern and geometry of the seam line, the higher the requirements for the quality of the tile material. Usually, to form a ceramic path along a furniture wall and tabletop, plain porcelain tiles with a rough surface are used.
Tile options for kitchen paths
The color is selected to match the color of the furniture, most often coffee, cream or dark. Even under conditions of significant abrasive load, the ceramic coating will not change its color and texture.
The second approach to choosing ceramics is to use a material with a multi-colored surface. Typically, multi-colored tile and laminate flooring is used in the kitchen and living room, where it is especially important to maintain zoning and avoid the appearance of colors on the kitchen floor that sharply contrast with the general color background.
In addition, the tiles are selected taking into account the geometry of the transition line. Tile is much easier to cut, whereas porcelain tile material can at best be cut in straight lines.
Only moisture-resistant laminate is used for kitchen tiles. It is best to choose an office or commercial class, since the wear of the coating in the kitchen is always an order of magnitude greater than in other rooms.
How to combine laminate and tiles in the kitchen
The correct arrangement of the transition seam is rightly considered the most difficult stage of the work. The joint between two types of coating is needed for technological reasons:
- The profile or seam material blocks moisture from entering under the laminate;
- The free gap space allows you to compensate for the expansion of the lamellas under load.
In theory, to meet the requirements, it is enough to make a groove 6-7 mm wide, which can be filled with any insulating material, most often it is silicone of the appropriate color. In practice, this solution turns out to be short-lived; the sealing material quickly darkens from contamination, becomes filled with debris, and peels off from the ends of the lamellas.
Sealing with sealant is a temporary solution to the problem
Therefore, a similar method is used in relatively small kitchens, where the use of moldings and protective profiles is impractical. The transition strip often interferes with the installation of furniture or simply does not fit into the interior of the room.
In addition to moldings and silicone, cork materials are used to seal the seam. Essentially, this is a tape, 3-10 mm wide, which is pressed into the joint groove. Cork is great for floors in the living room or bedroom, but in the kitchen its use is allowed only at the transitions between adjacent areas of the laminate.
Straight transition lines
If you have little experience in building laminate-tile floors, then it is best to limit yourself to simple straight lines, without broken or curved transitions. This transition option may look no worse than the author’s zigzags and arcs, and in practical application, a straight line turns out to be even more convenient and predictable.
The interior of such a kitchen with tiles and laminate, photo, turns out to be no less stylish; the simple transition configuration gives the flooring a more rational look, which has always been and remains in fashion.
Only a small part of the floor is allocated for tiling
An expansion joint 6-12 mm wide is made between the tile covering and the laminate. The joint can be sealed with a straight profiled separating strip made of plastic or laminated aluminum. Since the line is straight, the protective molding can be installed using clips and adhesive. This is a good way to prevent moisture from seeping in and swelling of the laminate flooring in the kitchen in the event of a water spill.
Curvilinear transitions from laminate to tiles
To create joints in the form of waves and arcs, a special design with a “breakable” base is used. After cutting the gap between the laminate and the tile, a support strip consisting of many segments is installed into the resulting gap. This allows you to bend the structure in the form of arcs and waves with a rounding radius of up to 1 m without any problems. A flexible molding with soft edges is placed on the supporting profile and snapped onto clips. For installation on the kitchen floor, the edges of the lining are additionally treated with silicone to improve waterproof characteristics.
Molding for curved seams
A seemingly simple design turns out to be quite difficult to install and capricious to operate. Even experienced finishing craftsmen are not particularly fond of it, and when laying molding in the kitchen they prefer to limit the number of waves and arcs at the border of the laminate and tile.
Where to place the joint?
When choosing a combined floor for a kitchen, many people wonder how to switch from tiles to laminate and where to make the joint between the coverings.
Basic principles of joint placement:
- The joining line should go along the main directions of movement of people in the room. With this placement of the joint, the likelihood of tripping over the threshold separating the two types of coverings in the kitchen is minimized.
- Most often, the tile covering is laid in the shape of an angle. Tile or porcelain tiles are laid under the set and partially cover the area in front of the countertop. Laminate is placed on the remaining space.
- If the kitchen area is small, then the tiles are placed under the kitchen unit so that it protrudes at a distance of 1-1.5 m parallel to the countertop or the plane of the furniture facade. With this method of installation, the housewife will not catch her shoes on the protruding threshold.
- If the kitchen is spacious, you can arrange a podium. In most cases, the ceramic-tiled area is 3-5 cm above or below the level of laminate kitchen floors, depending on the height of the ceiling.
READ MORE: Kitchen flooring TOP 8 best ideas and options
There are several ways to close a joint on the floor:
- use an aluminum decorative strip that secures the joint in the area of contact of materials;
- use PVC overlay;
- seal the joint with colored silicone sealant
- make a podium at the point of contact between the tiles and the slats.
There are various technologies for pairing tiles and laminate. Each of them has its pros and cons. Which one to choose depends on the qualifications of the master and the urgency of the order.
Thresholds are available in a wide range of colors and various textures. It’s easy to choose the right option for each interior. At the same time, the bar perfectly hides small errors made by workers when joining the laminate to the tiles.
Thresholds can be divided into several categories.
- Solid. They are a profiled strip. Fastened with self-tapping screws or glue.
- Prefabricated. They are a structure consisting of a fastening part and a decorative strip.
In this case, installation is carried out in a hidden or open way. In the first case, the caps of the hardware will be visible, and in the second they will be covered with a decorative element.
Main material:
- wood;
- plastic;
- metal (aluminum, brass).
Multi-level models also help to facilitate installation. They allow you to gently join materials of different thicknesses. In this case, you do not need to carefully select the tiles to match the dimensions of the laminate and vice versa. It is enough to look for a suitable threshold for the selected materials.
Plastic threshold
Plastic is good for its affordable price and ability to bend around curved shapes. Since tiles become quite slippery after washing, it makes sense to slightly compensate for this effect with a rubberized threshold. He will not let you slip at a crucial moment.
In places with complex geometry, a specialized flexible edging is used. It fits well and hides minor imperfections. Flexible models are produced by meter. They are easily wound into rolls.
Wood
Wood looks great in combination with porcelain stoneware and laminate. Tiles that imitate parquet require appropriate framing. Please note that wooden planks are quite rigid. To achieve a beautiful, smoothly curved line, you need to have extensive experience in using carpentry tools.
Metal
Thanks to powder coating, it can imitate any natural materials. At the same time, aluminum is quite gentle on delicate laminate flooring. Although, metal strips are more suitable for straight, clear lines. It is quite difficult to depict Yin-Yang with their help.
No threshold
If you have an intricate contour pattern, or you don’t want to spoil the overall impression of expensive materials with plastic, you can do without a threshold. In this case, the seam is filled with cork tape. Thanks to it, the laminate is able to move a little and compensate for the expansion of wood fibers with increased air humidity in the off-season.
If the cork expansion joint does not inspire you, you can do without it by simply filling the joint with sealant.
In this case, it is necessary to lay the laminate, carefully trim the contour, and then trim and lay the tiles according to the template. The work is very painstaking. Requires high patience and skill. The slightest errors will be visible, because the sealant, as well as the plug, will not be able to hide the uneven edges of the cut.
Since laminate and tile have different physical properties, the joint between them will inevitably have to be finished. Otherwise, the two materials will carry heavy loads along the contact line due to uneven thermal expansion.
The main condition is the safety of the floor for all family members. We need to think through everything so that it is impossible to trip over the threshold at the junction. It must not be placed across the direction of movement. Whoever enters the kitchen should (ideally) either not reach the joint or walk along it.
As a rule, tiles are placed under the furniture and extend into the kitchen space, forming a work area. Classic solutions involve placing it in a stripe or in the shape of the letter “G”. But it is not at all necessary to follow template solutions: you can find your own option for every kitchen.
Where to join tiles and laminate in the kitchen
Most often, tile covering is planned as an addition to the work area near the countertop. In this case, the width of the tile path is taken equal to 1.5 steps of an adult. This is enough to move freely along the furniture in the kitchen and not step on the protective lining along the edge of the laminate.
There is always more laminate in the kitchen than tiles
A narrower tile layout is not always convenient, especially if two or three people are at the stove in the kitchen at the same time. It makes no sense to build a wider strip, more than a meter wide, and besides, tile is not the most comfortable surface; it is much more pleasant to move on laminate than on slippery tiles.
Why install a combined tile + laminate floor?
It seems like, why complicate things: there are tiles in the hallway, in the kitchen, in the bathroom, laminate in the room. However, with the increase in the number of Euro-format housing (apartments in which the living room is combined with a kitchen), the issue of zoning premises has become much more relevant. People are thinking about greater practicality and comfort - even auxiliary rooms such as an entrance hall or corridor can be much more comfortable if a multi-component floor is made.
Which floor tiles are best for the kitchen?
We spend a lot of time in the kitchen - it is not only a place for cooking, but also for eating, and, lately, a place for socializing. Accordingly, everything should be comfortable, convenient, beautiful and safe. Close attention is not often paid to the floor, but if there is something wrong with it, it catches the eye immediately.
The most popular placement is a combination of coverings in the kitchen and in the hallway. The kitchen-living room stands out separately - here the proximity of materials separates the cooking and/or food area from the living space.
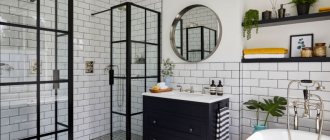
And certainly a combination is necessary if the house has a wood-burning fireplace or stove. According to fire safety rules, the floor around them must be covered with non-combustible materials - most often ceramics, porcelain stoneware or stone. All coatings with polymers (linoleum, quartz vinyl), paper (laminate) or wood (parquet, board) are unsuitable for this.
Options for combining kitchen floors with tiles and laminate
It is clear that using tiles on the floor is just a necessary measure and a way to protect the floor covering from moisture and grease splashes, but even in this case, you can approach design planning creatively.
Standard solutions
The most common scheme for combining tiles and laminate usually involves laying a narrow path of tiles directly in the work area near the countertop.
The width of the tile should be no less than the step of an adult
In order not to disturb the interior of the kitchen, the color of the tiles is usually matched to the tone of the furniture or wall apron. For example, for a tiled path, you can use squares with an edge of 60-70 cm, laid in one row. This floor design option looks much more impressive than if 25-30 cm tiles were used. This scheme is ideal for the kitchen - living room; most of the room with laminate flooring can be used for relaxation.
Double floor in the kitchen-living room
If the kitchen has huge window openings and light furniture, then it is best to abandon cream and beige colors. In order to effectively shade red-brown linoleum, it is best to use blue and light blue mosaic tiles.
A good combination of blue and white colors
On the contrary, white tiles are best suited for walnut and chestnut furniture.
White carpet under the bar counter in the kitchen
Mosaic tile sets always look good; such kitchen decoration is not cheap, but the advantage of such a scheme is that it will suit any interior of the room.
Universal combination of budget type
Customized solutions
Honeycomb tiles with laminate flooring in the kitchen are especially popular. In fact, this is one of the options for mosaic floors, the fashion for which almost never goes away.
Mosaic always looks very stylish
Mosaic elements can be used even in ordinary combinations. For example, in addition to tiles with the color and texture of natural sandstone, you can add a dividing line of ceramic mosaic tiles.
Mosaic seam
For dark furniture in the kitchen, you can use porcelain stoneware with a tinted walnut pattern. In combination with a “wooden” laminate, a very interesting color composition is obtained, not to mention the fact that such a solution in itself is very practical in everyday life.
Simple but very practical drawing
Combination options
When creating a harmonious space in the kitchen, it is important to choose the right combination of flooring in color and texture. Since the tiles are closely adjacent to the facade of the kitchen, they are able to shade and increase the decorative effect.
When choosing a floor covering design, color, texture and installation option, take into account the following:
- materials are selected in contrasting colors or similar shades;
- the method of transition from one material to another must be such that the coating looks like a single whole.
The most popular option for the line between the tiled floor area and the laminate is straight. If the kitchen furniture is located in a kind of “pocket” of the room, then it is better to make the transition along an existing line. If the furniture facade is located along a long wall, it is recommended to make the joining parallel to the kitchen line at a distance of 1-1.5 m from it.
For lovers of spectacular solutions, designers recommend making a joint in the form of a curved line, arc or semicircle.
The combination of several types of floor coverings in a contrasting color in the interior will visually divide the kitchen area into two designated zones: a food preparation area and a relaxation area. The use of contrasting tones does not require design skills or extensive experience. Laminate floors are most often made in dark colors, and tiles for them are selected in a light shade. If during finishing it is necessary to emphasize and make as expressive as possible a light kitchen set, choose dark tiles and light slats.
READ MORE: Do-it-yourself steam room floor - description diagrams
The principle of contrast can be used not only in color, but also in texture. To do this, choose tiles and laminates of approximately the same size range and related shades, and lay them perpendicular to each other. The result is that the room is divided into different zones by two types of covering, but visually a feeling of a single whole is created.
Before you start purchasing materials for renovation, decide on the color combinations of the kitchen unit, tiles and slats. It is easiest to choose a combination for furniture in light shades. A white, cream or pale brown set goes well with almost any light tile in warm colors. With this design option, the laminate must be chosen from a dark or red-brown group of shades.
It’s a little more difficult with furniture in dark colors. To prevent the kitchen from seeming gloomy, color divisions are used in the interior design. To emphasize dark facades, light-colored apron and wall cladding is used during finishing; floor tiles are also chosen in light colors.
These tiles will go well with dark shades of kitchen furniture and chocolate-colored laminate flooring. Depending on the size of the kitchen room, the color of the walls and ceiling, lighting, adjust the width of the light and dark areas of the floor.
In accordance with the covering installation option, they determine how many square meters of tiles and laminate are required to be purchased.
Since both coatings have their own pattern, color and texture, it is important to correctly determine what will play the role of a background and what will be the main detail of the interior. Most designers agree that the emphasis should be on tiles. There is usually less of it in the kitchen; in addition, it is placed next to the set, which helps highlight its aesthetic qualities.
How to lay tiles and laminate on the kitchen floor
After the design of the future floor covering has been finally thought out and recorded in diagrams and sketches, they proceed to preparing the base of the floor. You need to remove all furniture from the room, limit yourself to only what is most necessary and can be removed in a couple of minutes.
Next, a screed is poured into the base of the floor, usually based on a ready-made dry mixture of polymer concrete. After two or three days, measure the height of the surface and plan the level at which the tiles will be laid. Ceramics are glued onto plastic mixtures. After the mortar has set, you will need to seal the seams and install the kitchen cabinets with the countertop. This will help determine how comfortable the tiled path is; you may have to add or remove tiles, or change the shape of the site.
The kitchen can simply be divided into two equal zones
Before laying the laminate, you will need to lay down the underlay and place several slats next to the tiles. This technique helps determine the required amount and thickness of lining material. After assembling the covering, the transition seam is cut out using a hand router and the decorative overlay is installed.