How to disguise pipes without a box?
The materials used to close communications must meet the following requirements:
- Easy to install. When masking pipes with your own hands, it is important that even a novice master can cope with the task.
- Strength and wear resistance. If the structure is movable, then the material must withstand constant mechanical loads.
- Resistance to humidity. Condensation accumulates on some pipes, and in combined bathrooms the source of moisture is the sink or bathtub.
- Convenience and ergonomics. In typical apartments, toilets do not differ in size, so not only the aesthetic component is important, but also saving space.
Pipes are common property. It is important that in the event of a leak or inspection, access to the devices remains open, so it is not advisable to build blind structures. The main danger of bricked-up pipes is that when they leak, the process will go unnoticed. And when the neighbors below notice the accident, they will have to urgently open the walls.
Before installation work, you should put all pipes in order, check valves and meters: this prerequisite will allow the products to last longer and avoid additional costs in the event of an accident.
Using a plumbing cabinet, you can not only hide the pipes in the toilet, but also create additional storage space for construction tools or cleaning products. The sewer riser will remain freely accessible, and the bathroom will look aesthetically pleasing.
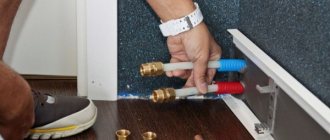
The photo shows a cabinet in a Khrushchev-era building, made to order from laminated chipboard. With its help, it is easy to hide the pipes in the toilet and keep the room looking attractive.
Tools and materials
You can order a closet for the toilet from a furniture company or make it yourself. To work you will need:
- Building level.
- Roulette.
- Screwdriver, screws, dowels.
- Drill.
- Jigsaw.
- Hinges for fastening doors.
- Blanks for creating a toilet cabinet: boards, chipboard, chipboard or MDF.
- Wooden bars.
- A covering film that will protect the floor from damage.
What else can you use to make a box for pipes in a toilet?
Not everyone likes to work with drywall and profiles for them. In this case, the frame can be assembled from dry wooden blocks. If desired, they can (and in principle should) be treated with antibacterial compounds so as not to rot.
Instead of drywall, you can use OSB, moisture-resistant plywood or flat asbestos-cement sheets. All these materials can hardly be called 100% environmentally friendly, but many are more accustomed to working with them. All of them are moisture resistant and easy to process, so they are a good option. By the way, the tile fits perfectly on asbestos, better than on all other materials, including gypsum board.
Louvered doors
The first thing you need to consider when developing a toilet design is where the plumbing hatch is located. Most often, it is located just on the back wall of the toilet. But there are several more important parameters: at what height and distance from each other the meters are installed.
For example, if they are installed on the sides, and you do not plan to make a global reconstruction, then louvred doors can be a simple solution. Usually they are inserted in place of metal ones, which are installed during rough finishing. The advantages of this solution are its relatively low price, environmental friendliness and appearance in line with fashion trends.
Lockers
Many people strive to use the toilet space as efficiently as possible, this is especially true for small apartments. Therefore, additional storage space appears in the bathroom in the form of a cabinet. Its main drawback is the very narrow shelves. But making them wider is also not an option: if the cabinet protrudes forward, you will often hit it - not a very pleasant habit.
Previously, completely closed cabinets were in fashion. In 2021, the trend is to leave at least one shelf open. Usually there are candles, incense sticks, decorative figures, and flowers on it. Another useful life hack: at the toilet level, you can make a narrow, high shelf for storing toilet paper and folded towels.
Most often, designers offer cabinet fronts with the texture of natural wood. But you can play with this trend. For example, use tiles that imitate wood under the cabinet, and leave the façade itself glossy and monochromatic. By the way, gloss is at its peak now, and besides, it will help expand the space in such a narrow room.
Chipboard doors are a more versatile option, as they can come in absolutely any size and color. Unfortunately, not all “furniture makers” want to take on such a small order if nothing else is required besides doors. There are two ways out: look for a long time for a contractor and prepare for overpayments, or make the doors yourself. Cutting chipboard to size will cost about 1000 rubles. All that remains is to cut in the hinges and install.
Compared to louvered doors, a chipboard solution will have better sound insulation. The rest is just a matter of individual preferences and vision of the final result. In addition, chipboard can be used to cover “fixed” areas that simply should not be visible.
Laminate
The real trend for 2021 is laminate installed on the back wall of the toilet. By the way, this is not the only place in the apartment where it can be adapted in a non-standard way. It will look fashionable in the area behind the bed, and even on the ceiling. By the way, the transition from the wall to the ceiling will look great in the toilet, as long as it is not too low.
As for the installation method, the choice is simple: if you want to expand the room, then you should choose horizontal, if you visually raise the ceiling - vertical. But keep in mind that this work is very scrupulous and only a master with extensive experience can cope with it. So trust those who can show you their previous projects.
Installation of a false wall
The partition will serve to create original decoration, convenience, and division of space. Surfaces can be decorated with all sorts of patterns, and decorative lighting can be created with stickers. You just need to select the material suitable for this purpose.
Brick
It would seem that brick has been used in decoration for so long that it has now gone out of fashion for a long time. But this is such a universal material that it will never lose its relevance, especially in classic dark red and light brown colors. And in toilet design, such a solution can be called innovative. Just don’t get too carried away - stop on one wall.
Photo wallpaper
This type of finishing will be an excellent solution if the bathroom area is very small. Landscapes that have a perspective going into the distance are well suited. Visually it will look as if it is not a wall, but an extension of the space.
By the way, in this case you can use not only the back wall, but also those adjacent to it. This way the effect will be even stronger. The big advantage of this type of finishing is that you are practically unlimited in choosing an image. It could even be a unique photograph, such as a landscape you captured while traveling.
Hanging shelves
Another fairly inexpensive way to diversify the interior of a toilet is hanging shelves. Moreover, hygiene items can be used as decorative elements: from ear sticks to toilet paper. It will look very non-trivial if everything is kept in the same color scheme.
If you want to go even further, use non-standard shelf shapes. Moreover, these can be either 2021 models from creative designers or pieces of furniture found in the attic of grandparents. Such a thing will add genuine comfort to any modern interior.
Roller shutters in the toilet
The easiest way to close the pipes in the toilet is to install plumbing shutters (roller blinds, roller blinds). This option is ideal if you need to cover the entire back wall. Guides are installed on the sides, a reel with strips is attached to the top, that’s all, the installation is completed, you can use it.
The disadvantage of this option is the price of roller shutters. She bites. But at any time you can raise the roller shutter that covers the pipes, and you can repair it. There is another way to reduce the price - install roller shutters not from floor to ceiling, but cover only the central part, where all the connections are located.
Even if you do not need to cover the entire wall, but only part of it, you can build a wall from gypsum plasterboard or wall foam blocks and attach roller shutters to this wall.
Hidden installation - gating
Grooving is an alternative to decorative types of masking pipes. When concealed wiring involves sewing parts in specially punched ditches, which are called grooves. Such technological holes are made using a wall chaser or a hammer drill. Pipes hidden in the floor screed also belong to hidden installation. In this case, the wiring is filled with concrete solution.
The main advantage of this type of camouflage is aesthetics. Communications are completely hidden in the wall. With the exception of the riser, the diameter of which is too large and cannot be embedded in the wall. The advantages include the complete safety of the pipes; damage to them during hidden installation is impossible. Significant space savings are also a plus.
The weakness of the method is the complexity, cost and inaccessibility of pipes. You can sew up the pipes yourself, but you will have to study a lot of literature to get everything right. The use of hidden installation is not possible everywhere. The method will be good in private houses built of brick or solid blocks, as well as in multi-storey buildings with walls of increased thickness. In other places, this method will run counter to SNIPs. The grooves significantly weaken load-bearing walls, which are already heavily loaded.
Some requirements can significantly complicate installation:
- Only one-piece pipes can be sutured; others require free access;
- there should be no electrical wires running through the wall on which the work will be carried out;
- it is necessary to take into account the linear expansion of the pipe material;
- you have to use clamps in order to have good sound insulation.
It is recommended to create a detailed drawing before hiding communications using gating. In case of major or emergency repairs, it may come in handy.
Step-by-step instruction
Let's get started:
- First of all, it is necessary to take all measurements and draw up a detailed drawing. The purchase of materials and accessories is made in accordance with the dimensions of the future cabinet, as well as the features of the layout and pipe routing.
- If the toilet cabinet is made of wood, the material should be impregnated with a moisture-repellent composition or varnished. Stain is also used: you can use different shades to make the cabinet more original.
- If there is space behind the toilet for internal shelves, we make supports for them from corners or scraps of timber. We lay the shelves after cutting out holes for the pipes. If high loads are not expected, plywood can be used.
- To install a built-in wardrobe, we make markings on the side walls of the toilet. We build a frame from timber, connecting the parts with self-tapping screws.
- We install the frame by nailing the corners to the walls and ceiling with dowels. If the location of the pipes allows, you can attach the side walls of chipboard with a thickness of 16–18 mm to the walls to the full depth.
- We screw the doors with self-tapping screws or using a screwdriver to the vertical beam of the frame. Apartment owners often choose louvered doors, as in the photo below. They look stylish and modern, can be painted in any color, and the holes in the doors will help ventilate the finished cabinet.
Covering the pipes with plastic panels
A box or false wall made of PVC panels is another cheap and practical way to hide sewer and water pipes in the toilet. Plastic is not afraid of moisture and fungus, it is durable and lightweight, and easy to care for.
This method is appropriate if the entire bathroom is lined with PVC panels: then the box will fit perfectly into the interior. Installation of products with the right approach will not cause difficulties and will not take much time.
In the event of an accident when dismantling the structure, the material will not be damaged - this is especially true for pipes that are not insured against leaks. After eliminating the damage, the box can be easily put back together.
In the photo, the sewer pipes in the toilet are hidden in a box made of plastic panels. Other walls are covered with ceramic tiles, but the finishing material is matched to match, so the difference is not immediately obvious.
Tools and materials
To cover the pipes in the toilet with PVC panels, you will need:
- Level.
- Roulette.
- Self-tapping screws, European screws and dowels.
- Sharp knife.
- Metal profiles or wooden blocks.
- Plastic panels for finishing.
- Special hatches.
- Skirting boards designed to mask joints.
- A jigsaw or hacksaw if the frame is made of wood.
- Screwdriver.
The photo shows fittings for plastic panels: finishing profile, connecting profile, internal corner and external corner.
Step-by-step instruction
- We take the necessary measurements, draw a drawing, taking into account the holes for access to the pipe distribution and meters. We start working with the supporting profiles: vertical and horizontal guides (or wooden posts) will determine the size of the box or partition. We attach them to the walls using European screws and dowels.
- To reliably cover pipes and other communications in the toilet with plastic panels, it is necessary to add jumpers. To do this, measure out equal sections 50 cm long. Next, install the starting profile, securing it around the perimeter with small screws.
- We install decorative panels in accordance with the instructions. If the sheathing is smooth, then there will be no problems with installation.
- We cut inspection holes and close them with hatches. One of the panels can be secured with silicone sealant to provide access to the pipeline elements. At the joints we install plastic corners and plinths, fix them with glue or “liquid nails”. PVC plates are both the main and finishing materials, which is why they are so popular in Russia. The photo shows how neat the back wall of the toilet began to look after masking the pipes.
Budget method: from scrap materials
It is not always possible to allocate funds for bathroom renovations and even blinds. In this case, leftover building materials will come to the rescue: PVC panels, laminate, tiles, silicone glue, polyurethane foam...
How to close the pipes in the toilet and bathroom with your own hands inexpensively and in an original way:
- If there is a niche in the wall, you can close the space using a regular PVC panel and corners with grooves. We glue the corners with silicone glue directly to the wall. We insert a plastic panel adjusted to size into the grooves. If desired, we insert shelves into the niche and make an opening flap from a PVC sheet. Details in the video:
In the same way, you can close the communications under the bathroom. This time we glue the corners to the floor and the top of the bathroom (under the rims).
- To mask the pipes behind the toilet you will need laminate, screws and slats. Using a grinder, we cut holes in the boards for the pipes, and then assemble the box.
- If your budget is very limited and you really want to close the pipes, you can make a box from polyurethane foam and plastic sheets. An example of the original repair in the video:
Before constructing the decorations for the pipes, it is recommended to sketch out the design. Take all measurements and cut out patterns from paper. Check how well they fit the wiring. Only after this cut out the parts from building materials.
How to cover pipes with plasterboard?
A gypsum board box is a product that even a beginner can handle creating. First, as for PVC panels, a frame is constructed from a metal profile. Some people use wooden blocks, but metal is considered a more suitable material. The frame is covered with moisture-resistant plasterboard, since the toilet is a room with high humidity. It is recommended to decorate the finished structure with a suitable material: tiles, mosaics, paint or wallpaper.
The pipes can be partially sewn up, giving the box almost any shape (for example, leaving space for a sink and faucet, going around a water heater) or erecting an overall structure. If the pipes are located on the side or in the corner of the toilet, creating a box is the best choice, since the installation will leave a lot of free space.
The photo shows a box made of moisture-resistant plasterboard with a communication hatch and porcelain tile cladding.
Tools and materials
To hide the sewer pipes in the toilet with your own hands, you will need:
- Screwdriver and screws
- Scissors and tin snips.
- Level.
- Roulette.
- Spatulas.
- Drywall knife.
- Roller.
- Moisture-resistant drywall.
- Aluminum profile.
- Screws and dowels.
- Finishing materials, putty, primer.
- Reinforcing tape.
- Sound insulation material.
The photo shows the minimum list of materials intended for creating a plasterboard box.
Step-by-step instruction
Let's start making the box:
- We make a drawing in accordance with the measurements. Space should be left for thermal insulation material.
- We make markings on the floor and walls in accordance with the diagram. You can use a simple or laser level. We fasten the metal guides with dowels.
- To make the sheathing more reliable, we create stiffening ribs: we cut additional elements from the metal profile, the width of which corresponds to the distance between the vertical guides. The corner profile is attached at the top and bottom with small self-tapping screws.
- Before sheathing the frame, we make markings on sheets of drywall in accordance with the drawing.
- We cut the material: we cut the cardboard layer with a knife, slightly deepening the blade into the plaster. Carefully bend the sheet and cut it on the opposite side.
- Before covering all the pipes in the toilet with plasterboard, we cut out inspection holes for hatches and access to communications. Only after this we proceed to the sheathing. We attach the parts of the plasterboard sheets to the sheathing and fasten them with self-tapping screws. We carefully trim the unevenness with a knife.
- We eliminate defects (joints and holes from self-tapping screws) using plaster and putty: we prime the structure, then we reinforce the corners with special tape so that the solution does not crack when drying. Defects are eliminated by sanding with sandpaper.
- Prime the surface again to increase adhesion. After the primer has completely dried, you can glue ceramic tiles, mosaics, and even install laminate flooring. Durable porcelain tiles will allow you to disguise the hole if you use the tiles as the front of the door, as in the photo below. The structure can also be painted or covered with moisture-resistant wallpaper.
Popular cladding options
Disguising the pipes in the toilet is not difficult. It is important to choose an option that suits specific conditions and, if necessary, provides unhindered access to communications.
The box for pipes in the toilet can be made of plastic
The most popular solutions today are:
- Box made of plastic or plasterboard. Even a person who does not have construction skills can do the work. Subsequently, the drywall can be decorated with tiles or wallpaper, depending on the overall interior design. Installation of the box significantly reduces the area of an already small room and makes it impossible to carry out repair work without completely dismantling the box.
- Cabinet made of wooden panels. Thanks to this solution, getting to the desired pipe will not be difficult. Initially, a wooden frame is made, which is attached to the wall with dowels. All that remains is to fix the doors on it and, if possible, install shelves where household supplies will be stored.
- Blinds. An optimal solution in terms of price and ease of implementation, which does not “eat up” space at all. Blinds and roller shutters can be removed at any time and easily cleaned.
Each of the above options has its own number of advantages and disadvantages. Therefore, before starting work, you need to carefully study each proposal and compare it with the available square meters.
We hide the pipes and leave access
Another modern way to disguise pipes in a toilet is roller shutters (or blinds), which were previously installed to protect entrance doors from burglary. Today, these structures have become more widely used in the home and perform the following functions: they close a closet on the balcony, hide sewer pipes, and are even used as a door to a storage room.
Roller shutters are mobile: they can be easily lifted and provide access to communications and metering devices. The design has a smooth, monochromatic surface, but for greater attractiveness and comfort, you can choose models with a pattern that is applied through photo printing. Roller shutters are made in different sizes, and the opening method allows you to save toilet space.
The photo shows a combined bathroom with a box in which access to sewer pipes is left. White roller shutters were used as the door.
Roller shutters are made of aluminum or plastic. The latter must be handled with care: despite being resistant to moisture and rust, plastic is not as durable as metal. Aluminum roller shutters are considered more suitable for toilets: their cost is higher, but they are durable and aesthetically pleasing. This is especially true if the partition will be raised and lowered frequently.
Tools and materials
For self-installation you will need:
- Roller shutters with a protective box, canvas and mechanism.
- Drill with drill bits for metal.
- Pliers.
- Hammer.
- Screwdriver.
- Metal scissors.
- Screwdriver.
The photo shows a standard diagram of the product, consisting of slats, a protective box, guide rails and a roller shutter shaft.
Installation instructions
To choose the right box, you need to take into account the dimensions of the rectangular opening. Let's get started:
- We completely clean the area intended for installing the box. We decide on the installation method. If the depth of the plumbing niche allows, a massive structure is installed inside: this arrangement looks more attractive:
- If there is not enough space, the box is installed outside:
- After installing the box, adjust its position using a level. If the pipes below interfere with closing, then the structure is mounted in two parts with a rise at the junction.
- We assemble the canvas and attach it to the shaft. We install the stopper and check the smooth movement. It is important that the shutters do not creak and move freely. Specialists are usually involved to select a model and carry out installation. But you can assemble the structure yourself by studying the detailed description in this video:
Procedure for drywall
When deciding to sew up a riser in a bathroom with plastic panels or plasterboard, it is important to understand a simple thing: it will no longer be possible to simply open access to communications. The structure will have to be completely demolished. Restoration work will require additional costs and will not always allow you to return to its original appearance.
If the risks are fully assessed and justified, you can proceed to the following actions:
- Cleaning the wall of old coating;
- Alignment;
- Space marking;
- Laying out a metal profile around the perimeter of the future cabinet;
- Preparation of plasterboard slabs;
- Next we hide the pipes - laying the material;
- We close the raw material - carrying out design work.
You can use plasterboard in the toilet without moisture protection
Experienced craftsmen can easily carry out work “by eye”. For those who are faced with this issue for the first time, it is better to first make a schematic project.
It is not necessary to describe everything as accurately as possible: just approximate dimensions are enough. Having seen his future creation clearly, the master may want to change some details. In the finished version, doing this will be very problematic.
Which method is better for a small toilet?
To build a complex dimensional partition in a bathroom, you will need a lot of material and free space, which means the method is not suitable for a cramped toilet. The optimal solution is considered to be boxes that follow the curves of water supply units: they not only mask the pipes, but also serve as additional shelves for hygiene items. Various blinds also save useful space: unlike swing doors, they take up less space.
To minimize the loss of bathroom space, you can use hidden installation of pipes. This option is suitable for small toilets. It is implemented at the initial stage of repair and only after a complete replacement of communications with modern ones. For hidden installation, pipes made of copper or plastic are used: they are sewn directly into the wall or floor. The grooves are made using a hammer drill and a grinder in accordance with the number and diameter of pipes. This decision requires a considerable amount of money and certain skills. We should not forget about the holes for accessing the meters.
What other options are there without renovation?
In order to hide a wall with pipes without extra costs, it is recommended to use regular blinds. This budget method is perfect for those who do not want to build complex structures or are considering a temporary option. Wooden blinds fit perfectly into an eco-style, and plastic ones into a modern one. But if the bathroom interior is made in a classic style, the products are unlikely to fit into the overall design.
Plastic blinds will last as long as possible: they are practically not afraid of water and are easy to care for. The modern market offers a wide range of products, which allows you to choose a design to match the color of the finish. Unfortunately, the blinds do not have sound insulation, and also do not completely cover the pipes - you will have to build a separate box for the bottom.
If a major renovation is not planned, and the pipes do not fit into the interior, you can order a special wall cabinet. Its installation will not take much time, but some of the communications will be hidden.
Many women will appreciate another idea for decorating pipes in the toilet: an ordinary roller blind will help hide unsightly elements - the main thing is to purchase a product that is suitable in width and height. There will be no difficulties with its placement. Roller blinds come in a wide range of colors, and the material is protected with special antistatic and antibacterial compounds.
In the photo, bright blinds located at an angle successfully hide communications. In an emergency, they will allow you to instantly shut off the water supply.
For connoisseurs of the loft style, the situation is even simpler: if the toilet is designed in an industrial style, the pipes can serve as an excellent decor that matches the chosen style. You just need to put the communications in order by eliminating defects, cleaning off old layers or simply replacing them with modern ones.
The photo shows a loft-style bathroom - brickwork serves as finishing, and black pipes near the sink are painted the same color. Standing out against the terracotta background, exposed pipes become one of the main highlights of the interior.
Using plasterboard panels
If you want to save money and not purchase a ready-made option, you can create the box yourself - its design is extremely simple, so no difficulties will arise. To work, you will need regular drywall and a minimal set of tools.
The assembly of the plasterboard panel is carried out in the following sequence:
- First, an L-shaped structure is made, which should rest against the corners of the room (if necessary, you can replace the structure with a U-shaped frame, which can be attached to only one wall);
- The installed frame is sewn up from the outside with pre-cut strips of plasterboard (it is better to give preference to moisture-resistant material, especially if the toilet is combined with a bathtub).
A significant disadvantage of this design is the impossibility of painlessly dismantling it, so after any manipulations with the pipes you will have to make a new box. This disadvantage is partly compensated for by inspection hatches, with which you can reach the riser without damaging the plasterboard box.