Lighting
Light plays a special role in the room. It will provide zoning of the territory and visually change it if necessary. You can use spot lighting around the perimeter, in a zigzag pattern. There are other ways to place them.
The smaller the room, the simpler the design of the two-level ceiling should be. This also applies to the color of the canvas, as well as the presence of a pattern on it.
Before installing the film, order electrical appliances: chandeliers, lamps. LED lamps are deservedly popular on the market today. To prevent accidental damage to the film, do not order devices with sharp edges.
Harmony, balance of details, correct color scheme, conciseness - these are the components of spectacular stretch ceilings.
Be sure to use thermal pads to protect the material from heat. A plan is first created that specifies lighting equipment. Before carrying out work, prepare a place for each device.
Lighting
The level of lighting in the room is of particular importance. It is necessary to create the most correct additional lighting system. Spotlights are ideal for this; they can be distributed not only around the perimeter of the tension structure, but also in a zigzag pattern. A suspended ceiling, supplemented with these elements, looks attractive and laconic. An interesting design approach to interior design allows you to adjust the level of lighting based on the time of day, as well as individual needs.
If you decorate the ceiling with built-in lighting, you can get the illusion of realism and volume. For a special effect, you can create a pattern on the canvas using the built-in LED strip. You can decorate the tension structure in different ways. Moreover, if you take diode light sources as a basis, you can combine them with wall decoration. For example, a good solution would be to illuminate a tension structure with a transition to the wall. In this case, the lamps can be placed around the perimeter of the structure.
Light
The choice of lighting elements plays the most important role. Because it is thanks to light that its existence becomes possible. One of the popular options for such a solution is LED strips. They have a low degree of heating, which has a beneficial effect on suspended ceilings, and also has a long service life.
Scheme of mounting LED strips in a plasterboard niche
In order for the lighting to correspond to the intended concept, special blocks are used, and they are used to control the lighting. In simple versions, the block has a programmed on and off function. But in sophisticated devices, control is carried out using a remote control, which allows you to combine many programmed combinations. Such remote controls allow you to change not only the degree of lighting (from bright to dim), but also choose more suitable color schemes.
What does the backlight consist of - components and components for the LED strip
Assembling the intended object
Installation of such a ceiling covering requires a number of steps:
- Preparation of the drawing. The drawing will allow you to avoid any kind of failures, and will also contribute to the correct assembly of the structure and laying of the lighting elements. This is especially true for multi-level structures; by painting the first level, it becomes clear where and how the second should be connected.
- Preparing the base for the work and marking the fixation points.
- Working with the lighting system. At this stage, all lighting elements are installed, including the control unit and the light-diffusing plug, which hides the frame mount.
- The installation of the second level can only begin after all work related to the first has been completed. The main thing is to clearly understand what level the suspended ceiling will occupy and which level will be covered with plasterboard.
Despite all the difficulties associated with installation, the end result will not leave anyone indifferent.
Lighting
Lighting along the contours of the floating ceiling is performed using LED strip. LED lamps are made in very small sizes, and the surrounding space does not heat up. Light strips have their own varieties, which you need to know when purchasing lighting fixtures. Tapes are produced in rolls (maximum length up to 5 meters).
You can adjust the lighting using the control panel. The single-level mechanism can be simply turned on and off.
Two-level and multi-level ceilings are adjustable:
- according to zonal parameters;
- by glow intensity;
- by color palettes;
- according to the lighting method, which can be constant or impulsive.
LED strip can be used as primary or additional lighting for a room. For small rooms, such a glow is quite enough, but in living rooms and other rooms it is necessary to additionally install lighting devices. In the hall, it is recommended to use central lighting in the form of a large, elegant chandelier and spotlights that are mounted in the canvas.
Lighting methods
The LED strip used for floating structures can act as both the main and additional source of lighting, and thanks to its moisture-resistant varieties, it can be used in every room. For small rooms - for example, a tiny hallway, it will be quite enough, although if you wish, you can always add wall or spotlights mounted in the canvas.
For a large hall, in addition to lighting, you can also use central lighting in the form of an original chandelier, a series of spotlights or panels. A combination of backlighting and side lighting can also be suitable for the bedroom if you do not need bright light.
Backlighting can act as an analogue of daylight, which will be especially appropriate in rooms without windows. It can be controlled either from a regular switch or using a remote control.
LED lights can pulsate or create a traveling wave, and are a great way to set a festive atmosphere with the touch of a button. The light coming from under the ceiling can be warm or cold. If the stretch fabric is warm in color, the cold light will not be very noticeable, but any room will still be more comfortable with warm lighting. However, warm yellow light can be placed on one wall or part of the ceiling, and white light on the other, and this would be a good option for zoning a kitchen-living room or a spacious kitchen, where the heat from the stove can be reduced with cold lighting, and the dining area can be decorated in warmer light.
The soft, pleasant and muted glow of the soaring ceiling can act as a night light for your child. According to many parents, with such lighting, children go to bed faster and more willingly and fall asleep without fear of the dark. To decorate a nursery, the best solution would be a canvas with a photo print or a design reflecting the interests of your child and several types of lighting - from the brightest for successful concentration in class to dim, ensuring a restful sleep. Particularly impressive is the combination of a soaring ceiling with photo printing and ceiling lighting. Trees, sky, sun rays, butterflies, flowers or, for example, a vine will take you from your apartment to the bosom of nature.
You can purchase a strip with a larger (140-200) or smaller (30-60) number of diodes per linear meter, which will provide your room with the appropriate brightness, or create an invigorating or romantic atmosphere by choosing a strip with adjustable lighting power.
RGB strips built into the ceiling profile make it possible to choose the color of the stretch ceiling, offering from 4 to 20 different options. You will have all the colors of the rainbow at your disposal, which will allow you to set a new mood in the interior every day, completely changing its appearance. You can see how a floating stretch ceiling with colored lighting of one color or another transforms the same room in the following photos.
The mode of alternating flashing of different colors is simply ideal for lovers of home parties or discos, while you can control the light and music either automatically or manually using the remote control.
The lighting can move from the ceiling to the wall, because you can always cover the perimeter of a picture, TV, as well as a niche or staircase with LED strip and change not only the color of the ceiling, but also the entire room.
Beautiful examples in the interior
Modern technologies make it possible to produce a wide variety of stretch ceiling models, each of which looks stylish and original in its own way.
Beautiful tension structures in combination with other interior elements fill the atmosphere with coziness and comfort. Chandeliers, floor lamps, and LED lighting systems give them special expressiveness and attractiveness. All this significantly transforms the room, making it as beautiful and unique as possible.
Stretch ceilings made in a mosaic design serve as an unusual and original interior decoration.
The correctly chosen color scheme of the design allows it to organically complement almost any style of room design and focus attention on certain interior elements
Two-level stretch ceilings look chic and impressive. They are especially relevant in rooms where it is necessary to visually raise the height of the room. With their help, you can implement the most ambitious solutions, creating unique design compositions.
Fabric stretch ceilings, the texture of which can convey natural leather, suede and other materials, will help give the interior an aristocratic feel. Such products include a special polyurethane impregnation, which helps preserve the original qualities of the material for many years. The presence of painting or beautiful drawings makes fabric structures truly unique and inimitable.
Each stretch ceiling model, regardless of its design, will be a worthy decoration for a room decorated in a classic style and a modern direction.
For successful design, it is important to choose the right pattern, material and texture.
See the video below for a little more about stretch ceilings.
Options in the interior of the rooms
The design primarily depends on what this or that room is intended for.
Bath
Plain, single-level surfaces, without unnecessary details, in light colors, will add cleanliness and additional graphics to the bathroom or bathroom.
The photo shows a bathroom interior with a suspended single-level soaring ceiling.
Bedroom
Laconic and aesthetic models with dim lighting, located above the bed, ennoble the bedroom, making it very comfortable and beautiful.
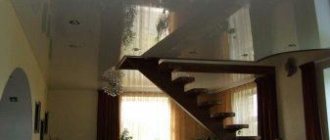
Hall or living room
Floating ceilings, due to their expressiveness, in combination with the warm light of spotlights, will not only decorate the living room or hall, but also adjust the space, correct excessive angularity and make the room larger.
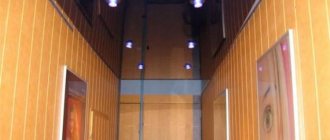
Corridor and hallway
A rather promising type of decoration that will update even the most ordinary hallway, transform it and create an exclusive interior ensemble in it.
Kitchen
One of the ways to create a stylish and original design in your own kitchen, the variety of which is presented in our selection of photos.
Children's
Unlimited color possibilities of LED lighting on a floating ceiling allow you to change the shade and level of lighting using the remote control, making it more intense in the evening or minimally dim at night. A large selection of textures and shapes will help bring any fantasy idea to life in the nursery.
The photo shows a wave-shaped soaring ceiling in the children's interior.
Balcony
This design will make the balcony more comfortable, significantly increase the space in it and turn the interior of the most ordinary loggia into an original design object.
Types of suspended ceilings by material of manufacture
A stretch ceiling is a covering framed in a frame; it can be made of fabric or PVC film; the main types are presented in our photo selection.
Photos and properties of suspended ceilings made of PVC film
For the ceiling, PVC or polyvinyl chloride with a thickness of about 0.2 mm is chosen, but this does not affect the strength; the coating can withstand up to a hundredweight of water per 1 m². It has a significant drawback - under the influence of elevated temperatures it loses its elasticity, however, when it decreases, it quickly restores its original characteristics. During installation, this property of the material is used, heating it with a heat gun. Color variations and widths vary and depend on the manufacturer.
PVC varnish surfacePhotos and properties of fabric stretch ceilings
This is the most modern coating; it appeared relatively recently. To improve performance characteristics, the fabric is treated with various impregnations. The main advantages include:
- Beautiful design;
- breathable coating due to weaving fibers;
- Compared to PVC, fabric coverings have a significantly longer service life.
Like any material, fabric has some disadvantages:
- breathing micropores become clogged with dust, so the ceiling needs periodic cleaning;
- absorb all odors, so it is not recommended to install in the kitchen or dining room;
- the cost is significantly higher than that of PVC.
Fabrics are mostly in calm tones
How to make a floating stretch ceiling?
To complete the review, we will consider the basic tips for installing stretch and gypsum ceilings with lighting that creates the illusion of floating.
Installation of a floating stretch ceiling
Decide on the type of construction and develop a ceiling design. Draw a sketch. Calculate how many profiles you will need. Buy guides and order canvas according to the size of the room. Preparing the ceiling involves removing the old structure, cleaning unsupported areas, and sealing large cracks. Soundproof if desired.
Next, you need to make markings on the ceiling, draw lines on the walls - using a marker, guided by a laser level. Then attach the guides in this way: attach the bottom of the baguette to the markings, make a hole through the profile in the wall. Fastening type: dowel-screws. The optimal pitch is up to 15 cm. The profile is attached directly to the ceiling or mounting beam. To build curved structures, make a cut on the profile and carefully bend it in the desired direction.
The LED strip is easily attached to the profile, fitting into the groove. Connect the wire of the required cross-section and the power supply to the tape. Test how the diodes glow. A common method of installing PVC sheets is the harpoon system using a heat gun. Operating temperature - 60 degrees. First, the corners of the canvas are attached, then the remaining parts. If the ceiling sheet is made of fabric, then it is not heated, but begins to be attached from the middle of large areas. The edge is tucked into the clip with a spatula, moving towards the corners. Corner fastenings are the final stage. The remaining canvas is cut off, hiding the remains under the cover.
Finally, masking tape is inserted; it reliably hides the LEDs. As a result, we see a soft, diffuse strip of light.
Installation of a floating plasterboard ceiling
You will need to purchase materials. The thickness of gypsum plasterboard or gypsum board is 9.5 mm. The main structure will need two types of aluminum profiles - CD, UD, and the additional one - CW, UW. If there are complex shapes, then you need an OSB board. Craftsmen also use ceiling hangers, anchors, or attach elements to dowels and screws. Installation work requires good tools, namely, take a drill or hammer drill, a special assembly knife, an electric jigsaw, a marker, and a convenient tape measure. To ensure correct markings, buy an accurate level. Plasterboard structures are finished using a roller and spatula.
First you need to prepare and mark the ceiling - remove cracks, remove trim, draw lines according to the level, mark the location of all elements, mark the backlight. Wall CD profiles are attached along the entire perimeter of the room. The best fasteners are dowel screws. Their pitch is from 15 to 30 cm. Cut the profile and bend it to each corner. Ceiling UD profiles rest against wall guides. Their pitch is 60 cm. Suspensions hold the structure on the ceiling. You can use crabs to extend profile pieces that are insufficient in length. Jumpers are placed at the joints.
To build floating parts, use a profile of types CW, UW, follow the technology of constructing a wall structure. Make curved elements from an arched profile. We cover the hanging figures from the inside with OSB boards, and attach drywall in other places. All hanging elements are attached to the ceiling using suspension springs. Massive structures are supported only by anchors.
When all the elements are installed, you can lay out the electrical wiring and secure it with plastic ties. Check if the lights are working. Drywall sheets are attached to a frame built from guides. Fastening type: self-tapping screws. It is enough to deepen their caps a millimeter. Next comes the stage of applying primer. The seams are unstitched where necessary. After everything, you can putty the ceiling. After drying, sanding occurs and finishing putty is applied. Drywall can be painted with your preferred interior paint, applying it in 2 or 3 layers.
example of lighting installation
installing LED lighting on the ceiling
How to choose a profile for a floating ceiling
floating ceiling - a practical type of ceiling finishing
Today, there are several types of special frames that can be used for the installation of single-level and multi-level structures. In addition, you can use regular baguettes for the ceiling. Such profiles are usually made of aluminum, and the fastening system is harpoon.
Types of baguettes
Floating profile options for suspended ceilings:
- insert for light scattering;
- a step that hides the LED strip;
- hidden niche for lighting.
Each of these profiles fits a specific situation. Next, let's look at the most popular options.
Wall molding KP 2301
baguette 2301 for a floating ceiling
After installing the canvas, an LED strip is inserted, which must be covered with a special plug. The profile for the floating ceiling has a height of 45 millimeters. It is at this interval that the canvas will lower. If a curved ceiling is created, then the baguette needs to be cut and bent. Incisions are made at intervals of 5-10 millimeters. Thus, the insert will transmit the maximum amount of light without distorting it. Thanks to the luminous flux directed from top to bottom, the lighting is bright and clear. To replace the LED strip, you just need to pull out the plug. The light diffusion insert masks the LEDs, so when the light is off it looks like a regular ceiling.
Profile KP 2429
profile for floating ceiling
The profile section looks like a bent hook. A ceiling panel is installed in the lower part, and the upper part is fixed to the wall. There is a special niche for LEDs. In this version, a plug is not needed, so installation is greatly simplified. The hidden harpoon system maintains the aesthetics of the ceiling. Profile height – 45 millimeters. Can be used for complex curved ceilings. The light is directed towards the wall, so the room is less illuminated than the previous option. A similar model is the PC 6 baguette.
Profile Flexy PF 2429
layout diagram of a baguette for installing a floating ceiling
Has special tabs that ensure perfect connection. All structural elements of a suspended suspended ceiling are installed without thresholds.
Baguette KP 4003
Used to install a translucent stretch ceiling. First, you need to insert the LED strip into the niche, and then secure the canvas. This design provides soft diffused lighting that is directed towards the wall. To replace a damaged diode, you need to remove the sheet.
Installation of a suspended ceiling on a floating profile
laser level marking
It is not necessary to use baguettes when installing a suspended ceiling with a floating ceiling effect. The profile for the ceiling is also perfect. The difficulty of installation is that it needs to be attached to the floor slab.
At the first stage, markings are made, and then metal corners are attached to the ceiling. A wooden beam is attached to them
It is important that the lower part is in a horizontal position. You can check the accuracy of the location using a laser level
There should be a gap of a couple of centimeters between the wall and the timber.
LED strip for floating ceiling
Next, the ceiling profile is installed. It is screwed onto the outside of the beam. This way the beams will be masked.
The LED is installed on the back side of the baguette. After connecting the power supply, the ceiling sheet is stretched.
Design principles for a floating stretch ceiling
Speaking about the color design of a ready-made floating stretch ceiling (you can look at photos of the most successful examples on the Internet), it is worth highlighting several principles that can serve as a guide:
If we are talking about a fairly spacious room, then the color chosen to decorate the soaring ceiling does not necessarily have to be the same tone as the rest of the interior. It is quite acceptable to create a contrasting ceiling by making the main color accent on it;
Floating stretch ceiling with lighting, consisting of two levels
- The texture of the ceiling can be any - glossy surfaces look no worse than matte ones. For example, a matte edging goes well with the glossy surface of the main canvas. And photo printing or even painting on the ceiling is an option for true connoisseurs of the exclusive;
- When choosing finishing materials for decorating the ceiling, try to limit yourself to two or three colors. Too many different shades on the ceiling are difficult to combine with each other;
- If the room is of limited size, using a mirrored ceiling surface can be an excellent solution. Using this technique will visually expand the space and create a feeling of infinity of the ceiling.
The ceiling, as if suspended in the air, looks original and unexpected
The emergence of this method of implementing the most daring and original design ideas could raise the use of suspended ceilings to a new level. Thanks to its simple but extremely interesting design, which can be done even with your own hands, a floating ceiling allows you to mask the imperfections of the surface of the main ceiling and use a completely new approach, working with the feeling of space in the room. Floating stretch ceilings with lighting are a real find for connoisseurs of original design.
Floating ceiling - design
It is very important to pay attention to the selection of high-quality materials and components. The result of all work depends on them. If you wish, you can install the structures yourself or by contacting specialists
If you wish, you can install the structures yourself or by contacting specialists.
Ceilings of this type come in several variations:
- Flat or single level. The main advantage is ease of installation and the possibility of self-installation.
- Two-level ones include two separate frames, each of which is covered with tension fabric.
- Multi-level. It is better to entrust such a system to professionals. There are a lot of technical nuances in multi-level structures, from the selection of suitable materials to installation work.
The main material is tension fabric. Common options are matte and glossy textures. Modern methods of decorating ceilings include photo printing and original lighting, which allows you to create the illusion of a “starry sky”, space and any other abstraction. The choice depends on personal preferences and financial capabilities.
As for the profile, it should also be suitable for the design features of the future ceiling. Depending on the requirements for the suspension system, the profile is divided into the following types:
Without a gap, it is used for the installation of two-level floating ceilings. With its help, you should try to create an unusual geometry on the ceiling, where the diode strip will be mounted, and the light will flow through the tension fabric.
- Flexible is used to create original shapes. From this profile you can make your own accessories for decorating the ceiling.
- Universal. It is designed in such a way that it reflects light radiation onto wall surfaces, and from the wall the lighting falls back onto the ceiling. This is how the floating effect is achieved.
- With gaps and holes for lighting, with which you can send lighting in different directions.
- Without cracks with a bumper. For any canvas, the profile is installed on top of the consoles, so you don’t have to waste time on preparatory work or extra money on purchasing materials.
Thus, the effect of a floating ceiling is created by a special design. At the same time, between different surfaces of the ceiling tiers, if a multi-level system is installed, gaps of 10-20 cm high are left, where LED lighting or spot elements are built in. It is due to the illumination that the image of a stretch ceiling floating in the air is visualized.
The main trick lies in the overlays installed on top of the profile. They diffuse light and act as decorative elements. If you need to replace the LED, the bar can be easily removed and then installed in its original place.
There is another way to mount a suspended ceiling - without using plugs. In this case, the lighting fixtures are located under the canvas, and diffused light flows along the contours that form the profile for the floating stretch ceiling. The disadvantage of this option is that if at least one device fails, you will have to dismantle the ceiling panel completely.
Do-it-yourself installation of a floating stretch ceiling
Preparatory work before installing a floating stretch ceiling
- In wooden houses, check that there are no cracks in the ceiling, otherwise the canvas will inflate.
- Peeling elements of the old coating are removed from the floor slabs so that they do not subsequently fall onto the canvas.
- The surface is treated with antiseptic agents to combat fungus, mold, and rust, otherwise stains will appear on the new ceiling.
- The ceiling is covered with primer.
- Remove all furniture from the room.
- Cover the floor with soft material to prevent accidental scratches from appearing on the film.
- Measure the length and width of the ceiling, transfer the dimensions to paper to scale. On the plan, show the location of communications, installation locations of lamps, control units, draw the shape of the frame (the geometry of the wall profile).
- Determine the length of the profile and LED strip along the perimeter. When purchasing, increase sizes by 10%.
- The amount of fasteners depends on the type of profile and the size of the ceiling; usually screws are installed every 8-15 cm.
- Attach wiring and other communications to the ceiling according to the drawing. From the cables, stretch the wiring to the installation locations of the lamps.
- Using a hydrostatic level, determine the lowest corner of the floor slab, step back from it down to a distance at which, after tensioning the canvas, a guaranteed gap will remain between the parts on the ceiling and the film. Place a check mark at this level.
- Using a hydrostatic level, transfer this mark to all walls. Connect the marks with a cord. Make sure that the cord is in a horizontal plane. Draw a line along it, relative to which the baguette will be placed.
Installation of a baguette for a floating tension fabric
- On flat areas, lean the baguette against the ceiling so that the top plane coincides with the line on the wall. Make holes through the profile, install dowels and screw in self-tapping screws.
- Check the quality of the baguette fastening by pulling it away from the wall. If it gives way, secure the profile with additional fasteners.
- If you need to bend the profile, cut it in the right place with a grinder to the middle and bend it. Straighten any folds that appear with a hammer, and sand the edges with a file and sandpaper. In this way, the profile is bent for installation in the corners.
- Connect the LED strips to the network and check their operation. After checking, install the lamps in the profiles and connect to the electrical wiring.
Attaching tension fabric to the ceiling
- Warm up the room with a heat gun to a temperature of 60 degrees and maintain this temperature until installation is completed.
- Unwind the film indoors at some distance from the heat gun. If you find creases in the material, do not panic - after installing the product, they will quickly disappear.
- Find the corner with the base mark on the canvas, secure this corner and the one diametrically opposite to the profile on the wall. To fix, drive the harpoon with a spatula into a special groove until it clicks into place.
- When attaching the material, direct an air flow from a heat gun heated to 70-80 degrees onto it, the heated film becomes elastic.
- Fasten the opposite corners of the canvas in the same way.
- After fixing the corners, secure the sides of the film in the direction from the corners to the center. Warm up the folds that appear on the film with a hairdryer, holding it at a distance of 200 mm or more from the surface.
- Place the plugs on the profiles in their original place if the profile design requires it.
Installation of floating tension systems
Before making floating ceilings with lighting, you need to select the design and construction and calculate the required number of profiles. If desired, draw a sketch of the room in accordance with the scale and indicate all the elements on it. Then they buy guides and begin the installation process.
Step-by-step work:
- Prepare the rough base. The previous coating is removed from its surface, poorly secured areas are cleaned, if necessary, cracks and cracks are sealed. You can soundproof the base.
- Mark the ceiling and walls. The profiles are attached to the walls, and sometimes, when creating complex structures, to the rough ceiling. To ensure horizontal installation, a laser level is used. If there are curved elements on the ceiling, the lines are drawn according to the sketch, otherwise the canvas will be unevenly stretched.
- Mount the guides. The bottom of the baguette is applied to the marking line, holes are made in the wall through the profile and fixed with dowel screws at a distance of 10 to 15 centimeters. The ceiling profile, depending on the size of the level, is attached to the ceiling or through a mounting block. To create curved elements, you need to cut the profile a little so that it bends easily. It is attached in increments of 8–15 centimeters.
- Install LED strip. It is mounted in a groove on the profile, snapped into place and it is in place. A wire of the required cross-section and a power supply, which is placed on the ceiling, are connected to the tape. Then they check the operation of the lighting system.
- Install PVC sheet. Usually it is installed according to the harpoon pattern. Harpoons are attached to the canvas during the cutting process. Installers, using a thermal gas gun to heat the sheet, insert fasteners into the grooves of the profile. The air in the room is heated to 60 degrees, and this temperature regime is maintained until the end of work. Fastening the canvas begins from opposite corners, then fasten the remaining sides.
- Install the fabric sheet. It is attached without heating. Installation begins from the center of the longest sides. The canvas is threaded using a spatula with a slight margin into the clips on the guides. Gradually move in both directions towards the corners of the room. At the end of the work, the corner sections of the material are tucked in. The fabric reserves are trimmed and the strip is attached.
Install masking tape. It is used to hide LEDs and make light stripes soft and diffused. This plug is placed in the gap with the LED strip.
We select suspended ceilings for a hall or living room
This room should be conducive to friendly conversation. Therefore, they usually choose a calm, laconic decor for it, which only emphasizes the overall style.
The list of top 5 universal ideas for the hall includes:
- Floral patterns. Their popularity is ensured by the fact that they look organic in most interiors. They fill the room with an atmosphere of romance and smooth out the presence of large furniture and other large details. They are combined with other accessories, such as carpets, textile pillows, curtains, creating a unified look for your room.
- Drawing in the form of a frame. It is located around the entire perimeter of the room and can be designed in the form of clear graphic lines or ornate patterns. The center of such a composition is usually a large chandelier, possibly with a fabric lampshade.
- Stained glass. Such drawings look very solemn and elegant. They fill the space with bright colors and add a classic touch that elevates the room in a special way.
- Frescoes. This is another win-win option. They always look elegant and sophisticated. Typically, muted tones are used for such pictures: peach, beige, pale blue, pistachio, honey.
- Abstract compositions. There are a great many options for this design. These can be soft lines intertwining with each other, some symbols, small patterns, imitation of colored drips or splashes.
The main thing to remember is that stretch ceilings with a pattern for the hall should match the stylistic direction so as not to create dissonance and keep the room neat and consistent.
How do floating ceilings differ from other ceilings of this type? Photos of floating suspended ceilings
To understand why floating stretch ceilings create such a unique effect, you need to understand their structure and design. How do floating ceilings differ from ordinary stretch ceilings? Firstly, the fabric used for floating ceilings is different from the usual ones used previously. Secondly, a completely different fastening scheme is involved. In order for the ceiling to “float”, a gap must be left between it and the wall, into which the lighting is subsequently mounted. What kind of lighting system it will be depends only on your desire: it can be fluorescent lamps or a multi-colored LED strip, but it is thanks to the influence of light that the ceiling is visually separated from the wall. All these techniques allow you to achieve the effect of a “floating” ceiling.
Floating stretch ceilings are perfect for connoisseurs of original design
Design of a stretch ceiling in a nursery
In a nursery, practicality, versatility and safety come to the fore, and here stretch ceilings have no equal. They can also be bright, colorful, with any designs and prints.
Stretch ceiling in a small nursery
PVC film is the most practical material for a nursery, because it is almost impossible to spoil, and it is not expensive. For a small room, avoid bulky figured structures and too bright colors on the ceiling.
Two-level stretch ceilings in the nursery
Little children are always delighted by unusual solutions - bright geometric shapes, flowers or colorful abstractions. Painting all the walls with colored spots is not the best idea, but a suspended ceiling with separate two-level elements will be very useful.
Matte stretch ceilings in the nursery
The nervous system of a growing organism is much more sensitive to any stimuli, including color and light. Therefore, laconic, monochromatic stretch ceilings, like the rest of the decoration around, are better suited for hyperactive children.
Glossy stretch ceilings in the nursery
A child's room always needs many areas: for sleeping, for playing, for studying, so the issue of space is especially acute. A glossy ceiling not only smooths out the situation, but also delights the little ones with the play of reflections.
Stretch ceilings with photo printing in the nursery
Space galaxies, abandoned forests, luxurious castles, mysterious caves and pirate ships - what they turn children into to please their precious child. And here stretch ceilings with a suitable thematic pattern would be appropriate.
Stretch ceilings with lighting in the nursery
Lighting is another bright element that always delights children. Create several color modes and both preschoolers and teenagers will go crazy.
Stretch ceilings “Starry sky”
Ceilings that imitate the starry sky are relevant for residential and public spaces. This type of design is actively used to create an atmosphere conducive to communication in bars and casinos.
Stretch ceilings “Starry Sky” - the fall of a comet against the backdrop of a flickering galaxy
Stretch ceilings “Starry sky”
Modern lighting technology allows you to create and play out various scenarios of the night sky: the movement of stars and planets, the fall of comets and meteors. For illumination, halogen and fluorescent lamps and LEDs are used.
Stretch ceiling “Starry sky” with planets
Stretch ceiling “Starry sky”
Stretch ceilings with optical fibers are the most effective. The ends of these threads are illuminated, which creates the effect of a starry night sky. The use of special technology ensures flickering at a specified frequency.
Scheme of operation of the stretch ceiling “Starry Sky”
Stretch ceilings of this type can be either single or multi-tiered. In the design of rooms, a combination of canvases and lighting elements is often used. For example, a “starry sky” is built above the seating area, and the rest of the ceiling space is covered with a multi-level structure.
Two-tier stretch ceiling with a picture of a starry sky
Starry sky on the ceiling
Materials used
To install a ceiling with a floating effect, the following are used:
- polyvinyl chloride film - glossy, matte, textured;
- polyester fabric treated with polyurethane;
- aluminum baguette up to 20 cm wide with a groove for mounting lighting;
- backlight equipment, including an electrical current converter or transformer.
- translucent plug covering the profile groove.
In principle, there are no big differences between floating (floating) ceilings and traditional ones in terms of the finishing coating material. The only difference is that textile material is used much less frequently, given its higher cost compared to PVC film. Most often they are made using glossy, matte or satin film.
Reflective ceiling material is well suited for rooms with a small area and height. During the daytime, sunlight reflected from the surface of the vinyl covering creates the illusion of spaciousness in the room. In the evening, when the backlight is turned on, the effect of a floating surface appears.
In residential areas, it is recommended to use neutral color coatings so as not to create discomfort for the eyes of the inhabitants. In a children's room or bedroom, it is possible to install a floating ceiling in the form of a starry sky, the cosmic abyss, the lighting of which is controlled using a remote control. Bright perforated surfaces, through which a powerful stream of light flows, are most often installed in discos, nightclubs, restaurants and other places of entertainment.
The mounting profile can be sold as a complete set with or without a light-diffusing plug. The design of such a baguette differs from those used to create all other suspended structures only in its shape, which allows you to create a gap between the wall and the canvas and place lighting elements inside the profile.
The translucent tape that covers the groove in the profile is made using translucent film capable of transmitting up to 90% of the light flux without changing its color and at the same time hides the built-in equipment, be it LED strip or fluorescent lamps. The lighting equipment may include a remote control, thanks to which you can turn the lighting off or on without getting up from the sofa or chair, as well as control the color of the light flux, if the equipment has such functions.
Floating suspended ceiling: photos, materials and components
The main task of a floating ceiling is to decorate the main roof floor. The principle of such products is to create a luminous halo around the perimeter of the room. To make the installation of a floating stretch ceiling less complicated, engineers have invented special profiles and special units that are selected depending on the complexity of the structure.
The modern market is rich in an assortment of color solutions for stretch ceiling film
The material for creating suspended suspended ceilings is PVC film. It can be matte, glossy, rough, satin or plastic. Natural fabrics are very expensive, so they are used much less frequently.
- In small rooms, glossy canvases look good, they visually enlarge the space, and lighting provides additional volume and airiness.
- It is recommended to install matte ceilings in the living room. They soften bright light and create a cozy atmosphere.
Modern style in the living room interior
Speed of installation is one of the main advantages of a stretch ceiling
In the bedrooms it is advisable to install floating systems with a space theme, for example, “Galaxy”, “Starry Sky”.
In nightclubs and bars, ceilings of colorful colors and complex shapes are installed to attract clientele.
Chic soaring ceiling with imitation of a starry sky
Baguette for floating suspended ceilings
The main difference between a floating ceiling and a regular one is the gap left between the walls and the ceiling. The gap is necessary for installing a special ceiling molding into which the LED strip is attached.
There are two types of profile baguette:
- No plug.
- With a plug.
Profile installation diagram with plug
Installation diagram of a two-level ceiling
When using a profile without a plug, the LED strip is inserted into a special groove and covered with a sheet from below. The light is directed towards the wall, so it is diffused. This design has a finished appearance, but also a significant drawback: if it is necessary to replace the tape, you will have to dismantle the blade.
A profile with a plug is an improved option. It is equipped with a transparent insert that allows light to pass through. It smoothes out the glow of the light bulbs and masks the fastening elements of the baguette. Because the light is directed downward, it is brighter. If the tape fails, you only need to pull out the plugs and replace them.
Stretch ceiling in the interior of a modern bathroom
Using ceiling lighting you can achieve amazing effects in room design
Floating stretch ceiling in the interior of the corridor
Design of floating ceilings: 6 stages in installation
Installation of floating ceilings is carried out in stages. An example can be given by considering the six main stages. Depending on the design, there may be more.
Ceiling installation steps:
- The first is preparing the surface of the rough ceiling (putty, primer, laying communications);
- The second is taking measurements and creating a drawing of the future structure;
- The third is the fastening of profiles for suspended ceilings, as well as suspended structures of all levels;
- Fourth – installation of lighting;
- Fifth - installation of the canvas with marking of fastening points for the next level;
- Sixth - bringing the lamps out, attaching the plugs, installing the hanging elements.
As you can see, the line of work is quite logical and technologically not particularly complicated.
Cost of floating structures
The costs of arranging a simple suspended ceiling are calculated simply: the cost of tension fabrics + the cost of a load-bearing profile laid along the perimeter of the walls + the cost of arranging additional corners (if there are more than 4 of them in the design) + the cost of lamps + installation work.
When calculating the costs of installing floating systems, to the costs of installing ordinary tension structures, you need to add the cost of an LED strip of the required footage, equal to the perimeter of the walls and power supplies (transformers) for protection against overloads and power surges at the rate of 1 device per 10 m of strip. It is necessary to take into account that:
- multi-color (RGB) tapes are more expensive than white ones;
- When choosing strips with color LEDs, you will additionally need a remote control for adjusting the brightness of the light output and color.
How floating ceilings work: photo examples
In order to achieve the necessary floating effect, the installation uses a special profile for floating ceilings, made of aluminum. It is thanks to this that a halo is created around the perimeter of the entire room. Typically its width is from 10 to 20 mm. A lighting source is built into the resulting niche at a certain angle, which provides diffused light, softening the space. The metal profile is accompanied by a special translucent insert that transmits 90% of the light, while hiding the illuminated components from view. This feature is due to a special translucent layer (you can watch a video on the Internet about why this insert is needed and how it is installed). A floating stretch ceiling, thanks to such a successful design, makes it easy to replace and dismantle LED strips as needed.
A soaring ceiling in the bedroom will help create the necessary atmosphere for relaxation and healthy sleep.
Types of floating ceilings
Depending on the materials used and methods of fastening, floating ceilings can be of three types. They are made from plasterboard and stretch fabric. The third type is a backlit cornice-type device.
Plasterboard
Drywall sheets allow you to create different interesting shapes that look aesthetically pleasing in the interior. This ceiling is mounted on a metal frame. Lighting fixtures are hidden in special niches so that the light coming up is reflected from the ceiling base and the top of the wall. The advantages of plasterboard floating ceilings include the ability to mask surface defects. The argument in favor of using this variety is also the strength, reliability of the material and its immunity to high temperatures. This allows you to install any lamps in the system.
Strong drywall can withstand heavy decorative inserts in the form of stucco, mosaic glass, and mirror inlays.
The disadvantages of illuminated plasterboard structures include susceptibility to moisture. If the material gets wet, it becomes unusable. With minor exposure to water, stains remain on the surface, and in case of severe flooding, replacement of the coating is required.
Tensioners
The technology for installing a floating stretch ceiling is somewhat different from the standard installation. To stretch PVC film or fabric, in addition to the usual profile, it is necessary to install special baguette frames around the perimeter. An LED strip is stretched inside them, and the frame itself is covered with a transparent plug. It protects against dust and at the same time improves light diffusion. The degree of illumination can be controlled using the remote control. The advantages of a tension illuminated structure include:
- Easy to care for.
- Durability.
- Moisture resistance.
- Aesthetics.
With all the advantages, suspended ceilings have several weak points. PVC film and fabric may be deformed due to impacts or scratches. The stretched material is susceptible to the high temperatures that lighting fixtures can create.
Cornice lighting
This device method is the most economical and least labor-intensive option. It does not require specific installation of the ceiling covering itself, since the lighting is created by devices mounted in the cornice. The interior of the room is no less interesting and original. Cornice lighting in the form of an LED strip is installed in a polyurethane baguette. It is mounted around the perimeter of the room at the top of the walls.
Such designs are valued due to the fact that ceiling heights are saved. If desired, the cornice can be decorated. The polyurethane surface is painted, aged, painted, and stucco is glued onto it. However, ceiling moldings create difficulties in maintenance. Dust constantly accumulates on them, and access to surfaces is difficult.
Accessories for suspended ceilings
Before making a floating ceiling, you need to prepare a special profile, and the choice of baguettes depends on the structural features of the ceiling and the number of levels:
- The wall profile KP 4003 is intended for arranging a soft diffused glow along the walls. It is installed in systems with translucent materials. The lamp can only be replaced if the cover is removed.
- Wall profile KP 2301. Has a translucent insert, which creates conditions for placing the LED strip after the installation of the canvas is completed. When this profile is used for a floating ceiling with lighting, the strip of light will be clear and bright and ensure correct color rendering.
- Connecting profile KP 4075. It creates a dividing strip that will connect two sheets without a level difference. The product bends easily and due to this, various curved elements can be made. It is fixed on the ceiling or on a special beam. The LED strip is placed in a niche in the center of the profile and covered with a transparent insert.
- Profile PL 75 for level transition. It is used for multi-level systems.
- Profiles KP-2 and NP-5 are installed as a set for floating structures with several levels.
- Canvas. You can use anything - fabric or polyvinyl chloride with different structures. Its color varies. When choosing transparent and translucent canvases and a diffused line of light, the KP 4003 profile is used for a floating ceiling. For opaque dark ceiling systems, KP 2301 products are chosen.
- Lighting products. For floating ceilings, single or multi-color LED strips are used. You can turn on the backlight using a switch and remote control.
Elements of a floating ceiling
Lighting around the perimeter of the stretch ceiling
Floating ceilings are beautiful in different designs; they are installed with several lighting options. These are chandeliers, spotlights, multi-colored or monochrome LED strips. Choose one of the elements or combine several. LEDs stretched along the walls provide beautiful diffused light. Colored lighting harmonizes best with a white canvas; in any case, it should be of a light tone. White LEDs can be used to decorate a ceiling of any color. Illumination is complemented by fabric stretch ceilings, as well as matte, glossy and satin PVC ceilings.
Plasterboard ceiling lighting
Some people underestimate plasterboard ceilings. In fact, they are very reliable; floating structures are also built from them. Plasterboard ceilings are combined not only with LEDs. Both halogen and fluorescent lamps can be located along the perimeter or above the shaped structures. The luminous elements are mounted on a suspended structure so that they are completely invisible when viewed from below. A ceiling made of plasterboard sheets allows you to hide the cables that run to the unit or go to the switches.
Tape for floating ceilings
LED strip today can be found in any construction and finishing store. It is represented by an elastic thin strip with lines that conduct electricity. The minimum length is 5 cm, the maximum is not limited. The cost of a linear meter of tape is from 150 rubles. A common form of release is 5 m reels. The LED strip has an adhesive layer and is glued to the ceiling or fixed to the cover of the cable channel. The LED power supply is located in a niche under the ceiling in an easily accessible place. A polyurethane baseboard is often glued together with a luminous tape. Perimeter lighting is a popular and easiest option for a floating ceiling.
square design
Profile for floating plasterboard ceilings
When constructing a plasterboard ceiling, the lighting is located above the structure. You can also remove it from your profile. To determine the line of attachment of the profile to the walls, a regular or laser level is used. The profiles are connected to the jumpers, crabs and hangers are attached. Regular and figured ceilings with lighting are installed using aluminum or galvanized profiles.
Profile KP-4003
Wall profile type KP-4003 creates a diffused soft glow around the perimeter of the room. The element is found in ceilings with a translucent canvas made in the form of a lampshade. During the assembly process, the LED strip is covered by a strip, so this type of profile involves replacing the lamp only with the strip removed.
Profile KP-2301
Using a wall profile type KP-2301, equipped with a translucent insert, you can install or change a strip of LEDs after the canvas has been installed. 90% of the light passes through the insert, so the lighting is clear and bright. Colored LEDs go well with this profile and their tones are not distorted.
Profile KP-4075
Thanks to the connecting profile KP-4075, craftsmen, working in a single plane, distinguish with a strip 2 canvases of different textures and different colors. The profile is incredibly flexible, so you can create absolutely any irregular shape with bends. Fastening occurs on a mounting beam or on the ceiling. There is a niche in the middle of the profile, an LED strip is placed in it, and it is covered with a transparent cover. The blades are fastened into grooves on both sides of the tape.
Profile PL-75
There is a profile type for moving from one level to another. This is a PL-75 type profile. Using this element, multi-tiered ceiling structures are built. The LED strip is closed into a groove, and the panels, located at different levels, are attached using a harpoon method. A dissipative strip is installed in the area of fasteners and tape.
Profiles KP-2 and NP-5
Some models of floating multi-level ceilings require the use of the KP-2 profile together with the NP-5 profile. These components differ from the PL-75 profile in the absence of a flashing; as a result, with them the light strip looks clearer and brighter.
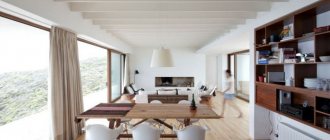
bright living room