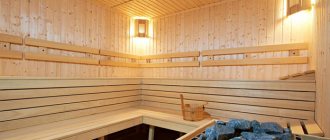
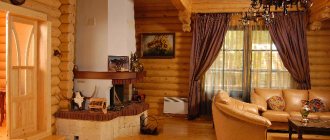
If we consider all the rooms that I had to decorate, then the steam room is without a doubt the most responsible option. This is due to the fact that the operating conditions of the structure are very complex and any mistake in the choice of materials and technology can, at best, lead to additional costs for rework. Therefore, I will tell you how to carry out the work on your own in order to get an excellent result with the least amount of effort and money.
The decoration of the steam room should not only be reliable, but also attractive
Stage 1 - ceiling
I won’t tell you how to insulate this part of the structure from the outside; we are only considering the finishing, so we will analyze the work that is done inside the steam room. The ceiling is a critical part of the structure, since it is exposed to the highest temperature, and if everything is not done as expected, then a huge amount of heat will be lost through the ceiling.
Materials for work
To begin with, let's look in detail at the main finishing material - wooden lining, it is used for both the ceiling and the walls, so in the next section I will not deal with wood, all the information from this paragraph will be relevant there too.
I recommend choosing one of 4 breeds, each option has its own pros and cons, so check the information in the table to choose what is best for you.
| Material | Key Features |
| Larch | The moisture resistance of this breed and its durability are known to everyone, so this option does not need any special recommendations. Larch can be used to sheathe ceilings; it tolerates changes in temperature and humidity well and retains an attractive appearance for many years. As for the cost, for a square meter of grade “A” you will have to pay about 850 rubles |
| Linden | One of the best options, distinguished by the beautiful white color of the wood and the reliability of the material, the lining does not change parameters due to changes in temperature and humidity. Linden takes the longest to heat up, which is a very important advantage when used in a steam room, but it has one drawback - if the material is not treated, it will begin to darken over time. The price of this group of products is approximately the same as that of larch |
| Aspen | In my opinion, this is one of the best options for a steam room; the wood is very durable and resistant to cracks. It has antiseptic properties and is almost not afraid of water; the material has a positive effect on human health. As for the cost, it is lower than the options described above; grade “A” lining costs about 600 rubles per square meter |
| Alder | Another excellent solution for a steam room, since wood is very reliable, has a positive effect on human health and perfectly withstands difficult operating conditions. Many bath connoisseurs consider this option to be optimal for use in a steam room. As for the price, it is approximately 650-700 rubles per square meter |
From left to right: larch, linden, aspen and alder. As you can see, wood differs in both color and texture, so this factor also matters
But besides the lining we will need other materials:
- The block for constructing the counter lathing is best if it is made of the same type of wood as the sheathing itself, so that when temperature changes occur, all elements behave the same, this minimizes the risk of deformation. The size of the elements may vary, but it is desirable that the thickness be at least 25 mm to create a gap between the rough sheathing and the finishing;
The dimensions of the bar can be different, there are no strict restrictions
- The foil will be used as a vapor barrier material and as a heat-reflecting screen to prevent heat loss. A special version is sold in stores; it is packaged in rolls 1-1.2 meters wide and 10-25 meters long. It’s easy to calculate how much material is needed, the main thing is not to forget about overlaps and joints (below I will deal with this aspect in detail). Don’t forget to additionally purchase foil tape for gluing the joints;
Foil allows you to significantly reduce heat loss
- The best fastening materials to use are wood screws; they securely fix the elements and are easy to use . The foil can be secured using a construction stapler; this is the easiest and fastest option. As for fixing the lining, you can use either self-tapping screws with a diameter of 3 mm or finishing nails, whichever is more convenient for you.
Finishing nails have a small thickness and a reduced head
Tool for the job
As for the devices that are needed when finishing the ceiling, you will need the following set:
- Construction stapler for fixing foil, equipped with staples 6 mm long. The simplest tool is suitable; you can buy it at any hardware store;
A stapler is a useful tool that every home craftsman should have.
- To tighten self-tapping screws, you need a screwdriver with appropriate attachments; everyone who does something with their own hands should also have this tool. It is better to purchase an option with two batteries, so as not to wait for recharging during operation;
It is better if the instrument is in a special suitcase - this way it is convenient to store and carry it
- You can’t do without measuring devices: a tape measure and a level must be at hand, because you will have to constantly measure the material and control the plane. Also, don’t forget about the marking pencil;
- You can cut the lining with a jigsaw or electric saw, or with a regular hand saw, the main thing is to purchase a good tool.
A hacksaw is much cheaper than a power tool, so you can use it
Installation work
Now we will figure out how to finish a steam room in a bathhouse with your own hands; the process is simple if you know the technology and carefully follow all the recommendations:
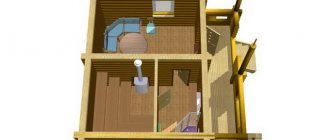
This is what the overall picture of the work looks like
- First you need to prepare the base, the surface is cleaned of contaminants if any. Next, you need to inspect the plane; if the heads of screws or nails stick out somewhere, then they should be deepened. If you have not carried out antiseptic treatment of wood, then do it at this stage;
- The foil is carefully unfolded, placed against the surface of the ceiling and leveled. At the same time, do not forget about 150 mm overlaps on the walls, so that later you can securely connect the insulation layers . Fastening is done using a stapler; grab the material in increments of 50 cm so that it holds securely on the surface; when carrying out work, it is better to call an assistant; when someone holds the foil, attaching it is much easier;
It is important to fix the reflective material well
- The following rows are attached in the same way, but do not forget that for maximum reliability, make an overlap of at least 150 mm. Carefully glue all joints with metallized tape; when working, it is best to press the material tightly with a cloth, so you will not damage the surface;
Adhesive tape helps protect joints
- When the foil is secured, you can start attaching the slats; they are located perpendicular to the placement of the lining in increments of 50 cm. The first element is placed close to the wall, and the next ones are located half a meter apart; naturally, there should also be a block near the opposite wall. Fastening is easiest done using self-tapping screws;
The slats provide the necessary gap between the insulating and finishing material
- If necessary, the lining is cut into pieces of the required length, work begins from any of the walls, the first element can be fixed from the outside near the wall, there will still be a plinth there . Fastening into a tenon is also carried out; this can be done either by screwing in self-tapping screws or driving in finishing nails. Fastening is done at an angle so as not to interfere with the placement of the next element;
Nails or screws should be placed at an angle
- Further installation is simple: the next panel is inserted with a tenon into the groove of the previous one, if necessary, tapped through a wooden spacer for a tight fit and fixed. The work goes quickly and does not take much time, the main thing is to accurately cut the material and fasten it firmly.
The main thing is to check the joints and fasten the elements evenly
I do not recommend using special fasteners in the steam room. There was an incident when a friend of mine, after 8 years of using the steam room, had a ceiling fall. It turned out that the clamps had rotted, since they were made of thin metal and did not have a sufficiently reliable coating.
Description of the category In the bath
If you are very excited by Bathroom porn and you are a true fan of this heat, watch our selected collection online for free. Here couples, without shame or conscience, will arrange such intimacy that you will simply go nuts.
The lustful women in our section are ready to do anything for pleasure. These sluts are not shy about exposing themselves in front of their young partners and taking huge machines by the cheeks, so that later they can be wildly fucked in their holes as a reward.”
Here is the richest collection of amateur porn in good quality. Surprisingly, hundreds of thousands of people from all over the world are ready to have sex on camera, and then post adult materials on the Internet so that other network users can enjoy their copulations. Today, hobbyists have become very popular. After all, the materials they perform are truly wildly exciting. Seeing real people get naked, frolic in different positions and have orgasms is a pleasant experience. Lustful blondes, skillful brunettes, red-haired women, brown-haired and fair-haired beauties - all of them are ready to lick their partners’ boners with their lips and tongues, and then show their fragrant vaginas and surrender to a pleasant spanking. Some people shave their vaginas, some don't. There is such a wide range of content here that you will be amazed. Non-professional people will show you how to spend your free time profitably. They enjoy having sex doggy style, missionary style, cowgirl style, and many other positions. Here are collected materials with the participation of a faithful wife and husband, with the participation of lovers who rent a hotel room to frolic and much more.
The banya category is intended for lovers of thrilling sights and sensations. In it you can see a wide variety of videos with hot and insatiable young ladies who crave to be fucked in all the cracks, and deeper, and not only with dicks.”
In almost any business, there are those who are considered professionals, and there are those who are amateurs. So, the section that presents banya porn was created for those who prefer to look at ordinary people who love to have passionate or tender sex in different places. Some people love to fuck in a hotel room, while others love to frolic in the forest, where there are no people at all. There is also a large number of amateur copulations in bedrooms, in hallways and even on a bench in the park. A distinctive feature of amateur porn is that sex is filmed by ordinary people using non-professional video cameras, and sometimes even on phones. Couples like to frolic in revealing positions and get maximum pleasure from the knowledge that later their own copulation will be available for viewing by hundreds of thousands of people. This turns on both girls and men. The slutty girls are ready to give their gentlemen deep blowjobs, caressing pink boners with their plump lips. Girls don’t mind at all when their comrades pick up video cameras and film women from top to bottom. Shooting amateur POV porn becomes even more interesting. After all, it creates a feeling of the viewer’s presence in the plot.
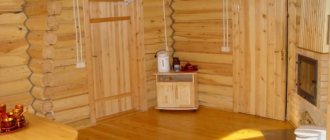
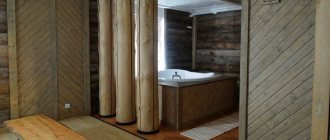
Stage 2 - walls
To make the steam room beautiful, you need to take care of the decoration of the walls. Most often they are covered with the same clapboard as the ceiling, but if desired, you can choose different options for the material. For example, attach narrow elements to the ceiling and wide elements to the walls, or vice versa - it all depends on your preferences and ideas for decorating the room.
There are many finishing options
Necessary materials
We will use the same list of materials for the walls as for the ceiling, but due to the more complex technology of work, we will need additional elements, and these are the ones we will consider:
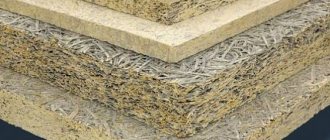
- Mineral wool for wall insulation, its thickness should be at least 5 cm, and better yet 10. I advise using basalt materials with special treatment, which gives the insulation moisture-repellent properties and ensures a high level of moisture evaporation . This is an ideal solution for a steam room, which is both convenient to use and safe for health;
Basalt materials are excellent for use in steam rooms
- To create the sheathing, we need a block, the height of which should be 30 mm greater than the thickness of the insulation. This will allow us to simplify the work process and avoid installing counter lathing on the vapor barrier material. As a last resort, take a block of insulation thickness and 30 mm thick slats to create a counter-lattice;
- A waterproofing material must be laid on the base; it can be a membrane or film; there are many options on the market, so finding something suitable will not be difficult. I recommend purchasing vapor-permeable membranes, as they allow moisture to evaporate and maintain optimal humidity in the insulation.
Waterproofing materials are presented in a wide range
The working process
Finishing a steam room in a bathhouse is a complex process; we will sew up the walls after installing the lining on the ceiling, this will allow both materials and insulation to fit perfectly together.
The work instructions look like this:
The wall decoration scheme in the steam room looks like this
- First you need to prepare the walls, everything is quite simple: the surface is cleaned of dirt and dust, fasteners are secured, and everything that could interfere with work is removed. Everything you need should be at hand; an extension cord is provided for the power tool if necessary. Below is a design diagram so that you can immediately clearly imagine the end result and understand what should be done and why;
This is what our final design will look like
- First, we need to secure the waterproofing material, it is fastened with a stapler, overlaps of at least 100 mm are made at the joints, for reliability, all connections are taped. It is important here not to leave any gaps or cracks, this will ensure the best thermal and waterproofing performance;
- A block is fixed on top of the film; it can be fixed either with self-tapping screws, or by attaching it to the back of the suspension. It all depends on what is more convenient for you, both options provide high reliability of the design. The distance between the elements should be selected in such a way that the insulation is located between the bars very tightly; if the material is cut and there is no difference, then place the elements in increments of 50 cm;
It is important to secure both the waterproofing and the frame as securely as possible
- The insulation needs to be placed as tightly as possible in the sheathing; personally, I prefer hard slabs, but soft options can also be used . When laying, fill all the cracks and joints for maximum reliability; there is no need to secure the material with anything additional; if you put it in as it should be, then it will definitely not fall out anywhere. As I wrote above, the thickness should be at least 50 mm, and if the building is not very warm, then 100 mm;
Fill the entire space tightly with insulation
- Now you can attach the foil. If you followed our advice and placed the beam wider than the insulation, then the reflective material is fixed with the help of slats, which are nailed to the side surfaces of the racks and thereby press the foil and provide the necessary gap between the insulator and the finish. To make it clearer, below is a photo of how the installation is carried out, everything is very simple and reliable;
This mounting option is simple
- The last step is to fasten the lining, the work is most often done from the bottom up, the principle of fastening is the same as on the ceiling. You need to hammer a nail or screw a self-tapping screw into the groove, then join the next element and so on until the wall is completely covered. The main thing here is to ensure that the lining is joined evenly and, if necessary, tamp it down for a tight connection.
The work is done simply and quickly if everything is done according to technology
When attaching lining, try to leave the most beautiful elements for the places that are best visible. For example, the wall behind the shelves is almost invisible, so you can put all the panels that are damaged or have any flaws there.
Porn models
Aria Alexander
Sydney Cole
Josie
Iris
Adrianna Russo
Sophia Santi
Josie Jagger
Kim and Kayla
Naomi Bennett
Holly Michaels
Sasha Crystal
Kelly Summer
Macy Ann
Abbi
Jessi
Vinna & Eveline
Ornella
Daisy Haze
Stage 3 - floor
I recommend making the floor from ceramic tiles, as this is an almost eternal option that will last as long as the bathhouse itself . If you do everything correctly, you will get a strong and durable surface; you don’t need to worry about the temperature - the floor in the steam room almost never heats up to a temperature above 30 degrees.
The tiles are great for steam rooms
Necessary materials
To work we need the following:
- Ceramic tiles, choose options that will be combined with wood trim, most often these are classic and antique-style collections. Pay attention to the surface, it should be anti-slip, since the steam room is a place with a constantly wet floor, and safety should be given paramount attention; I myself once had a very unpleasant fall on a slippery floor, so it is better to choose a rough option;
The surface should not be smooth, but textured
- Construction sand, we will pour it on the base in a layer of approximately 15 cm, based on this, the approximate volume is calculated. You can also use river sand; it is also excellent for creating a base for laying ceramic tile floors;
- Expanded polystyrene or extruded polystyrene 5 cm thick, with its help we will insulate the surface. It is best to use Penoplex and its analogues, since this material has grooves at the ends and it is very convenient to connect them on the surface. In addition, the thermal insulation performance of this type of product is much higher than that of conventional polystyrene foam;
Extruded material is much easier to lay thanks to grooves on the ends
- We need roofing felt to waterproof the base and create a reliable barrier to moisture from the soil. The material is inexpensive and you can buy it everywhere, so there shouldn’t be any problems;
Ruberoid is a cheap but reliable option for floor waterproofing
- The reinforcing mesh will help us strengthen the surface and prevent it from cracking. Choose options with a wire thickness of at least 3 mm; the mesh size can be any. If you have thin reinforcement, you can use it to tie a frame on the floor; place the rods in a lattice with a cell size of 100x100 mm;
The mesh will allow us to significantly increase the strength of the screed
- To fill the screed, we will use M200 concrete; you can buy it ready-made, in the form of a dry mixture for screeds, or prepare it yourself. If you use the latter option, you will need sand and cement in a ratio of 5:1, as well as water to prepare the solution;
- We will glue the tiles using special glue, which can be bought at any hardware store. The amount of composition is calculated based on the area being coated;
Tile adhesive must be fresh
- The seams in the tiles are sealed using a fugue, which should also not be forgotten. The grout color is selected depending on the color of the tile.
Among other things, it is advisable to install a drainage ladder in the steam room, otherwise you will have to remove the water after each use of the sauna. It is purchased assembled and set in advance at the required level as shown in the diagram.
The ladder allows you to drain water from the floor in the steam room
Work tool
Since these works differ significantly from the previous ones, different devices will be used here:
- To level and distribute the sand, you need a shovel; if you need to transfer it from somewhere, then it is advisable to have a wheelbarrow; it is not easy to do this manually;
- You can tamp sand with your feet, but it’s easier to make a tamper from a piece of timber, the work will be easier and better with it;
This simple device will help compact sand
- If you prepare the solution yourself, it is better to find a concrete mixer; you will spend a lot of effort manually. If you have a ready-made mixture, you will need a container and a powerful drill with a mixer to quickly mix the solution;
- Tile adhesive is easiest to apply with a notched trowel or float. For leveling, do not forget to use a level, especially if you have a ladder and you need to maintain a slope;
Use a tool no wider than 30 cm
- To apply the grout, use a small rubber spatula; you can buy it in the same place where you buy the grout.
The working process
Now let's figure out how the tiles are laid in the steam room. The process consists of many steps, so it should be understood very well. For simplicity and clarity, a diagram is presented that shows how the floor will look in section; we will use it as a guide during work.
The floor in the steam room consists of such elements
The work process is carried out according to the following algorithm:
- First of all, a sand cushion 15 centimeters thick is poured onto the base. It is necessary to thoroughly compact the surface to make this easier; the sand can be moistened. When working, do not forget to check the plane with a level in order to immediately make an even base and then not eliminate flaws;
Sand is poured after laying the sewer system, if any.
- Insulation is laid on a compacted and leveled surface; if it is Penoplex, then you need to align the grooves and lay out the elements as tightly as possible, cutting them off at the edges if necessary. The work is simple, and if the base is level, then the material will lie perfectly;
Grooves ensure perfect joining of the material
- Ruberoid is laid on top of the insulation, the material is simply spread over the surface and placed with an overlap of at least 5 cm to ensure the best reliability. Some people coat the seams with bitumen mastic, but this is not necessary, we will already have a very reliable system that will definitely not allow dampness to pass through;
Ruberoid allows you to reliably waterproof the base
- A reinforcing mesh is laid on the floor; it is simply laid out over the entire surface with an overlap of a few centimeters at the joints. If you have a ladder installed, then you can immediately begin laying beacons under the drain; the easiest way is to use wooden blocks; they are placed at a slight slope towards the drain. There is nothing complicated here, the main thing is not to miss this moment;
This is what a floor prepared for pouring mortar looks like:
- Next, the solution is prepared and poured onto the floor, you need to start as shown in the photo above - from the ladder to the wall, using the bars as beacons. If there is no drain, then simply fill in a smooth screed; you can put bars as a guide so as not to bother with beacons. The approximate layer of screed is 6-7 cm, if there are slight deviations, it’s not a problem;
The finished screed should sit for at least a week to dry.
- When the surface is dry, you can begin laying the tiles; the main thing here is to apply the adhesive evenly using a toothed roller and constantly monitor the position of each element with a level . The work is not as difficult as you think, even if you have small flaws on the plane - it’s okay, no one will notice it. To ensure that the seams are perfectly even, use spacer crosses;
Laying ceramics is a simple process, but it requires attention and accuracy.
- After a day, when the adhesive composition has dried, you can begin sealing the seams. To do this, all joints are cleared of mortar, after which the grout is prepared and distributed over all joints using a rubber spatula. Apply the composition so as to push it into the seams; the better you fill all the voids, the more reliable the result of the work will be;
The grout should fill the entire joint
- After about an hour, the dried compound must be removed from the surface of the tile, the final rubbing of the joints is done after a day: all excess is hit with a rag, and the surface is cleaned to perfect condition;
- Lastly, the plinth is attached to the sides, it can be cut or even a whole tile , or there can be special decorative elements made of ceramics, they are attached with the same glue, and then rubbed down in the same way.
The plinth covers the junction of the wall and the floor
For maximum convenience and safety, I strongly recommend that you put wooden ladders on the tiles; they protect against slipping and prevent you from stepping on a cold floor (this can lead to thermal shock in a steam room).
Steam room with tiles and ladders on it - reliable and practical