Bumpers for the crib
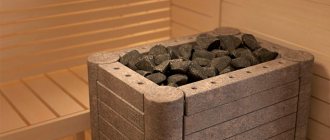
Filler holofiber balls
Warm and comfortable material is a new product on the market. It contains 100% high quality polyester. The thin fibers of the product are similar in appearance to springs, which are securely connected to each other. This structure gives the product special strength. The filler is great for sewing children's clothing, blankets and soft toys. The items do not cause allergies and do not absorb moisture well. After washing, the products do not wrinkle and quickly regain their shape.
The finished material, depending on the needs of production, is divided into several types:
- holofiber volumetric;
- software;
- medium;
- system;
- tek;
- WinterFoot.
You can buy holofiber pillow filling from us at an affordable price. All holofiber clothing has extraordinary lightness and excellent durability. An important advantage of the finished product will be its affordable cost. The material is several times cheaper than wool and down.
Some manufacturers provide a guarantee on items made from holofiber. Such products retain heat for several hours even at -40ºС.
Options for making bumpers for a crib
When a baby appears in the house, many issues are immediately revealed that need to be resolved to ensure restful sleep and care for him. One of the necessary things that a child will need in the first days of life are baby bumpers in the crib; they will serve to protect against drafts or impacts on the wooden bars of an overly active baby.
Types of sides
Sides (or bumpers) are thick pillows that are placed around the perimeter of the bed on the inside. They are secured with ropes or Velcro to the bed parts. There are several types of bumpers: solid (for the entire perimeter of the bed), on 3 sides and those that are only at the headboard. There are ready-made products on sale, but sewing yourself will cost 2 times less and will allow you to choose your own option and fabric to your taste.
The sides are installed in order to:
- protect the baby from accidental impact on the bars of the crib;
- do not allow legs and arms to be inserted between the rods;
- create an enclosed space comfortable for a restful sleep;
- protect from drafts;
- bright drawings will distract the child’s attention if he wakes up before his mother.
Choice of model and fabric
To make bumpers for a newborn crib with your own hands, you may need:
- natural cotton fabric, preferably dense (calico, linen, etc.);
- filler (foam rubber up to 30 mm thick or padding polyester);
- zippers, if the covers are removable (4 pcs.);
- decorative elements (optional).
When choosing fabric, you need to choose a bright, large pattern that your baby will like. Before sewing, the fabric must be washed in warm soapy water to shrink and ironed with a hot iron. The standard bed size is 120x60 cm, height 55 cm. For ease of use, it is better to have 2 sets of bed bumpers that can be washed alternately.
Determining the height of the side
Before you start sewing, you should decide what height of the sides of the crib for newborns is best:
- The full-height side will protect the baby well, but will block the entire view: the child will only see the inside of the crib.
- A bumper that is too low opens up a wider view of the room, but does not provide a high guarantee against injury.
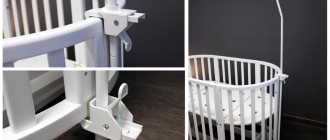
- The ties and Velcro that secure the sides can tear when the baby learns to sit on his own and pulls on them, so the most reliable method of fastening is considered to be using fasteners.
- If desired, you can make pockets on the side for small things and toys; they should be placed only on the outside of the sides.
Sewing high bumpers
Now we’ll tell you step by step how to sew high bumpers for a crib:
- The simplest bumpers are rectangles made with a margin of 3 cm, which are added to the size of the bed: 4 pcs. 123x63 cm, and 4 pcs. 63x63 cm, where 63 cm is the selected height of the side (can be reduced if desired).
- Cut the filler (foam rubber or padding polyester) to the same dimensions: 2 pcs. large and 2 pcs. small details.
- You will need 30 ties. 30x8 cm in size, it is better to make them from a single piece of fabric, stitching them along the entire length (fold the raw edges into the middle), and then cutting them to size. You can use ready-made braid as ties.
Bumpers can be made in the form of 4 separate parts that are tied at the corners, but it is better to make them a continuous strip so that the baby cannot stick his arms or legs into the corners.
Pattern example
Master class on making crib bumpers with your own hands:
- Sew all fabric parts on 3 sides.
- Place a cut piece of filler into each piece.
- Sew side 4.
- Separately sew the ties.
- Sew ties at the corners of the parts.
On video: how to sew bumpers for a crib.
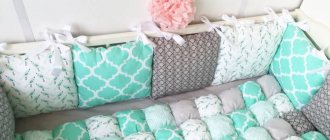
Low sides with ruffles for girls
Let's make another model of bumpers with lower sidewalls, decorated with ruffles. Low soft bumpers for a crib are sewn as follows:
- The side parts have a size of 123x43 cm (4 pcs.).
- The end part has a size of 63x43 cm (2 pcs.)
- At the headboard you can make a higher side with a semicircular top measuring 63x(43+15) cm.
- For ruffles, strips of 180x10 cm are cut out (for the sides), 90x10 cm for the footboard and 150x10 cm for the semicircular headboard.
Approximate pattern What should happen
Master class on how to sew bumpers with ruffles:
- Sew all fabric parts on both sides.
- On the third side, baste the ruffles prepared in advance (it is better to process the edges with an overlocker), while using your fingers to form the folds and sew them to the part.
- Another way to make a detail with ruffles is to gather a long piece of ruffle on a thread to the desired length and sew the ruffles to the desired detail.
- Topstitch the fourth side.
- Instead of ties, you can use Velcro, which are sewn in the same places as the ties.
How to sew on ruffles
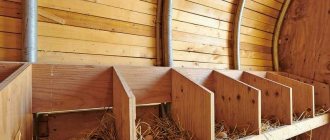
Pillow sides
Another option for decorating and protecting a baby crib is to make several pillows that can be filled with more filling for softness. The pillows are sewn 30x50 cm in size, they are not connected to each other, they are fixed each separately using ties or Velcro.
How to sew sides with removable covers? For this model, you need to buy 4 zippers with a length of at least 43 cm. The covers are made 2-3 cm larger than the filling to make it comfortable to wear. A zipper is sewn into one of the sides of each part, which will allow you to remove the covers as needed and wash them separately from the internal filling.
Sintepon for children
Non-woven material is characterized by lightness and warmth. The filler gives the product additional volume and elasticity. Good performance and affordable price make synthetic winterizer widely in demand on the market. The main advantages of the substance are:
- the ability to keep its shape and recover after being crushed;
- does not cause allergic reactions;
- harmful insects do not breed in it;
- high level of performance characteristics;
- retains heat perfectly.
Buying synthetic winterizer means betting on durability and high quality. Synthetic jackets will last for many years. Do you need to buy expensive things for your child, who is growing by the hour? Each parent decides for themselves. Remember - there is always a worthy alternative.
Modern synthetic fillers are produced using modern equipment. Thanks to new technologies, the quality of the material is not inferior to natural products.
Application area
Sintepon and holofiber have proven themselves to be excellent fillers for various products for children. For example, materials are suitable for sewing a blanket, which must meet a number of requirements:
- Freely pass air masses.
- Have a high level of hygroscopicity.
- Be easy.
- Easy to care for and dry quickly.
A padded polyester blanket is great for dry rooms. It is easy to care for the finished product. The material is not electrified and does not accumulate dust particles. Holofiber provides high-quality air circulation and quickly warms the child. High-quality fillers are used in the manufacture of pillows and toys. Do you want to make something with your own hands? Order the necessary material from the children's store.
Synthetic winterizer is a durable filler for children's jackets. The material is also suitable for overalls. Non-woven fabric retains heat well. The products retain their shape without problems for a long period of time.
The materials differ from each other. Holofiber is better in the following positions;
- It is considered a more environmentally friendly insulation. No glue is used to make the canvas;
- keeps its shape better;
- Thanks to the fine fibers, the fabric is thin and light in weight. This is very convenient for small and active children.
Do-it-yourself soft bumpers for a crib
Now in any store that sells goods for newborns, you can buy a set of bumpers or bumpers for a crib. They are not too thick mattresses that need to be secured with ties to the crib railing on the inside. This precaution will protect the child from accidental impacts on the bars.
Diagram of a baby crib with dimensions.
Such sets have only one significant drawback - their cost.
But even a novice craftswoman can sew a bumper into a crib with her own hands.
Making the sides will only take you a couple of evenings. In addition, you can additionally sew a mattress for the changing table, a couple of pillows and a canopy. Then your children's room will be decorated in the same style.
Preparing for sewing
Tools for making a baby crib.
In order to make bumpers for a crib, you will need the following materials:
- fabric for the inner cover of the side;
- fabric for the outer cover of the side;
- ready-made bias binding or fabric for its manufacture;
- interlining;
- zipper (length 45-50 cm);
- furniture foam rubber (thickness 1-2.5 cm);
- cord;
- materials for decoration (piping, bows, satin bias tape).
Of course, the sides of the crib can be sewn by hand or using a sewing machine. But in the first case, the work will take you much longer.
Scheme of sides for a crib.
In addition, you will definitely need the following tools:
- tailor's scissors;
- chalk or chalk pencil for marking;
- sewing pins (not “safety”);
- tailor's tape and measuring tape;
- iron.
Bumpers for a baby crib can be sewn without top covers, then you will only need to purchase 1 type of fabric. But in this case, you may encounter serious problems when cleaning the product. But if you make the covers removable, then no problems will arise. It will be enough to remove the soiled “typesetting” and replace it with a fresh one.
For the inner cover, it is wiser to purchase a fairly thick fabric with a dense weave of threads: calico, teak, satin. The choice of material for the top part depends entirely on your taste and preferences. But it is wiser to opt for fabrics that are easy to wash and do not require delicate care. The ideal option is ordinary chintz. It is cheap, practical, and the variety of its colors can amaze even the richest imagination. In addition, you can now purchase materials with water-repellent impregnation. This feature of the material in a baby’s crib can be a completely unnecessary precaution.
Fabric calculation
Bed headboard size chart.
In order to determine how much fabric you will need to sew the bumpers for the crib, you need to take measurements from the furniture. The side on the long side can be continuous, from the head to the foot. Or you can make 2-3 sections. Then one of them can be removed if necessary. If the baby’s bed is moved close to the wall, then it is wiser to make 1 solid side (for the fence that is located near the wall) and 1, consisting of 2 separate parts. You will also need 1 bumper for the headboard and footboard.
In addition, you need to take into account the desired height of the softeners. Stores now sell sides that cover the back the full height, 2/3 and half.
Let’s say that the length of our crib is 120 cm and the width is 60 cm. The height of the front side will be 65 cm, the back side will be 80 cm, the sides will be 60 cm each. Accordingly, we should have the following details:
- front side - 65*120 cm (or 2 segments of 65*58 cm);
- rear bumper - 80*120 cm;
- headboard and footboard - 60*60 cm.
Pattern for protecting the crib.
That is, if we purchase material with a standard fabric width (150 cm), then we will need exactly 3 m. Please note that if the fabric width is smaller, for example 120 cm, then its consumption almost doubles.
To sew such a product, you do not need to make special patterns. All calculations take place directly on the fabric. An example of a pattern is shown in Fig. 1. Naturally, you can make your own adjustments if your side differs in size from those indicated in the diagram.
Remember that the sides of the crib require a softener. It can be made from foam rubber or 2-3 layers of padding polyester. Blanks for softening are cut to the same dimensions as the bumpers themselves.
Cutting and sewing the product
Scheme of the pendulum mechanism.
Before you start making the border for the crib, be sure to wash the fabric, dry it and iron it. The fact is that some materials containing a large amount of natural fibers “shrink” when washed and hot steamed. In this case, the finished product may become deformed. And such defects are almost impossible to eliminate.
Fold the fabric lengthwise, edge to edge. Using chalk and a measuring tape, draw out the blanks. If you don’t have tailor’s chalk or a special pencil on hand, you can replace them with a piece of dry soap.
Don't forget the seam allowances. They should be 1-1.5 cm. Follow the direction of the grain thread. All parts of the workpiece must be located in the same direction. It is impossible to allow one element to be cut along and the other across the grain. Otherwise, the finished product may warp and creases and folds will appear on it.
Place marks on the lower edges of each part, the length between which should be equal to the length of the zipper minus 2 cm (1 cm each at the beginning and end of the fastener). If you do not want to use a zipper, then replace it with ribbons.
After you have cut out all the details of the sides of the crib, iron strips of interlining 3 cm wide under all the fastener allowances. The middle of the strip should be on the fold (seam) of the fabric. If the material in this place is not strengthened in advance, it will not only be deformed during sewing, but will also quickly tear.
Making ties and edging
Assembly diagram for a baby crib.
In addition to the main parts, you also need to cut out the ties. They are cut obliquely, at 45°, in relation to the grain thread. Their finished width should be 3-4 cm plus 2 cm (1 cm on each side) for allowances. Accordingly, the width of the workpiece should be 8-10 cm.
The total length of the ties depends on their number. There are usually 4 fasteners (8 ties) for the long section of the side of the crib, and 3 (6 ties) for the short section. The length of each tie is 25 cm. We get the following calculation:
25*(2*8 + 2 *6)=700 cm
That is, the total length of all ties should be 7 meters. Seam allowances are folded and ironed. The tie blanks are folded in half, with the wrong side inward. A stitch is placed along the edge of the tie, placing it as close to the edge as possible.
You can use ready-made braid or satin ribbons as ties.
But you won’t be able to do without edging tape. It will give all segments of the side the necessary rigidity and will not allow them to wrinkle. You can cut it out of contrasting fabric or buy ready-made bias tape.
The length of the edging tape should be equal to the perimeter of all segments of the border minus the length of the zippers. It is cut out according to the same principle as the ties, that is, on the bias. The width of the workpiece should be 4 cm (1.5 cm of finished trim and 0.5 cm of seam allowance).
It makes more sense to first sew all the details of the edging blanks into one ribbon. To make the seam less noticeable on the finished product, individual elements are sewn together using the bias binding principle. That is, the ends of the blanks are folded with their front sides perpendicular to each other; aligning the edges of the allowances, lay a stitch, and smooth out the allowances.
The finished edging tape needs to be folded in half and a cord inserted into it. The tape is sewn along its entire length, trying to lay the line as close to the cord as possible. For such work, it is convenient to use a special foot designed for sewing in zippers. Set the finished edging aside for a while.
Sewing bumpers for a crib
Bumper diagram for crib.
Next, you need to make internal covers for the side. To do this, the parts are folded with their front sides facing each other. If you use padding polyester as a softener, then simply place it under the bottom element and sew the blanks together as 1 piece. Topstitch the segment around the entire perimeter, leaving a gap of 10 cm in length in the seam. This will be needed to turn the cover inside out.
Trim the fabric allowances close to the stitching, and cut diagonally at the corners. Turn the workpiece inside out, straightening the corners with the tips of the scissors. Place foam softener inside the part and sew up the remaining hole.
Place the outer cover pieces right sides together. Lay the edging tape between them so that its stitching coincides with the seam of the cover, and the allowance lies between the allowances of the blanks. Be sure to pin the edging tape securely to the pieces. It will be even more reliable to sweep it.
In addition, insert ties between the parts of the workpiece, placing 2 of them at a distance of 1.5-2 cm from the corners of the bumper and 1 in the middle. The allowances of the ties should lie on the allowances of the parts. Sew a stitch around the entire perimeter of the element, leaving an open seam allowance for the fastener.
Turn the cover inside out and iron the zipper allowances. Place the fastener on the inside of the cover so that the fold of the fabric is close to the teeth. Topstitch the piece first on one side of the zipper as close to the edge as possible, then on the other. Place a double backstitch along the short edges.
Pull the outer cover over the side rail segment and tie it to the bed rail. Treat all sides in the same way. If desired, they can be further decorated with appliqués or embroidery.