Stainless steel has been a strategic raw material since the days of developed socialism. After all, the vast majority of Soviet missiles, airplanes and moonshine stills were made from it. True, the price for it, in those distant and glorious times, was quite affordable. As a rule, transferring a standard size stainless steel sheet was equivalent to one bottle of vodka and two toffees. Now the conditions have changed. For strategic raw materials and the price has become strategic. A tank for a stainless steel bath has become equal in cost to a serious investment. How correct is this and how fully justifies the money spent? Let's figure it out.
Do you need a stainless steel hot water tank in a bathhouse?
The answer to the question is not as obvious as it might seem at first glance. Most owners of steam rooms, before buying stainless steel water tanks for a bath, doubted for a long time about the correctness of their choice, and it’s not even the high price of a stainless steel tank, they were frightened by the shortcomings that few people know about.
Everyone knows about the benefits of using stainless steel for baths:
- The tank does not rot or rust, as in the case of using conventional ferrous metal;
- Remarkable appearance of polished steel, decorative qualities;
- Easy care and maintenance of the stainless steel tank. The body can be washed and cleaned with a brush, detergents and even phosphoric acid;
- A container made of alloy steel is not afraid of thermal and mechanical shocks, mechanical load, and there are no chips on the surface of the coating, like enameled products.
For your information!
Stainless steel is an extremely capricious and inconvenient material. It is especially difficult to weld a tank for a sauna stove from thin-sheet stainless steel blanks. Therefore, a good alloy steel cylinder for hot water is usually ordered from companies that have good equipment, and most importantly, high-quality welders.
It is clear that a container for hot water in a bathhouse is not cheap, more expensive than the 70-100 dollars for which you can buy a stainless steel tank in any salon that sells equipment for bathhouses and stoves. Of course, this does not mean that you only need to make a stainless steel tank for a bathhouse with your own hands; far from it, you can buy an excellent model made of alloy or stainless steel with additional functions that will last for several decades without a single comment. You just need to try to choose the right quality product.
Water bath containers: how not to make a mistake when choosing
The main elements of a bathhouse, if you intend to get maximum pleasure from the process, are a stove and a water tank. To ensure that everything related to the water tank in the bathhouse is done correctly, we will dwell on the main issues that may arise when setting up a steam room yourself.
The main questions that arise when choosing an element such as a tank for a bath are:
- Its parameters
- Which type should I choose: remote, built into the oven, on a pipe?
- What should it be made of: steel, stainless steel, cast iron?
Tank parameters
If you are used to doing everything with your own hands, then, of course, you will try to make a sauna tank yourself.
However, you should first think about what type of container is suitable for your steam room, what principle of water heating will be used, what material to make the tank from, so that later you do not have to invest money in re-equipment again. So, you must decide whether you will heat the stove in a sauna or simply heat the water using the heating element built into the tank. And in order to understand what is more profitable for you, heating a stove or using an electrically heated container, estimate how many people will steam at the same time. Another important factor is the volume of water that needs to be heated and the allowable time for heating to the required temperature.
Let’s say that if you want to steam alone, a person is unlikely to need more than fifty liters of hot water. But to please the whole family or group of friends, you need to install a water heating tank with a capacity of seventy or more liters.
Also pay attention to the thickness of the tank wall. It is this parameter that determines how evenly the water in it will be heated and how long its temperature will remain. But remember that the thickness of the tank wall directly affects its price and weight.
In any case, a stainless steel bath tank with a volume of up to fifty liters should have a wall thickness of 0.8-1 mm. For containers of larger volume, a wall thickness of 1.5 mm is desirable.
Advice from the master!
And do not forget that no matter what material the tank in the bathhouse is made of, you need to equip it with the optimal number of outlets and make an inlet for water. When choosing a tank in a store, ordering it in a workshop, or preparing to brew a canister for a sauna yourself, take into account all the parameters mentioned, and the process of washing in a sauna will be a complete pleasure for you.
Return to content
Selecting the type of container
It is known that when choosing a tank for a bath, you will need to compare the parameters of the main three types of tanks:
- Traditional, built-in oven
- Remote
- On the pipe
Just a few decades ago, no one would have doubted that the best option for a sauna tank was the one built into the stove. That is, the bottom of the boiler is completely placed in the upper part of the firebox, and, being in the hottest part, has the ability to accumulate the greatest amount of heat to heat and maintain the temperature of the water.
In the case of a built-in one, there is direct contact of the flame with the walls and bottom of the tank and the design of the container does not depend on the chosen method of smoke removal. You can take water from the tank built into the stove either with a ladle through an openable lid, or through a tap, where water from the tank flows by gravity.
Equipping the furnace with heat exchangers connected to the container with copper tubes allows you not to tie it to the location of the furnace, providing the opportunity to install it in any convenient place. In addition, under the influence of the natural laws of physics and following the convection principle, cold water will descend through the tubes down into the heat exchanger located in the furnace, and, having heated up to the desired temperature, return to the container. The remote tank in the bathhouse can be placed in the washing room, where the main hot water is collected.
Of course, it is important that the water in the tank not only heats up quickly, but also that the required water temperature is constantly maintained with minimal energy consumption. For this purpose, many people prefer to place the sauna tank on a pipe that serves to remove smoke from the stove. The smoke released during the combustion process can reach a temperature of 500°C and, of course, the water in the tank located around the pipe heats up quite quickly.
The above means that when planning to place the tank on a pipe, you can choose containers of a fairly large volume, since the heating element can be used along its entire length - from the stove to the ceiling. In this case, the water will heat up not only quickly, but also evenly. This happens because by making an elliptical tank, you can heat even a large volume quickly, since the pipe in this case, passing through the center of the tank, is a kind of heat exchanger with a significant working heat exchange area.
In addition, when placing the tank on a pipe, the unpleasant situation with the possibility of carbon monoxide entering the room is eliminated, since the canister serves as a kind of fuse in the event of smoke leaks.
If the type of tank is selected, it remains to decide on the type of fuel that will be used to heat the stove. In modern conditions, wood-burning stoves are increasingly being replaced by electric heating elements, because electricity is a cheaper and faster way to heat water compared to wood. However, many will argue that the smell of a burning log cannot be replaced by anything. And it’s hard to disagree with this.
But, on the other hand, if you really want to breathe in the smell of burning firewood without having to fork out too much to heat the sauna with wood, then after the steam room you can sit in the relaxation room in front of the fireplace with logs crackling under the influence of the fire.
Return to content
What material should the tank be made of?
Previously, cast iron was almost always used for bathhouses. And although it took several hours to heat the water in such a tank, which required a considerable amount of firewood, the temperature of the water in it was maintained long enough for the whole family to steam in the bathhouse. In addition, cast iron is not afraid of high temperatures and has a high degree of corrosion resistance. The main disadvantage of cast iron canisters is their heavy weight.
The most popular are stainless steel sauna tanks. Firstly, it doesn’t hurt your head that they will need to be protected from the corrosive effects of moisture. Secondly, stainless steel is characterized by a high coefficient of thermal conductivity and the water in such containers heats up quickly. Thirdly, the coefficient of deformation of stainless steel under the influence of sudden temperature changes is insignificant compared, for example, with ferrous metals.
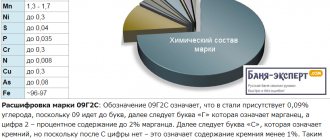
The best material for making tanks is stainless steel, which is used in the production of cookware. It is steel grades 8-12X18H10 (304) and 08X17 (430) that are endowed with such properties as high heat resistance, resistance to deformation under the influence of high temperatures, hygiene and corrosion resistance.
If you purchase a stove complete with a tank at, as they say, a low price, then be prepared for the fact that you will soon begin to worry about the question of why the tank in the bathhouse rusts. Don’t be surprised: at a low price you won’t find a stove complete with a stainless steel container. In order to avoid the unpleasant consequences of contact with “rusty” water, it is necessary to wipe the tank dry after draining the water.
Of course, using an enameled version in a bathhouse can also protect you from rust. But the enamel can chip, which is a significant drawback of enameled containers and is absolutely not inherent in stainless steel tanks. When using a tank made of metal that is susceptible to corrosion, you can get rid of rust only by coating the metal with a special heat-resistant paint.
Painted tanks can be used in a bathhouse if they are not built into the oven, but cover the frying plate with their bottom, which serves as a kind of dissipator of temperature shock, evenly distributed over the entire area of the stove.
So, the most practical and durable option is a stainless steel tank.
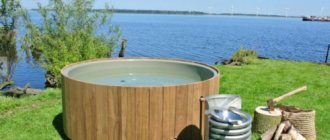
The most modern designs of sauna tanks have long been no longer built into the stove, but are more often remote. Such containers have a rather aesthetic appearance and do not spoil the pleasure of healing steam and the healing effect it has on the body and the organism as a whole.
A modern bath tank is a rigid welded structure, which is made of thin stainless steel sheet, equipped with an inlet for introducing water, as well as shut-off and distribution valves in the form of ball valves for drawing hot water from it. Such a tank does not rust, and therefore does not need painting. In addition, caring for him is simple and will not cause any difficulties for his owners. Typically, a sauna tank is made of stainless or chrome steel. This material not only does not absorb light, but also additionally illuminates the room, increasing the illumination when reflected.
Advice from the master!
The main thing is to observe all the installation features described in the instructions when installing and operating the container. Or, when making it yourself, comply with the necessary safety conditions. Especially if draining water in winter to avoid freezing of the system is not a problem, then any tank will last a long time and will not cause unnecessary trouble.
poparimsya.com>
Construction of stainless steel tanks for a bath, what to look for
In a modern steam room, several standard options for containers for obtaining boiling water are used. The design of stainless steel water tanks depends on the method of heat extraction from the stove, so the container is selected, first of all, taking into account the structural features of the chimney, installation location and the need for boiling water for the washing department.
The salon most often offers to buy one of three models:
- The most popular and safest is a mounted tank, made of thin-walled stainless steel, most often in the shape of a “suitcase”. To heat water, it is mounted on one of the side walls of the stove;
- An attached tank, or samovar, is a cylindrical container, inside of which a section of the stove chimney pipe is embedded. Heat for water is removed from combustion products and flue gases through the walls. Available in a variety of stainless steel grades;
- A wall-mounted or wall-mounted tank, heat is removed from the stove using a coil built into the firebox. The stainless steel container is located a short distance from the heater, so this model is considered the safest.
If in the first two cases the use of stainless steel is justified by the high temperature of the hot furnace walls, then a hanging stainless steel tank for a bathhouse is considered to be an element of room decor.
Is it worth buying a stainless steel hanging tank?
According to many experts, the beautiful, shiny body of the container does not experience any stress, either thermal or mechanical, therefore, thanks to the alloyed metal of the walls, it can last an unlimited amount of time.
If, when purchasing, you have the opportunity to choose the type and material of the container, then it is best to opt for a hanging tank made of stainless steel. Any containers made of ferrous metal, even with galvanization and a protective layer of paint, rot within 2-3 years of operation. As an illustration, mention may be made of electric boilers used for hot water in apartments.
The walls of a low-carbon mild steel tank, even if coated with a layer of ceramic enamel, are still subject to pitting due to the simultaneous action of water, high temperature and atmospheric oxygen. The service life of this container is extended thanks to built-in magnesium anodes. A similar situation arises with hot water tanks in the bathhouse. The production of stainless steel tanks, especially large ones, requires serious expenses, so they are not cheap, but in any case, the money invested in the purchase is worth it.
For your information! Stainless steel has very poor ductility; even a small amount of water in the tank, left in a bathhouse at the summer cottage in winter, can cause cracks in the welds.
Bath tank: what volume to choose?
Having estimated with a small margin how many people will steam and wash at the same time, based on 20 -25 liters per adult (on average), it is easy to calculate the desired smallest volume of a tank for a bath. Usually, for 3-4 people, they choose tanks with a capacity of 85 liters; this is a fairly convenient volume that will allow all participants to wash themselves. Of course, you can use bath tanks with a volume of 50 or 65 liters, but then, most likely, you will have to add water to the tank as it is consumed and wait until it reheats.
Features of the operation of mounted tanks
Cylindrical containers, or “samovars,” operate under the most severe conditions of high temperature. The chimney wall can heat up to 500-600°C. The metal of the walls burns into scale, as they say, to holes. In this case, using a stainless steel pipe for a sauna tank can be considered the best option.
The lower part of the tank is a metal glass with which the container is placed on the flange of the heater. This is the most loaded part of the structure. In addition to the high temperature of the walls, the weight of the tank itself and the water supply presses on the lower part of the stainless steel body. Plus, the hot glass gets the most boiling water and steam from the stones. In such conditions, ferrous metal burns out into rusty dust within a few months, so when choosing a specific tank model, pay attention to the bottom of the container; the thickness of the metal in this place should be at least 1.5 mm.
When choosing and inspecting stainless steel tanks for a bathhouse stove, it is imperative to pay attention to the quality of the welds on the bottom of the tank. The bottom part of the container of tanks from well-known Finnish and Swedish manufacturers is made of thicker metal or reinforced with stiffeners. In addition, the welding seams at the junction of the inner pipe, bottom and outer walls must be smooth and continuous, this indicates high quality welding.
Attention! Stoves and heaters in the bathhouse, equipped with mounted stainless steel tanks, cannot be heated without water.
If a container for hot water made of non-alloy steel is often deliberately not filled with water until the heater is ignited and completely lit, in order to speed up the process of gaining temperature, then in the case of stainless steel, such a “trick” can result in a burst wall or a dented bottom. Alloy steel has low thermal conductivity and a high coefficient of thermal expansion, therefore, during “dry” heating, severe stresses arise in the stainless steel glass and bottom part.
If a similar situation occurs, then you cannot pour water into an alloy steel container; you need to turn off the firebox and allow the stainless steel tank to cool to at least 50-60°C.
The procedure for connecting a stainless steel water tank
Important notes before you begin
It was previously noted that the most common options for mounting the tank are: inside the stove, away from it and on the chimney pipe. We propose to replace the first option with a method in which the tank is installed above the stove. This method is easier to implement, and you can resort to its use even if the stove has already been built - suddenly you first thought that you would not need such a heater, but after studying the material presented, you understood all the advantages of using it and wanted to install it in your bathhouse .
Important! The mentioned replacement will be possible only in the case of a collapsible chimney. The proposed method involves the combined installation of a tank - it will be simultaneously placed above the stones and around the chimney pipe, which will make the efficiency of heating water as high as possible. Otherwise, you will either have to give preference to the built-in tank model (if the stove is just being built), or install the unit at a distance from the stove.
If the stove is brick, preparing the space for the tank and its direct installation are carried out during the laying process (the specific stage depends on the chosen stove design and the size of the firebox, most often it is row 10). When laying a row, an opening is left to accommodate the tank. The size of the opening should be several millimeters larger than the dimensions of the structure being installed to compensate for thermal expansion.
The diagram shows an opening for installing a tank
Note! In the spaces between the marked quarters of the brick, pipes are laid, the presence of which will help to increase the heating efficiency - these are the design features of this particular furnace unit; these pipes may not be present in the project you have chosen.
The stove with the tank installed looks like this.
Oven with installed tank
A plumbing tap is embedded into the wall of the tank from below. It is assumed that the user will draw hot water directly from the steam room. If desired, the design can be improved by cutting in the previously mentioned pipe instead of a faucet, connecting a water pipe to it and leading it to the washing room.
When the masonry is brought to the upper edge of the tank, 2 metal strips are laid on it, the presence of which will allow you to safely cover the storage tank with bricks.
Tank overlap diagram
Next, the tank itself is covered and subsequent laying is carried out in accordance with the specifically selected furnace design.
Covering and further construction of the furnace
In the case of metal sauna stoves, the water tank is welded above the firebox (recommendations regarding welding were given earlier). As a result, the container is heated by flame forces, which ensures the fastest possible preparation of water. The design looks something like this.
Example of a sauna stove with a water tank
Important! If preference is given to a built-in tank design, for its manufacture you should use metal with a thickness of more than 1 mm and, at the same time, ensure that the quality of the welds is as high as possible. Otherwise, the tank will either quickly burn out or leak through poor-quality seams.
Helpful advice! In the case of a brick stove, you can take a simpler route by placing a water tank on the stove body above the firebox. The design looks something like this.
Water tank above the firebox
Installing a water tank above the heater
This method, as noted, involves combining options for installing the tank above the heater and on the chimney. The distance between the heater and the bottom of the tank is usually maintained in the range of 20-35 cm, with the possibility of changing in both directions: the smaller this indicator, the faster the water will heat up, but the tank will last less, and vice versa.
It makes no sense to provide detailed step-by-step instructions - you already have all the necessary knowledge. Previously, we described how to prepare holes in the bottom and lid of the tank for passing a smoke exhaust pipe through them. Do it.
Next, you need to pass the smoke exhaust system element through the internal cavity of the tank and connect the pipe to the tank at the inlet and outlet points (in the bottom and lid) by welding. You also know how to do this.
Stainless steel water tanks are relatively lightweight (for example, cast iron is much heavier and a tank made of it would require fixing to the ceiling using chains or other suitable means) and do not require additional fastening. Further installation of the chimney is carried out according to the standard scheme, depending on the selected type of structure.
Ideally, the finished system will look like this:
Tank installation example
Rectangular tank of samovar type
In the example image, the pipes and taps are not visible. The next design is not so beautiful in appearance, but the connection of the water outlet is clearly demonstrated here.
The photo shows the tap and water supply pipe
As for the supply of cold water, it can be organized in several ways, depending on the characteristics of the specific situation:
- The tank is filled manually;
- water is supplied from a well/well;
- Water is supplied from a centralized water supply system.
We will not consider each of the listed options in detail, because... These are topics for separate lengthy instructions.
Installing a remote water tank
The setup of such a system is also not overly complicated. The only thing is that the circuit is supplemented with a new device - a heat exchanger. It can be built-in or external. For self-production, it is better to choose the second option - it is more convenient and easier to implement.
A diagram of a system with a remote water tank is shown in the following image.
Diagram of a system with a remote water tank
Here we see that the external heat exchanger is installed on the chimney pipe. The water in the heat exchanger is heated by the heat of the flue gases transferred through the walls of the pipe. If there is an open heater under the heat exchanger, additional heating will be carried out by the heat of the hot stones.
Heated in the heat exchanger, the water goes into the external tank, from there, cooling, back into the heat exchanger. Water circulation will be ensured through the created slopes and pressure differences in the container with hot and cooled liquid.
Remote tank
Remote hot water tank 60 l
You can make a heat exchanger yourself. In essence, this is the same water tank, the manufacturing instructions for which you have already studied, only of a smaller volume (usually up to 5 liters). The heat exchanger is installed in the same way as the tank in the previous instructions (on the chimney pipe).
Tube heat exchanger
Register – heat exchanger for sauna stoves
Installing a built-in heat exchanger in a sauna stove
Prices for heat exchangers
heat exchanger
You already know how to make the necessary holes, install pipes, taps and pipes. Where to do this - see the diagram. All that remains is to prepare all the required elements and assemble them into a single system, maintaining the necessary distances and slopes in accordance with the above diagram.
In this example, a remote water tank is installed in the washing room and is equipped with a standard plumbing tap for draining water. The pipes, like the mentioned tap, are embedded in the bottom of the container. Holes for laying pipes through the partition can be made using a suitable tool, for example, a hammer drill.
In accordance with the current provisions of current standards, cold and hot water supply pipelines, if they are laid through a partition, must be laid through a sleeve. The diameter of the latter is selected so as to be 0.5-1 cm larger than the outer diameter of the pipe being installed. To seal the gap between the sleeve and the pipe, fireproof soft material is used to ultimately ensure the possibility of moving the pipe along the longitudinal axis in the event of thermal expansion. This is shown schematically in the following image.
Passage of water supply through the ceiling
The gaps in the partition can be masked in any suitable way, for example, by filling with the mentioned soft fireproof material and covering it with an external finishing element (lining, etc.).
All that remains is to figure out how to mount the water tank on the wall. The simplest option is installation on metal corners, the power of which would be sufficient to support the weight of the water tank.
Fastening is carried out as follows. Having attached the corners to the wall, you place marks on the surface, drill holes according to the marks and install dowels in them. Next, screw the corners to the wall using bolts 8-10 cm long and 1-1.2 cm in diameter.
Tank mount
You can install your water tank on the corners. The method is extremely simple to implement, but not the most reliable (we made a mistake when choosing the corners - they bent - the tank fell), and it is objectively suitable only for rectangular structures of small volume. The fastening method used when installing household water heaters is more reliable. To implement it, you will have to work with the welding machine again. You already have all the necessary knowledge, so no additional explanation is required. The procedure is as follows:
- a strip of metal is cut (the same stainless steel will do) with a thickness of 1.5-2 mm, a width of 5-10 cm and a length so that it protrudes beyond the side walls of the heater by several centimeters on each side;
- holes are drilled in the strip according to the diameter of the fastening bolts (you will understand by looking at the image below);
- the finished mounting strip is welded to the rear wall of the tank.
Further actions are similar to the previous instructions, with the only difference that the water tank is not installed on the corners, but is attached to the wall through them using a welded strip. It looks like this.
Fastening the tank through the bar
The tank is installed. You can test and, if everything is normal (no leaks, excessive heating and other unfavorable phenomena), accept the structure for permanent operation.
If desired, the system can be improved almost indefinitely, equipped with a variety of automation, measuring instruments, etc. The possibility of installing additional wiring to connect the tank to the shower stall in the washing room cannot be ruled out - this will allow you to wash with maximum comfort. An example of the implementation of such an idea is presented in the following image.
Connection diagram for a remote tank and a shower cabin to a sauna stove
Helpful advice! Install the tank in such a way that it is minimally distant both from the sauna stove and from the point of hot water intake.
Having sufficiently mastered the art of welding stainless steel, if you wish, you can make a tank not from a pipe, but from sheet material - this is a more responsible job compared to the considered option. An example of its implementation is covered in detail in the attached video.
Good luck!
Attached containers made of alloy steel
Structurally, an attached stainless steel tank is a rectangular, square or semicircular container, at least with a fairly large flat wall. A metal box is installed on a cast iron or steel stove in such a way as to ensure maximum close contact between the side or bottom of the tank and the hottest part of the firebox.
Due to lower thermal conductivity, water in a stainless steel cylinder takes much longer to heat up than in steel and, especially, copper tanks. This is one of the reasons why they prefer to make the walls of alloy steel containers as thin as possible. For ease of carrying, the design is equipped with side handles.
At the bottom of the container, a coupling or fitting is welded under the tap for drawing hot water. When choosing a specific model of an attached tank, you need to pay attention to two conditions:
- The hole for installing the tap should be located on the wall opposite the firebox. If you install a ball valve with polyethylene liners closer to the furnace than 20 cm, then during the heating process the internal parts of the valve, made of polymers, very quickly melt and lose their tightness;
- The stainless steel tank body must be equipped with its own fastening to the base, even if the cylinder will partially rest on the wall and parts of the furnace.
Attached stainless steel tanks are very reliable and durable in operation; the container is often used to heat water not only for use within the steam room, but also for any other purpose where warm-hot water is required. It is quite possible for two adults to heat and carry a cylinder of boiling water.
general information
Why are water containers made of metal or any other material needed? The answer to this question is obvious, but for some it remains open. The fact is that everyone uses storage tanks differently. Their purpose is to collect and store water for later use. How and in what form you will do this is up to you to decide.
The tank can have different shapes, depending on its purpose. A regular rectangular large tank can be used to collect rainwater. For a summer shower, you can use a flat, low tank that can be easily mounted on top of a metal frame. It all depends on the purpose of use.
Often, ordinary metal barrels are used as such a storage tank. This is a practical and inexpensive option, but not always convenient. Especially because of its open top, through which insects enter the water, and plants and rust form on the walls of the tank. It can also be used to collect rainwater only if you have drains and it is possible to lead the pipe directly to the barrel.
In order not to have to worry about barrels, craftsmen make homemade metal tanks. They have a simple design and low cost. Below you can see one of the possible drawings of a storage tank. This container is small in size, but quite spacious and holds up to 200 liters of water.
How to make a stainless steel container with your own hands
The retail price of one stainless steel tank of 50-70 liters, regardless of shape and design, is within 7 thousand rubles, a good quality cylinder will cost 10 thousand rubles. If you do it yourself, then making a 50 liter tank will cost only 30-40 dollars.
The amount of work is small:
- Select materials, thin-sheet stainless steel and welding material;
- Cut the body blank, adjust the dimensions;
- Weld a stainless steel tank, check the tightness of the seams;
- Conduct a test within the walls of the bathhouse.
The process is simple, but before you make a stainless steel tank with your own hands, you need to figure out the right choice of materials and select the welding mode.
The best materials for a stainless steel tank
Of the hundreds of existing grades of stainless steel, we need thin sheet metal with the best ductility and weldability. It is not difficult to weld a structure, even if you have to work with a thin sheet, but it is much more difficult to make a weld so that it does not become covered with microcracks.
If possible, it is best to choose austenitic steel, for example, the most popular and well-known stainless steel grade X18N9T. It is easiest to weld in a makeshift garage. As consumables, you can use wire for carbon dioxide semi-automatic machines with a diameter of 0.8 mm. If a stainless steel tank is made for sale, then it is best to look for specialized wire, any kind, as long as the marking contains a link to GOST 2240-60.
It is better to cook a stainless steel tank with wire in argon or carbon dioxide, because the metal is very thin. If you plan to make a tank from a 3-5 mm sheet, then it is best to use a plasma torch or a three-phase welder with a rectifying bridge and ballaster.
Features of the manufacturing process
The easiest way is to make a container of a rectangular or cubic shape; to work, you only need a grinder with a disk, a measuring stick, several bench clamps and the welder itself. The cut wall blanks are joined in pairs using clamps and secured with welding points or small seam strips.
After the side walls and bottom have been assembled, the stainless steel body is finally assembled with clamps and heated with a blowtorch. As soon as the sliver applied to the metal begins to smoke, you can begin to completely scald all the seams. Upon completion of the work, the welded block must be immediately covered with any heat-resistant, non-flammable material and allowed to cool slowly for a couple of hours.