Over time, variations in the location of wires outside the wall, without grooves, have changed. At this stage of technology development, to carry out manipulation, special channels are used in the form of a box made of plastic or metal. Contains electrical cords according to indoor safety standards. But in order to install such boxes correctly, you need to know how they are attached to different types of walls.
The nuances of installing and laying cable ducts
To ensure that the fastening of the cable channel to the wall is reliable and ensures safety, the following cumulative nuances are taken into account:
- The first thing you need to pay attention to is that the box can be made of plastic or metal;
- They also differ in shape. In cross-section - rectangular, round or oval.
In terms of size, there are mini cable channels that are practical and compact. But, there are also floor options that are used to implement hidden installation. This variation is found only in oval shape, so as not to be subject to unnecessary mechanical stress.
In addition, cable channels may differ in other parameters and characteristics. Available on the market:
- Skirting;
- One-sided;
- Double sided;
- Perforated;
- Flexible - for bypassing rounded, curved or concave areas;
- Parapet;
- Industrial;
- Transparent;
- Corner and others.
These parameters are taken into account before installation of the cable channel to various types of walls begins.
The first thing you need to pay attention to is that the box can be made of plastic or metal.
Classification of cable channels.
Depending on the room, the schematic arrangement of the wiring lines and the number of wires in them, it is recommended to use boxes of various types.
Main cable channel options:
- Pipe-based channels, further divided into horizontal and vertical. Similar channels will also include subchannels. The term “conduit” is used quite often;
- Box. PUE, clause 2.1.10 defines a box as a closed hollow structure of rectangular or other cross-section, intended for laying wires and cables in it. Boxes can be blind or with openable lids, with solid or perforated walls and lids. Blind boxes should have only solid walls on all sides and no lids.
- Trays. PUE, clause 2.1.11 defines a tray as an open structure intended for laying wires and cables on it. The tray does not protect against external mechanical damage to the wires and cables laid on it. Trays must be made of fireproof materials. They can be solid, perforated or lattice;
- Channels for laying cable harnesses, most often made on the basis of various types of discrete fastenings (brackets).
Channel cable size chart:
Dimensions of the cable channel.
Separately, we note that the installation of external electrical wiring is carried out last, after all finishing work has been completed.
The procedure for attaching a cable channel to the wall with your own hands
Since it is not difficult to attach the cable channel to the wall, you can perform this manipulation yourself. Here is the procedure to follow:
- First choose the right box. It fits the aesthetic characteristics of the interior and does not stand out on the wall.
- Please ensure that the installation is carried out accurately so as not to spoil the aesthetics of the room.
- Therefore, first a diagram is drawn up, taking into account the characteristics of the house and specific rooms. This way you can take into account the convenience and rationality of placing lines. Draw the shortest path of an electric line between two points.
- Only after drawing up the diagram is marking done, checking the parallelism and perpendicularity of future lines. A level will help here to check whether the line corresponds to the horizon and vertical.
- Lines are marked along the horizontal and vertical lines of writing instruments. At the same stage, the location of the distribution box and future connection points for household appliances are noted using plugs or switch buttons.
- If you have to make adjustments, then do this at the stage of fixing the cable channels.
The installation is carried out precisely so as not to spoil the aesthetics of the room.
Attaching cable ducts to plasterboards
Due to the excessive crumbling of plasterboard boards, attaching such a product to this type of plane is quite problematic. Any attempt to cut threads with self-tapping screws or drill holes will lead to zero efficiency.
Therefore, they use products made of plastic materials, which should be fixed with adhesives that provide the necessary strength. It is better to install boxes that are small in cross-section using double-sided tape.
They use products made of plastic materials, which should be fixed with adhesives that provide the necessary strength.
How to attach a cable duct to a concrete wall
Due to its high mechanical strength, it is possible to install boxes of different sizes (both plastic and metal) onto a concrete surface. Since any type of fasteners can be screwed into concrete.
Due to its high mechanical strength, it is possible to install boxes of different sizes on the concrete surface.
Fastening the cable channel to metal
When it becomes necessary to secure the structure to a metal surface, use special fasteners for the bracket. It allows you to achieve maximum reliability when fixing massive structures in which heavy cables are laid. This method has found application in industrial premises or office buildings, where a large number of electrical cords need to be laid out.
For domestic needs, in the vast majority of cases, they prefer metal screws; they are popularly called “bugs.”
When it becomes necessary to secure the structure to a metal surface, use special fasteners for the bracket.
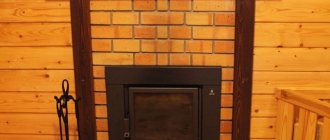
How to attach a cable duct to a brick wall
When attached to brickwork, it is best to use dowels due to their reliability. They can withstand significant mechanical loads. Take into account the peculiarity of a brick wall - do not drill holes in the seam lines, so that when fixing the plastic channel it does not experience sagging.
When attached to brickwork, it is best to use dowels due to their reliability.
Features and varieties
Cable channels are boxes for laying wires made of metal or plastic. The scope of their application is quite wide: interior decoration of offices and apartments, external wiring and ensuring the safety of cables in enterprises.
The functional purpose of such structures is to protect wiring from mechanical damage and open interaction with the environment. Elegant design and ease of use are additional advantages.
All cable channels according to types and sizes are divided into two large subgroups:
- rigid for electrical wiring;
- flexible from corrugated pipes or sections.
In construction, a metal modification of the cable channel is common, where the box body is cast or perforated.
Important! Boxes with a perforated metal body are used only when it is necessary to create a sufficient amount of ventilation in the wiring.
In everyday life, plastic structures are used that are sufficiently rigid to perform their direct functions and have an attractive appearance.
[ads-pc-1]
Methods of fastening to walls made of various materials
Before you begin to attach the cable channel, regardless of its material, it is necessary to clearly assess what type of wall this manipulation will be carried out on. In accordance with this, select the fixation method.
It is necessary to clearly assess what type of wall the cable duct will be attached to.
Fastening the cable channel to dowel-nails
The most common type of installation, which is distinguished by its versatility, ease of installation procedures and low price. This option is suitable for hidden and open installation variations.
But, it is important to consider that dowels, just like self-tapping screws and self-tapping screws, must be tightened to the end. Otherwise, the cap that sticks out may damage the wire insulation.
The method is used on walls made of brickwork, as well as concrete monolith. The fixation step should have a distance of about 45 cm.
This option is suitable for hidden and open installation variations.
How to attach a cable duct with glue
To implement this fastening option, first cut the plastic structure into sections of the required length. Then apply glue along the back of the channel. After this, fixation to the surface is carried out. Hold it a little so the glue has time to set.
It is worth remembering that choosing adhesive compositions is recommended in extreme cases when it is not possible to mount in any other way. For example, when it is necessary to place a plastic structure on tiles or expensive wallpaper.
To implement this fastening option, first cut the plastic structure into sections of the required length.
Features of fastening with self-tapping screws
Most often, such fasteners are used on wooden surfaces or on plasterboard structures. In the second case, it is necessary to carry out the manipulation very carefully so as not to lead to coloring. The distance between adjacent screws is most often in the range of 35...45 cm. It is selected according to the cross-section of the wire and the materials of the wall itself.
Most often, such fasteners are used on wooden surfaces or on plasterboard structures.
Can nails be used for installation?
The use of carnations is extremely rare. There is no reason to choose them.
- They can only securely enter a wooden wall;
- At the slightest mechanical load, they can jump out of the wooden surface and cause damage to the wire;
- Cloves can serve as additional fixation to the glue to ensure increased reliability in case the adhesive composition dries out over time.
The use of nails is extremely rare.
Method No. 1 - Self-tapping screws
If you decide to install electrical wiring in a wooden house or apartment with plasterboard partitions, then the installation of the cable channel must be done with special wood screws. The fastening step depends on what load will be placed on the plastic box, or more precisely, how many wires need to be stretched inside, and what their cross-section is. As a rule, to securely fasten a cable channel to a wooden wall or drywall, it is enough to screw screws every 40-50 cm. If the walls are uneven, it is better to reduce the fastening step, this will hide all defects and gaps.
You should not choose screws that are too long to install the cable channel yourself. To securely fix the box in the wall, it will be enough to screw in fasteners about 40 mm long. For screwing, it is best to use a screwdriver with a Phillips bit. We talked about how to choose a screwdriver for home repairs in the corresponding article!
How not to attach a cable channel
You cannot mount such an element of the product for electrical wires on the surface of the building from the outside. Since water can collect here from passing precipitation. As a result, a short circuit or other problems in the electrical networks are likely to occur.
The following is not allowed indoors:
- Fastening individual cable channel elements at an angle other than 90°;
- They also retreat from the window by at least 10 cm;
- Do not attach the cable duct directly to the ceiling. You will have to retreat 15 cm;
- It is impossible to secure the cable channel, leaving the corners around the corners uncovered. In these places it is necessary to use special corner nozzles;
- For fastening, select only those materials that can provide reliable fixation. Otherwise, a wiring break may occur.
You cannot mount such an element of the product for electrical wires on the surface of the building from the outside.
Main varieties
Depending on the modification, the dimensions of the cable channels, their shape, material of manufacture and technical parameters vary. In everyday life or for registration of wiring in offices, the following are most often found:
| Name | Peculiarities | Areas of application |
| Mini | Box with a small cross-section. They hold up to 3 small cables. Installation of mini cable channels is carried out using self-tapping screws. When turning the wires, the joints are poured at an angle of 45° or plugs are installed. Typical sizes range from 10x10 mm to 60x80 mm | Most often used for Internet, television and telephony. |
| Flattened floor | An oval profile, which is used if it is not possible to route cables around the perimeter of an office or apartment. When installing, one edge of the box is attached to the floor with self-tapping screws, then it is closed with a lid and plugs are placed at the joints. Made from aluminum, galvanized or hard plastic. Size variations: from 16×6.5 cm to 7.5×1.5 cm. Colors include white, black grey, brown and a natural wood option. | They are laid in offices where it is necessary to run the wire to office equipment or a workplace in the center of the wall. Suitable for one or more medium sized cables. |
| Parapet guides | Main (parapet) boxes are made of plastic. There are several variations depending on the type of profile: similar to the “P” burka without a partition, “W” - with three sections, “G” for corners, curly and universal. The main advantage is the ability to adjust the rotation angle from 7 to 45° using adapters. Dimensions from 10×6 cm to 1×2 cm. | Can be used in any domestic premises. |
| Perforated with open access | Made of plastic or metal, it is 30-40% lighter than conventional options with easier installation. They provide good air circulation, have constant access to the wire in different parts of the network and can be installed on curved surfaces. | They are used to connect wires to each other when entering electrical panels or in production workshops, where the appearance of the wiring is not important. |
| Skirting floors | This type of cable duct is fastened using self-tapping screws to the walls or floor. Their design resembles hollow sections with a lid on top. The main selection parameter is the width of the diagonal wall (5 and 7 cm). The advantages include versatility for residential and office premises, variability of colors and immunity to ultraviolet rays. After dismantling the plinth cable channel, it can be reused. | Offices, administrative buildings, apartments and private houses. |
| Flexible | Prefabricated structures made of metal or plastic. Available in different colors, there are corrugated models. Such cable channels protect against mechanical damage, vibration or chemical reactions with the external environment. Such a box is flexible, can reduce noise levels and provide free access to wiring. At the same time, it is easy to replace a separate element, and installation does not require much time. By diameter you can find the following subtypes:
| When connecting wires to machines and other equipment in production. |
| Corner under the ceiling | Installation of the corner cable channel is carried out at the joint between the wall and the ceiling. The triangular shape of the structure fits perfectly into a flat corner. The maximum dimensions of the internal cavity are 4 by 4 cm. Simple installation and light weight of the structure are among the positive aspects of the box. Such cable channels are fixed only under the ceiling due to their fragility. | Any office and residential premises. |
| Transparent with backlight | Externally similar to corner ceiling models. They have a completely transparent lid, tilted at an angle of 45°. They have built-in lighting. | They are used to decorate lighting systems under the ceiling, frame kitchen cabinets and other decorative elements. |
| Industrial wire | Made from metal wire. They provide free air circulation, quick access to wires and do not accumulate dust inside the structure. | Installed in warehouses and workshops, as well as behind suspended ceilings. |
[ads-pc-1]
The types of cable channels listed can be divided according to the degree of rigidity, the presence of a cover or the type of locks at the joints. However, installation of wiring boxes in an apartment is carried out according to the same principle and with general rules.
What can happen if the cable channel is installed incorrectly
If technological and design violations are allowed during installation of products for laying cables, wires and other electrical cords, for example, telephone, the following may occur:
- Fire if a fastener element violates the integrity of the insulation;
- Short circuit, which can cause breakdown of household appliances;
- Under no circumstances should power and low-voltage wires be placed in the same box;
- If there is contact with each other, adverse consequences may occur;
- Take into account the material and quality of the wall - this is a panel house, with wooden cladding or stone and brickwork. This is an important factor that imposes conditions on the choice of fasteners.
Under no circumstances should power and low-voltage wires be placed in the same box.
If the homeowner himself cannot cope with this task or is not confident in his abilities, then it is better to seek the help of professionals. They will be able to ensure the quality of installation work.
Tips and tricks
Before purchasing and installing cable channels, determine the position and number of power and low-current outlets in each location. If you know where and what furniture and electrical appliances will be located, it will not be difficult to count the sockets.
Related article: Calculation of a metal lintel for load-bearing walls
It is more convenient to lay the wires in the channels in one bundle, while simultaneously closing the box. You can pull the wires one by one, securing the already laid covers with a small piece every half meter.
To attach a large number of wires to gypsum fiber sheets, you can use special nylon plugs for screws that are inserted into the wall.
Preparation for installation, surface marking
Open installation imposes increased aesthetic requirements: everything must be “smooth and parallel.” In this case, the box is fixed along the preliminary marking lines. It is carried out using a level (laser or water, construction), a square, a tape measure, a marker, a ruler, a pencil (marker).
Installation instructions Install the box according to the marked markings
Here's how to properly divide the process into stages:
- Initially, a diagram of the optimal electrical wiring is drawn up;
- lines on the wall are drawn by tapping according to the level, all branches are strictly at right angles;
- on them, with a pencil, according to the existing plan, the location of distribution boxes, sockets, switches is marked;
- necessary adjustments are made as work progresses.
You can make turns and angles yourself
At the end, you should calculate the length of the marking stripes, the number of installation points, turns, and corners. This will allow you to order the exact amount of working material.
Turns and corners can be purchased either ready-made or made from cable duct yourself. Using the former leads to increased costs. But work on difficult sections is faster, and the appearance of the route is better than when using homemade ones.
Self-production will require the additional use of sealants to seal seams.
If you have a laser, you don’t have to make markings
Boxes for installation can be cut in advance (for a large area) or during the process. The first case begins with precise measurements using a tape measure along the marking lines.
Then they cut the working material into the required lengths in order to install it later. Accuracy of measurements is important here.
It is easier to carry out the work according to the scheme: try it on - cut it - fasten it.
Drawing straight marking lines and using ready-made components will allow you to attach the cable channel without spoiling the beauty of the room.
Decoration of corners
When installing electrical wiring in cable channels, you may need to make corner joints in the corners of the room or between the vertical and horizontal parts of the channel on the wall. To make a joint in the corner of a room, the end of the cable channel is cut from the side adjacent to the corner at an angle of 45 degrees. It is better to start installing the cable channel from a corner.
To make the junction of the vertical and horizontal parts, the cable channel is also cut at an angle of 45 degrees, but in a different plane. You can do it another way: cut the lid to the full width of the box. Minor defects can be covered with sealant.