Penoplex is a type of foam plastic used in insulation. To know how to attach penoplex to a brick wall, you need to have an idea of the features of this thermal insulation material. Brick is a good and convenient material for building structures, but its main disadvantage is the low level of thermal insulation, especially in the cold season. Penoplex is often used to insulate various buildings; its main advantage is a high level of protection from external environmental influences.
Penoplex is great for home insulation.
Advantages and disadvantages of using penoplex
According to its characteristics, this material belongs to the optimal insulation options:
- low thermal conductivity;
- high moisture resistance;
- strength, flexibility;
- does not rot, is resistant to the spread of mold and mildew;
- can be used at temperatures from -50 to +70Сº;
- does not burn;
- It is lightweight, does not overload the supporting structure, simplifies storage and transportation;
- easy installation, cut with a construction knife;
- service life reaches 50 years;
- low price makes it possible to inexpensively insulate a building.
The disadvantages of penoplex include the following features:
- melts in a fire, releasing toxic smoke;
- insulated surfaces do not breathe due to low vapor permeability;
- the material may be favored by rodents;
- destroyed by exposure to ultraviolet radiation;
- reliable fastening of the penoplex is ensured by dowels.
Main stages of external fastening
When working with penoplex, it is recommended to maintain the technological process and follow the sequence of main types of work:
- Surface preparation. The walls of the house need to be cleaned of dirt and dust. Then treat the wood with an antifungal compound. If mold is present, especially thoroughly soak the affected areas with antibacterial agents.
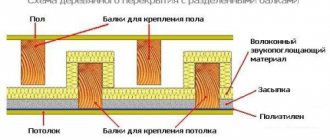
- Installation of sheathing. The sheathing is made of wooden blocks. An important aspect of the process is ensuring clearance. If the wall is made of logs, then the natural shapes of the logs create the necessary ventilation. If the wall surface is smooth, you need to fill the slats up to 2.5 cm, providing the required gap. It is optimal to leave a distance of no more than 1 meter between the slats. If the wall surface is not flat enough, you need to use underlays under the beams to level the plane. If necessary, the protruding parts of the logs are trimmed. You should check the geometry of the sheathing around the perimeter using a level. Doorways and windows are trimmed with timber to secure the edges of the future sheathing along these boundaries. The sheathing is installed with the expectation that the foam boards will be placed tightly between the beams. The height of the sheathing, or frame, must correspond to the thickness of the slabs, and the distance between the vertical beams must be made 0.5 cm less than the width of the penoplex to ensure a tight fit.
- Laying a vapor barrier layer. To protect against condensation, you can use foil or thick polyethylene film. It is secured using construction tape.
- Penoplex fastening. Clear geometry and special edges make it easy to install foam boards, like a children's construction set. The insulation is laid end-to-end, in rows from bottom to top. If necessary, a penoplex slab can easily be cut with a knife, despite the fact that the average thickness of slabs for exterior finishing is 8–12 cm. The slabs should be held in place due to their tight fit, but if necessary, they can be secured with wedges or nails. The joints of the insulation must be taped with metallized tape.
- Securing the waterproof layer. A moisture-proof film is stretched over the penoplex to provide waterproofing. It must be overlapped and secured with a construction stapler or tape.
- The final stage. Finally, a wooden frame is attached to a layer of protected insulation to finish the house with siding or another type of cladding.
You may find the article about façade insulation with penoplex foam interesting. Read about which glue to choose for penoplex here.
Fastening methods
Surfaces made of different materials can be insulated in different ways. The process of covering a building includes several steps:
- surface preparation;
- insulation fastening;
- finishing.
In order to perform high-quality thermal insulation, penoplex should be installed correctly. First, the starting bar is screwed strictly horizontally. The bottom row of insulation is laid on it.
It is recommended to install a factory additional element (perforated, metal). You need to buy a strip that matches the width of the insulation and the required number of corners.
Before installing penoplex, a horizontal level is drawn along the walls of the building. The starting bar is screwed to the line. It holds the insulation and maintains the “geometry” of the installation.
Insulation methods
We insulate the house with penoplex from the outside:
Insulating the house from the outside
Solving the issue of insulating a wooden house is possible without inviting specialists; basic skills in working with building materials are sufficient. It is important that thermal insulation using penoplex is possible both from the inside of the building and from the outside.
But practice shows that external, or external, insulation of a house is preferable for a number of reasons:
- Insulation on external walls will last longer, as it will be better ventilated.
- The external structure will not only serve as insulation, but also protect the walls from negative natural factors.
- External insulation will not reduce the internal living space.
- Work can be carried out in an occupied house without disturbing the internal structure.
Features of fastening to different types of walls
There are buildings made from various building materials (wood, brick, concrete, gas blocks). For different surfaces, taking into account operating conditions, the methods of attaching thermal insulation differ.
The combined method of attaching the heat insulator is especially common. In this case, bitumen (or adhesive) compounds are used together with umbrella dowels. The result is a sealed layer of heat insulation with an increased insulation coefficient. After installation, the surface is reinforced with mesh and decorative finishing is performed.
Brick
Often rough masonry has strong unevenness on the surface. It is recommended to attach insulation to such a base using combined methods. Before installation, the wall must be primed.
Advice! It is recommended to attach penoplex to a brick base with glue, with additional fixation with umbrella dowels.
Insulation of a brick wall.
Wooden
Wooden surfaces are treated with anti-rotting impregnations. Next, a frame is constructed from bars, which will ensure ventilation of the facade (the wood will “breathe”). Free air flow will protect the wood from rotting (a ventilation gap is created). Thermal insulation slabs are installed on the sheathing. Penoplex must be secured with special nails or self-tapping screws.
Insulation of wooden walls.
Block
Walls made of aerated blocks must be insulated and decorated with decor (without protection they become damp). Before installing the heat insulator, the walls must be primed. An uneven surface can be leveled with a drill and protruding areas can be trimmed off. If wall panels are chosen as the final finishing, then the penoplex is mounted on the sheathing. The insulation is attached with glue (fixed with dowels) if decoration and painting are planned.
Insulation of block walls.
Application and characteristics of penoplex
Penoplex has proven itself well in humid conditions.
Penoplex, like polystyrene foam, is a type of processed polystyrene foam. It is produced in the form of a plate and has good protection from mechanical stress and the influence of external factors.
In addition to all this, this material can be used for finishing rooms with a high moisture content. It is often used to insulate rooms.
The material is often used to insulate balconies and loggias.
You can lay such insulation in any conditions both inside and outside the house. It is used to finish the foundation, walls, ceiling or floor. The material will be the optimal solution for thermal insulation of balconies or rooms with high humidity.
For insulation outside and inside the room, it is better to use material of different sizes. For interior finishing, slabs with a thickness of 30-40 mm will be sufficient. For external cladding, a coating with a thickness of up to 100 mm can be used.
How to attach penoplex to the wall
Before you start attaching the penoplex to the wall, you need to draw a diagram with the exact location of the insulation sheets and indicate the dimensions, as well as make markings. This helps to calculate the required number of sheets, fasteners, and glue.
Video:
Inside
Indoor insulation work with penoplex is carried out sequentially:
Insulation inside.
- preparing the wall surface (removing old finishes, priming, sealing cracks);
- fastening of the slabs is carried out in rows (placed with a shift along the perimeter) or in a pyramid (the first row is around the perimeter, then the corners are laid out);
- glue protruding from the seams is removed with a spatula;
- The mounting mesh is laid on the surface of the heat insulator, and finishing work is carried out.
Video:
The procedure for insulating walls using penoplex
Install the insulation on a cleaned surface
. Most work is carried out on a concrete surface. To carry out this operation you will need the following tools:
- perforator;
- hammer;
- plumb and level;
- construction knife.
The insulation process consists of the following stages:
- Surface preparation. Preparation involves removing the old coating, eliminating defects in the form of unevenness, cracks, etc. You will also need to clean the wall from dirt and dust. If mold is found, you need to get rid of it and treat the affected area with a special antiseptic.
- Penoplex fasteners. Since the coating of such a material is smooth enough to fix it well, we recommend treating the material with a needle roller, this will increase the roughness index. 5 fasteners should be used for each slab. If a method with a combination of fasteners and glue is used, the holes for the dowels are pre-drilled and only then the glue is applied. The solution is applied in the center and along the perimeter. We recommend pre-filling the holes for fasteners with foam.
- Finishing. To implement such a finish, a reinforcing mesh is attached to the surface. After which the finishing material is applied. The best methods are screws, dowels, foam or glue. We recommend using the latter methods only for surfaces with low pressure. For more information about the process, watch this video:
As you can see, attaching penoplex is a fairly easy task. The main thing is to choose the right installation option and use only high-quality materials.
Fastening penoplex indoors with finishing plaster
Diagram of the construction of a penoplex sheet with a polymer layer.
The next step in the work is treating the wall against fungal infection. This is optional, but recommended solely for the following reasons:
- Prevention.
- If there was fungus on the wall before the renovation began.
Apply the product using a paint roller in a well-ventilated area.
Next, you can attach the penoplex to the wall. To do this you will need the following tools:
- Construction knife for cutting material.
- Glue with which the penoplex will be attached to the wall.
- A roller with which glue is applied to a sheet of foam.
Since we are talking about an internal insulation system, fastening mushrooms are not needed. It is believed that adhesive fastening is sufficient.
Penoplex is easily cut with a regular construction knife. Foam plastic does not have the characteristic properties of crumbling and making unpleasant sounds when cutting. Therefore, the stage of cutting plates to the dimensions of the selected configuration will be easy and quick.
Now you need to apply a thin layer of glue onto the foam plates. Glue them to the wall, laying them out in a checkerboard pattern.
Where it is possible to put them in grooves, you need to use this property, where it is impossible to apply glue, on joint surfaces too. Connect, leaving the minimum permissible distance between them.
In corners and other places at joints, you can use polyurethane foam that does not contain toluene, that is, you must carefully read the composition of the substance.
Further, the craftsmen advise different things; it is even believed that at this stage you can attach the mounting mesh and perform finishing plaster. It is recommended to use a non-metallic mesh to avoid corrosion.
Insulation of loggias using vapor barrier film
Scheme of insulating a loggia with foil polyethylene.
Often, to insulate rooms, a vapor barrier layer is used, which is foil-coated polyethylene.
Its fastening to the wall can be done immediately after finishing the plastering work; the protective film is glued in strips.
Using dowels, the penoplex plates are fastened.
Make frame guides and attach decorative materials:
- drywall,
- gypsum fiber.
The second method of attaching the vapor barrier layer is labor-intensive and takes up more work space. But it is more understandable, reliable, and therefore more effective.
Immediately after applying the anti-fungal agent, attach the penoplex plates in the same way as with the plaster system. That is, glue them with glue, laying out the slabs in a checkerboard pattern. After this, seal the seams with foil tape. Build a wooden frame using beams treated specifically for this purpose. Place polyethylene foil under the longitudinal slats. After this, attach the finishing layer.
The choice of method may depend on whether the house is panel or brick.
Sometimes it is the second method of fastening that is performed on loggias. It is used in particularly wet rooms, on end and corner walls. It combines very favorably with floor insulation.
Fastening penoplex outside the room
In order to attach penoplex outside the building, you must follow approximately the same rules as inside. You can visit the manufacturer’s website and calculate the amount of material for a specific house or apartment. It is important that, together with recommendations on the amount of penoplex, you can get an unambiguous answer as to what thickness of material is best to use, taking into account the territorial location of the building.
Installation work is carried out taking into account the interior decoration and external material of the house (for example, aerated concrete, foam concrete, brick).
To do this, the wall must be leveled and plastered. There is no point in applying an antifungal agent for external insulation. Therefore, next they carry out installation work on attaching the foam plates. Unlike interior work, this will require mandatory fastening with dowels. Such reinsurance is necessary at least in case of strong winds.
Then seal the seams with foil tape. Thermal insulation is placed under the longitudinal slats, which are attached directly to the penoplex.
After this, siding or any other finishing surface is installed. It is this type of insulation that is reasonable to combine with underfloor heating. This will guarantee that the dew point will either go to the center of the brick or aerated concrete masonry, or move closer to the sheathing, but even in this case it will not create anything critical.
Method one - using bitumen-polymer mastic
This is a fairly simple and common way of attaching insulation to walls. To do this, they usually use brands of mastic specially designed for polystyrene foam, and they are sold in finished form - no need to be fancy, it’s convenient, fast and reliable.
To glue a slab of expanded polystyrene, the composition is applied in dots in the corners, sides and in the center, after which the slab is firmly pressed against the wall, and after 5-10 minutes you can glue the next slab. To increase the adhesion of the mastic to the slab, it is recommended to roll the latter with a needle roller, and only then apply glue.
Types of dowels
Types of dowels
There are 3 types of fasteners:
- with a polymer nail;
- metal nail;
- metal nail with a thermal head.
Plastic dowels are made from nylon, polyamide or polypropylene. They have low strength and price. They are used for fastening to concrete, brick or other hard surfaces. Plastic dowels are not suitable for fixing to hollow walls or foamed concrete. The thermal conductivity of this type of fastener is 0.004 Watt/K, which allows it to be used at temperatures of -40°...+80°C. The length of the umbrella is determined by the sum of the thickness of the insulation and the height of the spacer. The plastic dowel can withstand a load of 20-320 kg, which allows high-quality fastening of mineral wool or polystyrene foam. However, such a fungus is not able to withstand the weight of heavy facing material.
Fasteners with a metal rod are stronger than plastic ones, but have high thermal conductivity. When using it, cold bridges are formed, which reduce the effectiveness of thermal insulation. Metal nails also corrode, leaving yellow stains on the plaster. To avoid this, you should choose galvanized rods coated with a special anti-corrosion layer. This will increase the service life of the entire thermal insulation layer. The diameter of the spacer element is 4-8 mm, and the dowel can withstand temperatures in the range -55°...+60°C. The maximum bearing load is 750 kg.
The standard dimensions of such fasteners are 200x10 mm. They are usually used for thermal insulation of ceilings and facade walls, because they are able to withstand a heavy cladding layer. The only disadvantages include the appearance of cracks through which the cold will pass.
Insulation mushrooms with thermal heads are an alternative to metal nails. They consist of a steel rod, the cap of which is coated with a metal with low thermal conductivity. Typically, impact-resistant polyamide is used for this. The nail is completely covered with a polymer composition that protects it from moisture. The thermal conductivity of polyamide is 0.027 W/μ, which is comparable to mineral wool and polystyrene foam. This results in the absence of cold bridges when installing insulation. The only drawback can be considered the high price of the product.
The dowel can be of different lengths. There are 3 sizes on the market:
- Fasteners 120 mm long, which are used in solid monolithic bases. It holds the insulation well on a wall made of concrete or solid brick.
- The 140 mm long dowel is suitable for installation in loose material. These can be walls made of aerated concrete, hollow brick, cinder block, etc.
- A 160 mm long fastening is used for hollow materials. Such a dowel provides adhesion to the internal parts of the wall, avoiding voids.
There are also threaded anchors that need to be driven into the wall. They are made from the following materials:
- plastics;
- metal.
Metal dowels are used when installing insulation if a heavy facing layer is planned. Plastic fasteners are divided into:
- polypropylene;
- nylon.
Roofing fungi are used when installing soft tiles, roofing felt, acoustic slabs, thermal insulation for concrete, etc. They consist of:
- caps with a diameter of 50 mm;
- fiberglass rod;
- anchor.
Features of fixing thermal insulation to the wall using dowels
The technology for fastening materials such as penoplex, polystyrene foam, and polystyrene foam is the same. First, the thermal insulation material is prepared, then the sheets are fixed to the walls using an adhesive composition. When the solution dries, they begin to fix the penoplex with dowels; before this, all seams must be processed so that cold bridges are not created through them. After this, the thermal insulation material is finished with a finishing coating, this can be various panels or plaster.