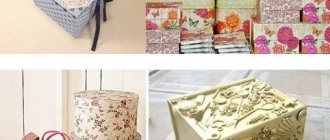
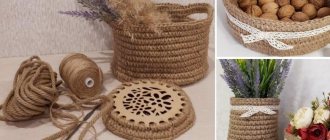
Paper baskets
Small decorative baskets not only decorate the room, but also help maintain order. Containers can be purchased at the store, but it is much more interesting to build them yourself. If you have a lot of scrap paper at your disposal and a few free evenings, you can design cute boxes in the right size and shape without breaking the bank.
Paper baskets are not as moisture-resistant and durable as wooden ones, but they are perfect for storing small items. In addition, thanks to proper painting, their appearance is practically indistinguishable from traditional products.
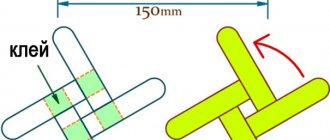
Baskets are woven by hand from paper twine or homemade ropes. The materials used to perform the latter are: baking paper, paper bags, postal leaflets, as well as sheets of newspapers and magazines.
Step-by-step instructions for any weaving technique can be found on the Internet. They are quite simple, all you need is desire and free time.
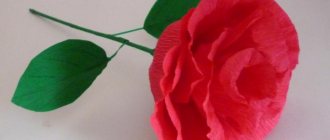
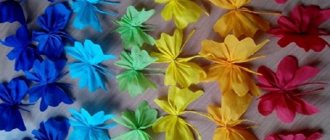
Fans and flowers made of paper
In childhood, everyone made fans out of paper, folding it like an accordion. Large fans that can be placed on the wall and flowers are made using the same principle. For them, colored paper is folded like an accordion; for a flower, the sides are connected into a circle. It is important that the sheet of paper has the shape of a long ribbon. A paper flower is glued to the center.
If you take paper with a pattern—you can buy it in craft supply stores or scrapbooking stores—the fan will look more impressive. You can apply glitter, and then under artificial light they will sparkle beautifully.
Huge flowers and pompoms are made from corrugated paper or thin tissue paper. The principle of creation is the same as that of a fan - the paper needs to be folded like an accordion. The width of the fold is approximately 3 cm. If you want to get a dense pompom, you will need at least 10-12 sheets.
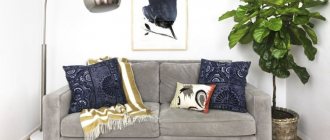
DIY paper decor
Decor idea with paper products
Carefully tie the folded accordion in the middle with strong thread. The edges of the future flower need to be aligned; you can give them a rounded shape. Now carefully, layer by layer, straighten each petal of the future flower, giving it shape.
If you are making a flower to hang on a wall, straighten the petals in one direction; for a pompom, open half in one direction, half in the other. All that remains is to fasten the pompom to a thread, and for the flower, glue a small circle on the back side for mounting on the wall.
Decor design with paper crafts
Interior decoration with paper
Paper decor
How to decorate a Christmas tree with paper decorations
To make the New Year's tree, decorated with your own crafts, look beautiful, you need to hang paper toys and decorations correctly. There are several options for placing jewelry - in a pyramid, in a spiral, vertically or horizontally. Each method is interesting; you need to pay attention to the shape, size and color of homemade paper toys.
Options for decorating a New Year's beauty:
- The top of the spruce is decorated with a voluminous star of a golden hue - the color of the Earth Dog.
- In the coming Year of the Dog, the spruce tree is decorated with medium-sized figures of restrained colors. It is especially important to use decorations made from natural materials - paper, wood, burlap, pine cones and twigs.
- You can place a dog figurine in the central part of the tree to attract good luck and prosperity.
- Garlands of golden, brown, yellow, green, red, purple, and beige colors are used.
- Paper beads, chains, flags connected into a garland are hung in one direction - horizontally, spirally, vertically, top to bottom.
- Medium-sized balls are attached to the tree in a chaotic manner; the toys can be the same or different.
- They complement the decor with figures of Father Frost, the Snow Maiden, angels, and pinpoint several voluminous snowflakes.
Before decorating the tree with paper toys and crafts, a garland with light bulbs is hung on the tree. You can use a little sparkling rain or complement the design with fluffy “snowball”.
The spruce tree is decorated to your liking, but in the coming year the decor should be natural, restrained, in a brown color scheme (all shades), with unobtrusive bright accents - a few red bows, burgundy bells, paper cones, decorated with beads. Then 2021 will definitely bring good luck and prosperity to your home.
New Year's origami crafts (2 videos)
All jewelry options (50 photos)
Useful on the farm
Craftsmen weave various baskets and boxes for different purposes from paper twine or homemade paper strands.
You can put albums, books, toys in the box. Store onions and garlic in a basket in the kitchen.
Boxes are woven from strands crosswise, and baskets are woven in a circle, starting from the bottom. After the item is woven, it should be painted and, after drying, varnished.
Gifts and feast
How can you do without gifts? Everyone loves to receive them. Many people love to give. But how difficult it can be to choose a gift. You can create a beautiful bouquet that is also a vase for sweets. For work you will need: sweets (as many flowers as there will be in the bouquet); chopsticks for Chinese food (same amount); cling film; corrugated paper, green (for stems) and another color (optional); thread (any). Prepared everything you need.
Amazing bouquet of sweets
Now we do this:
- We tie candies to the sticks with thread. If you can’t tie it by a candy wrapper, wrap it in cling film and tape it to a stick.
- We cut the corrugation into rectangles measuring approximately 20 by 10 cm (depending on the size of the candies, you need to estimate how beautiful it will be).
- We wrap each candy and secure with thread.
- We cut in a circle (according to the width of the petals). Forming a flower.
- Cut a thin and long strip of green harvester. We wrap the stem. We fix it.
- If desired, we can arrange a bouquet for a gift. Or we put flowers on tables for decoration and as a vase with sweets.
The bouquet is ready. But that's not all. A successfully set table is half the success of a cook. To decorate the table, of course, we use paper napkins (and use them in the traditional way at the same time). How many ways are there to fold napkins? A lot of.
MK bouquet of sweets
Let's try the three easiest and most obvious options:
- Fan.
To do this, fold the square napkin diagonally. Fold the resulting triangle like an accordion, starting from the long side. Let's fold it in half. Ready.
- Lotus.
We bend each corner towards the middle. The result is a square. We repeat. Square again. We straighten a petal from each corner of the square. Happened.
- Butterfly.
Fold it diagonally. We apply a right angle to the middle of the diagonal (towards ourselves). We apply the left and right corners to each other. Turn the square over. Fold the bottom corners up. Let's shift the triangle base up. Let's form the wings. Here she is our beauty.
New Year's compositions
Everyone knows how to make openwork snowflakes from a paper napkin. Window decor can be made even more diverse. Elements of the composition are cut out of white paper using stencils - forest, houses, deer and Santa Claus's sleigh. You can come up with many stories.
These elements are placed on the window (you can glue them using paste made from flour or starch). If you want to create a completely magical atmosphere on New Year’s Eve, you can place small light sources nearby. They will shine through paper and glass, creating an unusual effect.
To make the interior beautiful, make the composition three-dimensional by cutting out another one of the same size and placing the lighting between the layers of paper. Add glitter to the interior arrangement.
DIY paper decor
Decor idea with paper products
You can make voluminous Christmas tree cones from paper, decorating them to your liking, or Christmas wreaths. They will create a festive atmosphere in your home.
A wedding, birthday, New Year, and just a desire to do something unusual with your own hands are a good reason to pick up paper. With its help you can do the following things.
- Unusual curtains for the doorway - from long, triangular-shaped multi-colored ribbons, twisting them into a “tube”, starting from the wide side. The finished elements are strung on threads and attached to the opening. Such curtains can be made from colored pages of glossy magazines.
- Panel - laying out its elements from paper strips.
- Volumetric letters – having made a blank like a volumetric heart, you can cover them with scrap paper and decorate them with additional elements.
Show your imagination and come up with your own “paper” room. With such decorative items that keep the warmth of your hands, your home will become even more comfortable and filled with love.
New Year's decorations made of colored paper (master classes)
You can make beautiful and unusual New Year's decorations from colored paper with your own hands in advance of the holiday. Such bright crafts are used to decorate a room and hang on the New Year tree. Even a small child can make a simple chain garland.
You need to prepare scissors, glue, several sets of colored paper for crafts, and optionally choose beautiful beads, beads, rhinestones, sparkles, and colored ribbons. Simple New Year's decorations made with your own hands from paper turn out to be interesting and relevant.
Simple garlands
The simplest New Year's garland is a chain. For it, paper of different colors is chosen in order to alternate links with each other. Blanks of any length and thickness are cut, then all the strips are glued together - first, make the first link, thread a paper strip into it, glue it again and repeat the steps until you get a garland of the required length.
Article on the topic: Original table decoration for the New Year 2019 (MK +95 photos)
Another interesting decoration option is a chain of colored hearts, and connecting the elements is much easier with a stapler. By analogy with the previous master class, the required number of narrow strips are cut from colored paper. Take the first two strips, fasten them with a stapler, turn them inside out (as if opening them), connect the two free edges, add two new strips to them and then fix them with a staple. The result is an unusual decoration that looks elegant in the decor of the room.
Garland of paper balls
A more complex decoration is a voluminous garland made up of multi-colored paper balls. Additionally, to make a craft you need a sewing machine, but if you don’t have one, you can do the work manually.
How to make a garland from paper balls:
- Cut out 6 circles of the same size in different colors from colored paper.
- Prepare several sets of circles along the length of the garland.
- Sew a stack of blanks on a machine, then the next one and until the end.
- Carefully wrap the fragments at the seam, forming bright balls.
For crafts, you can use crumpled or non-plain paper - the craft will be more fun. Garlands are hung from the diagonal corners of the room, decorated with them on the Christmas tree, walls, and ceiling.
Garland of flags
A popular New Year's decoration for the home is a garland of colorful multi-colored paper flags. On colored paper, draw the shape of a flag with a fold line in the middle and cut it out. You should get a double-sided element. Flags of a different color are prepared in the same way. Each flag is opened, glue is applied to the fold line and a strong thread is glued until the required number of paper parts for the garland is collected.
Alternatively, the flags can be made in a triangular shape by gluing the free corners of the products. Sometimes scraps of colored fabric are used for such decoration. After the New Year, you can hang garlands with flags to decorate a children's party.
Christmas trees
What's New Year without a Christmas tree? You can decorate this festive beauty with your own crafts made from colored paper. To make a three-dimensional hanging decoration, you need to take paper, scissors, cardboard, glue and tape.
We make the Christmas tree in this order:
1. Cut multi-colored narrow identical strips and make a cone out of paper.
2. Glue the edges of each strip together like a loop.
3. Glue the blanks to the cone starting from the bottom using tape or glue.
4. Decorate the top of the Christmas tree and the loops with any decor; you can also hang decorations on the Christmas tree.
As an option, an interesting garland is assembled from paper Christmas trees - the figures are sewn to a bright ribbon or secured above and below (chaotically) on a colored cord.
Christmas balls
One of the most popular Christmas tree decorations is balls. Colorful, bright, shiny toys make the Christmas tree more beautiful and fun. New Year's balls can be made from colored paper.
From paper strips
To make a simple ball, cut out thin paper strips (at least 18 pieces, more stripes, a more beautiful toy) and two small circles. Select a large bead, insert a thread into it, and thread both ends of the thread into the eye of the needle.
After this, a paper circle and all the prepared strips are threaded onto a needle along one edge. The next step is to string the second edge of each strip, the second circle and another bead in order, and draw out a loop. If you loosen the thread, you get a beautiful ball-shaped toy that can be further decorated.
From circles
This option is even simpler:
- Cut out many circles of the same size from colored paper.
- Stack the circles and draw a fold line in the middle.
- Along this line, fasten the circles with staplers or sew them together.
- Place a drop of glue between each pair of circles, either from above or from below.
- Glue the toy pointwise to make the ball voluminous.
Woven paper balls
You can use ready-made patterns for New Year’s decorations to make balls and make them out of paper with your own hands or weave complex toys. Curly stripes and a small circle are cut out using the templates. Lay out the parts in the shape of a flower and glue a circle in the center. Next, the strips need to be woven like a braid from many strands.
To prevent the structure from falling apart and to make it convenient to work, the strips are fixed with ordinary clothespins. By the end of the weaving, a ball will be formed, the edges of the figured strips are again fastened with a circle and a loop of shiny thread is threaded.
Option 1
Option 2
Option 3
In the video: New Year's ball made of colored paper.
Magic lamps
Lanterns made of colored paper look unusual and original on the Christmas tree. Decorations are easy to make, even children can handle the job. The lamps symbolize warmth, wealth, prosperity and good luck. There are several simple master classes on how to make Christmas decorations with your own hands from paper in the form of lanterns for a Christmas tree.
The most popular option: take two sheets of different colors, glue a tube from one - the middle of the lantern, and fold the second sheet in half, step back 1 cm from the edge, draw a line. Then cuts are made from the fold to the drawn line. The cut sheet needs to be opened, wrapped around the cylinder tube, glued the edges and made a loop-handle at the top of the flashlight.
Lantern made of stripes
To make a beautiful toy, you need to cut many thin strips of colored paper - all the details of the decoration should be the same in size, approximately 15 cm long. The strips are folded edge to edge, each piece is pierced in this place with a needle, pulling a lace or thread through them.
Related article: How to stylishly decorate your home for the New Year: current ideas
The free edge of the lace is pulled through the hole on the other edge of the strip and gently pulled to form an arc - an elongated loop. The upper part of the lantern (where the edges of the strips) are glued with a thin strip of paper in a circle, and the rounded loops will hang freely, forming a pear-shaped lantern from thin strips.
Chinese lantern
The Chinese are the inventors of paper, they learned how to make interesting decorative items from it. A Chinese New Year lantern will decorate the holiday tree. To work, use a diagram; you can draw the segments of the flashlight yourself. The size of one part is on average 10 cm; according to the diagram, there are circles at the top and bottom of each segment for attaching a flashlight.
How to make a decoration:
- Transfer the drawing onto colored paper.
- The flashlight is made of six segments.
- Cut out the workpiece and glue the edges.
- Form the top and bottom of the flashlight.
- Sew the lower circles with thread, then the upper ones.
- Make fastenings and a loop. A cute Chinese lantern is ready.
Use this template to cut out the lantern segments
sky lattern
The decoration will be made on the principle of a flying lantern, but there is no need to launch it into the sky. The decoration is made from bright colored paper. You need to prepare a large sheet - 24 by 60 cm. It is folded in half, and then in the shape of an accordion. Next, the sheet is unfolded and triangular creases are made in the center (along the fold line). The same creases are made at the top and bottom. A figurative triangular cylinder is glued from the blank, and a bright loop is glued.
Ded Moroz and Snegurochka
The New Year is unthinkable without the main characters of the holiday - Father Frost and Snow Maiden. They are quite simple to make, using colored paper of blue (dark blue), red, white, yellow to cut out the elements of the New Year's figures yourself.
A circle is cut out of blue paper for the Snow Maiden, and from red paper for Santa Claus. The circles are cut to the middle, rolled into a cone and glued together to form the bases of the figures. Separately, a flat kokoshnik is cut out for the Snow Maiden, small slits are made on the cone and the resulting element is inserted into them. First, the figure’s face, drawn on a white oval, is glued onto the kokoshnik, and a yellow braid is glued to the back. For greater realism, you can make small cone-shaped hands and decorate the bottom of the Snow Maiden’s coat with white fringe.
Santa Claus' face is drawn and glued to the base cone. Then a small red cone is cut out. A mandatory element of decoration is a thick beard; if desired, you can make a bag with gifts.
To make the figures of the main New Year's characters more durable and voluminous, you can use colored cardboard instead of paper. To make a fringe or beard, white paper is cut into thin strips, each strip is wound around a pen or pencil - the result will be three-dimensional. You can decorate the finished figures at your discretion with snowflakes, stars, and pieces of cotton wool.
New Year's wreath
New Year's decorations use a wreath to symbolize prosperity, longevity, hope and happiness. The wreath serves as a kind of amulet for the family hearth from various troubles. Traditionally, the decoration is hung above the front door. To make a very simple construction paper wreath, you need more green sheets. The child must be involved in the creative process.
Master class on making New Year's door decor:
- Choose a large plate, trace its outline on a sheet of colored cardboard (the wreath will be stronger) - this is the base.
- In the center of the large circle, a smaller circle is cut out under the saucer, resulting in a wreath ring resembling a donut.
- On green paper, trace the child’s palms with a pencil and cut out many fragments - the more, the prettier the decoration.
- The “palms” are glued onto the ring, partially overlapping each other. It’s okay if it turns out messy – it’s more interesting that way.
- Bright decorations are glued to the top of the “palms” - bells, bows, ribbons.
Original lamps
Designers are increasingly demonstrating exclusive versions of modern lampshades. Such clothes for lamps often cost a lot. However, this is not a reason to take outdated specimens out of the attic and decorate lamps with them. Let's look at some varieties of incredibly interesting paper lampshades that you can design yourself:
— Improvised rose garden. To create a floral miracle you will need 24 paper cups. Openwork roses are produced from them. It's not very easy, but the result is worth it.
— Another way to use the cups is to cut off the top of each of them and attach the parts to a Chinese lantern. Very bold and unusual.
— The Chinese lantern is a universal attribute in our business. You can also stick paper feathers, butterflies, flowers or circles on top of it. The lighting will be very soft and pleasant, and the atmosphere in the room will become more comfortable.
— Table lamps. Lampshades are constructed using weaving techniques or by attaching ornate paper plates to an existing base. Looks very stylish!
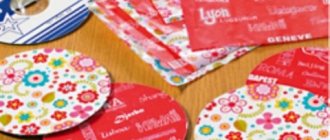
DIY paper crafts - photo
We talked only about a small fraction of those paper crafts that can decorate your interior. It would take a very long time to describe the various techniques, but it is much better to see the finished products with your own eyes. This is what we suggest you do. Our photo selection is at your service!