Cleaning old walls with sandblasting
Good day, dear readers!
The bathhouse is a building where magic hovers! The owners of steam rooms are truly lucky because they can enjoy the mysterious magic every day. And in order for the charm to always hover in the atmosphere of the national health resort, you should take care of it carefully - carry out repair work on time.
If, due to certain circumstances, this process is neglected, you can say goodbye to the bathhouse, since the lack of major repairs is the main reason for the destruction of the entire structure. The process, without a doubt, requires enormous financial investments, however, the sooner you start repairing the bathhouse, the cheaper the remodeling will cost.
In addition, if you do the work yourself, you can save money. In some cases, it is advisable to seek the help of professionals who specialize in repairing a particular facility on a turnkey basis. But do you want to fix the bathhouse yourself? Then let's begin this entertaining process.
Analysis of the state of the bath structure
At this stage, before restoring the bathhouse, you will need to identify all the defects that have arisen during operation, choose ways to eliminate them and draw up a list of repair work.
The inspection is carried out in the following sequence:
- First, the walls are inspected. Check the quality of the insulation, whether cracks, cracks and other defects have appeared on the walls.
- Next, inspect the foundation. If subsidence and significant cracks have formed in it, then in this case repairing the foundation may not be practical. The bathhouse will have to be dismantled.
- Now you can inspect the ceiling, roof, chimney and stove. There should be no gaps in the ceiling and roof, and the insulation should be intact. The chimney and stove must also not have cracks, chips or other similar defects.
- Windows and doors are inspected; they must be hermetically sealed; distortions and other damage are unacceptable.
- There should be no fungus on the floors and walls inside the room, and the floor boards and partitions themselves should be checked for strength.
- And finally, you need to check the condition of the bath drainage system, shelves and bath furniture.
Once all the building sites in need of repair have been identified, a work plan has been drawn up and all materials have been purchased, you can proceed directly to the repair work.
Heating restoration and modernization
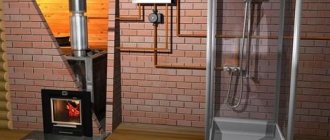
The most important element of a bathhouse made of logs and any other building materials is the stove. If the bathhouse has not been used for a long period of time, then it is necessary to check its condition, clean the chimney and replace failed elements.
If necessary, a brick oven can be replaced with a metal boiler, purchased in a store or made by yourself. The advantages of the boiler are obvious:
- firstly, it is more compact;
- secondly, it has greater heat transfer;
- thirdly, with a boiler it is much easier to arrange a heating and heat exchange system.
Of course, you can leave the oven on too. After checking its functionality, it must be painted with chalk or lime.
Foundation repair
Restoration of the foundation in the bathhouse will be required if such defects appear: a slope of the base of the floor was discovered, traces of destruction began to appear on the walls. It will be necessary to drain groundwater using drainage devices, high-quality blind areas and storm sewers.
After you have gotten rid of the cause of the subsidence and other shortcomings, you can proceed to restoring the foundation of the bathhouse.
You will need to perform a number of these steps:
- Preparatory work to move the bathhouse is being carried out. To do this, its internal space is freed from all objects without exception, even from the stove.
- To raise a small wooden bathhouse, you need to stock up on several jacks and beams to fix the bathhouse in a new position. This process must be carried out carefully, slowly, so as not to disturb the geometry of the walls. If this happens, it will be very difficult to give it its original proportions. The bathhouse is raised with jacks in stages, starting from one corner, which rises to a small height, and moving to the opposite, raising it to the same height. Each new height must be fixed by placing beams. Such actions are repeated until the bathhouse is raised to the desired height.
- At the next stage, the area under the bathhouse is cleared to lay a new foundation.
- Now they are installing formwork and making frames from reinforcement.
- After this, cement mortar is poured into the formwork. To save it, it is allowed to add a certain amount of stones to the formwork.
- After the cement mortar has hardened, the resulting foundation is covered with a coating or rolled bitumen water-repellent layer.
- After three weeks have passed, the formwork is removed, and the bathhouse is lowered onto the finished foundation. The lowering process should also take place carefully and step by step, moving from one side to the other.
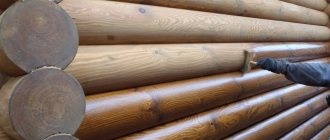
Tree protection
I started treating the wood with a protective coating from the ceilings. The ceiling in the steam room was treated with linseed oil. The ceiling in the washing room and dressing room was covered with a scuba tank with Eurotex-sauna wax. Then the walls, door and window openings are the same, the steam room is linseed oil, the dressing room and washing room are Aqualak, only in three layers. At the last stage, the floor, as I already said, had to be sanded in places. The floor was treated with Eurotex-sauna, also three times in all rooms.
The baseboards and corners were treated separately, the “spare parts” from the steam room were treated with linseed oil, the rest with scuba diving. Eurotex dries quickly, the next layer must be applied half an hour after the previous one.
Bathroom floor restoration work
When checking the floor, the condition of its finishing, embedded beams, joists and the lower crown of the frame is determined. Based on the unpleasant smell coming from under the floor, one can conclude that it is rotting. It is difficult to determine by eye whether the material is spoiled, because outwardly it may look normal. The easiest way to determine the condition of the board is with an ordinary awl. If the tree is rotten, it is pierced very easily.
The destruction of the joists occurs from the end part. If a moisture-repellent layer has not been laid, then destruction occurs much faster. Rotting of the floor can be very dangerous for frame baths and log houses, since the destructive process can spread to the walls.
If spot repairs of floors are required, then pieces of damaged wood are cut out in the right places, and new boards are driven in their place. After this, the entire surface is leveled, and unevenness is removed with a plane.
If logs, embedded crowns, rough or finishing coatings have rotted, they should be replaced immediately. In this case, the entire floor will need to be jacked up, the lower part of the frame removed in parts, and the old embedded beams replaced with new ones.
After the new embedded elements are installed, the logs can be secured to them, and a new wooden floor can be laid on the logs. The floor will also need to be insulated. In the washing room you can lay one of the types of extruded polystyrene foam, sheets of which are 15 cm thick. In the dressing room, polystyrene foam of the same thickness is suitable.
Experts advise: in order to determine the degree of deterioration of the wood, you should hit the board with a hammer. If the sound is muffled, you can judge that the boards are starting to deteriorate. To find out about the condition of the joists, you should hit the nail that secures the flooring. If the sound is dull, then the tree is already rotten.
Features of repair work depending on the building material
Features of repair work depend on the material that has been destroyed:
- If fungus, mold, or rot appears on wooden surfaces, it is recommended to replace boards, bars, or wood panels.
- Concrete surfaces can be restored with plaster and putty.
- Plastic panels need to be replaced.
- Damaged tiles, decorative, natural stone also need to be replaced.
It is better to restore an old chimney or stove equipment rather than replace it with a new one. According to statistics, in 9 out of 10 cases new stoves do not give the desired effect.
Wall repair
If during the inspection areas of heat leakage through the walls were found, re-insulation is carried out.
In this case, the sequence of work will be as follows:
- First, the old insulation is removed from the walls, and to make the surface smooth, bars are attached to the walls.
- After this, a vapor barrier membrane is attached to the bars using a stapler.
- Insulation made of basalt wool in the form of slabs is placed into the cells of the frame.
- A moisture-proof film is fixed over the insulation, and sheathing is made on top.
The cladding on top of the external insulation can be made of hinged ventilated panels, and the internal one - from wooden lining made from coniferous wood. Quite often, when repairing walls in a bathhouse, only caulking is done at the joints of the logs.
There are times when the lower rims of an old log house deteriorate, in which case it is necessary to trim the bathhouse as soon as possible.
Replacing a damaged crown
If something irreparable does happen and the material deteriorates, it is better to know how to replace the lower rims of the bathhouse.
There are several ways to do this:
- They dismantle the walls, replace the crown with a new one, and lay the frame again. This is an excellent preventative measure for old buildings, since at the same time a number of other shortcomings can be eliminated. But the procedure is very labor-intensive and time-consuming;
- The upper rows of the plinth or foundation are dismantled, and the rotted material is replaced with a new timber, processed according to all the rules. The house is supported by a special structure or supports. The method is also difficult and tedious;
- They cut holes in the rotted row for inserting jacks, raise the bathhouse, replace the beams and put it in place. The most rational method, provided that the frame is of high quality, the corner joints are not damaged, and changes in geometry are not dangerous.
Advice! Before you replace damaged timber, remember about larch. This tree only becomes harder from moisture and is able to stand for centuries in salt water, like the supporting pillars of Venetian houses.
The frame is lifted with a jack and replaced.
Bathroom ceiling restoration
As a rule, the ceiling has to be repaired after the furnace is restored. In this case, the old coating is first removed. All insulation is removed from the attic. To minimize dust rising into the air, the surfaces should be slightly moistened.
Now you can remove the first board. After removing all the covering, they proceed to inspect the beams. Rotten elements are replaced.
If the condition of the attic is such that it does not need repair, only re-insulation is carried out. Polystyrene foam or mineral wool are ideal as insulation. On the attic side, a layer of insulation is placed on a layer of vapor barrier material located between the floor beams. Moisture-proofing material is laid on top, followed by flooring, which is nailed to the beams.
Conclusion
The bottom row of logs in a log house is a weak point due to objective reasons. That is why special attention should be paid to its installation in order to avoid time-consuming and expensive replacement and repairs. The video in this article illustrates everything that has been said well, so we recommend watching it.
Repairing a bathhouse most often involves restoration work. If structural elements cannot be restored, they are replaced. The bathhouse is a specific room due to the constant presence of moisture. In about 10-15 years, repairs will have to be done regardless of what materials the building is constructed from.
Bathhouse roof repair
Depending on what material was chosen for roof repair, you will need to perform the following work:
- Slate . If cracks appear in the coating, they are sealed with a solution of cement with fluffed asbestos and PVA glue. Asbestos and cement are added at a ratio of 3:1, and glue is diluted with water in a ratio of 1:1. Everything is combined and mixed until you get a homogeneous paste mixture. After the surface has been cleaned, it can be primed with a solution based on PVA glue, and then all cracks and cracks can be covered with the prepared mixture. Apply it in several layers until the coating reaches 2 mm. Each layer should be given time to dry.
- Metal roofing . The gaps between the sheets are sealed with tow soaked in hot bitumen, and a layer of bitumen mastic is poured on top. If there are more severe damages, they are repaired using patches. The area near the damaged area is lubricated with hot bitumen, and two layers of roofing felt, lubricated with mastic, are placed on top.
- Soft roof . If it is necessary to repair a soft roof, get rid of defective fragments. The surface is cleaned and the nails are removed. After this, the new tile is covered with glue, and it is installed, placing one side under the bottom of the top tile. Next, it is secured with roofing nails, and the joints are filled with a sealing substance.
Prevention of rotting of the lower crowns: protective measures
You can replace old logs in the crown, but after 2-3 years you will find them rotting again. To prevent this from happening, the lower crowns must be properly waterproofed and protected from rotting. Protection measures may be the following:
- Making lower crowns from larch, which is little susceptible to rotting. Instead of solid logs, you can use larch boards. They should be placed under the lower crown. This way, a protective layer that is not susceptible to fungi will be formed between the crown and the foundation. A good alternative to larch are oak logs and boards.
- Coating logs with antiseptic. You can use any water repellent, for example, antiseptics “Pinotex”, “Sadolin”, “Senezh Ognebio”, etc. Another popular “folk” antiseptic is machine processing. Its disadvantage is a sharp odor that does not disappear for a long time.
- Coating the base of the bath with a water repellent.
- Using several layers of roofing felt (2-3) to waterproof the joint between the crown and the foundation.
- Protection of the lower crowns from external moisture using canopies (for example, from galvanized strips).
Such simple methods will help you eliminate the cause of rotting and prevent the need to repeatedly replace the lower crowns of the bathhouse.
List of useful tips for quality bathhouse repairs
It remains to list a few simple and, at the same time, useful tips:
- It wouldn't hurt to completely replace the electrical wiring. If wires with aluminum conductors were previously used, they can be replaced with those with copper conductors. For light bulbs, a wire with a cross-section of 2.5 squares is suitable, and for electric heaters - 4 squares.
- If the doors and windows in the bathhouse are old and there are drafts, you can replace them and provide good insulation. The slopes can be covered with foam plastic.
Inspection of the structure
The purpose of the event is to identify faults, determine a method for correcting them and compile a list of necessary materials and work.
The audit is performed as follows:
- inspection of external walls - the condition of the insulating material, the presence or absence of cracks, crevices, gaps, rot, the integrity of corners and other wall structures is checked;
- inspection of the base - checking for the presence or absence of flaws;
- inspection of the roof and ceiling - the general condition of heat, water and thermal insulation materials is checked, as well as the presence or absence of defects;
- inspection of the stove and chimney - the presence or absence of certain damage or burnout is checked, as well as the condition of the lining, if any;
- inspection of doors and windows - checking the presence or absence of distortions, cracks, chips, gaps, cracks, as well as tightness;
- inspection of the floor - the general condition of the insulating materials is checked, the presence or absence of fungus, termites, cracks, crevices and other defects, as well as the “health” of the finish, if any;
- inspection of internal walls - the presence or absence of cracks, cracks, chips, gaps and other defects is checked, as well as the condition of the facing material, if any;
- inspection of interior items;
- inspection of water supply and drainage systems;
- inspection of electrical wiring.
After assessing the condition of all elements of the structure, an estimate is drawn up, materials are purchased, and repairs are made.
Dear friends, just a moment! To ensure that the purchase of raw materials does not “eat up” all the money available in the bins, it is advisable to inspect the bathhouse annually and carry out light cosmetic repairs regularly.
Cleaning the room
Not only global violations in a bathhouse require the close attention of the owners, but also basic compliance with hygienic standards for the maintenance of a bathhouse.
Cleaning the bathhouse from soot, fungus, resin and other damage will make bathing procedures as beneficial as possible.
Getting rid of mold
Mold that appears in a bathhouse can cause some human health problems: allergies, asthma, disturbances in the normal functioning of the cardiovascular system, headaches, diathesis in children. In addition, mold formations deprive the bathhouse of its aesthetic appeal and create favorable conditions for the destruction of the entire bathhouse structure.
Such negative aspects are unacceptable during constant use of the bathhouse.
How to deal with such negativity as mold in order to get rid of it forever?
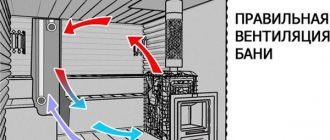
First, you need to understand the cause of mold. Impaired air exchange can become a source of mold, so you need to pay close attention to ventilation. Cleaning the ventilation shafts and redesigning the entire air exchange system is what needs to be done to prevent mold from appearing in the bathhouse.
If the bathhouse is not always clean and tidy, then the likelihood of mold formation increases many times over. After bathing procedures, the room should be thoroughly washed and well ventilated.
Moldy areas can be easily removed with regular alcohol. This effective method helps remove moldy deposits both outside and inside wood components.
Iron sulfate solution is also a good helper in the fight against mold. The recipe for the product is simple: 1 liter of water, 22 grams of iron sulfate, 44 g of potassium alum and 18 grams of table salt.
This product is used not only in the garden, but also in the fight against mold in the bathhouse.
Folk remedies for combating mold in the bathhouse include:
- "Whiteness";
- formalin solution (25 ml of forty percent formalin per liter of water).
The modern chemical industry produces quite effective products against mold formations; they can be purchased at construction and hardware stores. Preventive agents are not suitable for getting rid of mold; for this you need chemicals marked - for REMOVAL of mold. After treating surfaces in a bathhouse with chemicals, be sure to thoroughly rinse everything with clean water afterwards to remove any remaining harmful chemicals.
Ventilation is the final stage of treating moldy areas. To avoid the recurrence of mold, the internal surfaces of the bathhouse should be coated with special preventative agents.
Access to fresh air and drainage of the bathhouse are useful measures for preserving the bathhouse
Removing the fungus
The fungus appears in places where there is a particular accumulation of dampness in the bathhouse.
Such damage to wooden structures must be repaired.
This can be walls and ceiling, floor, water drainage area, etc.
When the fungus is already visible to the naked eye, you can use the following means to combat it:
- Mechanical method. You can get rid of visible fungal manifestations using a spatula or iron brush. A drill with a brush attachment and a grinding machine will help speed up the mechanical cleaning process. Removing the entire affected layer and burning it is a feasible task for those who fight the fungus in the bathhouse and do not want it to reappear. Helpful advice: for best results, before starting work, you need to moisten the surface with fungus with water.
- Folk remedies. These drugs are used by those who do not accept chemical treatment in the bath. Copper sulfate, bleach, sulfur, hydrogen peroxide, bleach - these are the means that people use to eliminate fungus.
- Chemical special preparations. Chemical manufacturers produce a wide range of products for combating fungus indoors. You should not save money and buy dubious products; it is better to choose well-known and proven brands.
Antifungal drugs are produced by both domestic and foreign manufacturers
Cleaning from soot
Soot on the walls and ceiling of the bathhouse occurs if the flame is too high during operation of the stove. Another reason for an unpleasant raid is a fire.
It is strictly not recommended to wash in such a bath
Soot is a product that arises from the combustion of firewood, fire briquettes, and any other materials that are thrown into the stove. Most often, this formation does not have a dry, but a fatty substance that should not be rubbed or washed off with cold water.
Under no circumstances should you use toxic materials in the bathhouse to clean soot from surfaces!
When carrying out work, it is best to protect yourself from possible fumes (especially if the soot is the result of a fire) by first ventilating the room, wearing a respirator or a bandage soaked in water.
Using a sander and protecting your respiratory tract while working
It is advisable to wear a hat on your head, and use old clothes, which you don’t mind throwing away later.
In a wooden bath, do not wet the smoked surface with water. Soot is very well absorbed by wood, so additional moisture will promote deeper penetration of soot into the pores of the wood and, accordingly, complicate the process of getting rid of soot.
Step-by-step removal of soot from the surface in a bath:
- Using a vacuum cleaner. The outer dry layer can be easily removed using a vacuum cleaner with a convenient attachment. You can use different nozzles to reach hard-to-reach bath areas covered with soot.
- Using a special sponge with “anti-soot” impregnation. It is better to purchase such a sponge in more than one copy, since soot quickly renders the sponge unusable. You can also use one sponge, constantly cutting off the contaminated layer with a sharp knife.
- Carrying out work on degreasing surfaces. For this purpose, grease-fighting detergents, a brush or a mop with a long handle will be useful. The water for this process should be very hot to make it easier to deal with the fat.
- Remove the soap solution with a clean cloth and dry the room. Change the water often to keep the sauna clean.
The modern chemical industry also offers special products for removing soot. For example, MAZBIT+ is a highly concentrated detergent designed to combat the consequences of fire. Its use will greatly speed up the process of getting rid of soot and make it easier.
Opponents of the introduction of “chemistry” into the bathhouse prefer to make do with folk remedies: river sand with laundry soap, mechanical removal of the soot layer using a grinding machine.
Removing the resin
Wooden rooms with strong heating can intensify the process of resin release. Some people like the smell of this substance, but most bathhouse attendants fight this problem mercilessly. Resin can negatively affect human health and the quality of sauna construction. Of course, to avoid this problem, you need to build a bathhouse from dried material, without using building materials of dubious quality.
How to remove resin that has come to the surface of a wooden surface in a bathhouse?
The problem of resin protrusion is completely solvable
The simplest and most effective way is to simply mechanically remove resin stains using a spatula, chisel or any other suitable device.
Some craftsmen advise making patches in places where resin is actively leaking, using the same wood that led to this problem. You can use a soldering iron and a chisel. To remove resin, use a soldering iron to burn the area near the resin exit, melting the build-up, and then use a chisel to remove all the resin. The resulting hole is filled with shellac and sanded to hide these “patches” and maintain the aesthetic appeal of the bath surface.
Recommendations
In order for the operation of the bathhouse to be a long-term, safe and useful procedure, try not to ignore cleaning the bathhouse after each use. This is not difficult to do:
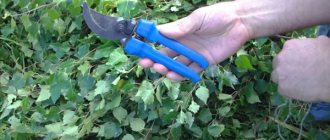
- sweep away the leaves left from the broom;
- ventilate the room;
- try to remove excess moisture from the walls, floor, and drainage areas.
Regularly (at least once a month) during the period of active bath procedures, organize general cleaning. Thoroughly washing away the dirt between the tiles, removing soot, removing resin stains and splashes from the broom on the walls and ceiling are the most minimal actions that can really extend the service life of the bathhouse.
To clean the bathhouse, use a vacuum cleaner, rags, hot water and detergents.