When the homeowner has a question: how to fix the insulation to the wall, it is necessary to familiarize yourself with the work procedure, especially if you want to install it yourself. There is nothing complicated in attaching mineral wool, self-adhesive rolls, packaged insulation or sprayed composition. Even a beginner can do most of the work with his own hands if he takes the advice of experts.
Sheathing with insulation can be either forced or internal. But whatever the method of attaching the insulation to the wall, it is important to comply with simple conditions:
- the building should not be dilapidated;
- the attached materials should not weigh down the structure or settle under their own weight;
- The treated surface should not crumble.
You can begin work on thermal insulation only after an inspection of the walls. It is enough to make sure that the new building has gone through the process of primary shrinkage. If the house has stood for many years without insulation, it is worth inspecting it for serious defects.
You should not attach mineral wool or apply polyurethane foam to a dilapidated building with cracks or insulate the walls of a house that is being demolished!
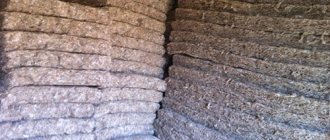
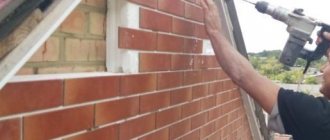
Fastening mineral wool on a brick wall
If the wall is plastered, first tap it lightly so that the surface separated from the base crumbles. In such places, all work is carried out anew. It is recommended to pre-treat the bare wall with a fungicidal compound if there is a suspicion that fungus is present.
You should not spare effort, time and financial costs if the plaster has fallen off along the entire insulated wall. This would happen sooner or later. It would be worse if the plaster separated along with the insulation or crumbled underneath it after finishing onto the mineral wool. After completing the application of plaster in the “bald spots”, its layer should be the same as in other places.
When applying plaster, putty or primer multiple times, each layer must be applied to a completely dry surface.
Careful leveling of the plaster is required only when gluing sheets of foam plastic or materials with similar properties, for example, to a brick wall. For basalt wool (another porous material) and spraying with polyurethane foam, surface treatment with leveling is not required. You don’t have to level the surface even when attaching the insulation to the wall using fungi.
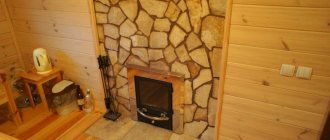
Waterproofing work is carried out before fixing the insulation to the wall or in parallel with them. The use of vapor-tight materials without sufficient ventilation requires treatment with antifungal drugs. If the surface comes into contact with heating communications, a heat insulator is attached and treated with a fire-fighting compound. It is especially important to take these factors into account if it is a log house or other structure made of wood that is affected by mold on the outside.
Basic methods of attaching insulation
The method of fixing the insulation depends on its structure and the surface on which the material is installed. Soft heat insulators are conveniently fastened using lathing. Insulation is fixed to concrete and brick walls using dowels and glue.
Fixation with lathing
This method is used for laying soft insulation (mineral wool). A frame is created from bars, which are located at a distance equal to or slightly less than the width of the thermal insulation. The result is cells into which the slabs are laid.
The most common area of application is the insulation of internal walls, floors, roofs and ceilings. On the street it is used when it is necessary to make a ventilated facade. The frame in this case is made of a metal profile. If the cladding is made in the form of a wet facade, this method is not suitable. A soft heat insulator will not support the weight of the facing plaster layer.
Fixation with dowels and nails
The insulation is fixed to a hard surface using dowels and nails. Dowels come in three types - plastic, with a metal nail and with a metal nail with a thermal head.
When choosing thermal insulation clamps, it is important to choose their size. When attaching thermal insulation to a brick wall, the length of the holder should be 70 mm greater than the thickness of the insulation board. Plastic products are used if the maximum length does not exceed 120 mm.
Fixation with glue
This method is optional. There are a large number of adhesive bases for installing insulation. They have minimal differences, but it is important to ensure that the adhesive is suitable for the specific type of heat insulator and surface. When working, it is important to look at the composition. It shouldn't be rough. If the glue has such a consistency, it can be judged that it was improperly stored and unsuitable for use. Suitable for installing foam plastic on walls.
Choosing a method for attaching insulation for external and internal work.
Insulation of external walls.
With this option, the internal usable area of the building is preserved, and there is no need to install a vapor barrier layer. For external walls, the frame option is rarely used, only in cases where a ventilated façade is planned.
To perform subsequent plastering work, it is necessary to select hardware.
Insulation of internal walls.
Installation of insulation on internal walls is carried out mainly using lathing. If slabs of mineral or basalt wool are chosen as insulation, then, in this case, correct installation consists of laying the heat insulator itself, and then it is sewn up with horizontal strips of vapor barrier. In order to fix the vapor barrier, you can use a construction stapler. Aluminum tape is used to attach the insulation.
Installing insulation behind radiators can present some challenges.
Important! To minimize heat loss, you need to install a reflective screen that will dissipate heat throughout the room.
Conclusion
So, we looked at the features of choosing thermal insulation materials and found out what the instructions are for installing them on wooden walls. Provided that installation work is carried out correctly, external insulation is guaranteed to last for 10 years or more. As a result, the house will be warm in winter and cool in summer.
But you need to understand that the optimal result is guaranteed not by separately performed insulation, but by complex insulation, during which the walls, ceilings and subfloors are treated.
Calculation of the length of dowels and their number
To securely fasten the insulation, you need to correctly calculate the length of the mushroom rod. When calculating, we use the formula: L (rod length) = E + H + R +V. Let's decipher the meaning of the terms:
- E – length of the spacer section of the dowel rod;
- H – thickness of insulating material;
- R – thickness of the adhesive layer (if there is a need for gluing);
- V – deviation of the structure from the vertical plane.
Important. The length of the spacer section of the plate mushroom (dowel) must be at least 45 mm
The consumption of the number of dowels for installing insulation directly depends on its weight. For example, penoplex can be fixed with 4 mushrooms per 1 m2, and basalt wool will require at least 6 pieces of plate mushrooms. The exact amount is found by calculating the surface area to be insulated.
The formula for finding the total fastener consumption looks like this:
W = S * Q, where:
- S – total surface area;
- Q – number of dowels per 1 m2 of insulation.
To the result obtained, you need to add 6-8 pieces in case of unforeseen circumstances (loss or breakdown). When calculating consumption, keep in mind that, unlike walls, more fasteners are needed for corners. Therefore, we add another 12-15 pieces.
Operating principle
Despite the extensive technological process and improvements in materials, the fastening of the dowel remains unchanged - it is fixed thanks to the holding force of friction. It is so large that the fastener can be called disposable: when removed from the hole, it is destroyed.
Of course, you can ruin it in another way - tear it out along with the insulation. To prevent this from happening, you need to make the right seat.
The hole for the fungus must be of the appropriate diameter and depth. It is necessary to avoid the presence of cracks, chips and construction dust in it.
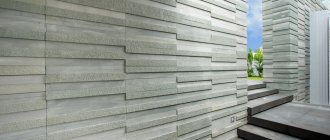
How to attach basalt insulation to a wall for facade thermal insulation?
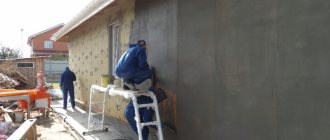
Let us consider in detail how to attach basalt thermal insulation to walls in plaster facade systems:
- Preparing the base . Basalt insulation slabs are glued to the walls, so their surface must be fairly flat. To do this, repair chips and potholes. Before fixing the basalt wool, priming is performed to strengthen, remove dust from the structure and improve adhesion.
- Gluing mini-slabs . Why are special adhesive compositions selected, designed to both attach basalt insulation to the walls and ensure its tight fit to the surface. Such dry mixtures ensure maximum adhesion of thermal insulation to brickwork, concrete walls and other surfaces, have frost resistance of the hardened layer, and special modifications make it possible to attach mini-slabs at sub-zero atmospheric temperatures. The glue is applied according to a special scheme, carefully working out the perimeter and applying the composition in the middle, after which the slab is pressed to the surface. The position of the miniplates is maintained using a level. After installing the first row, the second is fastened with staggered seams so that the joint of the slabs falls in the middle of the bottom line of the slabs. The rule must be followed for all subsequent stripes.
- Doweling . The basalt insulation should be attached to the wall using disc-shaped dowels after a certain time allowed for the glue to dry. Then all work is carried out both on the installation of plaster and decorative layers, and on the final painting of the facade.
To understand the intricacies of attaching mineral wool slabs to facade walls, we invite you to watch a video about installing a thermal insulation system.
Insulation on the sheathing
Another common method: attaching insulation to a wooden wall or under ventilated facades. It is characterized by minimal fixation rigidity compared to the methods listed above.
- Laying a vapor barrier film.
- Preparation for installation of the bottom row of insulation using a base profile.
- Fastening the timber on top of the vapor barrier along the width of the slabs (approximately 60 cm increments).
- Laying mineral wool into the resulting niches and covering with wind protection.
Insulation of walls in sheathing
The tighter the insulation is installed, the better the protection, eliminating cold bridges. If there is a “heap” or a protrusion above the foundation of the house, additional support from below in the form of a base profile or complex fasteners for insulation is not required. But it is advisable to first do the waterproofing, and only then start attaching the insulation to the wall.
Obviously, all the described methods of attaching thermal insulation to walls are quite accessible. They are suitable for insulating a country house, corner apartment, cottage with an attic or do-it-yourself bathhouse. Instructions for using the adhesive base can also be found on a can of foam or a bag of dry cement mixture. If you have any questions, for example, whether glue is needed for mineral wool, you should also watch a video with recommendations from a specialist.
For dowels
In 90% of cases, mineral wool and other materials are attached to the wall using dowels.
Now we will simply describe the sequence of work when using this method.
First of all, if adhesive was initially used to fix the insulating boards, they must be well secured. Most often, fastening with dowels can be carried out 2-24 hours after gluing. A more accurate figure can be found in the instructions for the adhesive composition.
- Select and purchase an umbrella of the required length;
- We drill a hole into which the fastening element will be driven;
- Insert the dowel into the hole;
- Using a hammer, hammer in the anchor (with plastic nails you need to be especially careful when applying force).
Our sheet is securely fixed.
In the case of laying mineral wool, namely its rigid slabs, on the slabs themselves you will have to pre-drill not only holes, but also round recesses for the hats of umbrellas. Otherwise, these caps will protrude above the surface of the insulation, which will create difficulties when installing the finishing trim.
We discussed the most popular ways to attach insulation to the wall. Thinking about the difficulties and features of installation, they are increasingly choosing another material for insulation - polyurethane foam. It doesn't need to be attached at all.
Dowels allow you to attach the material to a brick wall and surfaces made of concrete and wood.
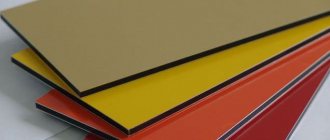
Types of fasteners for thermal insulation
Dowels used for fastening various types of insulation are divided according to the material of manufacture and their design. The dowel for insulation can be either plastic or steel, and also equipped with a thermal head. Plastic umbrellas are also divided into:
These products also differ in the method of fastening, when the core is screwed into the insulated surface, and when it is simply driven in with a hammer.
Features of plastic fasteners
Products made from propylene differ from all others in that they have cone-shaped holes in the umbrella, which promote better adhesion of the product to the insulation. Nylon fasteners, called rondoles, are used for fastening light and soft materials.
Similar products are made from high-strength polypropylene, polyamide or nylon. The main advantage of such fungi is:
- good resistance to aggressive environments;
- low cost;
- reduced thermal conductivity, as a result of which cold bridges are not created;
- ability to withstand significant temperature changes;
- long service life - they do not rust or rot;
- can withstand a load of almost 400 kg/m2.
Plastic mushrooms can be used when attaching thermal insulation to concrete and brick walls. One of the disadvantages is the impossibility, after insulation, of finishing surfaces with a material with a high specific gravity.
Metal fasteners - advantages and disadvantages
The core of such a product, made of galvanized steel or, in rare cases, polyamide, is inserted into a polypropylene sleeve that has spacers at the bottom. Its size exceeds other fungal models. But the ability to withstand loads is also high - up to 750/m2, which allows finishing with any materials, both light and heavy. The disadvantages include the following:
- high price;
- formation of cold bridges and condensation at the entry points of the metal rod into the base surface;
- poor resistance to moisture, as a result of which rusty spots may appear on the surface of the plaster.
Thermal Head Fasteners
Mushrooms with a thermal head are a metal core that is coated with durable polyamide. The upper part of the metal nail is equipped with a plastic part, which eliminates the formation of cold bridges at the points where the fastener passes. Such products are most often used when insulating wooden structures. All the advantages inherent in metal and plastic mushrooms apply to fasteners with a thermal head, with the exception of the price, which significantly exceeds the cost of all other fasteners of this type.
How to choose mineral wool products
First you need to pay attention to several characteristics:
- Thickness of mineral wool for wall insulation. The thicker the insulating layer, the higher its fire safety, sound insulation and strength. For interior partitions and frame structures, mats of 5 cm are suitable. For facades - from 5 to 10 cm.
- Density (P). We wrote about it above. The rigidity of the structure and its ability to withstand loads depend on it. For facades, the indicator should be in the range of 100-125 kg/m³. If plaster is chosen as finishing, then 150 kg/m³. For interior partitions - 75-90 kg/m³.
- Thermal conductivity. The smaller it is, the better. In this regard, basalt and fiberglass products have proven themselves well.
- Vapor permeability. The coefficient suitable for private buildings is that of stone wool. Designated MU1. The larger it is, the better the product.
- Fire resistance. The fire resistance level of fiberglass is 600⁰ C, material made of rock alloys is 1000º C.
What else to pay attention to
If you are planning work on the outside of the building, choose basalt slabs. When it is necessary to insulate from the inside, fiberglass coating is also suitable. When purchasing, look at the storage conditions.
- If the product gets even a little wet, there is no point in purchasing it. Check that there are no tears in the packaging.
- Blocks and rolls should be kept under cover and not outdoors.
Installation
The fastening features are determined by the characteristics of the material.
Thermal insulation is in most cases used in the form of panels or sheets. Such material is fixed according to the rules, which should be taken into account both during calculations and during insulation. Read below about the consumption of dowels per 1 m2 of insulation.
Calculation of dowels
The peculiarity of the calculations is that the bearing load here is not decisive. The weight of the insulation turns out to be less important compared to its thickness and looseness, as well as compared to the nature of the wall or ceiling. The product data sheet, of course, indicates the pullout load, but in practice it is taken into account when choosing the appropriate length of the product.
- Length is an extremely important characteristic, since it includes several quantities: the thickness of the insulation, the thickness of the adhesive layer or the vapor and waterproofing layer, or all together, the amount of deviation from the vertical and the minimum permissible amount of penetration into the material. Moreover, the latter is indicated for each material - dense concrete, cellular, hollow brick, and so on. All these parameters must be indicated in the certificate, and you need to pay close attention to them.
- Cap diameter - here the recommendations are more approximate: the more loose, lightweight material is used, the larger the cap diameter should be. For foam plastic, for example, you can choose products with minimal heads. To attach mineral wool to the ceiling you will need large disks.
- The number of dowels is determined not so much by the weight of the insulation as by holding 5 fasteners: 4 in the corners, 1 in the center.
- If the insulation is installed on a facade, where wind load , there should be more fastenings. At the corners of the building, the panel is fixed with at least 6 dowels - arranged in two parallel rows, with a building height of up to 20 m, the panels are fixed at the rate of 7 pieces. per 1 sq. m - located in two rows and 1 in the center. If the building is higher than 20 m, then the insulation is fixed at the rate of 9 pieces. per 1 sq. m.
Technology
The heat insulator is fixed at an intermediate stage of installation. Some of its complexity lies in the fact that all the nuances of fastening must be taken into account in advance. For example, if the ceiling to which the dowel will later be attached is covered with plaster, it is necessary to increase the length of the penetration, especially if the plaster is not new, or remove it altogether.
- The insulation is fixed to the surface using glue - polystyrene foam, polyurethane foam, or spaced into frame cells - mineral wool.
- Mounting points are marked on the panels. Then drill holes for fasteners directly through the insulation. The depth of the hole in the base surface should be 10–15 mm greater than the calculated one.
- Unlike usual cases, there is no way to clean the hole here. And if the dowel does not penetrate the material to a sufficient depth, it will not even hold the heat insulator.
- The dowel is inserted into the hole, the disc head should press the material somewhat.
- Then, if there is one, a spacer nail is driven into the dowel. The nail head is covered with a cap if nails with thermal heads are used.
Prices for a disc dowel (mushroom, fungus, nail) for attaching insulation are given below.
Dowel nails for thermal insulation
Price for labor and materials
Thermal insulation is an essential part of construction and most renovation work. So the need for disc dowels for thermal insulation is always high and does not depend on the season. Many well-known companies produce products.
- Fischer - it is probably impossible to name a fastener that is not produced by this German company. Plastic dowels will cost 10–11 rubles. per piece Fasteners made of nylon sleeve and nails made of galvanized yellow-passivated steel - 13–37 rubles. per piece
- Mungo all possible types of fasteners, including disc dowels. The plastic version costs from 6.6 to 14.3 rubles. per piece, option with a galvanized steel rod - from 9.8 to 18 rubles. per piece
- Koelner, a well-known Polish manufacturer on the Russian market, produces various types of fasteners for thermal insulation. Plastic fasteners for facade thermal insulation cost from 12 to 15 rubles. per piece The option for roofing thermal insulation is telescopic, it will cost 10–13 rubles. per piece
- Tech-KREP is a Russian company offering fasteners for hollow and solid materials. A disc-shaped dowel made of polyamide with a basalt-plastic rod costs from 8.8 to 14 rubles. per piece
The dowel for thermal insulation is an indispensable participant in the work of insulating a building. The fasteners are very easy to use, do not create a load and provide reliable fixation of the thermal insulation of the material.
The video below will tell you how to properly attach thermal insulation to walls using dowels:
Calculation of the required number of dowels
To calculate the total number of required fasteners, you must first draw up a diagram of the location of the insulation on the wall. The skills of a draftsman are not needed here, a simple conventional drawing is enough, the main thing is to find out the number of sheets to be fixed, including small cut pieces, and estimate the points for optimal fastening of the thermal insulation. The density of the insulation, that is, its weight, is also taken into account.
Light materials are fastened with four dowels per square meter, and heavier ones, for example, basalt wool, with six. The same amount of fasteners is used on corner sheets. With a large height of the insulated wall, the number of attachment points can increase to seven to nine. You should also remember about the possible increased wind load on the building.
Fasteners are made at the joints of the insulation, so that the cap presses several sheets at once, and from one to three symmetrically in the center of each sheet.
Be sure to take a dozen dowels in reserve in case of loss or breakage. This won’t cause you much financial damage, but it will save you from an unnecessary trip to the store for a few items.