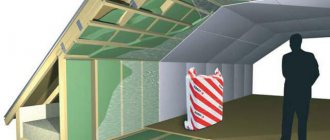
The roof is one of the elements of the building envelope. Its main function is to provide a heat-insulating barrier space that protects the interior of the structure from harmful atmospheric influences (rain, snow, wind, hail, etc.). Heat loss in a building with an uninsulated roof is about 15-30%.
Therefore, properly equipped roof insulation will allow you to significantly save on heating costs.
More than half a century of experience insulating roofing structures with expanded clay has shown that this is one of the most versatile, effective and reliable methods.
What is expanded clay?
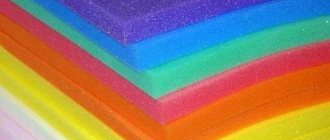
Expanded clay is a lightweight and highly porous thermal insulation material with a dark brown shell. It is made by firing clay or shale at a temperature of 1050-1300 degrees Celsius for 25-45 minutes. With different processing modes of the clay base, it is possible to obtain expanded clay with a bulk density of 0.35 to 0.6 g/cm3.
Depending on the form, there are three varieties:
- Expanded clay gravel. The cellular elements have a streamlined oval shape. The grain size is 5-40 millimeters . Used when the required thickness of the insulating layer is more than 5 centimeters.
- Expanded clay crushed stone . The dimension of the elements is similar to expanded clay gravel. It has a cube-shaped shape with sharp protruding corners and edges. This type of expanded clay is obtained by crushing large pieces of expanded clay.
- Expanded clay sand. The grain size is in the range of 14-50 millimeters . Small dimensions make it possible to use expanded clay sand with a heat-insulating layer thickness not exceeding 5 centimeters. It is also used as a filler for concrete and other types of mortar.
Material properties
Since expanded clay is a material that has a natural base, it has strength and durability that synthetic materials do not have. Its service life is an order of magnitude higher than wood insulation. Another advantage is that rodents do not grow in its layer.
The raw material for making expanded clay is clay, so it is not afraid of rotting. Its structure cannot be changed by low temperatures in severe frosts or high temperatures in hot weather. It is not destroyed by moisture.
Expanded clay is produced by melting and firing clay. To do this, only certain varieties are selected, pre-dried and crushed.
Raw materials are loaded into a drum-type oven, which rotates at a certain speed. Heated air is supplied to the oven. As it moves down the drum, the clay begins to stick together into lumps, sinter, and rotation gives it a rounded shape.
The quality of expanded clay and the size of its granules are achieved by regulating the temperature of the heated air and the rotation speed of the furnace. As a result, the output is an environmentally friendly material with excellent thermal insulation, soundproofing, fireproof and frost-resistant characteristics.
Kinds
Several types of expanded clay can be used as insulation - crushed stone, gravel, sand.
But crushed stone has sharp edges, and sand is heavy. Therefore, gravel is more suitable for roof insulation. It allows you to fill all cavities and create a high-quality thermal insulation layer. For the best effect, expanded clay gravel is mixed with foam chips. It is possible to use expanded clay of several fractions at once.
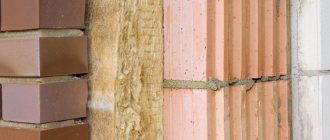
A layer of 10 cm of insulation is comparable to 25 cm of wooden beams, 60 cm of expanded clay concrete slab, and a meter of brickwork. But it is better if the layer exceeds 15 cm, then the maximum effect is obtained. In addition, such insulation is 3 times more economical than wood, and 10 times more economical than a brick wall.
Advantages and disadvantages of expanded clay
Compared to widely used slab insulation materials such as mineral wool, expanded clay is much more profitable. When insulating a roof with expanded clay, no special skills or abilities are required. The use of bulk thermal insulation does not require adjustment of elements and additional fastenings . Roof insulation with expanded clay has the following advantages:
- Expanded clay is a highly environmentally friendly material . It does not decompose and does not emit toxic gaseous fumes that are hazardous to human health.
- Not edible for rodents.
- Has increased resistance to frost . Can withstand up to 25 cycles of complete freezing and thawing.
- Fireproof and fireproof material.
- Excellent heat and sound insulator .
- When wooden surfaces are insulated with expanded clay, their service life increases to 50 years.
- Lightweight material.
- Resistant to chemical attack.
- Cheap , a cubic meter of slab insulation will cost several times more than expanded clay of the same volume.
- When using high-quality expanded clay insulation, the thermal conductivity of which is 0.07-0.16 W/m, heat loss is reduced by 70-80% .
clay is a bulk material ; it fills almost the entire provided volume. This, unlike slab insulation, allows for the most effective insulation of small cavities.
NOTE!
It is not recommended to lay expanded clay on a plank base without a backing . Small crumbs and dust can enter the living space through the gaps between the boards.
How to properly use expanded clay in different situations
Arranging such insulation with your own hands, as a rule, does not cause any particular difficulties for a normal owner. I will say more, the instructions for insulating different parts of the house with expanded clay are generally similar, only small details differ.
Insulation of the attic and concrete floors
The insulation of the floor, or rather the ceiling, in a private house directly depends on the material used as load-bearing structures. It’s one thing when it’s concrete slabs, and quite another thing if the ceiling in a wooden house is supposed to be insulated with expanded clay.
On a concrete base, the weight of the insulation does not play such a big role. The thickness of the layer can be anything. According to the rules, when deciding which layer is needed for the ceiling, floor or walls, you should be guided by a single criterion - the expanded clay layer cannot be less than 100 mm. If you do less, the effectiveness of such thermal insulation will be too low. By the way, this is one of the reasons that people abandon expanded clay in favor of polystyrene foam or extruded polystyrene foam.
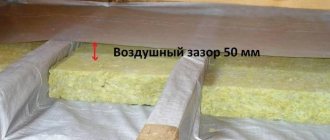
The expanded clay layer for insulating the attic and interfloor ceilings ranges from 140 to 200 mm on average. To install insulation on a concrete base in interfloor ceilings or in the attic, you can do without installing waterproofing. The floor slab below is heated by a warm room and, in principle, there cannot be any moisture there.
A dry attic filled with expanded clay without subsequent arrangement.
Theoretically, a dry attic can simply be filled with expanded clay and left as is. From the point of view of thermal insulation, this will be enough, but in this case it will be problematic to use, because expanded clay is a free-flowing material, plus it produces a huge amount of dust. So you can immediately forget about a clean attic.
Personally, I decided to do things differently. My attic floor is non-residential and is only partially heated, but some communications go through there, plus, like many of our people, the attic is a place for storing things that are a pity to throw away. The house is brick and standard reinforced concrete slabs are laid as the ceiling; naturally, their load-bearing capacity is more than high.
Screed filled without beacons.
Since intensive use is not expected here, I took the easy route. To begin with, I filled in and leveled 200 mm of material. When the layer thickness does not exceed 200 mm, two fractions of expanded clay need to be mixed for backfilling: gravel + sand 50x50. This way the volume is filled much better and the insulation does not sag.
Next, I laid a metal reinforcing mesh over the entire area of the attic, in this case I used an ordinary chain-link, but this is not a dogma, you can use any one. The grid performs 2 functions. Firstly, you will be able to walk normally without fear of “breaking” the layer of expanded clay you have leveled, and secondly, it will become the basis of the future screed.
In order to further strengthen the loose fill, you need to pour it with so-called cement laitance (cement + water) and wait until everything dries. I did it in the summer when it was hot, and it dried in a week in my draft. Next, I mixed a cement-sand mortar and poured a 3 cm thick screed. I am far from a professional plasterer, so the floor turned out to be warm and durable, but, however, not very smooth, although this is not so important in the attic.
Sectional view of a screed over expanded clay.
But when you plan to insulate a concrete floor in a residential area, you need to do it a little differently, because here you need a perfectly flat floor on the second floor. The general instructions are approximately the same, you just need to start by installing beacons. In this case, it is not so important how the beacons will be installed, in length or width, the main thing is that the overall horizontal line is well drawn.
As beacons, you can use strips of plywood cut to full depth (fill + screed). They are vertically fixed onto plaster cakes at intervals of about a meter. You can take special guide strips; they are also attached to plaster. Next, you fill in and level the expanded clay mixture, lay a reinforcing mesh between the beacons and fill in the screed.
Beacons made of special strips fixed on plaster cakes.
In order to achieve a perfectly even screed, you don’t need a lot of intelligence, the main thing is that the beacons are even. They covered a small area between the beacons with a thick cement-sand mortar, placed a rule on the beacons, drew and leveled the floor surface. And so on throughout the area.
Cement screed with alignment according to the beacons.
It is not worth using self-leveling mixtures in this case. Firstly, they are liquid and will flow into the base of the fill until the entire layer is filled. And secondly, their price is far from low.
You can walk on such a floor after 3–4 days, but it will still take about a week to dry. Although it is believed that such a screed should set for at least 2 weeks. Linoleum or other covering can be installed after the moisture has completely evaporated.
It’s easy to check this by taping a small piece of clean polyethylene to the floor around the perimeter overnight. If there is moisture underneath it in the morning, it means the screed has not yet dried.
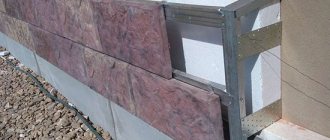
Expanded clay can only be used as roofing insulation on flat or sloping roofs with a slight angle of inclination. This option may be of interest to residents of the top floors of apartment buildings with flat roofs and a concrete parapet around the perimeter of the roof. Whatever the thickness of the layer, the roof should not have a too sharp angle of inclination.
Insulation of floors in a multi-storey building.
You understand that loose insulation simply will not hold up on a sharp gable roof. For these purposes, there is mineral wool or polystyrene foam with its derivatives.
Naturally, the arrangement of such a roof is slightly different from the installation of attic and interfloor ceilings on a concrete base. Here you will initially need to do good waterproofing. In this case, I recommend using rolled types of waterproofing; in the budget version, it is roofing felt placed on heated bitumen or bitumen mastic.
Further, the instructions are the same as for arranging an attic, only instead of a floor covering, another layer of waterproofing is installed and some kind of roofing material is laid.
Insulation of wooden floors
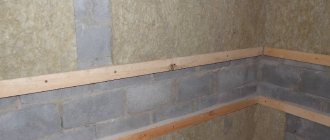
In wooden houses, expanded clay is very often used as insulation for interfloor coverings. It is not difficult to install ceiling insulation in a wooden house with expanded clay, but there are some nuances.
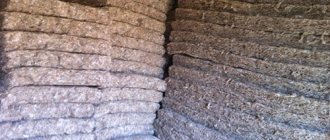
Filling material between beams.
As I already said, expanded clay is a hygroscopic material, so you can’t just pour it into such a “breathable” wooden floor; it will gradually become saturated with moisture, which can lead to weight gain and the collapse of the ceiling. Plus, it’s not very pleasant when expanded clay dust falls from small cracks in the wooden ceiling.
Naturally, you need to start with the bottom frame of the wooden floor joists. Decide for yourself how to hem it, but keep in mind that 1 m³ of expanded clay weighs about 250 kg on average. As a rule, a board with a thickness of 20 mm or sheet material such as plywood and USB with a thickness of 12 mm or more is used. In both cases, the lining is attached to the joists with powerful self-tapping screws, as often as possible.
If you plan to completely cover the house with clapboard from the inside, then keep in mind that it is not able to withstand the weight of expanded clay. This is a purely decorative option and the lining must be attached to a solid base.
Leveling the embankment between the joists.
After this, waterproofing is installed on top. In this case, there is no need to use roofing felt. It is much more convenient to work with technical polyethylene. Take a wide roll and cover the room with it, going around the joists and overlapping the walls.
If the width of the strip is not enough to completely cover the entire room, then overlap it by 20 - 30 cm, and seal the joints with tape. On polyethylene it is better to use wide stationery tape; it is not expensive and holds firmly.
Next, between the logs to their entire depth, a layer of expanded clay mixture is poured, which is covered with another layer of polyethylene on top. Thus, our insulation will be in an airtight cocoon. After which you can sew up the room with a standard floorboard. There is no point in installing a screed here; it will only make the structure heavier.
Subfloor made of planed boards.
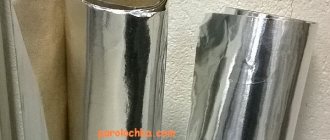
When arranging the ceiling in a bathhouse, polyethylene, roofing felt and other similar waterproofing materials cannot be used. Instead, foil is mounted here, preferably in 2 layers, it breaks very easily. Otherwise, the technology is the same as when working with simple wooden floors.
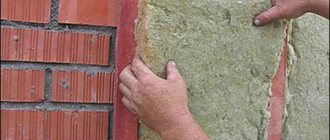
Wall insulation
Before insulating the walls with expanded clay, you need to prepare a place where to fill it. I have come across only one option in which such work is justified. This is when the walls are initially made of two layers, and expanded clay is poured between the layers.
Wall insulation option.
Typically, the foundation of the house is cinder block or some similar material. The outside of the house is lined with facing bricks, and the gap between them is intended for insulation. The insulation is filled in as the house is being built. That is, 1 m of walls have been removed, you need to fill in expanded clay and pour it with cement laitance. And so on until construction is completed.
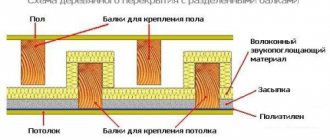
Wall insulation scheme.
But to be honest, I don’t share the enthusiasm for installing such structures and I think that expanded clay is not very suitable as insulation for walls. In my opinion, in this case, foam boards will be much more effective.
Floor insulation
There are two types of expanded clay floor insulation. The first is more suitable when the base in a wooden house is also made of wood, and ventilated (an option when the house is on stilts, and there is a large gap between the floor of the house and the ground). The second is designed for a solid, concrete strip foundation without ventilation and a basement.
I will talk about installation taking into account the installation of the “Warm Floor” system. Naturally, if you don’t need it, then you simply don’t do it, but the general algorithm remains the same:
- According to the first option, you need to start with arranging the subfloor; it is mounted from below, as shown in the diagram. Please note that the board here needs to be at least 40 mm. Plus, both the wooden logs and the subfloor board itself will need to be well treated with protective impregnations, because below we have open ground, which means moisture;
Scheme of insulation of a wooden floor, taking into account the “Warm Floor” system.
- If you are more impressed by a plywood sheet, then it should be from 16 mm, and it is better to take a waterproof FBS model or at least FSF, it is more expensive, but it is worth it. The FK brand plywood board will become saturated with moisture and quickly delaminate;
- After filing the subfloor, we get a kind of “trough”, which in this case needs to be well waterproofed. There is no need to think too much about waterproofing and don’t spend a lot of money; take regular two-layer technical polyethylene. It is necessary to cover with an overlap with an overlap of 20 - 30 cm, plus it is advisable to glue the joints with tape;
Impregnation of expanded clay floor with cement laitance.
- Some people recommend “shooting” the polyethylene with a stapler, but I did it without it and it holds up fine. When the expanded clay is poured in, everything will level out and your polyethylene will not go anywhere. After filling the expanded clay mixture, it will need to be watered with cement laitance so that it settles less;
- The next layer is to lay a heat-reflecting coating, in other words, foil. Ordinary foil, which is used for arranging a bathhouse, the material is delicate and breaks easily, so I took foil penofol and taped the joints. In principle, there are now enough such materials;
Laying a heat-reflecting layer.
- A reinforcing mesh is laid on top, over the entire floor area; it is not at all necessary that it be metal; fiberglass models can be used. Moreover, there are now such meshes on the market with ready-made fastenings for metal-plastic pipe wiring for heated floors;
- At the final stage, the heated floor wiring is laid and filled with screed. Of course, a simple cement-sand mortar is cheaper, but you need to be able to level it. If you are far from this, then take self-leveling mixtures, this will be appropriate here. Anyone can work with them, instructions are on the package;
- It is customary to pour a cement screed under the tiles; if you are planning a classic wooden floor, then it will be enough to throw another layer of polyethylene on top of the expanded clay and you can immediately attach the boards to the joists. To install linoleum or parquet, instead of a floorboard, it is better to make flooring from FC plywood with a thickness of 12 mm or more;
Plywood covering over insulation.
- In the case of a concrete strip foundation, the instructions will be slightly different. Here, on the pre-leveled and compacted layer of soil inside the tape, you will need to fill in and compact well a layer of wet clay;
- The minimum thickness is 50 mm, ideally 100 mm. Such a layer is called a clay castle and can even withstand the attack of groundwater;
- Next, a waterproofing layer is laid. Moreover, in this case, it must cover not only the clay castle, but also completely, up to the very top, protect the expanded clay from contact with the concrete monolith. All subsequent actions are similar to the installation of insulation on a concrete floor;
Metal reinforcing mesh between the beacons.
- That is, pour in the expanded clay mixture, pour it with cement laitance, and when everything is dry, lay down the reinforcing mesh and pour the screed. The parameters of such insulation will differ from standard insulation of a concrete floor. Your expanded clay layer will be at least 30 cm, so here it is advisable to add more expanded clay crushed stone to the mixture.
Scheme of floor insulation on the ground.
The thickness of the screed remains unchanged, 3–4 cm. But it makes sense to install beacons only in large areas, although this is up to you to decide. For such floors, beacons should be made of durable, waterproof material. This could be plastic or fiberglass board.
Expanded clay granule in section.
Video 1.
Video 2.
Video 3.
Video 4.
Video 5.
Disadvantages of expanded clay insulation
- The lightness of the material is relative . So, when installing thermal insulation, a layer of expanded clay of 10-40 centimeters is required . Even such light-weight porous elements in such a volume will create a significant load on the underlying supporting structures.
- Expanded clay strongly absorbs moisture , which negatively affects its thermal insulation properties. It is imperative to install layers of hydro- and vapor barrier.
- The fragility of the material can lead to mechanical damage to the integrity of the granules. Water will get into unprotected pores and voids, which will lead to the loss of the positive properties of expanded clay.
How to determine the optimal insulation thickness?
In accordance with regulatory documentation, the required thickness of the thermal insulation layer depends on the climatic zone in which the building is built and the area of the insulated room.
The climate zone is determined by special maps; they can be found in SNiP or TKP for heating engineering.
The required insulation thickness depends on the thermal resistance value of the structure being calculated (R) . This is a standard value, depending on the climatic region, as well as on the type of insulated structure.
The values for the floor, walls and ceiling will vary significantly. If you do not know what layer of expanded clay is needed to insulate the roof, then we suggest you use the formula below.
Roof insulation with expanded clay: layer thickness and calculation formula (P):
P=R*k
Where k is the thermal conductivity coefficient of the material. For expanded clay, its value is 0.16 W/m*k.
Alternative types of insulation
Expanded clay is not the only widespread thermal insulation material used in roofing structures. Let's look at the most common options:
- Expanded polystyrene, better known as a type of polystyrene foam. The thermal protection of such material is much better than that of cotton insulation. The layer of polystyrene foam insulation will be much thinner. Polystyrene foam does not absorb water and is quite rigid and durable. The use of specialized additives allows for increased fire resistance. But, if the material does catch fire, toxic gases will be released that are dangerous to human health and life. Unlike expanded clay, mice and rats love to chew foam.
- Basalt wool and mineral wool. The fibrous structure of this type of insulation ensures its high saturation with air. This allows them to be used as a thermal insulation material. When laying fiberglass, you will need additional protection: gloves and a respirator. Disadvantages include susceptibility to rotting, as well as high cost .
- Polyurethane foam. Foam insulation manufactured directly on the construction site. Application is carried out with a special gun. The expansion of the material after application allows you to create a monolithic insulating structure. It is lightweight and fire resistant . The service life is about half a century. The disadvantage is the need to use specialized equipment and an experienced team for high-quality work.
- Ecowool. A material containing 80% cellulose fiber and 20% fire-resistant and antiseptic additives. Has good heat and sound insulation . Ecowool forms a seamless coating that eliminates the formation of cold bridges. Service life - more than 50 years .
Expanded clay insulation: pros and cons of the solution
Modern thermal insulation materials are very effective. But this efficiency is often compensated by serious disadvantages: some insulation materials are very fire hazardous and flare up like a match; others only smolder, but release toxic substances that cause serious harm to the human body without any fire; still others are extremely hygroscopic and lose their heat-insulating properties when wet. Unlike synthetic insulation, expanded clay:
- Does not burn or smolder . Expanded clay is porous granules of fired clay, so it is absolutely fireproof.
- Environmentally friendly material . To produce expanded clay, you only need clay, high temperature and rotating drum containers. No environmentally hazardous production by-products or additives.
- It's inexpensive . You can buy expanded clay at a price of 3000-3500 rubles per m3. Of the insulation materials, only polystyrene foam and glass wool are cheaper in terms of the thickness of the required insulation layer. But keep in mind that this price for expanded clay only applies when purchasing it in bulk or in large packages like big bags.
- Durable . The service life of baked clay products is calculated not in tens or hundreds, but in thousands of years. The pottery from the times of Ancient Greece, which is filled with museums, is the best confirmation.
- Resistant to fungus and mold, rodents . There is no mold or mildew on dry expanded clay.
- Resistant to freezing and temperature changes . Expanded clay can withstand 150-300 freezing/thawing cycles and significant temperature increases up to 700-800 °C.
- Durable . Expanded clay poured onto a roof or ceiling can easily support the weight of a person, even without boards laid on top of it.
- Fills cavities . The main fraction of expanded clay for insulation is 10-20 mm, but it is usually mixed with smaller material. The resulting granular mixture perfectly fills any cavities and cracks, preventing the formation of cold bridges near boards and walls.
Roof insulation with expanded clay: technology and features
Required tools and materials :
- Vapor barrier;
- Waterproofing;
- Rake used for compacting and leveling;
- Shovel;
- Buckets;
- sharp knife;
- expanded clay
Before insulation, some preparatory work should be carried out. They include leveling and cleaning the covered surface, as well as sealing cracks and cracks. You can read more about roof insulation here.
Flat roof roof pie
If laying is done on metal, it should be cleaned of oxidation products and painted with an anti-corrosion compound .
- The first layer on the base is a vapor barrier. You can use both membrane and ordinary polyethylene films. Using a vapor barrier with one foil side will provide an additional effect of heat reflection into the room. Any vapor barrier material is overlapped and also pulled tight. The joints are glued together with specialized tape .
- Expanded clay insulation is carried out in strips. To do this, guide rails are attached to the vapor-insulated base in increments of 2-3 meters. The thickness of the expanded clay layer must correspond to the calculated value . A smaller layer will not provide the necessary thermal insulation, and a thicker one can lead to the destruction of the load-bearing structure being covered.
- After filling the entire area, the expanded clay layer is leveled and compacted .
- A layer of waterproofing is laid on top of the expanded clay or a cement screed is installed, which improves the strength and rigidity of the structure.
- To assess the quality of the thermal insulation work performed, it is necessary to warm the room to a certain temperature, while closing all doors and windows.
- After a couple of hours, check the thermometer readings before and after. If there is a significant drop in temperature, then you need to inspect the insulated surface for gaps and cracks.
Floor lathing allows you to divide expanded clay into separate cells and serves as joists for the subfloor
Leveling the expanded clay layer using a building level
CAREFULLY!
Laying and compacting expanded clay must be done very carefully so as not to damage the fragile porous elements.