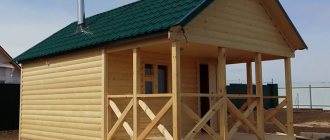
In private houses and apartments, a popular way of arranging the floor is considered to be a structure on logs. This method is quite universal, it allows you to insulate and level the base. However, its design can vary greatly depending on the floor, type of building (private house or apartment), presence of a warm basement, etc.
In this article we will look at several options for laying a wooden floor cake.
Wooden floor with expanded clay insulation
Floor frame
Basic elements of a wooden floor
First, let's study the main constituent elements and main rules:
- The underground space from the pads to the floorboard must be at least 1 cm (and no more than 25 cm for floors on the ground). This is necessary for good ventilation inside the frame.
- Logs are transverse bars that serve as the basis for further cladding with boards. They can rest on beams, a concrete slab, posts, and even on the ground (when using pads).
Note! According to GOST 8486-86, unplaned boards treated with an antiseptic from coniferous or deciduous wood, except linden or poplar, are used for joists. Wood moisture content should not exceed 18%.
- The width of the logs when laid on a slab should be in the range of 80-100 mm and 100-120 mm when laid on posts or beams. The thickness when laid on a slab should be 25-40 mm, and when laid on posts - 40-50 mm.
- Beams are horizontally laid structural elements that perform load-bearing functions. They are supported at least at two points on load-bearing walls.
- Columns (linings) are used to level the base. For logs with a thickness of 40-50 mm, linings are installed every 80-110 cm.
- The pitch of laying the logs depends on the thickness of the sheathing. For example, if you use the thinnest floorboard 21 mm, then the step of laying the logs should not exceed 30 cm.
- It is best to use a thicker floorboard 35 mm, and make a standard laying step of 60 cm, especially if you are going to insulate the base. This way you won't have to cut the insulation to width.
Features of device technology
All three types of wooden floors, despite their differences, have many common requirements that must be met during the installation process, regardless of what wall material the house is built from:
- The supporting beams are distributed at even intervals, set strictly horizontally along the plane and parallel to each other.
- The permissible deflection of the flooring cannot be higher than the normative one in relation to the length of the beam - 1/350.
- When the span is large and the cross-section of the beam is insufficient to ensure the design strength, the structure is strengthened by installing vertical columns using specially designed perforated fasteners.
- When tying wooden elements with load-bearing walls, it is necessary to lay waterproofing materials, for example, damper tape or roofing felt.
Ground floor
Such a ceiling is made of load-bearing beams with a subfloor , used as a base for thermal and waterproofing. Lay the finishing floor on top of the last layer.
Before installing the edges of the beams on the load-bearing basement walls, cut-off waterproofing is carried out with bitumen or several layers of roofing material. When arranging the base, special openings are made in advance for installing beams with openings of at least 150 mm so that the ends of the beams can freely rest on the wall.
When the beams are mounted, cranial bars are attached to them from below. On which the boards are hemmed, a layer of hydro- and thermal protection is then laid. After the ventilation gap is formed, rough floor boards are placed on them, and then the finished floor.
Second
The assembly of such floors begins by securing the beams. As a rule, they are inserted into the grooves of the walls; this process is allowed only during the construction of wall structures .
Stages of installation of interfloor slabs:
The load-bearing beams are treated with antiseptic impregnation against rotting and fire retardants for fire safety.- The ends are filed at an angle of 60, painted with bitumen mastic and covered with 2 layers of roofing material for waterproofing protection.
At the same time, the end of the beams remains open so that water vapor can freely escape without damaging the beams. - Initially, 2 end beams are installed, with a minimum gap of 50 mm from the load-bearing walls.
- The beam is 150 mm, maintaining a ventilation gap between it and the wall of up to 30 mm.
- They control the horizontal laying of beams at the building level. They are leveled using dried, waterproofed with bitumen, dies of various thicknesses, made of wood.
- In order to prevent the formation of creaking on the beams when walking, as well as preventing the entry of cool air currents, the resulting gaps are sealed with tow or mineral insulation.
- The remaining beams are secured using a similar technology.
- Every 5th beam is additionally fixed to the wall using anchors.
- When forming a “pie” of the structure, cranial bars of 50x50 mm are installed on top, along the beam edges on both sides, with the lower part under the plane of the beams.
- The boards are fixed with rolled cranial blocks to form a rough ceiling using nails.
- To install a significant layer of insulation between the beams, it is better to hem the board from below.
- A vapor barrier membrane is installed in front of the insulation to prevent condensation from penetrating into it, which is likely when rooms on different floors have different internal temperatures, that is, they are heated and unheated.
In the same way, steam can leak into the thermal insulator of the structure from wet rooms on the 1st floor, in particular from kitchens, baths and showers. Therefore, the membrane is laid on top of the load-bearing beams with an overlap of 100 mm, and the joints are sealed with mounting tape. - Next, material for heat and noise protection is placed tightly between the beams on top of the film, while preventing it from jamming.
- To reduce impact noise in the ceiling, specialized soundproofing strips are installed along the upper plane of the beams.
- A waterproofing membrane is placed on top of the insulating material with an overlap of 100 mm, in order to protect against the penetration of moisture from the upper room into the insulation, the joints are treated with tape.
- Install the subfloor from boards or sheet material such as OSB or thick plywood using nails or self-tapping screws.
- Any finishing building materials can be installed on top of the rough base at the bottom and top of the ceiling. On the 1st floor, the ceiling is being finished; lining, OSB panels and plasterboards can be well used here.
Attic
Recently, developers have been constructing attic space in the form of a warm attic , so its ceiling must combine two important functions at once - load-bearing and insulating.
This explains the fact that such floors are also made multilayer, like the previous floors.
Stages of installation of the attic floor:
- The process begins at the final stage of roofing work.
- Load-bearing beams are installed, as a rule, beams 150 * 150 mm for one-story houses and 200 * 200 mm for two-story houses, which are laid on brick or reinforced belt.
- Perpendicular to the load-bearing beams, logs are installed on the edge; this will require a 150x50 mm board, the installation step is 500 mm.
- A vapor barrier layer is installed.
- A heat insulator is placed between the joists to avoid heat loss and increase the level of sound protection of the ceiling.
- Install a waterproofing with a ventilation gap between the slabs and the membrane so that the insulation does not collect moisture and it can evaporate freely.
- After this, the floor is laid, first rough, then finished.
- The ceiling is designed for the lower floor.
Important ! Before installing the attic floor, all wooden structural elements must be impregnated with antiseptic and fire-fighting agents.
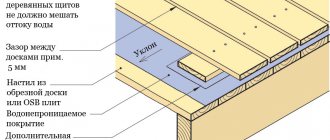
Installation technology
If the base is uneven, then it can be leveled using a backfill of sand with a moisture content of less than 4%.
Installation of logs
Laying joists on a flat surface
- Most often, logs are installed perpendicular to the light from the window, so that the boards then lie along it. This will make the gaps between the boards less visible.
- First of all, install the outer joists with a gap of 2-3 cm from the wall. Then intermediate logs are installed.
- The logs are laid on the base without rigid fastening. Their evenness is checked using a level and a 2-meter rod. They all must be in the same plane. In this case, leveling with wooden pads or wedges is not recommended, but adding sand under the waterproofing is acceptable.
- To increase the rigidity of the structure, the logs are connected to each other by wooden jumpers, which are attached to galvanized 4*4 corners.
Note! It is imperative to install an additional joist in the doorway so that it protrudes into each room by at least 5 cm. This is necessary so that the boards from adjacent rooms rest on one base.
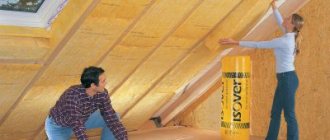
Insulation layers
Correct placement of insulation
- If laying takes place on a concrete slab, it is imperative to use a waterproofing layer, especially if the screed is new. For this purpose, roofing felt, polyethylene film, and backfill types of waterproofing are used. They are laid in a continuous sealed layer, with an overlap of 15 cm on the walls.
- To increase sound insulation and reduce the transmission of vibration noise through floors, it is recommended to install logs on soundproofing pads. You can make them yourself from polyurethane, cork backing, soft fiberboard.
- To insulate the floor, a layer of mineral wool or expanded polystyrene can be laid between the joists. Mineral wool also provides a soundproofing effect. Unlike concrete screed, it is not necessary to use high-density insulation materials, since there will be no load on them.
- For additional protection against noise transmission through the structure, before installing the sheathing, a cork backing can be laid on the joists.
- If you use mineral wool, then it must be covered on top with a vapor barrier membrane, such as glassine. This is necessary to protect against moisture ingress and condensation removal. It is secured as the boards are laid on the joists using a stapler.
- After installing the vapor barrier, there is no ventilation gap left under the boards, so it is recommended to screw a counter-lattice made of boards at least 1 cm thick onto the logs on top of it. The floorboard will be attached to them.
Finished flooring
Installation of finished floor
- A tongue-and-groove floorboard is most often used as the last layer; its price is approximately 13,500 rubles per cubic meter.
- To save money, you can use an unplaned board, but you will have to trim and process it yourself.
- Thick plywood or OSB sheets are also a good alternative. For floor coverings, their thickness should be 15-21 mm.
Installation of a classic subfloor
After installing the beams in the sockets, it is necessary to secure the cranial bars on their narrow sides. The fixation is carried out in such a way that the cross section forms the letter T. The classic section of the bar is 4*4 or 5*5cm. At the time of fastening, it is necessary to ensure that the surface of the bars is perfectly flat. This will avoid difficulties when installing slab flooring material.
Classic subfloor
There are certain rules for laying a subfloor on wooden joists, which are prescribed in the construction regulations. OSB boards, plywood, chipboard, as well as tongue and groove boards or edged boards can be used as flooring materials.
There are certain rules for laying slab material and edged boards on wooden logs to give maximum strength to the finished structure:
- The top layer of plywood veneer must be fixed in such a position that it is located across the joists.
- The long side of the chipboard sheet is located along the purlin. And the installation of parallel joints of adjacent sheets should be carried out staggered.
- When laying plywood sheets, it is possible to shift joints perpendicular to the direction of the beams.
- When using edged or tongue-and-groove boards, you must choose a size that is at least 18cm wide. The purlins provide precise support, and the angle of attachment of the board to the purlin should not exceed 450C.
This is important: fastening the flooring as a base for subsequent finishing coating should be done using self-tapping screws. Only when subsequent installation of a flexible base is planned is it necessary to use nails equipped with a ruff notch or ribs.
It should be noted that the service life of the future floor directly depends on the quality of the flooring. The installation of thermal insulation materials also plays an important role. You can choose various materials for insulation.
Laying thermal insulation
To ensure that the finished base structure is not only strong and durable, but also warm, experts recommend using thermal insulation materials, as well as vapor barrier membranes. The main layers of the so-called “pie”:
- Waterproofing layer. Its task is to prevent the wood from becoming saturated with moisture. For this purpose. A diffusion membrane is used, located under the beams.
- A layer of mineral wool or other slab insulation. It is mounted directly on the diffusion membrane.
- The vapor barrier is located directly under the subfloor material. Experts prefer foil materials that can reflect heat back towards the room. This allows you to reduce the cost of heating the building.
- Sound insulation is used mainly in the construction of houses with 2 or more floors.
A prerequisite is the use of antiseptics for treating the base slab material, as well as joists and cranial beams. Their use is most effective before the stage of cutting slab material or wood. The cut site must also be carefully processed. In this way, it is possible to increase the service life of the finished subfloor on wooden joists.
Wooden floor in the apartment
The simplest and most common way is to install wooden logs on a concrete base in an apartment.
Wooden floor in the apartment
- The main feature of a wooden floor in an apartment is the absence of an additional subfloor. Here a concrete slab is used instead.
- The base of the floor in apartments is warm, so insulation is rarely used here, but sound insulation is required.
Pie of wooden floor for an apartment with sound insulation:
- Concrete slab leveled with sand;
- Waterproofing;
- Noise-reducing pads;
- Wooden logs;
- Mineral wool;
- Vapor barrier;
- Counter grille;
- Sheathing made of boards or plywood;
Purpose of subfloors on wooden beams
Subfloors are used for the following purposes.
- As one of the elements of insulated floors. Such subfloors are attached to the bottom of floor beams or floor joists. Serve as a basis for laying insulation materials. Rolled or pressed mineral wool, foam or polystyrene boards, expanded clay, etc. can be used as insulation. Subfloors can be made from various lumber, including used ones.
Wooden floor insulation scheme
- As a base for laying finished floors . They perform two functions: leveling the floor and supporting the base. They are used as one of the elements of flooring made of thin laminate or various soft finishing coatings. The requirements for manufacturing materials are more stringent; OSB boards, sheets of plywood or planed edged boards are mainly used for construction.
Technology for installing a subfloor in a wooden house. Example with lags
The technology for making subfloors largely depends on their specific purpose.
First floor in a private house
Floor pie on the first floor
Consider the following example of a design for the first floor in a wooden house. It does not use logs, and the sheathing is installed directly on the floor beams. This allows you to save ceiling height, makes the scheme simpler and cheaper.
The floor pie of the first floor in a wooden house is shown in the photo.
This scheme is suitable for the first floor above a warm basement, and for floors between the 1st and 2nd floors.
- At the very bottom there are cranial blocks made of 100*25 mm boards. They are screwed to the beams from the bottom. They are needed to construct a subfloor for laying insulation.
- Then there are load-bearing beams 200*50 mm.
- The subfloor made of 100*25 mm boards is laid on cranial blocks.
- A windproof film (vapor barrier membrane) is laid on the subfloor.
- Then insulation is placed between the joists. In a specific example, 2 layers of Rockwool Light Butts mineral wool are used, laid staggered, with a total layer thickness of 20 cm.
- The top of the insulation is covered with a vapor barrier.
- Then the sheathing of the joists is done. In this case, FSF plywood with a thickness of 21 mm is used. It is laid with offset joints.
- Additionally, it is recommended to add counter battens to this scheme to create a gap under the plywood.
Features of insulation
The frame structure of logs is found not only in wooden houses, but also in many buildings built in the first half or mid-20th century. At that time, this was the most affordable way to quickly build a residential building. Characteristic features of such coatings are good thermal insulation properties. But they also require periodic repair and updating - much more often than concrete floors. Therefore, experts recommend making an additional layer of insulation when planning these works.
In addition, installing joists is one of the effective options for creating a warm base in modern residential buildings, however, due to the reduction in the overall height in the room, it is not always acceptable for standard apartments and houses.
To analyze the feasibility of insulation between joists, let’s consider the features of this technology:
- In most cases, logs are installed on a rough wooden base, thereby forming several separate cells on the surface. Those. the insulation will not be evenly distributed over the entire surface, but will fill only these zones. The difference between the heat transfer coefficients of the beams and the heat insulator can cause uneven temperature distribution on the surface.
- The insulation material should not negatively affect the wooden structural elements. To a greater extent, this relates to its hydrophobicity - moisture absorption. Therefore, the technology of floor insulation using joists provides for increased waterproofing measures.
- Mandatory air gap. It is necessary for the timely removal of water vapor released by wood. To do this, provide for ventilation gaps between the insulation and the upper base of the floor.
Taking into account this specificity, you can begin to select the optimal insulation scheme. To do this, we will consider various design options for the heat-insulating layer.
Floor pie on the second floor
A floor pie in a wooden house to cover the second floor can be made as follows:
Floor pie on the second floor
- At the very bottom of the diagram there is a 5*4 cm beam. It is needed to support fiberboard sheets, give additional rigidity to the frame and for decorative purposes.
- Then comes the vapor barrier. It is not necessary to use it here, but it will additionally protect the first floor from mineral wool dust. If the 1st and 2nd floors are heated, then it can be replaced with a windproof layer, but in wet rooms a vapor barrier membrane must be used.
- Then there are fiberboard sheets to create a subfloor for laying insulation. They are attached with a construction stapler from below to the beams.
- Mineral wool 15 cm thick is laid on the fiberboard. It is mainly needed for sound insulation.
- The insulation is covered with a windscreen on top to prevent dust from penetrating into the room.
- A continuous sheathing of 150*25 mm boards is mounted on the windbreak.
- Sheets of FC or FSF plywood, 9-12 mm thick, are attached to the boards. You can also not make a continuous sheathing, but, as in the previous version, use 21 mm plywood.
How to insulate a floor in a wooden house: layering
The most common technology is insulation along joists with mineral wool. The advantage of such a floor is the absence of “wet” processes, quick installation and ease of construction. Non-flammable insulation in the form of mineral wool also prevents external noise.
- The main components of the “pie” of floor insulation by joists:
- Lags.
- Wind barrier (membrane).
- Sheathing the lower floor (if it is planned to insulate the interfloor space), subfloor, or fastening the wire.
- Mineral wool.
- Vapor barrier film.
- It is better to leave an additional air gap between the vapor barrier and the subfloor: bars are mounted on the logs on top of the vapor barrier.
- Floorboard, OSB, plywood or other wood base for finishing.
- Floor layer (laminate, parquet, linoleum, carpet).
The principle of creating a “pie” from mineral (stone) wool
The basis of the structure is wooden floor joists. The distance between them is determined depending on the insulation used. For example, for standard stone wool slabs the distance will be 580-590 mm. With this size, the slabs fit tightly to the frame, leaving no cold bridges. This will also make installation easier.
OSB or another solid base (subfloor) is hemmed underneath, where insulation is subsequently laid. For screwing, it is better to use galvanized or yellow self-tapping screws rather than black ones (less susceptible to corrosion).
Helpful advice.
Instead of a subfloor, you can fasten the wire between the joists. It is most convenient to arrange it in zigzags. A good option is metal mesh. This creates a base for the insulation, and there is no need to install bars or hem the wooden base. Construction costs are significantly reduced.
If the ceiling of the second floor of a wooden house is located above a room with high humidity (bathroom), then before laying the stone wool, an additional layer of vapor barrier is laid. Otherwise it is not necessary.
The thickness of mineral wool is at least 20 cm. When laying the second layer of mineral wool, it is necessary to maintain a run-up between the seams of 100-150 mm.
To avoid moisture condensation on the insulation, a vapor barrier film is laid on top. Be sure to lay it overlapping, also overlapping the walls by 150 mm. The seams must be taped with double-sided tape (acrylic tape).
A solid foundation completes this pie. Typically this is OSB, wood, fiberboard or drywall.
Additional insulation of the floor of a wooden house
Wooden beams or joists between the insulation remain cold bridges that can be localized by transverse insulation. To do this, another row of joists are attached across the main ones on top of the laid vapor barrier. The width of the gaps depends on how to insulate the floor in a wooden house from below.
It is preferable to take organic heat insulators that are safe for human health:
- cellulose
- linen
- bonfire
- straw
- light adobe (clay with straw).
This is a good way to insulate the exterior floor of an old farmhouse without tearing down the old boards.
How to properly insulate a floor on the ground?
The most important thing when creating such a floor is high-quality soil compaction:
- Soil compacted with crushed stone.
- Preparation from 50 mm concrete.
- Built-up bitumen waterproofing on a synthetic base 3-4 mm.
- Extruded polystyrene foam 50 mm.
- Cement-sand screed M150 (not less than M100), reinforced with ZVR1-100 60 mm mesh.
- Finish floor covering.
Material (thickness, mm):
- Expanded polystyrene PSB-35,
- EPPS 40 kg/cu.m. m,
- Polyurethane foam 70 kg/cu.m. m,
- Mineral (stone) wool 120-170 kg/cubic. m,
- Perlite concrete 600 kg/cu.m. m,
- Aerated concrete, gas silicate,
- Foam glass (gas glass) 200 kg/cu.m. m.
The most popular and appropriate for today are EPPS and polystyrene foam for insulation PSB-35. An effective material with ideal technical characteristics for ground flooring. The price of the finished coating is also the lowest.
Ground floor floor
If you do not have a warm base, then install the floor on the first floor on the ground using stands made of posts.
Wooden floor on posts
- To make such a floor, you first need to remove the plant and soft layers of soil. This can be done locally at the installation site of the columns, or throughout the entire area inside the strip foundation.
- Then a dry layer of soil of at least 15-20 cm is poured and thoroughly compacted.
- The resulting base needs to be moistened and crushed stone or gravel pressed into it a few centimeters on top.
- Then the sand-crushed stone mixture is backfilled and, after compaction, red brick columns are laid on it to support the floor beams. They are laid in increments of 70-100 cm, several bricks high. The top and bottom of the posts must be protected with a layer of roofing felt waterproofing.
- It is advisable to lay a layer of waterproofing between the columns so that moisture from below does not affect the beams.
- Beams are laid in the center of the columns. Their height should be at least 2 cm greater than the height of the subfloor boards and insulation, so that an air gap remains.
- The subfloor boards are laid on posts along the edges.
- Then comes a layer of vapor barrier.
- Insulation (mineral wool or extruded polystyrene foam, polystyrene foam) is placed between the beams.
- A finished flooring board is attached to the beams on top.
The correct “pie” for the floor of a frame house
When using a pile foundation, the floor can be raised to a height of up to 1 m, usually this gap is 30 cm.
If the height allows, then the subfloor is filled from below directly onto the supporting beams. As was said above, everything must be treated with protective agents.
The second method is to make secondary guides on top of the log, but this method is not widespread, as it will require additional costs.
In most cases, the foundation is low and cranial bars are used, which are made of timber measuring 5 x 5 cm. They are attached to the bottom of the logs or beams using self-tapping screws or nails.
Boards with a thickness of 25 to 40 mm are used as subflooring material, the thickness depends on the load. The boards are fixed using construction fasteners.
After the base of the subfloor is ready, vapor diffusion moisture-proof membranes are spread on it. This material has replaced film, which combines waterproofing and windproof properties at the same time.
The material is laid with an overlap of at least 100 mm, all joints are taped. We fasten the material using a construction stapler
Laying insulation.
There are three types of thermal insulation materials:
- Bulk fillers.
- Materials in the form of rolls and tiles.
- Sprayed thermal insulation.
Bulk fillers have been used in construction for a long time. Expanded clay, slag, perlite or sawdust are used as filler between the beam space.
Now this method is used for insulation above the basement space. Usually with a strip foundation. Although expanded clay is still often used today, since it is quite light, it is convenient to work with and is a good thermal insulation material. Typically used for ground floor floors.
Installation is simple - just spread out the insulation and level it using a rule. You can do the work yourself. Lately, backfilled or blown-in ecowool has become popular.
Rolled - mineral wool in the form of rolls or denser tiles is used as insulation.
Makes it possible to use thin boards for the subfloor, since the weight is not significant.
Just 10-15 cm of insulation is enough for high-quality insulation and noise reduction.
The installation process is just as easy, we place cotton wool in the space between the joists, but not all the way to the top, leaving a gap of about 3 cm for ventilation.
Sprayed thermal insulation is a thermal insulation material made from polyurethane foam. Unfortunately, you can’t apply it yourself; you’ll need to call a professional.
Yes, it should be noted right away that this is an expensive pleasure.
But this method is the most effective, since after all the reactions have passed and the mass has dried, one continuous layer without voids is formed, the entire structure has low vapor permeability and air permeability. And the surface has increased protection from moisture.
A layer of vapor barrier should be laid on top of the insulation. You can choose to lay a membrane or film. They are also secured with a construction stapler.
Installation of finished floor
After laying the entire “pie”, we proceed to installing the finished floor.
You should leave a gap of about 3 cm between the insulation and the finished floor.
Usually it is made from edged boards 4 cm thick and about 10 cm wide. But you can also use sheets of plywood, OSB, while for the finished floor they do not use edged boards, it is much cheaper.
And don’t forget to treat everything with means to protect against fire and rot.
It is necessary to take into account the reinforcement of beams at the locations of partitions and stairs. And also provide mortgages in places where pumping stations and heavy household appliances are installed.
Particular attention should be paid to the arrangement of the subfloor in the area of the stove or fireplace.
Around this place, it is better to use basalt glass wool, and treat the boards well with a penetrating compound.
And the surface of the finished floor is covered with a metal sheet or asbestos sheet.
Pile foundation base
Since we use a pile foundation, there is space between the subfloor and the ground. Many people make the mistake of completely sewing up this space.
Thinking that they are reducing heat losses, but in fact moisture accumulates in this space and has nowhere to go, which leads to an acceleration of the process of wood rotting.
To prevent this from happening, ventilation holes are left on opposite sides, which are decorated with grilles. You should also not close the vents for the winter.
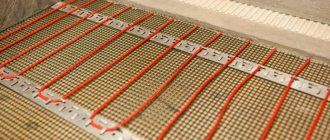
Installation of heated floors in a frame house
For heated floors, both water heating and electric heating are used.
Let's start with the electrical method, since it is often used in the installation of heated floors. Cable floors, infrared and heating mats are used. It is best to trust the specialists.
Recently, water heating of wooden floors has become increasingly popular, as it is much cheaper than electric.
Water heating can be arranged in three ways:
- Swedish stove.
- Use of heat-reflecting plates.
- Use of concrete screed.
The Swedish stove is a fairly expensive method of installing a heated floor.
It is as follows:
It is necessary to dig a pit of small depth, then fill it with sand about 15 cm and tamp it.- Then we lay all communications and fill everything with 15-20 cm of gravel. We install formwork around the entire site.
- Then we insulate the entire area with polystyrene, in two layers with staggered seams. The thickness of each layer is 10 cm.
- Then we lay the metal sheathing and lay the heating pipes on top of it. We fill everything with concrete mortar and level it.
You should wait until the concrete has completely set. We get that the Swedish stove is a full-fledged subfloor. Subsequently, we build a frame house on this slab.
Use of heat-reflecting plates.
When using heat-reflecting plates, the top layer of the subfloor is arranged a little differently.
- To begin with, we change the thickness of the board from 4 cm to 5 cm and fasten the fasteners in a scattered manner, leaving space for the pipes. In such a way that the heating pipe fits together with the plate.
- A fine finishing coating (laminate, parquet, etc.) can be laid on top of the resulting layer.
Use of concrete screed.
When using a concrete screed, you should also replace the boards with 5 cm ones.- Then we lay the waterproofing film overlapping the walls, and tape the joints with tape.
- We lay out the pipes for the heated floor and pour a concrete solution 6-7 cm thick.
Wait until the screed is completely dry.
This method is rarely used. Since the weight of the resulting layer is very large. Also, if the pipe is damaged, everything will have to be disassembled.
Conclusion
As we can see from all of the above, the technology for installing the floor of a frame house is not a complicated process; you must strictly follow the instructions, design and sequence of the multilayer structure.
Everything can be done independently, without the use of specific devices and tools.
If you are building a house for yourself, you should not skimp on materials. Use only trusted manufacturers.
The microclimate in the house depends on the correctly chosen thickness, as well as on compliance with the sequence of laid layers of the “pie”.
Installation of wooden flooring and flooring on beams
- On both sides of each beam, bars are attached, to which the flooring is fitted closely. Boards, gypsum boards or other material can be used as it. The essence of the process is to form a flooring at the level of the lower plane of the beams.
- Waterproofing work should be carried out on the flooring panels to ensure the safety of the insulation. To do this, the entire surface of the flooring is coated with a clay-sand mortar, or roofing felt is laid.
- Floor insulation is being installed. This can be done using slag, which is poured onto the flooring between beams, mineral wool slabs, foam sheets, sawdust or other floor insulation options.
- Next, the floors are laid on wooden beams. Planed boards with a thickness of at least 35 mm can be chosen as the material. You can lay joists along the beams, and then lay the floor on them. This will be the best option, since in this case an additional ventilation gap will be formed.
Private low-rise construction has become increasingly popular in recent years.
Cladding tiles can be made as floor tiles, prefabricated type with beams and ceramic tiles. The beams should rest on the edge of the block and the tip of the anchor should be inside the gutter. Make arrows on the slab and counter. Before making concrete, place 5mm steel rods on top and wrap around the gutters to avoid breaking the slabs. The concrete cover will be 3 cm because the slab is a backing. You can buy ready-mixed concrete by asking for a concrete mixer and pump so that the concrete does not reach the second floor without any force.
You save enough time and effort. And to make the finish, use planks resting on the board. With a back and forth motion you level the concrete. Don't forget: concrete is not dry, concrete is curing. Therefore, you must keep the slab damp and covered.
Country houses and country houses built with their own hands are occupying an increasingly large share of the total volume of housing put into operation.
Oitao is a wall that sits on the edge of a slab. It is on this wall that the wooden roofs will be supported. This is a triangular wall that will give the finish to the roof. If you place a water tank on top of a cladding board, the wall needs to be of a height to match the water tank. And besides the height of the support, leave a little space to open the lid, move into the water box, wash, etc. if you leave 1.3 m, that will be enough. In the case of a 10m slab, the oval would be this triangle on top of the slab with 10m on the bottom, 1.3m high, with two equal sides, each side being part of the roof.