If you intend to install a large stove in the house, then this is one situation - here we “squeeze out” everything that is possible and to the fullest extent: a brick stove on a solid foundation and a seriously thought-out and insulated chimney. When it comes to a stove in a bathhouse, the situation here is much simpler and more varied.
Let us at least take into account that the market offers many already developed options for every taste. And the best choice would be to choose a ready-made, proven model. However, you will have to do the maintenance yourself, so it will be necessary to know the structure of the furnace.
>
Economical sauna stove taking into account all the nuances of use
Construction of the foundation
The construction of a bathhouse begins with preparing the foundation. A wooden bathhouse can be built on a strip foundation. Also, columnar bases are perfect for such buildings.
Strip foundation for a bathhouse
First stage. Prepare a trench for the foundation. Determine the trench parameters individually in accordance with the selected type of foundation, dimensions and weight of the future building, soil characteristics at the construction site, etc.
Second phase. Carry out the necessary backfilling. The technology for constructing foundations requires the creation of a cushion of sand and crushed stone. Reinforce the foundation. The order of reinforcement will vary depending on the type of base chosen.
Third stage. Pour the concrete. In the case of a strip base, concrete must be poured in horizontal layers. Treat each layer with a special vibrating tool to remove excess air.
Fourth stage. Waterproof the foundation. Select the type of waterproofing, again, in accordance with the design of the foundation. Most often, special coating waterproofing materials and roofing felt are used.
Bathhouse foundation
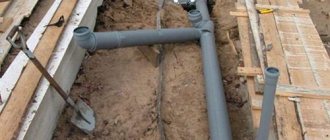
At the stage of arranging the foundation, consider creating holes for future utilities. It is most convenient to do this before pouring concrete. It is not recommended to create any holes in an already poured foundation, because... this may lead to reduced structural strength.
Technical requirements for sauna heaters
Sauna stoves are designed to solve the following problems:
- provide strong heating of the stones to generate clean and dry steam in the steam room;
- efficiently use fuel material at each loading;
- maintain optimal temperature conditions in the room - up to 80 degrees under the ceiling surface, up to 55 degrees above floor level;
- maintain high efficiency during long-term combustion.
Therefore, when choosing or constructing a furnace, increased requirements are placed on it:
- the stove should not have any damage to the body or structural elements;
- during installation, a minimum distance of 55 cm must be maintained between the heating equipment and the wall;
- when operating the device, it is important to exclude any contact of the heating surface with wooden interior elements;
- the ash collection compartment should be located at a distance of 18 cm from the floor level;
- to protect wall surfaces from fire, it is necessary to use a protective screen made of fire-resistant materials;
- installation of equipment is carried out on a special platform or metal base.
Important! Regardless of the design features, the heater stove must be safe, economical and durable.
Sauna heaters are functional devices equipped with a special compartment for loading bath stones. When the fuel material burns, the stones heat up, which leads to heating of the water and the formation of steam.
The most popular are two types of heaters - brick and metal. Each of them has its own advantages and disadvantages.
Walling
Approximately 3-5 weeks after pouring the foundation, you can begin building the walls. The construction procedure will vary depending on which material you decide to use as the main one.
Walling
Traditional Russian baths are built from logs. Currently, frame construction is very popular. It’s easiest to build a frame bathhouse - the wall elements are sold ready-made, so all you have to do is secure them to the foundation.
Walling
It is recommended that beginners give preference to frame baths. Firstly, constructing a frame from ready-made blocks does not require much experience or serious skills. Secondly, the result will be a reliable and environmentally friendly wood structure.
Build the walls in accordance with your existing plan and design. At each stage, check the evenness of the installation of structures using appropriate tools. Don't forget to leave openings for doors and windows.
At the beginning of the construction of walls, you can lay floor joists in parallel and think about the installation of utilities.
Roof structure
Roof structure
After removing all the walls and partitions planned for the project, begin building the roof.
First stage. Knock down the base of the roof from reliable and durable wooden blocks - Mauerlat.
Second phase. Place the rafters on the prepared base. It is more convenient to assemble the rafters on the ground and lift them onto the roof in finished form.
Roof of the bathhouse
Third stage. Fix the sheathing to the rafters. Most often, continuous sheathing is made of boards. This is the most convenient, reliable and versatile option.
At the same stage, think about where the chimney will exit. Leave a hole in the sheathing of the appropriate size for the passage of the chimney.
Fourth stage. Secure the necessary insulation materials. On the attic side, a vapor barrier material is attached to the roof frame. Insulation is placed in the sheathing, usually mineral wool. A layer of polyethylene film is fixed on top of the insulation for waterproofing.
Don't forget to nail small wooden blocks to the sheathing elements to create a counter-lattice. Thanks to them, a gap will be created for normal ventilation of the under-roof space.
Bathhouse roof insulation scheme
Fifth stage. Install the selected roofing material. At this point, focus on your preferences and available budget. The main thing is that the finishing coating is fireproof and reliable. After laying the roofing material, proceed to installing the floor.
Roof
Characteristic features of brick products
A brick structure for a bathhouse is considered a good solution. It has a number of undoubted advantages. Among them:
- the generated heat is retained for a long time;
- fire safety is ensured;
- the sauna space is heated evenly;
- it is possible to warm up a bath with a large area;
- the stove is easy to use;
- combustion products and stones do not come into contact with each other.
In this video you will learn how to make a stove-heater:
But a heater for a brick sauna also has its drawbacks: it needs to be heated in advance, and difficulties may arise in arranging the foundation. In addition, it is important to choose the right place to place it.
Bath floor
At this stage, no difficulties will arise.
Bath floor
First stage. Insulate the basement of the building. To do this, secure mineral wool and plastic film along the base or above-ground part of the foundation.
Second phase. Pour the concrete floor in the washroom. In the remaining rooms of the bathhouse, make a thermal insulation backfill; expanded clay works well.
Third stage. Lay insulation boards (mineral wool) and vapor barrier material in all rooms.
Wooden floor for a bath
Finally, all you have to do is install the supports for the plank flooring, lay the boards and finish the surfaces. Place the supports in such a way that there is a gap of 10-20 mm between the flooring and the underlying insulating materials.
Bath decoration
Bath decoration
Start finishing work with insulation. Polystyrene foam is traditionally used for external thermal insulation. The inside of the bathhouse is usually insulated with mineral wool.
First stage. Cover the walls of the bathhouse with a vapor barrier material. A special membrane film material is suitable.
Second phase. Attach the sheathing to the walls of the steam room in increments of 1-1.5 cm smaller than the width of the insulation.
Third stage. Lay waterproofing material over the insulation. You can use plastic film that you are already familiar with.
Fourth stage. Apply finishing trim to the walls. Usually the cladding is done with wooden clapboard. For the rest, be guided by your own preferences.
Do-it-yourself bathhouse finishing
Move on to finishing the ceilings. The insulation process is carried out in the same way as the thermal insulation of walls. It is recommended to use fiberglass to insulate the attic floor. Mineral wool with a vapor barrier material is laid on top of the fiberglass and a rough finish is performed. You can also make a cement screed.
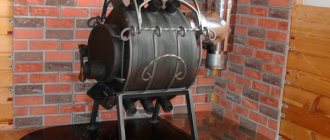
Long-burning boiler principle
Before reviewing the unit, you need to understand the principle of its operation. The bubafonya stove runs on solid fuel - wood. Before you start burning it, you need to prepare the wood. In the boiler it is heated to 250 degrees Celsius using paper ignition.
When charring, wood decomposes into simple chemicals: gases and vapors. When the temperature reaches 300o Celsius, the gaseous components ignite, accelerating the thermal reaction.
To protect against fire, and also to prevent it from spreading throughout the entire container, a protective screen is provided on the fireplace. A damper is used to regulate the temperature. When turned off, the air supply stops, as does the combustion process.
e73a5161b278f1b9b6cce9d093acdbd7.jpe b91f0cbcde1d75943e45664645a35bcc.jpe c66866520f2ead98723282e8dfc82f03.jpe c3e999ec2fa9779517be1a04935 82877.jpe
Installation of doors and windows
Installation of doors and windows
At this stage, no difficulties usually arise. To install the doors, it is enough to install the frame, fasten the hinges, hang the leaf, and then install the decorative elements and fittings
The technology for installing windows will vary slightly depending on the material they are made of.
Installation of doors to the bathhouse
In general, there are no difficulties either. First, the frame is fixed in the prepared opening using anchors or special plates, the position of the window is leveled in all directions, the cracks are filled with polyurethane foam and slopes are constructed.
Commissioning process
It is not enough to know how to make a heater in a bathhouse; you also need to put it into operation correctly. Before lighting the stove, allow it to dry thoroughly. To do this, keep the doors, vent and views open for 7 days so that the heater dries out faster. When a structure does not smoke when lit, this means that it has good draft.
The main thing is not to rush with the first kindling. The fact is that cracks may appear in the masonry if it is not dried sufficiently.
Arrangement of the bathhouse
In matters of internal arrangement, be guided, first of all, by your personal preferences. You will be using the bathhouse, and it is you who should feel comfortable and comfortable in it.
Arrangement of the bathhouse
Among the useful and most important items for furnishing a bathhouse are a table with chairs for the rest room, a small refrigerator, an optional billiard table and a TV, hangers, headrests, buckets, lighting fixtures, etc.
When it comes to wiring, it is best to enlist the help of a professional electrician at this stage.
Also, in the process of arranging a bathhouse, you need to connect the main plumbing fixtures and all related activities.
Bath stove
Bath stove
The stove is the heart of any sauna. For your steam room, you can choose absolutely any of the many existing variations of sauna stoves. Beginners can be advised to take a closer look at metal wood-burning heating units. A metal stove is much easier to create and install compared to its brick counterpart. The process of arranging a furnace includes several simple steps.
DIY sauna stove
First stage. Prepare a pipe about 150 cm long. The diameter of the pipe should be about 50 cm.
Second phase. Cut the pipe into 2 parts. One part will be 90 cm long and will be used to make a heater with a combustion chamber; from the second part you will make a tank.
Third stage. Cut a hole at the bottom of the long pipe measuring about 200x50 mm. Weld a round steel plate with a thickness of 12 mm over this hole.
Fourth stage. Prepare a sheet of metal for making a grate. Select the dimensions of the grate so that it fits normally in the body. The grate itself is installed in the ash pit. For convenient and reliable fastening of the grate, weld 4 “ears” to it.
Sheet steel stove
Fifth stage. Cut a niche for the combustion chamber. Make a metal firebox door measuring 250x300mm and secure it in place using hooks and loops. A simple latch must be attached to the door.
Sixth stage. Weld the heater blank over the firebox. The functions of the heater will be performed by a piece of pipe about 350 mm long. Weld the back wall of this pipe. Equip the pipe itself with a door up to 300 mm wide.
Seventh stage. Fill the heater about half full with pebbles. Weld a steel circle to the heater to prevent the pebbles from falling out.
Eighth stage. Attach a coupling at the top of the stove with a width of 5 cm and a thickness of about 0.5 cm. To make the coupling, use a steel bar. Weld the coupling to the unit body so that one half of the product protrudes above the stove. You will attach the tank to this part of the coupling.
Metal stove
Ninth stage. Prepare a container for water. Weld a circle of steel about 8-10 mm thick from the bottom to the end of the tank. First, in this circle you need to cut a hole with a diameter of about 15 cm for the chimney. Weld the bottom of the chimney to the bottom of the water container so that liquid cannot drain into the firebox.
Tenth stage. Cover the top of the water container with the steel circle mentioned earlier. Weld the chimney to the hole in the circle. Prepare a hole in the top of the water container for pouring liquid. Equip the hole with a convenient lid with a handle.
Eleventh stage. At a distance of about 350 mm from the water tank, weld a steel platform about 300 mm wide.
Twelfth stage. Weld a faucet with a valve opposite the water supply hole (it is located at the bottom of the tank).
Thirteenth stage. Install the combustion chamber doors.
This completes the assembly of a simple wood-burning stove for a bathhouse. However, you need to know not only how such units are assembled, but also how to install them correctly.
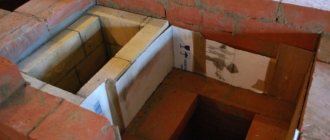
First stage. Prepare the foundation for the stove. You can lay out a brick platform or pour a concrete base 20-30 cm high. You will still have to lay two rows of refractory bricks on the concrete with clay mortar.
For the stove in question, a foundation measuring 700x700 mm is sufficient. Make the foundation at a distance of at least 20-30 cm from the walls.
Installing a stove in a bathhouse
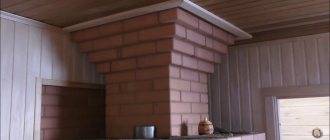
Second phase. In the place where the chimney pipe passes through the wall or ceiling, install high-quality thermal insulation. Asbestos works well for this. Additionally, cover the insulation with clay mortar.
Third stage. Cover the part of the pipe passing in the space between the ceiling of the bathhouse and its roof with a layer of plaster and lime on top. The pipe must rise above the roof ridge by at least 50 cm.
In wooden baths, metal stoves must be lined with brick. A screen with a height of about 120 cm will be sufficient.
Thus, you can handle all the work on building a bathhouse - from laying the foundation to assembling and installing the stove - with your own hands. You just need to follow the instructions you received in everything, and very soon you will be able to enjoy the healing steam of your own bathhouse.
DIY wood-fired sauna
Good luck!
Read an article on our website about how to make a country bathhouse with your own hands.
Preliminary metal preparation
When making iron stoves for a bath, during preliminary preparation of the material, those parts that heat up more than others (sides, top and door) should be released. To do this, we take the material for the parts of the firebox and heat it until red (for heating, you can use any method convenient for you).
Cool and trim the sheets with a hammer (they may bend after heating and cooling) and double-check the dimensions. If they have changed a little, they need to be straightened. We will avoid this effect (warping of the metal) directly during operation.
Design features of a metal furnace firebox
The next task that worries many: how to make sure that the temperature is maintained evenly and the stove does not produce maximum heat at the very beginning, when the wood burns best? Often you need to constantly add new firewood to raise the temperature again to the desired level. Otherwise, it will be very hot at first, and then it will become completely cool in the bathhouse.
Grate bars are most often installed in the furnace. These grates allow air to pass through well and are designed to heat up the oven quickly. They are made in different ways: by welding metal rods or drilling holes in a sheet of metal.
Firewood is placed on the grate, air draft increases and the combustion process noticeably accelerates. Due to this, the heat is also distributed unevenly. As mentioned above, the top, door and sides of the stove heat up the most. At the same time, the bottom of the structure and the rear wall do not heat up so much.
Often you have to manually regulate the heat - either fill the fire with water, or add wood. And instead of resting, we constantly run back and forth.
What solution? It is simple - place the firewood not on the grate, but on the bottom of the stove. High-quality sealing with mineral wool will also help. You can also make several holes in the firebox door, which will be closed with an additional damper. This way we will regulate the flow of air that gets inside.
One stack of firewood is enough for an hour of heating, plus we get the opportunity to independently regulate the heating level of the stove surface. In this case, there is no need to make grates and an ash pan.