Kitchen sink: device features
To find out which kitchen sink is best, you need to consider the following factors:
- resistance to temperature changes, household chemicals and minor shocks;
- ease of care;
- combination with the general interior of the room, with furniture and kitchen appliances;
- how often food will be prepared and how many dishes will be washed each day;
- mixer option;
- furniture next to the sink and other items.
Additional elements will make the routine procedure more convenient
When choosing a multifunctional sink for the kitchen, it is worth considering a convenient shape for the sink. A good option is a round sink with no corners. Square and rectangular products look more strict and are suitable for any interior. Depending on the style of the room, you can choose a sink of a certain shape. An important parameter is the depth of the bowl. The deeper the sink, the more dishes can be placed in it.
Modern models are varied; you can choose a good option for any situation.
In addition, when choosing a sink, consider the following parameters:
- material of construction;
- dimensions;
- the shape of the bowls and their number;
- availability of additional accessories;
- mixer functions.
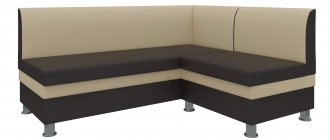
Double sink in the corner area does not look too bulky and does not take up much space
Stainless steel sinks are especially popular. They are distinguished by their affordable cost, durability and attractive appearance. Depending on the number of bowls, sinks can be single, double, with or without overflow.
Unusual double design
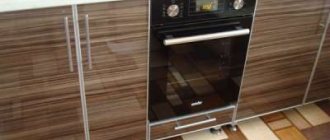
For your information! When installing a sink, you must follow the rules of the “golden triangle”. At the same time, it is not recommended to place a cabinet with a sink next to the oven and refrigerator. It is also better to install the sink closer to the work area.
How to choose a siphon for a kitchen sink
When installing washing equipment, you need to know how to assemble a siphon for a kitchen sink. Additional elements can be installed for this device:
- A side auxiliary input is required if you need to connect additional equipment. It is located between the water seal and the neck of the sink;
- The siphon overflow is selected to prevent flooding. The overflow is discharged into the sewer drain.
The siphon is selected taking into account the sink model
It is necessary to pay attention to the installation of a siphon for the kitchen sink. Manufacturers offer a wide selection of designs and materials for siphons. Siphons can be with a special cover, a built-in stopper, or plastic and metal flasks.
Related article:
Siphon for kitchen sink. What is this device for? What are they, how much do they cost and how to choose the right one? The answers are in a special publication on our portal.
Features of a kitchen sink drain
The most popular materials for kitchen sink drains are polypropylene and plastic. If the sink is made of copper, stone or bronze, then the best material for the drain will be copper or bronze. A good option is a drain made of brass treated with chrome.
Modern plums are easy to use, resistant to rust and various odors. Materials for kitchen drains must provide long service life.
The further operation of all equipment depends on the quality of the drain.
According to their design features, plums can be corrugated or bottle-shaped. A corrugated drain looks like a curved plastic tube shaped like the letter S. There is a hole in the bottom of the drain structure. These plums are made from high quality plastic.
What is a kitchen sink grinder?
You can choose various useful elements for washing. To prevent the drain from getting clogged, it is recommended to buy a grinder for the kitchen sink. This device is a cylindrical body, inside of which there is a crushing disk. This element is made of stainless steel, so the shredder is not afraid of other harmful components. The waste enters the container of the device, and then, under the influence of centrifugal force, is pressed against the walls and ground.
For the chopper in the kitchen sink, not only a switch with buttons is used, but also a design cover that you simply need to turn to turn off the device. Do not allow objects such as glass, plastic, metal, polyethylene, rope, thread or hair to get into the disposer. These materials can cause premature equipment failure.
A high-quality shredder protects against problems such as frequent blockages
Related article:
A new product in built-in household appliances is a food waste grinder for the sink , either mechanical or electric. What types of devices exist, selection criteria, average prices, nuances of self-installation - read in our review.
Other Kitchen Sink Items
It is worth considering other useful devices for the functional operation of the sink. An important element is a special dryer located on one or both sides of the bowl. You can place different dishes on this wing.
An indispensable attribute for the kitchen is a drying rack.
Many modern bathroom fixtures are complemented by grater sets, wash and dry baskets, soap dispensers and kitchen sink screens. These additional items make the housewife’s work easier and increase comfortable conditions in the kitchen.
A good mesh protects against rapid contamination of the drain hole
You can install a pump for a kitchen sink. This device will forcefully push out wastewater. In this case, drains from a washing machine or dishwasher can be connected to the pumping device. This option will help if there is a problem with the gravity drainage of dirty water.
Pumping equipment allows you to connect additional devices
It is necessary to consider the type of design when choosing kitchen sink faucets. There are traditional kitchen faucets with two valves for cold and hot water. More modern single-lever models are also popular. They are also divided into two types - cartridge and ball. New products on the plumbing market include electronic faucets.
When choosing a faucet, the depth of the sink is taken into account
Accessories for corner sinks
If space and financial capabilities allow, an ordinary kitchen sink can be made more functional through the use of the following accessories:
- The automatic valve makes it possible, with one press, to close the drain of the sink and turn it into a small bathroom, making it convenient to wash vegetables.
- Side wings for drying vegetables, dishes and herbs.
- Cutting boards that will be the same size as the sink. With their help, you can increase the working area, and this is especially true when two people are cooking in the kitchen at once.
- A colander is a special bowl-shaped tray that is equipped with many holes and is required for defrosting frozen pieces. This option will be relevant for sinks with two or more bowls.
The washing basket also follows the shape of the bowl and has many holes, but differs in that it has greater depth than that of the colander.- The drinking water faucet makes it possible to supply filtered clean water, and at the same time, the resources of the filtration device will not be spent on purifying the water used for washing dishes. Very comfortably.
- A dishwashing detergent dispenser with a dispenser under the sink will greatly facilitate the process of washing dishes, but you will need to allocate space in the bedside tables and constantly add detergent to the dispenser.
- A waste disposer is also a great thing that is installed under the sink and this makes it possible to reduce the risk of sewer clogging. At the same time, it will rid the kitchen space of unpleasant odors, because organic waste can simply be crushed and sent to the sewer, and thus there will be no situation where the waste lies and rots in the trash can and stinks.
In the end, I would like to note that it would not be superfluous to pay attention to the name of the manufacturer.
Types of kitchen sinks
Let's look at the main types of shells:
- one bowl The simplest type of sink, which can have a round or rectangular configuration;
- two bowls . Two or more bowls are located on one level line at an angle relative to the tap;
- one and a half. Consists of two bowls of different sizes. One is used for washing dishes, and the second for washing food or defrosting;
This option is functional and convenient
- corner It consists of two rectangular bowls located at an angle;
Corner model ideal for small spaces
- sink with one or two wings. This option can be used as a continuation of the table.
Based on the type of installation, sinks are divided into the following groups:
- overhead sinks . The sink is placed on the table. This option is great for kitchen sets made from separate blocks;
- mortise bowls . The model belongs to the common types. Its installation is not particularly difficult;
- integrated sinks . These designs may have sides located above or below the level of the tabletop;
- undermount sinks . Fixed under the tabletop.
What to look for when choosing a sink is shown in the video:
For your information! In modern kitchens, round or oval-shaped sinks are often found. They look great on corner ends. These options are more spacious than their square counterparts.
Features of overhead sinks
A great solution is a countertop kitchen sink. It can be performed in a variety of configurations. Such sinks can have dimensions: 50×50, 50×60, 60×60, 50×80 or 60×80 cm. When choosing sizes, you must take into account the dimensions of the bowl. The price of such structures may be affected by equipment configuration, surface type, body thickness and bowl dimensions.
Overhead models differ in a special installation method. In this case, the sink is placed on top of the cabinet instead of the countertop. There is a special side on the side and front of the structure for fixing it to the cabinet. Most often, this model has a rectangular shape and rounded edges.
The overlay design looks very organic and can have different stylistic configurations
Advantages of the invoice model:
- ease of installation. Fastening is done using special self-tapping screws;
- affordable prices;
- resistance to corrosion, since such products are often made of stainless steel;
- attractive appearance.
How to choose countertop sinks
Installing a built-in sink into a kitchen countertop is not an easy task, so you need the help of specialists or you can buy a ready-made option.
This model has its advantages:
- significant space savings;
- original design;
- can be installed in a small room;
- ergonomic design.
Mortise design is considered a more durable option
There are two ways to cut into a cabinet or countertop. The sides can protrude above the surface or create a flat surface. The mortise structure is fixed with special brackets. This provides a tighter fit to the bowl.
Characteristics of built-in sinks
Installing recessed kitchen sinks requires special equipment. This installation is more complex. Such a sink should be installed in the countertop at the same level, and the docking should be perfect. The advantages of the design include the tightness of the product at the joints. This option is ideal for a single tabletop.
The built-in model is practical
Options for corner sinks for the kitchen: photos of original models
A corner kitchen sink is not only an excellent interior decoration, but also a design that allows for maximum use of space. The model is recommended for small spaces. Corner structures can be built-in or overhead. They help save work space. The most convenient bowl is considered to be a rectangular bowl, but in corner products a round configuration is often used. The number of bowls varies from 1 to 5.
For a small kitchen, a combination sink or an option with two rectangular bowls is suitable. When installing a corner sink in the kitchen, do not forget about lighting the work area. It should be comfortable.
Corner option with double sink
Installing a kitchen sink on a cabinet
The process of assembling and installing an overhead sink in the kitchen with your own hands is quite simple - you just need to place it on top of the kitchen cabinet. There are two types of installation procedures for an overhead sink:
- ordinary;
- retractable
The last installation option involves installing curved slides on the side of the sink and on the front side, since the cabinet is equipped with special grooves. After assembly, the sink needs to be inserted into these grooves and pushed against the wall, and then you can begin connecting the water supply and sewerage.
If you install the sink yourself using the usual method, you will have to seal all the joints with sealant. It is necessary to apply a waterproof compound to the top of the cabinet and secure the sink on top.
A bulky and heavy countertop kitchen sink should never be installed using sealant alone. It may not be able to withstand the weight of the dishes and will fall into the cabinet, thereby destroying the sewer and water supply system with its weight.
Therefore, in order not to have to eliminate the consequences of such an accident not only in your apartment, but also among your neighbors, it is best to install a large sink using lathing from the inside of the cabinet or auxiliary bars.
Standard sizes of kitchen sinks
The size of the kitchen sink also depends on the design configuration. Here are some examples:
- square _ The standard shape is suitable for a small kitchen. Most often it has dimensions of 50x50 or 60x60;
Traditional design suitable for any interior
- rectangular _ This option is suitable for a narrow tabletop. The most compact sink size is 40x60 cm, but there are others - 50x60, 50x80, 50x100 and 50x125;
Rectangular model with additional platform
- round . They are more spacious than rectangular and square options. Standard diameters range from 45-51 cm.
The round version will fit into any environment
The dimensions of the corner sink may also vary. To choose the appropriate option, you need to measure the width of the cabinet frame, as well as the length and width of the part of the countertop where the bowl will be mounted. Double or triple sinks require more space. The width of the cabinet frame must be at least 80 cm.
How to choose a sink can be seen in the video:
How to use a combination sink with furniture
The kitchen sink with cabinet is especially popular. The product must fit harmoniously into the interior. There are different ways to install sinks in furniture. Cabinets can be drop-down or monolithic.
A built-in kitchen sink is considered more aesthetically pleasing and comfortable to use. There are no gaps between the furniture and the bowl, and water does not get into hard-to-reach places.
Corner cabinets under the kitchen sink are distinguished by their ergonomics and functionality. Furniture is selected taking into account the dimensions of the room. Narrow sinks with cabinets are suitable for small spaces. They are installed in a corner and divide the room into two separate zones.
Simple design with cabinet
Models with a cabinet are easy to install and dismantle. Extended cabinets can be used as tabletops. If you don’t want to bother with installation, you can purchase a built-in kitchen sink in the countertop.
Installation work
Next, we will consider the installation process of a mortise sink, since it is more complex when compared with the installation of overhead models. The instructions below will allow you to carry out the work yourself with a minimum number of errors.
During installation, you must follow a certain sequence of actions.
Cardboard template for marking.
- First of all, markings are applied to the countertop using a cardboard template, which is usually supplied with the purchased product . If such a blank is not found, then it is recommended to make it yourself, taking into account the size of the bowl. There should be a distance of at least 25 mm from the back wall, and at least 50 mm from the front part.
- Using a drill, a hole is made within the inner part of the marking into which you can insert the blade of an electric jigsaw and complete the work . During work, the cutting tool must not move away from the drawn lines, otherwise there may be too large a gap between the end of the table top and the product.
- Before you completely combine the table with the kitchen sink, you need to do a fitting . The sink should fit into the prepared hole without any extra effort. If this cannot be achieved, then additional cutting of the edges is performed. After the final fitting, it is advisable to sand the end part with sandpaper.
- When the product takes its place in the hole made, it is necessary to apply a layer of sealant under the outer edges so that water does not penetrate inside the sink cabinet . After the product has been applied, it is necessary to press the sink firmly against the surface of the countertop. You can put some weight inside the bowl.
- At the last stage, all necessary communications are connected to the installed sink . A connection to the sewer is made, and a mixer is installed. The tightness of the joints is checked.
The basic fixation scheme is shown.
Note! If installing a sink in the kitchen is problematic, then you can remove the countertop from the cabinet itself and place it in the most attractive place for installation.
Materials for making sinks
Before purchasing, it is worth finding out what kinds of kitchen sinks there are. Particular attention should be paid to the material of the product. It must be resistant to aggressive environments, detergents, high temperatures and mechanical damage.
Sinks can be made from the following materials:
- Stainless steel is a budget and durable option;
- composite materials are represented by acrylic, agglomerate, kerasil and others;
- Artificial stone products are expensive materials. They are durable and look great;
- ceramic models are made of porcelain and earthenware.
Kitchen sink made of artificial stone: advantages and disadvantages
If you decide to choose a kitchen sink made of artificial stone, then you should know that it is a mixed material. The composition contains stone chips, a special polymer for gluing and a small amount of dye. With their help, natural shades are transmitted to the material. Acrylic stone is made from acrylic resins that are mixed with polymethyl methacrylate and aluminum hydroxide. Stone kitchen sinks are coated with a special protective compound. It allows you to close the pores from clogging with dirt.
A model made of artificial stone will decorate any interior
A stone sink has the following advantages:
- resistance to aggressive environments;
- moisture resistance;
- the surface does not make noise when water gets in;
- no white spots from water are formed;
- resistance to high temperatures;
- color remains unchanged for the entire period of use;
- assortment of color models;
- environmental Safety.
The disadvantage of such models is their high cost.
Ceramic and sanitary sinks: pros and cons
The ceramic kitchen sink does not tolerate rough handling. Most often, only pure ceramics are not used for sinks. Similar models are made of porcelain stoneware. The composition of this material includes granite chips. At the same time, the products become resistant to temperature fluctuations and mechanical damage. In addition to granite chips, various special additives are used.
The ceramic model blends harmoniously with its surroundings
Let's consider the advantages of ceramic structures:
- resistance to mechanical damage;
- not afraid of high temperatures;
- Excellent noise absorption.
Of the minuses it is worth noting:
- heavy and massive structures;
- difficulty in installation;
- high price.
Ceramic sinks come in different types. Porcelain or earthenware is used for production. The latter option is a more porous material. Therefore, earthenware products are specially coated with a special glaze. If the coating is damaged, the product will become unusable. Porcelain is made from the same material as earthenware, but using a different technology. This material is considered more resistant to various influences.
Popular stainless steel kitchen sinks: advantages and disadvantages
The most common and budget options include stainless steel sinks for the kitchen. This design has the following advantages:
- fits into any modern interior;
- resistance to corrosion and impact, which increases service life;
- product plasticity;
- various configurations and colors;
- contaminants do not linger on the surface, since there are no pores on it;
- ease of care.
The stainless steel model is suitable for those who value practicality
The disadvantages include the increased noise that the bowl produces when water gets in. Stainless steel sinks are made from stainless steel with the addition of chrome and nickel. These components reliably protect the product from shock, temperature changes and corrosion.
Stamped stainless steel mortise kitchen sinks are made from a single sheet, so there are no seams. Welded structures are more expensive, but also noticeably stronger and more convenient than stamped options.
For your information! You can check the quality of steel in a store using a magnet. It will slide on a quality product. If the magnet sticks to the surface, the washer will not last long.
What are sinks made of?
Currently, there are many materials that are used in the manufacture of sinks.
Sinks are made from:
- of stainless steel;
- artificial stone;
- ceramics;
- cast iron;
- glass;
- natural stone;
- copper;
- bronze;
- polymers.
Let's consider the characteristics of the most popular materials.
Photos of kitchen sink options in kitchen design
In the photo you can look at different models of sinks in the interior.
A double kitchen sink can make washing dishes easier. In addition, the second compartment can be used to defrost food
The sink model in the kitchen by the window looks original. This arrangement will allow you to watch children walking in the yard while working.
A practical solution for installing an enamel kitchen sink
The black kitchen sink looks great on a white background.
This unusual sink and dryer matches the color of the surrounding decor perfectly.
A bowl mounted into the countertop is a functional solution
Table 1. Models of kitchen sinks
| Photo | Models | Description | price, rub. |
| Bianco Zia 40 S Sigranit Pura Dur | Mortise model. Made from artificial granite. There is a wing. | 9400 | |
| Schock Eton 45 D | Mortise option. Rectangular shape. There is a button to drain the water. | 12800 | |
| Aquaton Paola | Round model of mortise type. There is a wing. | 15600 | |
| Melana MLN 5060 | Rectangular overhead model. Material of manufacture: stainless steel. | 1300 | |
| Sink Light 8050 | Overlay model. Wing available. Made of stainless steel. | 1890 | |
| Jacob Delafon Vox EYG 102 | Mortise type bowl. Made from faience. It has an oval shape. | 9500 | |
| Reginox Empire R 15 Right | Integrated rectangular model. There are wings on both sides. Material of manufacture: stainless steel. | 39000 |
Mortise installation
With this installation method, sinks are mounted in a special recess in the countertop. This is the most common type of kitchen furniture.
Subtypes of mortise sinks:
- top installation;
- flush;
- bottom installation.
Installation from above is the most practical and simplest method. To do this, simply make a hole in the countertop for the sink bowl. The contours must be treated with sealants.
Most often, flush-mounted sinks are mounted into stone or glass kitchen units. The slot in the countertop should perfectly match the contour of the bottom of the sink. The mixer is installed exclusively on the wall.
Note!
U-shaped kitchen: pros and cons of the U-shaped layout. Methods of arranging furniture, dividing into working and dining areas. Photos and videos of design ideasKitchen facades: TOP 180 photos and video reviews of kitchen facades. Types of frames, criteria for choosing materials and color solutions
- Short curtains for the kitchen - features of using short curtains in small and large kitchens. Advantages and disadvantages of fabric materials (photo + video)
The most difficult part is installing the sink at the bottom. With this method, it is located under the countertop. The mixer is installed at the discretion of the user.
How to install a kitchen sink step by step
Now we will learn how to install a kitchen sink into a countertop. To do this, you should take care of purchasing some tools and materials in advance, which will allow you to quickly complete the job.
Table 2. Installing a kitchen sink: step-by-step instructions
| Photo | Description |
| First you need to prepare pliers, a screwdriver, a screwdriver, a jigsaw, tape, clamps, sealant and the sink itself. | |
| The template is placed on the tabletop. You can fix it with tape. It is important to remember that the sink should not come into contact with parts such as sidewalls and power struts. It is optimal if the sink is located at a distance of 10 cm from the edge of the table. Then the outline is drawn. | |
| After this, a second contour is drawn inside and the hole will be cut along it. | |
| Using the resulting markings, holes are cut using an electric drill. | |
| You need to cut through the finished holes with a jigsaw. In this case, you cannot go beyond the boundary of the drawn line. | |
| The resulting cut must be cleaned of sawdust and dust, and the cut area must be cleaned with sandpaper. | |
| The accuracy of the drink is then checked. When installing the sink, its sides should fit snugly against the countertop. | |
| The edges of the tabletop must be well treated with sealant. This will provide protection from moisture. | |
| Double-sided tape is applied to the edges of the cut. | |
| Then the sink needs to be installed using fasteners. They are fixed from below. | |
| The final collection of the sink is carried out. At the same time, its edges are pressed tightly against the tabletop. Finally, you need to install the kitchen sink drain. |
The process of how to fix a sink on a cabinet in the kitchen occurs in a similar way.
Related article:
Kitchen faucets with drinking water tap. How do these mixers work? How much do they cost and how to choose the right one? The answers are in a special publication on our portal.
Installation of mortise sinks
The most important part of this installation method is not even the cutout itself and its cut, but the quality of sealing of the joints between the sink and the countertop. Of course, the niche should be as level as possible and correspond to the size of the sink.
High-quality work will save you from hassle in the future caused by swelling of the tabletop from excess moisture.
Remember that a properly executed installation will be the key to the reliability of your kitchen. Follow these simple tips to avoid trouble in the future
There is a direct relationship between the complexity of the installation process and the size of the sink. The larger the size of the bowl, work surface and additional sections, the more difficult it is to manipulate the sink during work. But with a competent approach, using the advice of professionals, you can count on excellent results.
Installing a kitchen sink sink consists of a number of traditional steps:
Image gallery
Photo from
Stage 1: Selecting the optimal location for washing
Stage 2: Marking the hole for the kitchen sink
Stage 3: Fixing the mixer with liner
Stage 4: Attaching the sink to the hole
What you will need during the work process
Having chosen the optimal sink for your kitchen interior, you can begin installation. First you need to stock up on all the necessary tools.
During the installation process you will need:
- sealant - preferably with a feeding gun;
- electric drill;
- assembly knife, screwdriver and adjustable wrench;
- jigsaw;
- measuring tools - pencil, ruler and tape measure.
Additionally, you will need several 10-12 drills and a cardboard box.
Procedure for applying markings
So, we have a clean wooden countertop in which we need to cut a niche to fit the size of the sink. We start with markings, determining the center of the sink on the countertop. It is necessary to determine the lines of symmetry in order to position the sink symmetrically with the rest of the furniture in the kitchen.
After this, we draw the outline of the product on the tabletop itself. The contour should have a perimeter that is comparable to the widest part of the sink that is recessed under the countertop.
To create an outline, you can use a cardboard blank, which will serve as a template for applying the outline to the tabletop. This is the best option that will give high accuracy.
Use a cardboard blank to apply the most accurate outline to the base of the tabletop. Draw with a regular pencil with a highly soft lead.
The cutout should be located at least 5 cm from the front edge of the tabletop and 2.5 cm from the back. These recommended values may vary in practice, but it is best to adhere to them so that the kitchen set does not lose its integrity and strength.
This arrangement of the sink is convenient and practical, since splashes of water do not fly onto the floor, and your back does not get tired while washing dishes.
How to cut a niche?
Next, you need to drill 4 through holes using a drill that matches the size of the jigsaw blade. The holes should be close to the cut line, but not beyond the perimeter. Now, along the line strictly marked with a pencil, cut out a niche from the front side of the tabletop.
During the sawing process, you need to screw several self-tapping screws into the resulting gap from different sides as you cut. This will prevent the inside of the tabletop from falling, which could damage the finish and create long nicks.
To enter the jigsaw we use drilled holes. After complete sawing, the cut out mass will be held on by self-tapping screws. You need to remove the screws one by one, holding the slab from below. The cut must be freed from sawdust by sanding it with fine-grain sandpaper.
While the jigsaw is working, insert several screws that will prevent the cut slab from falling. Do not use the jigsaw at maximum speed, otherwise the edges of the tabletop may melt
Now you can do a test dive of the sink into the niche. Please note that the sides of the product must be fairly close to the walls of the cut. A slight play is allowed, since the sink must fit freely into the cutout.
Places that prevent complete immersion must be cut with a jigsaw. You should also think in advance about how the connection to the mixer, the siphon and the tap itself will be placed.
Step-by-step installation of plumbing
First you need to install the complete fasteners, which serve to fix the product. A layer of sealant is applied to the edges of the tabletop (on the cut side), which will protect the wooden surface from moisture penetration and prevent the wood from swelling.
To do this, you can use a rubber spatula or spread the adhesive mass with your finger. Chips on the plastic (countertop covering) around the cut are also coated.
Use caulk to coat the inside of the countertop. Please note that it can be well absorbed into the porous structure of the compressed slab
Sinks often come with a seal made of foamed polyethylene, which is glued to the back side of the sides of the sink.
If, after fixing, the seal protrudes slightly beyond the edges, then it must be carefully trimmed with the sharp end of a mounting knife. If this is not done, the protruding seal will not allow the fasteners to press the sink to the base well enough.
After this, you need to degrease the surface of the tabletop and the sealing polyethylene. We use a rag soaked in acetone or gasoline. A layer of sealant is applied to the seal in a continuous strip, but do not get too carried away with the thickness of the strip.
Plumbing manufacturers often include double-sided tape in the kit, which serves as an additional gasket between two surfaces, increasing the tightness. It is glued along the edges of the tabletop, and a layer of sealant is applied on top of it.
In practice, they often do without a seal. A sealant is used as a substitute, which fills the entire space intended for foamed polyethylene.
Next, install the sink into the countertop, pressing its edges firmly. This will allow the sealant to fill any voids, creating a tight and airtight barrier.
Using a sealant is the most practical and effective sealing method. When using it, you can easily dismantle it if necessary
But this method also has its drawbacks: high consumption of sealant (increases the time of complete drying), as well as an extremely labor-intensive dismantling process in case of unsuccessful installation or the need to replace the sink in the future.
Leveling and securing the sink
The sink is inserted into the niche and aligned with the markings. Let's take several fasteners (2-4 are enough) and at an equidistant distance from each other we begin to fasten the sink, gradually tightening the screws.
During work, we constantly monitor the position of the sink relative to the markings. You should not use a screwdriver so as not to tear off the plastic threads on the fasteners. After making sure that the sink is in the correct position, tighten the screws diagonally.
To screw in self-tapping screws, use only a screwdriver. This way you can control the degree of tightening. Using a screwdriver can miscalculate the force and damage the plastic thread
To ensure that the metal spikes of the fasteners penetrate more deeply into the surface of the tabletop, you can first sharpen them using a file, and also lightly tap them with a hammer during the final tightening of the screws. As you tighten, the sink is pressed against the countertop.
Squeezed out sealant can serve as relative evidence that the sink is pressed tightly against the base. Its excess, as well as remnants of markings, are removed with a dry cloth.
The structure should be left for a day until it dries completely and the adhesive composition crystallizes. Only then can you begin installing the mixer and connecting the sewer.
What are the most common kitchen sink problems?
Now let's look at various problems that may arise when using sinks.
Problem #1. How to eliminate odor from a kitchen sink: useful tips
First, let's find out why the kitchen sink smells like sewage. One of the reasons for the appearance of an unpleasant odor is contamination of the siphon. After a long cooking period, it is necessary to wash mountains of dishes, and it is at this moment that a large amount of food debris ends up in the sink. They begin to rot, and an unpleasant odor appears. In this case, you need to remove the siphon, clean it and wash it.
An unpleasant odor is not so easy to remove with simple fragrances.
The cause may also be a leak in the seal. This can happen at the junction of the siphon and the pipe. A signal of such a problem will be the resulting drips. Such leaks cause unpleasant odors, as well as the formation of fungi and mold. A similar problem occurs if the seals are worn out. If a violation occurs between pipes, then the joints must be coated with silicone sealant.
Using a plunger can solve a minor blockage problem.
You need to know how to remove odor from your kitchen sink. There are different ways to do this:
- A special plumbing cable is used to remove debris. It can be used to clean out odor-producing stagnant waste;
- chemicals can dissolve many contaminants. Acidic compounds remove hair and soap well, while alkaline ones remove grease;
- To get rid of stagnant waste, you can pour a few tablespoons of table salt into the sink or fill the bowl with a hot soda solution.
Related article:
Untimely repair can lead to clogging of the siphon and flooding of rooms. How to eliminate odor from the kitchen sink easily and simply - we will tell you in this article.
Problem #2. How to clean a clogged kitchen sink
You also need to know the first steps if your kitchen sink is clogged. What to do in this case depends on the cause of the blockage. Here are the main reasons for traffic jams:
- poor condition of the pipeline, which over time is subject to rust and other damage;
- deposits of salts and heavy metals that are in the water;
- accumulation of fat, hair and various food waste;
- Specific sink designs can affect the formation of blockages in the siphon.
A special cable will help deal with the blockage. Additionally, you can use chemicals
Various mechanical devices are used to remove clogs in the kitchen sink. A plunger allows you to clean pipes from stagnant drains. For complex blockages, a special cable is used.
For minor dirt, you can also use a vacuum cleaner with an air blowing function. You can also use special chemicals. Tiret, Mister Muscle and Mole are especially popular. To remove the clog, liquid should be poured into the hole in the sink and left for a few minutes. It is worth remembering that such drugs are highly toxic, so when working with them you need to wear gloves on your hands and a respirator on your face. In case of contact with skin or eyes, rinse thoroughly with water.
Problem #3. What to do if there is gurgling in the sink
Now let's find out why there is gurgling in the kitchen sink. This can happen if the top outlet does not absorb the required amount of air to allow the drain to flow freely. Due to lack of ventilation, a water lock occurs behind the water flow, which causes bubbling sounds. To compensate for the lack of air in the riser, it is necessary to connect certain plumbing fixtures. When a blockage occurs, gurgling sounds may also occur. In this case, water cannot move freely.