The main types of slabs used for balconies and their features
A balcony is a slab that protrudes some distance from the wall of the building. For security purposes, it is fenced with railings along the entire perimeter. A balcony is a structure that includes a horizontal base plate, fastenings and fencing.
Today there are several types of balcony slabs, which differ in design:
- Cantilever plate. It is used in brick houses with reinforced concrete floors. They fasten it by pinching it into a wall with two opposite sides or one;
- PB (balcony slab). It is a multi-hollow reinforced concrete or metal floor platform. Used in old buildings, at a depth of more than 38 cm;
- The balcony slab in a monolithic house is a continuation of the floor slab. Features of installation of balcony slabs
Many people believe that all slabs are a continuation of the floor, but this is not entirely true. When building a balcony, a wide variety of fastening methods are used:
- Use of additional support. It is mounted on the ground floor, as it requires an external steel, reinforced concrete or wooden support fixed to the ground;
- Pinching in the structure of the wall of the house. A cantilever plate is used;
- Suspension to the load-bearing walls of the balcony platform;
- In frame buildings, the support rests on the consoles of the internal walls or columns. In this case, there is no load on the wall.
- In panel-type houses, for example, in Khrushchev, balcony slabs are used with floors and supported on reinforced concrete structures.
- Installation in a brick building is carried out by pinching it into the facade of the house. Overhead and underlay elements made of reinforced concrete are walled into it. They make up a niche for the stove. The edge that is adjacent to the wall is thickened. A fairly large entry into the wall of the building is required. It must be welded using steel anchors to reinforced concrete elements.
Balcony slab
Rules No. 1: general provisions
Despite the fact that the dimensions of the balcony slab may be different, they often have the same problems, this is a weakening of the structural strength, since it extends beyond the facade and is subject to atmospheric influences.
Console plate PBK 24.12-5a
GOST for balcony slabs 2569783 divides them into:
- multi-hollow (only for loggias);
- solid flat;
- ribbed;
- the entire load in a monolithic or brick house is transferred to two or one side, pinched in the wall at two edges.
Balcony installation method
Fastening in a brick house and in a panel house is essentially the same and the same problems also arise, especially in old houses. For example:
- in the well-known “Khrushchev” buildings, the design permissible load per linear meter along the wall was 100 kg, but under the influence of moisture it decreases over time;
- It is noteworthy that in some houses of this type, over 40 or more years of operation, the cross-section of the reinforcement in the slab has decreased four (!) times, therefore, at the moment the permissible load is 50 kg;
- the situation in “Stalin” buildings is much worse, since they are older and reconstruction has long been needed there, because the service life of the slabs has already come to an end - they are more than 50-60 years old;
- therefore, it is not recommended to allow any additional loads - in some cities, slab collapses were observed and people were injured;
The main reasons for the destruction of the balcony
As practice shows, the main reason why balconies collapse is depressurization of joints and violation of waterproofing. As a result, moisture enters the room, forming condensation, from which mold appears.
In addition, moisture can act on reinforced concrete, penetrating into it and causing corrosion on the reinforcement. The age of concrete directly depends on the penetrating ability of water - the older it is, the easier it is for moisture to penetrate inside. Corroded reinforcement loses its load-bearing capacity and expands, which causes a deterioration in the load-bearing capacity of concrete.
Also, the destruction of the base of the balcony is caused by high pressure on the slab, sudden changes in temperature and a long absence of major and current repairs, such as in Khrushchev.
The reasons for the destruction of balconies can be errors made during installation. These include: the presence of a reverse slope of the slabs, the absence of drips and drains in the lower part of the concrete slab and the absence of protective screens protecting the slab from moisture penetration.
There are 2 stages of destruction of the base of the balcony:
- The first includes minor destruction when it is necessary to strengthen the slab. Such destruction occurs in houses whose age is approaching 40 years. You can do it yourself, as this is a minor repair. For example, in cases of crumbling corners.
- The second stage is the destructive appearance of the object. These include the collapse of part of the balcony, the appearance of cracks at the junction with the wall, open sections of reinforcement, destruction is observed in the upper layer of the platform or detachment in its lower part.
Who should repair the stove?
Due to the fact that the regulations do not stipulate what a balcony is (a living space or part of a supporting structure), it is impossible to clearly answer the question of who to contact and who is responsible for the repairs. Ideally, the balcony slab should be replaced and strengthened by the management company, but the railings and parapet should be replaced by the apartment owner himself. However, it is impossible to accurately answer the question at whose expense the repairs are being carried out. On this basis, disagreements very often arise between apartment residents and the management organization.
If the fact of destruction of the integrity of the slab has been noticed, then you should write a statement to the management company. This document is signed by a specialist and recorded in the appropriate journal. A good reinforcement of your words would be an application in the form of several photographs of a destroyed balcony. Neighbors who live on the floor below must leave their signatures on the corresponding application. The next step will be to decide on further actions. You can wait for utilities, or you can carry out repairs with your own hands or with the help of construction crews. In the latter case, an estimate is needed in order to receive a recalculation of the rent in the future. If none of the options are suitable, you can safely go to court.
Diagnostics of the load-bearing slab, elimination of defects and selection of a method for strengthening the parapet
In preparation for high-quality glazing of a balcony, you should perform a number of actions:
- We carefully check the load-bearing slab and the parapet itself, identify their technical condition, and then eliminate minor defects on site.
On an open balcony, it is necessary to waterproof the surface of the floor and roof, protecting the balcony from the harmful effects of weather conditions.
- If you take on the slab thoroughly, it is advisable to completely dismantle the floor covering, but this is done only if in the future you plan to insulate it or install heating underneath it. Without dismantling, it is practically impossible to check the condition of the slab and strengthen it, and this in turn creates an additional risk of collapse.
Before starting work, we identify the degree of dilapidation and other features of this structure, after which we begin to select the necessary materials to strengthen it, without losing sight of their mass and the weight of the future glazing, which will create additional load on the balcony slab.
Important! Metal reinforcement of the parapet is an excellent option even for neglected balconies, but high-quality brickwork will help to properly strengthen the loggia.
Balcony restoration stages
In order to carry out repairs with your own hands, for example, in a Khrushchev building, you need to know in what sequence and what to do.
- The first stage will be preparation for repairs - clear the balcony of debris, remove all unnecessary objects, remove crumbled concrete.
- Exposed parts of the fittings must be cleaned of rust. The first layer is easy to remove, but the lower ones need to be treated with a special product.
- The mesh of reinforcement is attached to the slab with dowels. So that it fits into the concrete screed without protrusions, leave a small gap between the mesh and the slab. Formwork boards are fixed along the entire perimeter of the board.
- Next, you need to prepare a solution consisting of cement and sand, which will be poured onto the reinforcement. Subsequently, the screed is covered with cement and rubbed, that is, “ironized.” It is important to remember that the thickness of the screed is twice or more times the thickness of the mesh.
- The surface located below should be treated with a primer and plastered a little later.
If the reinforcement cage is more corroded, the best solution would be to strengthen the slab. Here it is necessary to carry out a set of preparatory measures.
- The first step is to install steel beams on the sides of the platform and secure them to the wall with a console. Weld the mesh to them and begin pouring concrete, the process of which was described above.
- Upon completion of the repair work, the surface should be waterproofed. Coating or roll-type materials are suitable for this purpose.
So, if you do the repairs yourself, you should remember that this is not an easy task. This largely depends on the degree of destruction of the balcony. Some things you can do yourself, and others you can entrust to professional construction teams. To avoid mistakes, it is recommended to carefully check the degree of wear of a certain element. If you have no experience in this matter, then it is better to contact an appraiser.
Features of fastening plates
A balcony is not only a decoration for any home, but also an excellent place to relax; you can store supplies for the winter on it. In order to be safe from any incidents, it must be reliably repaired. You need to know what material the building is made of. Some people mistakenly believe that balcony slabs are a floor projection. But in construction, a variety of methods for attaching loggias are used:
- support on attached (reinforced concrete, steel or wooden) structures;
- use of cantilever floor slab;
- clamping or pinching the outer wall of a building;
- suspension of the slab to internal load-bearing transverse walls or to the ceiling.
In buildings built of bricks, the installation process is carried out using pinching. Builders embed reinforced concrete and backing elements into the outer wall, which forms a stop for the slabs. The edge that is adjacent to the outer wall thickens.
Sometimes in brick houses, to ensure reliability and safety, the lower plane of the balcony is welded to reinforced concrete parts using steel anchors.
In panel houses, slabs are most often supported by reinforced concrete structures using floors. In frame objects, the strengthening process occurs using block technology. It has absolutely no load, because the material rests on the consoles.
Strengthening Tips
It is necessary to take a decision from the relevant authorities. All independent work related to changing the appearance of the house entails administrative responsibility. It is worth knowing that if the fastenings are chosen incorrectly, the structure may collapse.
Once you have decided on the type of house, you can get to work. It is very important to follow several rules that will give effective results. For example, when glazing the balcony part receives additional load, so it is important to strengthen it. This can be done using different methods. First of all, we need to create new support points:
- The first option involves installing supports from below. However, this method is suitable when the balcony is not high. To do this, you need to agree with your neighbors so that they do not complain about you when a similar structure is located in front of their windows. With this method of strengthening, 2 supporting metal structures are used in the lower part, which are concreted in the ground and support the balcony like columns. The supports are best secured using special brackets or screws.
- The second method is fixation from above, much more convenient than the first. To do this, you need to drill 2 holes through the wall above the balcony (on both sides) and install strong metal rods (anchors, bolts) or special hooks. If they have threads, then they are secured with nuts and small plates, otherwise they must be concreted on both sides. The part protruding outwards serves to support balconies, which are suspended, for example, with chains.
- If the additional structure is outdated, its parapet needs to be strengthened. Metal structures are the best help in this matter. You need to weld a triangular frame, which needs to be attached as rigidly as possible to the wall of the apartment. This option is universal for all loggias, even the oldest.
- By using a foam block, you can not only strengthen it, but also insulate the room, but this increases the weight of the structure, which will put pressure on the base of the balcony. Because of this, the method is not suitable for old and narrow balconies.
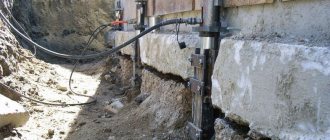
There is another option for fastening using T-beams. It is very suitable for updating old premises that are in danger of demolition, but you must know exactly the height of the ceiling:
- First you need to cut off the old slab.
- Drill out 1 m long recesses in the floor at 1.5-2 tee heights, if the ceiling allows. Don't forget that there are neighbors below you, and they need a ceiling. It is necessary to make 3-4 such grooves.
- Next, holes are knocked out in the wall.
- Metal rails (brands) 3 m long are passed through them. 1 m remains in the apartment, and the remaining 2 in the outer part.
- Build formwork on the floor and on the protruding part of the rails and fill it with concrete mixture. The level of the slab and the load-bearing covering of the house must completely match.
- Then the frame of the fence is welded from the corners.
- You can build a loggia, decorate and insulate it using special materials.
It is important to know how to properly strengthen it so as not to compromise the integrity of the building and not endanger those who go out onto the balcony. If you realize that you are unable to carry out repairs yourself, seek help from the experts.
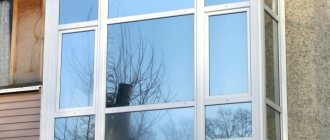
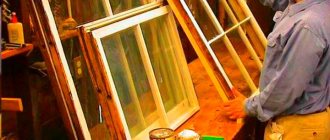
Preparation for glazing
Strengthening the supporting structure
Preparation of a balcony for glazing means a complete technical examination of all structures included in its composition. In this case, you will need to pay attention to the condition of the balcony railing, which cannot always withstand the additional loads associated with installing windows. These complications usually arise for the following reasons:
- dilapidation of balcony fastenings;
- presence of visible damage;
- design features;
- low quality materials.
Strengthening the balcony
Thus, immediately before glazing the balcony, you will most likely have to work on strengthening its fences (parapet), which is a necessary condition for the reliability of the balcony structure under noticeably increased loads.
Work on strengthening the parapet can be combined, at the request of the owner, with adjusting its height.
Step-by-step instructions for strengthening the parapet
We dismantle the old parapet. If there is an old metal fence on the balcony, then, for safety reasons, you don’t have to remove it completely, but cut off a few posts so that you can prime and plaster the masonry without interference. When planning, you need to take into account that the new parapet must be 10-15 cm higher than the old one so that an external ebb can be installed. Between the posts of the old fence and the masonry of the new one, you need to leave a gap of about 1.5-2.0 cm.
Important. The height of the parapet in buildings up to 30 meters (10 floors) must be at least 1 meter. If the building is taller, then at least 1.1 meters. Data taken from GOST 25772-83. If the sand-cement screed crumbles, then remove it and fill in a new one.
We glue rolled bitumen-based waterproofing (Linokrom, Uniflex, Steklokrom, Bikrost) to the screed. You will need a propane torch for this step. Some builders do without waterproofing, but place an aluminum U-shaped channel (with shelves up) around the perimeter of the balcony. They “sit” it on the cement mortar, screwing it in with dowels to be sure. This guide profile becomes a kind of mortgage into which a solution or adhesive mixture is placed and the bottom row of the foam block is inserted.
One of the popular materials for strengthening the parapet is foam blocks
We calculate how many blocks are needed. To strengthen the parapet, it is better to use an interior foam block with dimensions 100 × 300 × 600, (thickness * height * length), grade D600 - D700.
If the number of rows is fractional, for example 3.5, then a “half” foam block is placed in the first row, sawn side down. When working, use a plumb line and a building level.
The side walls of the parapet are attracted to the load-bearing walls of the building through reinforcement. To do this, one edge of the iron rod is driven into the wall at such a height that its second end hits the horizontal seam of the masonry.
Every 50-60 cm (on a horizontal seam) a piece of reinforcing galvanized mesh (wire ø 3 mm) is placed so that it connects adjacent foam blocks. The mesh is sold in rolls and is easily cut with a grinder.
As the foam block is laid, its front and inner sides are treated with a deep penetration primer (Volma, Ivsil, Knauf). Plaster with high adhesive properties is applied to the outer and inner sides of the parapet. On the packaging of such mixtures it is written: “intended for foam blocks.” But if you are going to immediately sheathe the parapet and do glazing, then this item is not necessary.
Balcony slab repair
Balcony slab in need of repair
Before starting repair work, the surface of the base of the balcony is cleaned of dirt: dust, stains of paint or grease, salt deposits. Then an examination of the balcony is carried out, in particular, an examination of the slab. The emergency condition of the structure involves the following defects:
- destroyed concrete layer;
- reinforcement corrosion;
- collapse of cornice, parapet;
- loosening of the fence, etc.
If the condition of the slab is satisfactory, then minor defects can be hidden by pouring a new screed.
Repair of balcony slab: reinforcement
In case of serious violations, it is necessary to strengthen the balcony, that is, overhaul it. Its essence is to create a strong frame, which is fixed to the load-bearing wall of the building. This neutralizes the weight load on the slab.
- The slab is reinforced by laying a mesh of reinforcing wire (ø 5) on its cleaned surface, at the rate of 3 x 3 rods per meter. At the intersections they are fastened by welding.
- The screed is poured onto the reinforcing mesh with a layer twice the thickness of the reinforcement.
- The screeds are ironed.
- Install profile slopes with holes for mounting bolts.
Slabs that have become unusable are replaced: a new base is cast and the load-bearing capacity of the structure is strengthened.
- On the load-bearing wall, holes up to 20 cm deep are drilled in increments of 10 cm.
- Pieces of reinforcement are installed perpendicular to the wall and secured with cement mortar.
- Parallel to the building, reinforcing bars are welded onto them, corresponding to the length of the balcony.
- Formwork is installed on the finished new base frame and a cement slab 10-12 cm high is cast.
- Strengthen the slab.
Thermal insulation for parapet
To choose a material for thermal insulation of a parapet, you need to take into account several factors. These are: average annual temperature, design features of your balcony (loggia), cost, thermal conductivity of the material - the lower it is, the less heat loss will be.
Let's consider several types of thermal insulation:
- Mineral wool.
Cheap and versatile inorganic insulation. Morally outdated, but this has not lost its popularity. Its main disadvantage is its high hygroscopicity. At the manufacturing stage, a water-repellent impregnation is added to the cotton wool, but this does not bring much effect. Thermal conductivity - 0.05 W/mºС.
- Expanded polystyrene.
For thermal insulation of the parapet, extruded polystyrene foam in slabs is purchased. How to choose high-quality EPS? Firstly, the smaller the cell size, the better its thermal insulation and strength characteristics. When you press on a high-quality polystyrene foam board, you don’t hear any cracking or noise. This material has practically zero water absorption, and therefore a high thermal conductivity coefficient - 0.03...0.05 W/mºC. According to the latest data, the service life of EPS is 8..10 years. Among the disadvantages: flammable and toxic material. It practically does not allow air to pass through, which leads to high humidity and the formation of fungus.
You can insulate the parapet with polystyrene foam
- Penofol.
Refers to reflective insulation. This two-layer insulation is made of polyethylene foam and foil. Works as hydro-, sound-, thermal insulation. The small thickness, excellent performance characteristics and environmental friendliness of the material made it a very attractive option for parapet insulation. But there are also spots on the Sun - this material is too soft, so its installation poses certain difficulties. It is easy to attach only type C penofol - on the polyethylene foam side, waterproof glue is applied to the insulation. Often, when a balcony or loggia is not insulated with foam blocks, penofol is used as an additional layer to the EPS. This insulation method will be described in more detail below.