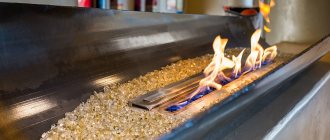
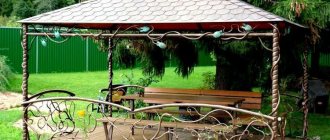
You can take refuge in the summer heat or rainy weather in the gazebo, and if you equip it with a fireplace, then you can come and bask by the live fire, enjoying the comfort and warmth.
Such a gazebo with a fireplace has advantages at any time of the day or night, as it creates a favorable atmosphere for relaxing and cooking delicious dishes over an open fire.
It is possible to build a structure with your own hands if you have construction skills and desire. Or you can contact professionals who will create the necessary design in accordance with your sketches and wishes.
First, you should decide on the desired result, what kind of gazebo and what kind of fireplace do you need? To do this, consider the main types of structures:
Project options for gazebos
*
The recreation area in the space of the site can be arranged in various ways. Varieties of gazebos are associated with the presence of walls:
- If the structure contains only posts with railings and no walls, such objects are classified as open.
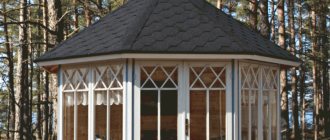
- Partially closed type of gazebos includes several closed walls.
- If all the walls are installed, then the gazebo is closed.
In open versions, it is still necessary to install one wall, which will support the fireplace and protect it from draft winds.
When choosing the type of construction, carefully weigh all factors related to your climatic conditions.
In the southern regions, open gazebos are more often erected, and in case of frequent winds or regular precipitation, partially or completely closed types are chosen.
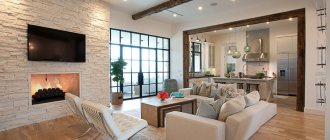
Using modern materials and technologies, it is possible to build a gazebo with a fireplace according to your own projects and unique design.
Scheme of a wooden gazebo frame
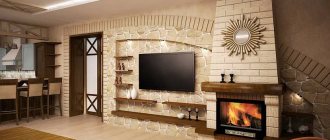
* External parts can be decorated with siding, and for a budget option, choose plastic or aluminum finishing. The inner surface is decorated with stone or wooden lining.
Since wood is a highly flammable material, it is necessary to take into account fire safety measures in advance when designing a gazebo:
- You need to cut out a space in the wooden floor to pour a concrete foundation for the fireplace.
- Before burning, it is necessary to sheathe the working area with sheets of iron.
- The optimal location of the fireplace is in the center, as this eliminates the possibility of the walls catching fire.
When choosing a brick gazebo, it is worth noting that building a fireplace in it will be much easier than in a wooden gazebo. For this you will need standard materials, the same as for laying the stove.
Having thought through all the nuances, you can calculate the amount of building materials needed and proceed to the construction of your gazebo.
Some construction features
In order to start independently building a brick stove in a gazebo with your own hands, you can find plenty of material, but let’s dwell on some of the construction features.
Any brick oven must be installed on a foundation. If you deliberately provide for the construction of a stove and a gazebo at the same time, the process will be easier and faster. Ideally, it is easier to build a stove and arrange a gazebo around it. No matter how funny it may look, some experienced craftsmen do this. Otherwise, it will be necessary to dismantle not only the floor covering of the gazebo, but also the elements of its supporting part.
If there is no goal to heat the room, then the stove can be built in the corner. Then its walls will serve as load-bearing walls of the gazebo. But this approach is rare, as there is a large loss of heat.
Construction is in full swing
Despite the advice for beginners on arranging gazebos with the simplest models, you need to choose only those projects that implement smoke removal. Over time, it will become clear that a barbecue stove with a chimney for a gazebo will provide a comfortable stay, and a chimneyless simple brick barbecue will fill the space with smoke. Even a ventilated structure will not help.
Some elements of the furnace complex are not tied together with the furnace, but the same foundation is prepared for them. This means that you need to immediately decide from which components the desired complex should be built, and then begin to search for a suitable project. Make sure that the project contains all the comprehensive information for an inexperienced craftsman.
I would like to pay special attention to preparing the solution. It cannot be prepared in the same way for all elements
The foundation is poured with liquid cement-sand mortar. The proportion of components is the same as for conventional masonry. The furnace body should be built using clay mortar. Today you can purchase a ready-made mixture, which just needs to be diluted with water. Try to check the graininess of this mixture. Since the size of the seam between the bricks from which the firebox is formed should not exceed 5 mm, then to fulfill this requirement you will need well-sifted sand and crushed clay
Popular articles Hydrangea Fraise Melba: description, planting and flower careIf there are coarse particles in the mixture, then you should pay attention to another manufacturer.
Usually, it is not recommended to make changes to the order, since building a furnace is quite a responsible undertaking, and any inaccuracies can cause a lot of trouble later. But still some improvements can be allowed.
Note the overlap that covers the lower firewood compartment. It is presented in the form of a tabletop
Undoubtedly, the usable area of this countertop will be useful for cutting food. However, if on the other side the picture is symmetrical, then the countertop can be used to embed a sink and arrange a sink.
In winter, the water supply will have to be dismantled, because even the location of the main line at a certain depth will not save the system from freezing, since the gazebo is not a constantly heated room.
Construction of a gazebo
*
- Foundation. Construction begins from the foundation. It is better to fill it with a monolith at a time if the floor will be laid with paving slabs in the future. Or construct a ribbon belt when planning a wooden floor in a gazebo.
The foundation must be reinforced using a VR mesh, since the height above the floor level will be insignificant. After pouring the base, it is kept for about 7 days for initial setting so that further work can be carried out.
- Frame pillars and roofing. Next, frame pillars are installed to prepare for the installation of the roof. Rack posts can be made of reinforced concrete, brick, metal pipes or profiles, as well as wooden beams.
- Fireplace laying. After installing these elements, you can proceed to the construction of the fireplace. The walls of the fireplace are laid out on the finished foundation in accordance with the chosen scheme. For masonry, bricks soaked in water are used so that they do not draw moisture from the mortar. The firebox portal is laid out with refractory bricks.
When designing a fireplace, keep in mind that its main function is visual decoration and style, so pay attention to the size of the fireplace. It needs to be made spacious to enjoy an open fire.
Chimney and ventilation system. A fireplace is considered complete if it is equipped with a chimney and a proper ventilation system.
When constructing such structures, always take into account fire safety rules.
*
Basic rules for laying rows
Masonry schemes should be presented in a visual form, since it is quite difficult to describe them verbally. But for any chosen project, there is a set of basic rules that novice craftsmen and professionals adhere to.
- The preparatory work should include a visual assessment of the dimensions of the complex. It is necessary to establish the absence of negative factors that may appear during the construction process.
- It is recommended to lay out each row with bricks alone, without using mortar. This is done to evaluate how the bricks fit in size and to fix the main dressing nodes.
Massive building on a summer cottage
- Various devices help to maintain horizontal and vertical. Some use a building level or plumb line. To ensure that the work is completed as quickly as possible, a frame is sometimes constructed within which the masonry is carried out. Then this frame is dismantled.
- The thinnest seams between bricks are located close to the combustion chamber. They are 3 mm. The facing brick is laid on a mortar of 5 mm. In the chimney design, it is permissible to increase the seam to 10 mm.
- Ensure the integrity of the seam, as it not only serves as a fastener, but also ensures the tightness of the cavities. If the mortar is poorly laid on at least one of the bricks, then smoke will certainly flow into the gazebo through the gap.
Construction inside the gazebo
- The rules relating to the interior decoration of ducts state that any turn of the duct or protrusion of a brick can cause a drop in the speed of air masses. For the same reason, after laying, excess mortar should be removed with a damp cloth.
- The minimum temperature of the solution that is permissible when laying a fireplace is 5°C degrees. Otherwise, construction work will have to be postponed.
- You should not light the stove without allowing it to dry after construction is completed.
Good to know: Installation of a fireplace with air heating, how to make it yourself
In addition to the main functions of the complex, it is necessary to think about security measures. The chimney, passing through the ceiling, heats it. To prevent this, insulation should be made of mineral wool at the exit point. The stove body is insulated from the wall of the gazebo. A plate of non-combustible material is laid on the floor around the base.
Multi-format fireplace complex
Construction of a brick fireplace for a gazebo
There are many varieties that differ in the number and modifications of furnace complexes. The optimal location is near the wall or in the corner of the gazebo.
To expand the functionality of the fireplace, you can supplement it with the following elements:
- cast iron hob with additional firebox;
- smokehouse or oven;
- a convenient niche for drying and storing firewood;
- barbecue
According to the principles of construction work, an outdoor fireplace is similar to a home fireplace. It has the same dimensions, masonry scheme and decorative design.
To reduce the cost of the fireplace, you can make a metal hood in the upper part, and instead of a brick pipe, install a metal one.
The success of laying a fireplace is determined by the source material. For it, ordinary or fireclay bricks are used. Simultaneously with the construction of the fireplace, an adjacent brick wall is built.
If you wish, you can carry out the laying yourself or find a professional craftsman.
Device
From the listed components, you can select only those that are of interest and include them in your own project. Moreover, the combination of individual furnaces can be made in any order.
Depending on the owner’s wishes, the idea for a new furnace complex begins to take shape. Since all components must not only fit compactly in one case, but also perform their functions correctly, amateur efforts are inappropriate here, and it is advisable to take the advice of professional craftsmen who provided ready-made projects. These projects are easy to find on the official websites of construction organizations that direct their activities in the direction of stove masonry.
The advice to use a ready-made project stems from the fact that already at the initial stage of construction you need to have an idea of the components of the complex. The foundation must be erected for the entire structure at once. No additions can be made over time.
Beautiful contrasting masonry
A solid foundation can be made from cement and sand. As a filler, a layer of crushed stone can be poured onto the bottom of the pit. But in some cases, foam blocks are used, since they are strong enough to support the weight of the entire structure. The furnace body is made of brick. Due to the fact that intense heat exchange occurs outside, and the walls of the stove do not heat up as much as in the house, the outer layer can be laid out from facing bricks. This will allow you to save on finishing the complex after construction.
Good to know: How to install a fireplace insert, we do the work ourselves
Taking into account the destructive effects of rain, wind, snow, and sun, they try to protect the constructed furnace complex in every possible way from the influence of the environment. Therefore, they arrange it in the form of a gazebo or inside a gazebo, the roof of which will relieve the harmful effects of the climate.
Among ready-made models, there is often a set of ovens with hobs, a bread chamber, a smokehouse, a barbecue grill and a panel for a cauldron. In addition, the project describes several functional properties of the fireplace body. There are shelves, drawers, and niches in which you can store small kitchen utensils. A barbecue complex with a fireplace will gather the whole family around for dinner after a working day.
Ready-made version in sketch form
The design features of the complex are aimed at effectively removing smoke. As you know, draft in a chimney depends on the pressure difference at the top and bottom. When the stove is built outdoors, it is very difficult to achieve a large difference. Therefore, even more attention is paid to the construction of the chimney in the complex than to efficiency. By the way, heat transfer issues are not raised at all in street models. Localized energy is used to prepare food.
Construction of walls and roof in the gazebo
Having completed the laying, they begin to install the roof. One of the most important points is the correct calculation of the roof slope angle. The best roof is a sloping one, as it provides less resistance to wind loads.
For covering use boards, metal sheets, slate or polycarbonate sheets.
Important! All wooden elements must be treated with antifungal and fire-bioprotective agents.
- Flooring in the gazebo. After completing the roof, laying the flooring begins. The best option is paving slabs made from sand and various polymers. It has a variety of colors and a long service life.
- Construction of walls or railings. At the final stage of construction, walls or railings are installed. Any material suitable for practical and aesthetic purposes is used here. Typically, lining, block house or decorative wooden grilles are used for walls.
Materials for the construction of a stove and gazebo
For the construction of both the stove equipment and the gazebo itself, you need to choose non-combustible materials. This is a prerequisite for fire safety.
Particular attention should be paid to metal fragments of furnace equipment. Cast iron elements for the stove are considered optimal
It is also advisable to make the following elements of a stove with a barbecue or grill in a gazebo from cast iron:
- grate, grill or barbecue;
- firebox;
- lining;
- spit;
- baking tray with stand;
- grate
Heat-resistant steel can also be used. But under no circumstances should you use standard sheet or stamped steel, as it begins to oxidize when heated over an open fire, releasing iron oxide, which spoils the taste of cooked food, causing harm to human health.
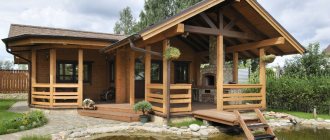
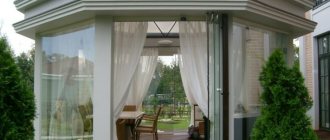
When constructing a summerhouse building as in the photo, facing brick or stone is used
The structure should not be closed, as it is very important that it is well ventilated. For the construction of the floor surface, it is important to use non-combustible materials - fire-resistant tiles or ordinary concrete
It is very important to arrange a slope to allow water to drain from the stove to the outer edge of the gazebo. This will prevent water from entering the stove during heavy rains.
Popular articles Layout of a summer cottage plot of 8 acres: examples of area zoning
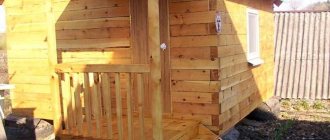
If the owner of a summer cottage prefers buildings made of wood or he already has a ready-made wooden gazebo, then it is very important to remember about fire safety by arranging a non-combustible foundation made of concrete or metal under the stove or using a collapsible metal barbecue or other portable equipment
Installation of lighting, electrification and communications
*
Point elements are used to illuminate the space in the gazebo. For a small area, 2-3 lamps are enough. If desired, you can light the path leading to the gazebo.
For electrification, it is necessary to purchase high-quality wiring, ensuring reliable waterproofing of the wires.
The presence of electrical outlets will provide the ability to install electrical appliances, additional lighting or sound.
For convenience, install a pipeline with drinking water, hiding it in the ground. In this case, it is necessary to consider the sewerage outlet if there is a washbasin or kitchen sink.
Simple brick grill
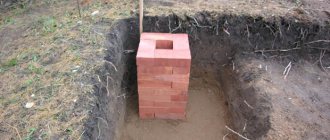
Any brick structure requires a foundation. And even such a small barbecue, as presented below, is very undesirable to place directly on the ground. The foundation will have to be poured. It can be made strip or slab. The slab is more reliable: it will not move in winter and the masonry will not fall apart.
Popular articles How to grow gladioli from children
Even a beginner can build this simple brick grill with his own hands.
The dimensions of the foundation for a brick grill are 10-15 cm larger than its dimensions. First, the plant layer is removed; if necessary, the pit is deepened by 10-15 cm. Its bottom is leveled and compacted. A 10 cm layer of crushed stone is poured and compacted again. It is advisable to use a vibrating plate: you will not compact the soil enough with a manual tamper. The height of the tape is 20-30 cm, the thickness of the slab foundation is 10 cm.
Depending on the type of foundation chosen, the appropriate formwork is constructed. For greater strength, reinforcement is made with a rod of 10-12 mm in diameter. For the tape, two threads are laid around the perimeter; for the slab, a “cage” is made: rods are laid lengthwise and crosswise in increments of 20 cm. Everything is filled with concrete of a grade no lower than M200.
If the temperature during construction stays around +20°C, after about a week you can continue work: the concrete has gained more than half its strength. Two rows of waterproofing are laid on it (roofing felt, roofing felt, modern roll waterproofing), coated with bitumen mastic or other liquid waterproofing solution. After this, you can begin laying.
Dimensions and materials
You can build this small brick grill with your own hands even without any experience. It is a structure in the shape of the letter “P”. There are two parts: the brazier itself and the table next to it. The design is simple and easy to modify. You can add another section nearby, make it wider or narrower, deeper or shallower. You can make two protrusions for the grates - this is if you will be preparing a large number of kebabs.
In the basic version, the dimensions are as follows:
- width 180 cm;
- depth 90 cm;
- barbecue height 100 cm.
To lay this garden barbecue, you can take solid ceramic bricks, you can also use fireclay SHA-8. For the order given below, 202 bricks were used.
For the lower part - up to the 5th row - a cement-sand mortar 1:3 is used or with the addition of one part of lime. Further, where heating will already occur, a clay-sand solution is used. Its proportions are selected based on the qualities of the clay (oily, normal, skinny). In terms of thickness - it should not be too liquid, but not too thick. About the same as good thick sour cream.
Order and order of work
This country grill is made of bricks laid “on a bed”. Two protruding rows (bricks laid crosswise) serve as support for the brazier sheet and the grill grid. Here you can also place it on a spoon (place it on the narrow part), then the sheet will rise a little higher. In the lower part you can store firewood or use it for other household needs.
The rows are placed in a bandage - offset, for this you need halves of bricks. They can be cut with a grinder. The first six rows form the brazier and table on the right. Starting from the 7th row, the masonry goes only in the part where the grill itself will be located.
Seam thickness 5-8 mm. It should be the same.
Arrangement of a small country barbecue made of bricks
In order not to disturb the geometry during construction, you can pull the cords and align all the rows along them. But you check each brick and each row with a level for horizontalness. You must constantly check the verticality of the walls and corners. To do this, use a plumb line (a cord with a weight at the end). You can check the verticality with a level, but it has an error, especially if it is not a professional, but an amateur instrument. So, with such a check, there is a good chance of getting a roasting pan with slanted, clogged walls.
The procedure for this brick barbecue is simple and does not require additional explanation. Questions may arise regarding drying. If the weather is dry, leave the grill to dry for three to four days. Then you can build the fire little by little. Heat in a gentle mode for a couple of days, using thin wood and little by little. Then you can fry the first batch of kebabs.
One of the options for a simple brick grill. It differs from the basic version in that there are two rows of protruding bricks. Another difference is that the table is smaller.
If rain is expected and there is no canopy over the grill, cover it with oilcloth. After about a week, you can begin slow drying: turn the fire low and not for long. Drying will also take 2-3 days. Then you can test a brick grill built with your own hands.
You might be interested in reading “How to make a metal grill with your own hands”