Nowadays it is extremely difficult to surprise with something new. However, there is a chance to find a flooring option that will certainly attract attention and appeal to everyone. Decorative self-leveling floor successfully combines excellent performance and beautiful appearance. This amazing coating can turn a room into a real art gallery. How to make such a floor yourself?
Decorative self-leveling floor
Decorative self-leveling floors
Self-leveling decorative flooring is an original, very durable and reliable, but at the same time beautiful coating. It is made from special mixtures, which, when hardened, form a solid base. Previously, self-leveling floors were installed only in industrial premises, but now many understand that a durable floor is also needed in an apartment or house. Self-leveling floors have already significantly displaced other types of floor coverings on the market - laminate and tiles are not nearly as popular as before.
What are self-leveling floors?
The composition of the mixture for self-leveling floors can be different, the similarities are as follows: they are all made on the basis of polymers, fillers, and various additives that increase the rate of polymerization of the composition and its spreadability. Yes, the self-leveling floor is indeed “poured” onto the base during installation, but it cannot be evenly distributed over the surface on its own. It will have to be further leveled.
Installation of self-leveling floor
Mixtures for self-leveling floors
The self-leveling floor can have any color, but no matter how beautiful it is, the monotony quickly becomes boring. Therefore, many people now create decorative self-leveling floors in their homes. They are exactly the same smooth, usually glossy, coatings as the usual type of self-leveling base, but they always have some decorative inclusions - mosaics, sparkles or patterns. Moreover, most often self-leveling floors are made not with ordinary, but with 3D patterns. This type of floor is considered the most beautiful; it makes it possible to create absolutely any picture on the floor, from the seabed to the endless sky.
On a note! You can safely draw ideas for decorative self-leveling flooring from your head. The main thing is that they are combined with the overall style of the interior.
Epoxy floor with 3D effect
Thanks to their excellent aesthetics with high strength and wear resistance, self-leveling decorative floors are deservedly in demand and are increasingly appearing in apartments. They fit perfectly into any interior, since you can choose a color or decorate them as required by the style of the room.
Dark self-leveling floor in a Scandinavian-style kitchen interior
Laying the pattern on the floor
The image of the self-leveling floor can look like a banner or be painted with special paints. The first option is preferable because it is publicly available and easily adheres to the base layer. First, a transparent mixture of polymer and solvent is applied to the surface and left for 24 hours.
After the soil has completely dried, a canvas, tile or pattern is applied in another way.
A simplified option for laying out a pattern is to use ready-made self-adhesive film. It is enough to remove the protective film from the back, lay it on the surface and straighten it with a roller.
When laying the banner, it is necessary to carefully remove air bubbles. To do this, carefully roll it over it with a dry roller from the center to the edges.
Advantages of self-leveling decorative floors
Self-leveling decorative floors have many advantages over other coatings. They can serve for decades without repairs or special preventive measures. The minimum service life is 20 years, and then only when using the cheapest mixtures. They can be easily cleaned from dust using a vacuum cleaner or wet cleaning.
Characteristics of self-leveling floor
Attention! Self-leveling floors should not be washed with products containing abrasives. With constant use, they can scratch the finishing layer and the floor will lose its shine and attractive appearance.
The mechanical load on these floors is not at all terrible. Furniture and equipment that have significant weight can be installed on them. Also, the floors are not afraid of chemical influences, and in addition to everything, they have excellent fire resistance.
Self-leveling floor in the interior
Such floors can fit perfectly into any interior due to the ability to create absolutely any pattern and a wide selection of shades. They look especially good in the bathroom or kitchen. It is in premises of such purpose that the use of decorative self-leveling floors is most appropriate and convenient. Do not be afraid that such a coating will be slippery when water gets on it. On the contrary, its slip index is much lower than that of tiles or linoleum. And such floors are not afraid of water - even if you spill boiling water on them, nothing will happen to them, unlike the same laminate. All you need to do is wipe the wet floor with a cloth.
Self-leveling floor in the interior
Also, floors do not fade under the influence of sunlight throughout their entire service life if they were made correctly and with strict adherence to technology.
On a note! Such floors are indispensable in apartments where people with allergies live. The coating is completely hypoallergenic and does not emit unpleasant or irritating odors after complete hardening.
Self-leveling floor
But you should not consider self-leveling decorative floors as an ideal floor covering option. They also have their disadvantages. First of all, this is the need to strictly follow the installation instructions, since otherwise the coating can easily be damaged, and correcting the entire work will be difficult and expensive. Also, polymer floors are somewhat toxic at the installation stage - the polymer mixture emits a very pungent odor and it will not be possible to work without at least a respirator and compliance with safety regulations. The cost of the floor also leaves much to be desired - the prices for some mixtures are quite high, and not everyone can afford to make such a base in the entire apartment. Especially when you consider that the consumption of mixtures during installation is quite high, although the floor is laid at a maximum thickness of several centimeters.
On a note! The average consumption of mixtures for self-leveling floors is 4 kg/m2, provided that the base is poured with a thickness of only 3-4 mm.
Beautiful self-leveling floor
Prices for some brands of 3d self-leveling floor
self-leveling floor 3d
Advantages and disadvantages
Self-leveling 3D floors are valued both for their aesthetic qualities and for their functionality, reliability and safety. They represent a unique surface that consists of three layers: a base base, a three-dimensional image, and a protective coating. The structure and materials used are responsible for good performance characteristics. Among the main advantages of this type of finishing are:
- Durability. The coating has a long service life of more than 20 years, while it does not lose its presentable appearance.
- Strength. If the casting technology is followed, the canvas will be resistant to mechanical loads and impacts.
- Wear resistance. The finish has good resistance to abrasion and abrasion.
- No seams. After pouring, the floor is solid and smooth, without any seams.
- Decorative properties. You can choose any design, decorate the room in an original way, and bring bold design ideas to life.
- Ecological cleanliness. After hardening, the raw material becomes harmless and does not harm the health of residents.
- UV resistance. The picture does not fade under the influence of sunlight.
- Moisture resistance. The polymer material completely and reliably covers the base and serves as a waterproofing agent. It is neutral to water, so it can be used in the bathroom, toilet, and kitchen.
- Fire safety. The components used belong to category G1, they do not burn.
- Chemical inertness. The polymers used are not affected by chemicals and can be cleaned with detergents.
- Possibility of heating. It is possible to combine it with a “warm floor” system.
- Easy care. The canvas does not accumulate dust or absorb dirt. To maintain cleanliness, it is enough to periodically perform wet cleaning.
We advise you to study - Types of roofs of private houses by design and geometric shapes
Like any other material, canvas has a number of disadvantages:
- High price. Arranging even a small room will require significant costs, which not everyone can afford.
- Complex filling technology. Only professionals can do quality work.
- Dismantling. Removing floor covering is very difficult. It becomes monolithic; you will have to use a jackhammer to work.
- Long hardening time. Drying the poured layer can take up to six days, and at low temperatures and high humidity this process takes longer.
Self-leveling floor structure
In order for the self-leveling floor to turn out correct from a technical point of view, it is important to know what it consists of and not skip a single layer. The structure of the self-leveling floor includes the following elements.
- Base or rough base. Usually this is a concrete screed laid on the floor or ground.
Concrete screed
- Primer layer . It is necessary for additional leveling of the base, increasing adhesion, and protects the floor from negative external influences.
- Decorative layer . It is this pattern that makes the floor original and beautiful. This can be a mosaic, a pattern made of shells or beads, paint, glitter and, of course, 3D printed drawings.
- Finish . The finish coat is a thin layer of a clear polymer mixture that covers the design or pattern and protects it from abrasion.
- A layer of varnish . It is necessary to maximally protect self-leveling floors from negative mechanical or chemical influences. It is important to use high-quality varnishes at this stage.
Installation of self-leveling floors with 3D patterns
An intermediate layer is also sometimes applied. It is located between the primer and base layer of the self-leveling floor, its name is broach.
Photo of a beautiful bedroom floor design
Note! Bedroom with a blue tint - 100 design photos
Let's discuss this article together:
Click to cancel reply.
Where are decorative floors used?
The scope of application of self-leveling floors has expanded greatly in recent years. If previously they were used only in workshops, bakeries, in the chemical industry or medical institutions, today coatings are actively used in various fields of construction due to their unique properties.
Self-leveling floor for workshop
Decorative self-leveling floors are used mainly in rooms where there is a high traffic flow of people, as well as where it is necessary to create a design that is pleasing to the eye.
Areas of application of such coatings:
- trading floors and lobbies in shopping centers;
- swimming pools and saunas;
- entertainment centers and clubs;
- restaurants and canteens;
- office rooms.
In an apartment, self-leveling decorative floors can be installed in absolutely any room. This could be a bathroom or toilet, bedroom, living room, kitchen, children's room, etc.
Self-leveling floor in the kitchen
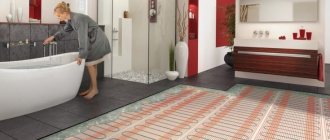
On a note! In rooms where people rest or stay for a long time during the day, it is recommended to install a heated floor system under self-leveling floors. Otherwise, especially in rooms located on the ground floor, the floors may seem cold and will be unpleasant to walk on.
Advantages and disadvantages of self-leveling coating
The self-leveling floor in the kitchen looks quite stylish and unusual. Modern technologies make it possible to obtain a variety of images, from 3D self-leveling floors in the kitchen to imitation of natural wood and stone.
It is worth noting that all the images look quite realistic, which allows us to erase the boundaries of human consciousness.
The floor covering has no connecting seams. Due to the presence of chemical components, this coating can last for many years.
Today, a shiny surface can be replaced with a matte, plain coating. Everything depends on the wishes of the customer.
The advantages of gender include:
- stylish interior design;
- no flaws;
- easy cleaning of the floor surface using household chemicals;
- excellent resistance to mechanical stress;
- original design solution.
As for the shortcomings, there are practically none. Recently, kitchens with self-leveling floors have become very popular among consumers.
Surface decoration options
There are 4 main options for decorating a self-leveling floor. They differ from each other only in the components that are used to decorate the base.
Decorative floor with glitter
Table. Options for decorating self-leveling floors.
| Material used for decoration | Peculiarities |
| Glitter or sparkles | The glitter is applied to the first layer of the self-leveling floor and then covered with a transparent compound. Such floors will shimmer when light rays hit them. The amount of glitter can be very different, due to this you can adjust the intensity of the glitter. |
| Regular and 3D paint drawings | The pattern on the self-leveling floor can be created either manually or using stencils. The pattern is simply applied to the first layer of the self-leveling floor and then covered with the finishing layer. If the person performing the work does not have the skills of an artist, then it is recommended to seek help from professionals or use a stencil. |
| 3D drawings on the banner | In this case, the desired design or pattern is printed on banner fabric, which is then laid on the first layer of the floor with the pattern facing up, secured and filled with the finishing mixture. |
| Chips | These are flakes of ordinary water-dispersion paint, which, when added to a self-leveling floor, will help make it unusual and colorful. Sometimes very original coatings are obtained, despite the simplicity of the material used. |
| Using different colors | Sometimes very unusual designs can be obtained if you use 2-3 contrasting colors and mix them together. |
| Mosaic, shells, coins, pebbles, etc. | In principle, absolutely any objects of suitable size can be used to decorate a self-leveling floor. Some people lay out patterns from small river stones, others from shells. You can use everything, you just have to give free rein to your imagination. |
Self-leveling floor with a pattern
Using films to decorate floors
The easiest way to make floors as unusual as possible is to use patterns on film or banner fabric. This is also the fastest option for decorating the base. First of all, the main layer of the polymer composition is poured, and after it hardens, the design printed on the film or banner fabric is laid on top and secured. Now you just need to fill it with a transparent composition and dry it.
Laying the decorative layer
In order to create a 3D drawing using this method, you do not need to be an artist. Just choose the design you like on the Internet and print it in the required size, depending on the parameters of the room.
3D floor in the toilet
Preparing for work
Before you start pouring a decorative self-leveling floor, you should prepare thoroughly. It is not enough to just purchase the necessary mixtures; you also need to buy special tools and materials, although the list is very small.
Tools for pouring self-leveling floors
To create a decorative floor you will need:
- two-component primer with deep penetration properties;
- epoxy-based putty for leveling the base;
- a transparent primer that will be used to fill the decorative layer;
- the mixtures themselves for the self-leveling floor;
- finishing varnish (glossy or matte);
- Grinder;
- vacuum cleaner;
- a design printed on banner fabric, film, or glitter and other decorative material;
- needle roller;
- damper tape;
- protective film;
- construction mixer for mixing the mixture;
- paint shoes;
- squeegee;
- container for mixing components.
Using a needle roller
Only after everything is at hand can you proceed directly to the work.
Order flooring from professionals
provides services for pouring self-leveling floors in living rooms, using materials of its own production. Confidence in the professionalism of the craftsmen and the quality of the products allows us to include a guarantee clause when concluding a contract.
We are confident that the customer will never have any complaints about our work. An additional bonus will be favorable prices for materials and work. The absence of intermediaries allows us to maintain them at the minimum level in the region.
The main reason to order or buy a polymer floor from us is that we can create a beautiful floor covering with a long service life because we have been working in the coating market for more than 15 years and know all the features of the material that needs to be used. After pouring the coating, the room will pleasantly please not only you but also your guests; it will be pleasant to walk on this floor.
Technology for creating decorative floors
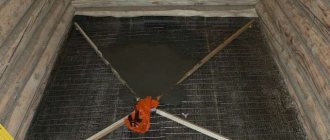
Step 1. All work begins with the preparation of a rough foundation, which is usually a cement screed. The old floor covering, if any, is completely removed, and the base is assessed for integrity and strength. All cracks on it, even small ones, must be repaired using epoxy putty, and the base is also sanded to remove various bumps and irregularities.
Preparing the subfloor
Attention! In particularly difficult cases, it is necessary to fill the base with a layer of self-leveling mixture to get rid of defects.
Calculator for calculating dry mortar for self-leveling floors
Go to calculations
Step 2. The moisture level of the base is measured - it should be no more than 4-5%. Otherwise, it should dry well before continuing work.
Humidity level measurement
Step 3. The surface is dusted using a construction vacuum cleaner. It is important to remove as much dust as possible, carefully going through all the cracks.
Dust removal of the subfloor
Step 4. The primer mixture is applied. The floors are thoroughly coated with it and then dried.
Applying primer
Step 5. The walls along the perimeter of the floor are covered with damper tape. It is necessary to compensate for thermal expansion.
Damper tape is glued
Step 6. The walls are covered with a protective film so that they are not stained with the self-leveling floor mixture during the work.
Protective film is applied to the walls
Step 7. The base layer mixture is mixed - the first layer of self-leveling floor will be formed.
Preparing the base layer mixture
Step 8. The mixture is applied to the prepared rough base and leveled. After this, it is rolled with a needle roller to remove air from the mixture.
Pouring the mixture
Leveling the poured mixture
Step 9. The film pattern is glued to the selected place on the floor or the banner is laid.
Pasting a picture
Step 10. Mix the transparent mixture to apply the finishing layer.
Preparing the mixture for the finishing layer
Step 11. The mixture is also poured over the base layer and leveled.
The mixture is poured
The mixture is leveled
Important! All work begins from the corner farthest from the exit from the room.
Step 12. The freshly poured layer is rolled with a needle roller. The surface dries well. Then the finishing varnish is applied, also dried, and you can move on the floor.
The floor is rolled with a needle roller
Pouring technology is the main condition for quality and durability
There is an opinion that you can make a self-leveling floor yourself. Having considered all stages of the work, many will agree with this statement. The opinion is wrong. Following it, there is a high risk of getting coverage that will last several months.
Next, you will need expensive repairs or complete replacement (with preliminary dismantling, which is also not free).
If you decide to fill your floor with your own hands, it is best to read articles where there are detailed tips on how to lay the floor, depending on the composition, correctly on our website. The difficulty of laying a self-leveling floor is strict adherence to technology, more precisely:
- deadlines;
- checking the readiness of the surface for the next stage;
- cleaning and degreasing the preliminary layer.
All compositions have high adhesion and can be used on all types of surfaces. Before pouring the first layer, the base is thoroughly cleaned, defects (cracks, chips, unevenness) are eliminated, if necessary, leveled with a layer of concrete floors, dried, and degreased.
Before starting work, a primer is applied. When laying methyl methacrylate self-leveling floors, it is mandatory. When the primer layer has completely hardened, liquid cement mortar is poured with the addition of polymers that increase strength. To continue work, it must not only harden, but acquire the necessary humidity and temperature.
Before pouring the finishing layer, the necessary composition is prepared. If we are talking about a monochromatic colored surface, then the necessary dye is added to it. When creating a decorative surface, the necessary pattern is applied, including 3D. Then the finishing layer is applied. A special varnish is used to give a glossy shine.
When performing work and during the hardening period of each layer, the room must maintain a stable temperature and humidity. Violation of these conditions leads to a decrease in the quality of the self-leveling floor and a reduction in its service life.
Places of delamination or air voids quickly appear on the surface (if air bubbles remained during pouring), which spoil the appearance of the living room. After 12 hours of drying, you can begin installing any furniture on the floor, but avoiding sharp impacts.