Many car owners use a garage to protect their car from theft and adverse weather conditions. However, in the absence of good ventilation, extremely unfavorable conditions are created for the machine in the form of high humidity, which causes metal corrosion. We should not forget that for humans there is a danger of poisoning from gasoline vapors or other derivatives of the engine. This article will look at how to make ventilation in a garage with your own hands.
Air exchange classes in the garage
It should be noted that ventilation of a garage box with and without a basement is practically no different from each other.
Do-it-yourself ventilation in the garage can be made according to the following schemes:
- natural. Is the simplest of all. Air exchange in the room is carried out due to the difference in temperature in the room and outside;
- mechanical (forced). The system is expensive, but the most effective. Air exchange occurs due to equipment that supplies and removes air;
- combined. It works similarly to natural, differing by adding a fan to the circuit to remove air from the room.
Ways to improve the performance of a natural garage hood
By organizing natural ventilation with your own hands, you can achieve optimal renewal of the atmosphere in the garage without the help of mechanical tools, for example, by heating the exhaust pipe and installing a deflector. The heated air is lighter than the cold air, and as it rises, it will quickly exit through the exhaust duct, being replaced by fresh outside air.
To improve air heating in an unheated garage, simply paint the exhaust duct with black paint. This way, the walls of the duct will absorb more solar energy, heating the air in the duct and pushing it upward. When planning natural ventilation with further painting of the air duct, there is no need for additional thermal insulation of the ventilation duct, so such simple and affordable measures will also help reduce the cost of purchasing and installing the main components of the system.
The cold weather that comes in the fall does not in itself create any special problems for a car in storage, but it can seriously disrupt the operation of the entire supply and exhaust ventilation system. A warm engine will give off additional heat within an hour after the car enters the garage, but later in the unheated garage the temperature will drop almost to street values, which is why natural ventilation will cease to function.
To maintain air exchange in the room and prevent icing of the exhaust duct, in which condensation will inevitably accumulate, it is enough to purchase a regular 40-watt incandescent lamp. It should be installed under the opening of the vertical exhaust duct and left on. The lamp will generate heat, providing air movement at speeds of up to 0.4 m/s. Additionally, the air duct must be covered with heat-insulating material, making sure that no moisture enters it. The disadvantage of this method of improving heat transfer is the increase in the level of fire hazard in the room, and therefore you should purchase the most reliable and safe incandescent lamps.
SNiP and ventilation
For non-residential premises, ventilation standards also strictly regulate air circulation.
Building codes provide for the provision of air to a garage space in the amount of 180 liters per hour.
The circulation of air masses must be organized constantly. Let us note that in Western countries this figure is and should be twice as high.
If we talk about the materials from which the room is built, ventilation in a metal garage will be no different from ventilation in a brick or concrete garage.
Security measures
The main purpose of installing a ventilation system is to ensure the safety of painters. When painting, a large number of particles of paint, solvent, and varnish enter the air. A toxic mist appears that causes discomfort to the mucous membranes during breathing. Proper ventilation should press the resulting “fog” to the floor with a vertical air pressure.
Employees must also use protective equipment:
- respirator;
- gloves;
- protective clothing;
- mask and glasses;
- closed shoes.
The room must be finished with fire-resistant materials; there should be no sources of open fire; The wiring is carefully insulated.
Cabinets, equipment, and any other items are removed from the spray booth so that dust does not accumulate on them and they do not interfere with ventilation.
Natural air exchange installation
Due to its ease of installation and low cost, such ventilation is suitable for many. It is also commonly used for cellars.
Installing ventilation in a garage necessarily begins with calculations.
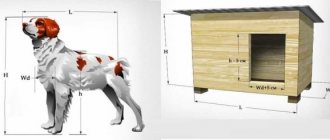
According to SNiP, for every 10 square meters of area there should be 15 centimeters of air duct diameter.
For example, the size of a garage is 5 by 4 meters. The garage area will be twenty square meters. We calculate according to the formula: 20 * 1.5 = 30 centimeters.
As a result, we obtain a channel diameter of 30 centimeters. If you plan to install two hoods and two supply channels, this value should be halved.
The figure shows the ventilation in the garage with your own hands, the diagram shows the location of the ventilation openings.
The next stage is preparing the opening for air intake. It is done using a hammer drill at a height of about ten centimeters from the floor. Proper ventilation of the garage will occur when the hood is installed in the opposite supply wall, and it is advisable that the hole be made diagonally.
Using a hammer drill we do the same thing, only under the ceiling. This is necessary because the ventilation pipe will be installed above the roof of the room to a height of approximately fifty centimeters.
Next is treating the voids between the wall and the pipe with sealant. For better bonding, you need to choose a sealant that allows you to connect different materials. At the very end of the installation, care must be taken to install protective devices. To prevent rodents and insects from entering your garage, install protective grilles. A small lid or dome will help protect against precipitation.
Thus, installation of ventilation will cost approximately 300 rubles. It is worth considering that natural air exchange is most effective when the outside temperature is less than 10-12 degrees Celsius.
Accordingly, in the summer, air exchange will be ineffective. In addition, pipes often freeze in winter, which leads to hypothermia in the room.
Criteria for choosing the optimal ventilation scheme
Ventilation in the garage should be developed even when drawing up the project, since various functional openings on the base and walls of the building must be made during the construction of the building. Be sure to take into account the number of floors, the number of cars that will presumably be located here, the area of all rooms and each of them separately, as well as the height. Here you will have to choose the most suitable option for arranging the ventilation system, and this, in turn, largely depends on the assigned functions.
There are several types of ventilation systems; let’s look at the features of each of them.
- Natural ventilation. It is based on the rules of aerodynamics, as well as the ability of air to move freely.
- Mechanical. To implement this, special installations are used that stimulate the inflow/outflow of air.
- Combined. It is a successful combination of the previous two varieties, since in it natural air exchange acts in tandem with mechanical equipment that stimulates air movement.
In all three cases, either one or two channels can be used. And to stimulate forced air movement, as a rule, only one hole is sufficient.
In order to create the necessary holes, pipes made of metal or asbestos are used. Their diameter is calculated based on the volume of air to be replaced. In accordance with the standards, this is 1.5 centimeters for every square meter of area. In other words, if you need to equip a ten-meter garage, then for this you will need a couple of pieces of metal pipe with a cross-section of 15 centimeters. To calculate the size of ventilation holes, you can use another formula, according to which 1/3 of the total area of the room must correspond to the total size of all ventilation holes. This formula is usually used when calculating such holes that must be installed in a mechanical single-channel system.
Note! The cellar, as mentioned earlier, should be ventilated separately, if it exists at all. The inspection hole should receive the same attention as the room as a whole.
Installation of a combined circuit
This scheme is practically no different from the previous one. In the same way, a hole will be made on one side of the garage at a height of ten centimeters from the floor. The only difference is that there is no need to make an exhaust hole in the opposite wall. Installing the fan allows you to install it anywhere.
Thus, the combined air exchange method is more suitable, as it will work effectively at any time of the year.
As for fans, many of them have minimal power consumption, so when purchasing, you should choose the one that will produce the least amount of noise.
Fan installation
The fan is installed on the ventilation duct. It is necessary to arrange two channels:
- for the flow of fresh air from the street, which is mounted below;
- to eliminate the dirty that is created near the ceiling.
Advice! It is better to design the holes when building the garage. If a finished room is used, holes are made using a hammer drill at a height of more than 5 cm from the zero point of the floor.
The hood is mounted on the wall opposite the air supply as high as possible. The fan must provide an air flow speed of 25 cm/s. So, for example, a painting booth with an area of 28 m2 requires equipment of 2500 m3/hour.
Mechanical air exchange
Forced ventilation in the garage is carried out by installing fans in the air supply and exhaust openings. However, there are other devices that can cope with this task.
Here are just a few of them:
- Heating lamp. Its installation is carried out in the pipe itself. Thanks to it, the air is heated, and as a result the pressure increases;
- Weather vane diffuser. It is attached to a pipe that performs the supply function. Powered by wind pressure;
- Deflector. Unlike a weather vane-diffuser, it is installed on the hood. Better exchange is ensured by air dilution;
- Monoblock. Among hood specialists, it is considered the best option for providing ventilation in the garage. Thanks to this system, the owner has the opportunity to control the entire air exchange process. Air exchange done in this way will be the most effective compared to natural and combined ones. The only negative is the cost of installation, which can reach 240 thousand rubles or more.
However, in some cases, do-it-yourself forced ventilation in a garage can be quite inexpensive. To do this, you need to do the same as for installing natural ventilation: use a hammer drill to make holes in the walls opposite each other diagonally and install pipes in them. Next, a fan is installed at the inlet openings of the air ducts.
This scheme will allow you to regulate air exchange at any time of the year. To prevent the air duct and the garage box itself from freezing in winter, you can install valves or fan speed controllers. And to protect the room from moisture in winter, experts advise covering the inspection hole or cellar.
Hood in the garage for painting cars: installation diagrams
Method #1
To implement the project, a duct type fan is used, the diameter of which ranges from 150 mm to 250 mm. With the help of such a ventilation system, all gases and paint fumes are removed. In no more than 15 minutes, the air in the garage is completely replaced. The presence of an additional fan helps equalize humidity and quickly dry the car. The fan is mounted at the top under the ceiling; therefore, the air inlet is installed at a height of at least 5 cm from the floor. An additional fan is installed to create internal circulation.
Advice! To avoid the occurrence of stagnant zones, the air inlet and outlet should be placed diagonally in the room.
Method #2
This installation option is used for garages with an inspection pit or basement. When implementing such a project, ventilation is removed to a separate shaft. To equip the ventilation system, pipes with a diameter of 100 mm and a length of no more than 1.5 m are used, which are insulated with 5 cm thick mineral wool. This will avoid the formation of condensation in the system and will become a reliable protector against the formation of rust.
The air duct is installed in the upper part of the inspection hole, and an inlet opening is mounted on the opposite wall. The channel is closed with a cap, which should rise no more than 50 cm above the soil. The cap can be made of sheet steel. Clean air, entering the garage through the supply opening, is distributed throughout the room and removed through the ventilation.
Important! Working in an inspection pit using chemical components is unsafe. To avoid the harmful effects of paint, it is necessary to install a reversible exhaust fan to supply fresh air. According to physical phenomena, fresh air is supplied from below, since it is colder than the air in the room. When heated, it moves, mixing with the air in the room, up to the fan and out. That is why fans are mounted under the ceiling.
For large or heavily used rooms, you will need to place two fans, which are mounted at a distance of at least 50 cm from each other.
Air purification in the cellar
As a rule, a garage is used not only for parking a car, but also for storing food. Accordingly, this also provides additional moisture. But even if storage is not carried out, ventilation of the pit must be organized for comfortable work in it.
As experts note, natural ventilation is the best option in the cellar.
Provided there is good air exchange in the room, it is possible to use pipes with a diameter of 10 centimeters.
One of them is installed around ten centimeters from the floor, and the second on the opposite side, ten centimeters from the ceiling. The end of the top pipe is brought out.
It is also worth taking care of the protection of the hood.
In the cellar or basement
If your garage has a cellar or basement, and you plan to use it to store food, supplies and more, then you cannot do without ventilation. However, the matter is made easier by the fact that the usual outlet of plastic pipes will cope perfectly with air circulation in the room.
True, there are nuances: the supply pipe must be installed at a distance of at least 50 cm from the floor level. As for the exhaust, it is located exactly under the basement ceiling and is brought directly to the roof of the garage. It is optimal if you insulate it well: this way you will protect the pipe from condensation.
When outputting, avoid any complex bends - there should be the most simple design that properly performs its task.
The effect is enhanced by the use of bricks with through holes in the above-ground parts of the garage. However, this is just a recommendation and not a strict guide to action.
Study carefully the ventilation schemes developed for other garages and already tested in practice.
Ventilation schemes for garage
In most cases, a private garage is a small room for one car. Plus, often part of the space in it is given over to a workbench with tools and a place for storing tires, cans, etc.
Making your own ventilation in such a building is as easy as shelling pears. There is no need to make complex calculations for air exchange here. It is enough to know a couple of formulas and norms.
There are two schemes for organizing garage ventilation:
- With natural air exchange.
- With forced air circulation between the street and the room.
The implementation of both options involves the installation of two ventilation vents with pipes - one for the exhaust, the second for the supply. A forced ventilation circuit requires an electric fan. But for most garages, a conventional system with natural air draft will be more than enough. It is non-volatile, extremely easy to install and cheap.
Air circulation in a garage with a pit with natural ventilation
Flow or exhaust ventilation in a garage that requires power supply should only be done if it has heating. In this case, it is best to leave your choice on one hood. With its help, you can organize quite effective air exchange. And it will not cost as much as combined supply and exhaust ventilation. The latter consists of a considerable amount of expensive equipment, which also requires additional expenses during operation.
When choosing a garage ventilation scheme, you must also take into account the design features of the garage box. If it stands in a row of structures of the same type, then there are restrictions on making ventilation holes in some of its walls. It will not be possible to install ventilation pipes from all sides of the building. But to increase natural traction, they should be located in the garage at exactly the opposite ends.
In this case, it is recommended to opt for an exhaust, supply or combined option. These types of garage ventilation are not so dependent on the location and size of the ducts. The fan power will be more important here.
Air exchange during forced ventilation
Why is ventilation needed?
100% confidence, or rather even the misconception of many car enthusiasts, that the garage does not need ventilation, is easily refuted by the following negative consequences:
A garage creates a toxic environment that can negatively impact your health. If there is no ventilation system in the garage, then there will be an atmosphere inside that causes lethargy, migraines, and in some cases even intoxication. Even to you it will seem that there is none of this, which means that the concentration of toxins is not high, but over time the indicator will increase and make itself felt.- Dampness has a destructive effect on car parts. It can also damage electronic equipment. In addition, excess moisture causes irreparable damage not only to the car, but also to walls, wooden supports and other structural elements (fungus often forms on them).
Even if you equip a simple natural ventilation system in your garage, you can protect yourself and your property from negative factors. By the way, according to SNiP 02/21/99, any building for economic purposes must have at least minimal communications.
Please note that regardless of the complexity of the ventilation design, it must be in both a cold and heated garage. The standards state that the air from outside must enter the room at least 185 l3/hour, while the temperature in the extension must be at least about +6 degrees.
If you are interested in this, then in European requirements you will find that air exchange and its frequency in the garage should be at least 7-10 times a day. We also note that ventilation, which can provide good air exchange and blow over the car, should be installed in both one-story and two-story buildings. The second case is an object with a workshop, which is usually located on the second floor. This also includes garages that are equipped with an inspection hole. In a word, all rooms located in the garage must be well ventilated.
In addition, autonomous ventilation of the cellar room (if there is one) is definitely necessary, since it is isolated, which means that air masses do not circulate in it, as it should be to eliminate excess humidity and unpleasant odors.
Ventilation options in the garage
The easiest way is to install ventilation in your own garage using natural air draft with your own hands. To do this, you need to calculate the diameter of the exhaust and supply pipes, and then punch holes in the walls and/or roof and install these air ducts. The main thing then is not to forget about the need to reliably seal the gaps between the pipe and the concrete, brick or metal of the wall.
Ventilation shaft equipment options
According to the standards, the draft in the garage should be such that the entire volume of air in it is completely replaced 6-10 times in an hour. At a minimum, this is 180 cubic meters per hour per 10 square meters of garage floor. To ensure such natural air exchange, for every 10 sq.m. a pipe with a cross-section of about 15 cm is required.
The ventilation inlet should be located at a height of 15–20 cm above the ground on the wall with the door. The exhaust duct should be located opposite the first one in the roof or in the wall under the ceiling with the air duct rising above the roof about half a meter. This way the traction will be maximum. In this case, the cross-section of the supply pipe should be equal to, or preferably slightly smaller than, the diameter of the exhaust duct. If the dimensions are made the other way around, then the draft may overturn.
Layout of ventilation pipes in a garage with a pit
The effectiveness of natural ventilation in a garage depends on:
- differences in air temperatures inside and outside;
- the presence of wind outside and its strength;
- pressure difference between the upper exhaust point and the lower inflow point;
- location of ventilation pipes on the facade and the degree of their insulation.
How to position a ventilation shaft for better draft
There are many influencing factors. Therefore, it is often necessary to create a ventilation system that operates thanks to the forced draft of air masses. Here the calculation of parameters is even simpler.
Pipes can be taken in half the size as in the option discussed above. All the same, air exchange will be carried out due to the operation of the fan. Its power is selected based on the cubic capacity of the garage and the required air exchange rate. In the vast majority of cases, a 100 W axial channel model is sufficient.
Pipes and holes are located in the same way as in the version with natural draft. At the same time, it is often easier to do ventilation with forced exchange yourself. Air ducts are required to be smaller in diameter. This means that smaller holes will have to be punched in the walls. However, due to the presence of electrical equipment, such ventilation will be more expensive than its conventional counterpart.
Diagram of air flows for different types of ventilation
If you are installing a fan, you should take a model with a timer. Leaving it on all the time is not profitable for money (light bills will be considerable) and dangerous due to the risk of fire. Working electrical equipment should not be left unattended for a long time.
Scheme of natural ventilation in the garage
And so you can set the desired mode so that the fan turns on for a while to completely replace the air in the room, and then immediately turns off. After all, a garage ventilation system is being built, and not ventilation in the bathroom and toilet, where air circulation must be continuous.
Setting up a paint booth in the garage
To implement the project you will need:
- A garage in which a car painting booth will be located.
- Heat generator to ensure fast drying of paint materials.
- Ventilation system for air exchange.
Advice! When arranging a garage for a camera, it is worth using cleaning, fire-resistant materials that ensure the room is airtight. Insulated steel walls, slatted floors, and metal doors are best suited for such a room.
A garage hood for painting is one of the key elements that allows you to carry out this type of activity. A ventilation system with additional filters ensures air purification and removal of colorful mist inside the garage.
There can be two options here:
- Single-motor ventilation, with the help of which fresh air is forced from above by the installed unit. In this process, the colorful mist and harmful volatile substances are deposited downwards under pressure and eliminated through the holes;
- Double-motor ventilation uses two units: a blower motor supplies fresh air to the room, and a suction motor removes dirty air to the street.
A homemade garage hood should be supplemented with a high-performance air filter. It will protect against dust particles and volatile chemical components.
Advice! For garages for painting cars, two-phase filters are used, which bind large particles in the first phase, and small ones in the second.
When installing ventilation, take into account its productivity, which is at least 20 cm3/s. The installed filters must clean the air that is supplied and discharged. Only elements with multi-level cleaning phases can cope with such tasks. When installing them, air pressure is taken into account. That is why filters should be installed on the floor and ceiling along the entire length of the room.
Installation nuances and calculation tips
Garage ventilation with natural air exchange should be designed so that there is a distance of about 3 meters between its lower and upper points. If it is less, then the thrust will be reduced.
Ventilation design elements
To prevent the garage from freezing in winter, it is necessary to be able to adjust the volume of air passing through the hood. To do this, it is recommended to choose ventilation grilles with adjustable blinds for installation. If necessary, they can be closed and then opened fully.
Air exchange during forced ventilation with heating
If there is no heating in the garage box, and sometimes heating is required, then it is worth installing a supply ventilation system with a heating element. Such ventilation in the garage will allow you to quickly heat it up when necessary. An electric air heater consumes a lot of electricity. But for short periods of turning it on for heating, if necessary, to repair the car in winter, this is just the thing.
Ventilation diagram for a heated garage
Each of the pipes (exhaust and inflow) must have the same diameter throughout its entire length. Narrowing is unacceptable here, and there should be a minimum of turns. Fortunately, in most garage spaces they can be made vertical without horizontal outlets.
What is it for, requirements
Due to the periodic use of this building, energy-independent natural ventilation through vents or ducts is preferable. When designing ventilation in a garage with your own hands, the diagram and photo may differ slightly depending on the presence of an underground vegetable storage cellar.
Scheme of natural air exchange of a garage without an inspection hole or cellar
The basic requirements are specified in SP 7.13130; when storing vehicles, the air must be renewed hourly; when the engine is running, the air exchange rate must increase to 4. Therefore, axial and radial fans are often installed in the exhaust and supply ducts, turned on as needed by the owner.
Forced mechanical ventilation diagram
Lack of air flow leads to the following consequences:
- reduction of vehicle life due to body corrosion;
- destruction of garage load-bearing structures from excessively humid air;
- danger of poisoning from car exhaust.
Exhaust gases will accumulate in the room without an exhaust hood
Various ventilation schemes, how to do it yourself
Depending on the budget of the car owner, for ventilation in the garage with your own hands, the scheme may have several options:
- natural - an inlet opening at a level of 15 cm from the floor, an exhaust hood at a similar distance from the ceiling, a pipe connected to a pipe rising 50 cm above a flat roof or the ridge of a pitched roof is inserted into it;
Natural ventilation scheme
- forced - both air ducts are equipped with fans of the same power;
Axial fan built into the duct
- exhaust - the fan is mounted only inside the hood.
Exhaust fan
Supply ventilation vents are located near the ground, so they are equipped with screens to protect against animals and rodents or are decorated with gratings. Canopies or weather vanes are mounted on the vertical exhaust pipe to protect against the penetration of precipitation.
Ventilation protected by metal mesh
Air exchange inside the cellar
If there is a cellar, the ventilation scheme in a metal garage with your own hands becomes more complicated:
- an independent ventilation system can be installed in the underground room;
- the supply opening can be located in the ceiling of the cellar, the hood can exit through the roof or outside along the wall of the garage.
Related article:
Organization of air exchange in a garage cellar
Supply pipes inside garage walls are relevant for significant masonry thicknesses. If the wall is made of brick, leave square windows decorated on the outside with bars.
Ventilation duct in the garage wall
The main difficulty in organizing natural air exchange is due to the lack of heating in the garage and the location of the supply ventilation ducts almost near the ground. Most often, the ventilation ducts of the cellar become clogged with frost, since the humidity inside it is high from stored vegetables. Therefore, regular cleaning or installation of valves is required.
Organization of natural ventilation in a garage with a basement and inspection pit
A normal pressure difference is considered to be a level of 3 m vertically between the inlet and outlet. In a standard garage this is not achievable by default, so combined, mechanical air exchange systems are used.
Inspection pit
The inspection hole also becomes the weak link of the ventilation systems. Despite the fact that it is located indoors, natural ventilation cannot ensure the exchange of air masses inside it.
Ventilation of inspection pit
The only option in this case is to install air ducts near the floor of the pit, in its upper part. When using fans inside ducts, this problem is completely eliminated.
Calculation, design and ventilation schemes
The calculation of ventilation in the garage is based on the air exchange rates in the serviced room. According to current SNiP, this figure is at least 180 liters per hour for every 10 square meters. meters of its area. It has been practically established that a plastic pipe with a diameter of about 15 cm can pass such a mass of air.
Ventilation calculation
The number of cubic meters of air that pipes of different diameters can pass through.
If we assume that the garage area is 24 square meters. m. (4x6 meters), for such a room you will need a ventilation outlet with a diameter of: (6x4) / 10x15 = 36 cm. It is possible to make an air duct with such a huge diameter, but it will look very awkward. This will look especially ridiculous in a relatively small garage building.
The other option looks much preferable. Plastic pipes of smaller diameter are used, and their total number is doubled. Then the calculation takes into account each of these channels separately. The final result is obtained by their arithmetic addition.
When carrying out calculations, it is also taken into account that there are several types of ventilation systems:
- natural;
- forced (mechanical);
- combined.
They differ in the source of the motive force that sets the air masses in motion.
Natural ventilation
The calculation of this type of ventilation is based on the principle of natural draft created due to the temperature difference at the upper and lower points of the operated facility. Due to this, a pressure gradient is created between dense and rarefied layers of air, causing them to move intensively. At the same time, air layers heated from existing heat sources rise to the upper zone, and cold layers, on the contrary, fall down.
In practice, setting up an effective natural ventilation system comes down to the following steps:
- An optimal arrangement of supply and exhaust pipes is being thought through to achieve maximum ventilation efficiency. To achieve the desired result, they try to space them as far as possible from one another.
- It will be easier to achieve the movement of significant air masses if you place the inlet and outlet openings along the longitudinal diagonal of the room - at its opposite ends.
- The supply inlet is made at the bottom of one of the walls of the garage, and the exhaust is made at the top of the wall located opposite.
Particular attention is paid to the correct choice of location of the supply pipe. Placing it directly near the ground is theoretically justified, but usually in practice this is never done. This is explained by the fact that in winter it is immediately covered with snow, after which the air flow stops. For this reason, the inlet hole is made at a distance of 15-20 cm from the ground.
When choosing input and output locations, the prevailing wind directions for the region must be taken into account. Preference is given to the option in which the inlet opening is located on the leeward side.
Compulsory system
The disadvantage of relatively cheap natural ventilation that does not require energy supply is its dependence on the temperature gradation and the chosen layout of the air ducts. All these difficulties can be overcome by installing forced or mechanical exhaust. The advantages of this type of ventilation in the garage include:
- independence of the quality of air exchange from the configuration of the air ducts - supply and exhaust pipes can be placed next to each other along one wall;
- the possibility of distributing air flows at the discretion of the garage owner according to an arbitrarily chosen scheme;
- a device that creates forced movement of air masses can also be placed in any convenient place;
- high air renewal efficiency.
Forced ventilation with built-in electric fans
Thanks to the advantages of the forced option, complete ventilation of garage spaces takes much less time. However, the systems considered have some disadvantages:
- for the operation of a mechanical air blower, a permanent power supply line will be required;
- if there is no electricity, the air exchange system will not work;
- in the presence of garage electrical wiring, the requirements for electrical and fire safety increase many times over;
- Like other mechanical devices, fans used in the system require maintenance and periodic repairs.
Considering all these difficulties, before deciding to use forced ventilation, the user will have to calculate all the upcoming costs.
Combined option
If you have combined ventilation, you can save electricity by turning on the fan as needed.
In some cases, for garage buildings, the combined ventilation option is more suitable, almost completely repeating the case with natural air exchange. Its difference from the latter is that a powerful fan is additionally installed in the exhaust duct. A feature of this scheme is the ability to use the built-in device even in the absence of electricity, since its blades will rotate due to the natural movement of air masses.
When the fan is plugged in, the performance of the entire system increases dramatically. The choice of type and power of the ventilation device depends on the size, location and design of the garage, as well as the internal layout of its spaces.
Temporary ventilation in metal or permanent garages is organized through the use of a powerful ventilation device installed in a convenient location. When using this method of ventilating a room, the most important thing is to securely fasten the fan to a strong and rigid base.
Installation of forced ventilation
In most cases, installing a fan in the gap in the exhaust duct is sufficient for a garage. In this case, do-it-yourself ventilation of an iron garage, the diagram of which is given below, is installed in stages:
- supply channels are cut in one wall;
- Pipes are installed in them, the joints are sealed with sealant;
- an axial fan is mounted on the inside of the exhaust pipe;
- a similar scheme is used in the basement.
Installation of forced ventilation in the garage
When calculating the cross-section of the air duct, standard solutions can be used, since the size of garages is usually standardized to 6 x 4 m. The standards indicate that for every 10 m2 a pipe with a cross-section of 15 cm should be selected. If you cut two holes and install standard 11 cm pipes in them, you will get a significant supply.
When choosing mechanical ventilation, the hood can be mounted on any walls. The diameter of the channel completely coincides with the supply pipe. There are several types of supply and exhaust ventilation:
- modular is mounted from separate blocks, the operation of which is coordinated by sensors;
- monoblock has a recuperator design (pipe in a pipe), the inner pipe is used for exhaust, the supply channel is located between the walls of the pipes.
The latter option allows you to reduce the number of nodes for entering engineering systems through walls; it can be used in a surface garage and underground vegetable storage. For a cellar, a recuperator is especially relevant, since it allows the vents not to be closed during the winter, the cold air is partially heated by the warm air escaping, and the vegetables do not freeze.
Recuperator for cellar
The VSN 01-89 standards recommend two-level ventilation for industrial garages. Car exhaust is heavier than air, so it accumulates in the lower level. Therefore, when the engine is regularly turned on for a long time indoors, it is recommended to install supply ducts and hoods at different heights. In this version, the inspection hole and the hatch of a leaking cellar become areas of increased danger.
Scheme of two-level garage ventilation
Therefore, SK-125S fans (or a similar analogue) are usually chosen for mechanical air exchange systems. For the latest operating conditions, you should select the power of the electrical appliance according to a similar characteristic of the vehicle:
- 800 cubic meters per hour for a 240 liter car. With. (175 kW)
- 650 m 3 /h for machines 180 – 240 l. With. (130 – 175 kW)
- 500 cubic meters for equipment 120 – 180 l. With. (90 – 130 kW)
- 350 m 3 /h for cars up to 120 l. With. (within 90 kW)