Advantages of a vegetable garden located on a slope.
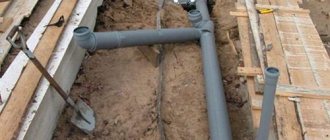
First of all, it is a little easier to organize an irrigation system in such an area. Water does not accumulate on the beds, but rather quickly gets between them. There will be no stagnation of water on the slope. However, it makes sense to drain the area anyway.
The second advantage of such a site is its decorative potential. With the right approach, you can become the owner of a unique estate. Such a site provides an excellent opportunity for the location of waterfalls and alpine slides. Hilly terrain gives scope for the imagination of even a novice landscape designer.
Finally, even capricious heat-loving plants can be grown on a southern slope, since the slope will be well warmed up and illuminated.
We decorate the area. Flower beds on a slope.
A flower garden on a slope will look especially impressive. Planting flower beds is not very different from planting vegetable beds. On a gentle slope, a flower bed can be laid out as if the area was completely flat. However, if the slope is a little steeper, it is worth strengthening the soil with a metal mesh. If the flowerbed is large enough and the area is particularly steep, you need to make a terrace. Its walls can be made simply from boards. In this case, the flowerbed will look especially good.
vertical garden
On a site with a slope, the most noticeable part will, of course, be the top wall or fence. Its design should be given special attention, for example, creating a beautiful vertical garden.
Along the most prominent wall at the top of the site, you can place tall plants in flowerpots or pots. You can also use vertical gardening techniques on the wall itself. Climbing plants such as virgin grape, honeysuckle, common ivy or vici grape are ideal.
How to rationally use an inconvenient area.
Sometimes owners do not know how to properly manage a plot of land on a slope. Only relatively flat pieces of land are used, and the slopes remain uncultivated. In such places, the owners simply sow the lawn, or, in the worst case, the area simply becomes overgrown with weeds. This is an irrational use of land. Slopes often have fairly fertile soil on which vegetables can be planted. Due to the slopes, you can significantly increase the size of your garden.
Depending on the steepness of the slope, the site is divided into three types:
- gentle slope. The slope of the site is no more than 10 degrees;
- slope of medium steepness. The slope of such a section is much greater - from 24 to 28 degrees;
- steep slope. The angle of inclination of such a section is more than 30 degrees.
With a gentle slope, no difficulties arise with planting. You can use such a plot for planting vegetables, or you can try to plant a garden.
Proper arrangement of high beds
The device begins with the preparation of the selected area. The level of fertile soil will have to be raised. Therefore, you need to approach the location from the point of view of convenience, first of all.
Site preparation
The selected area must be cleared of snags, the soil must be dug up and weeds must be selected. Then relatively level the soil level so that the frame becomes level.
Otherwise, when choosing a location, just like in a garden, you need to focus on lighting, absence of drafts and proximity to other plants.
Assembling a frame for a high bed
The height of the frame depends on the height of the bed (it, as a rule, rises above the soil level). Depending on the material, you can install the frame yourself or resort to professional help. The main thing is that the parts of the frame are securely connected to each other.
Installation of the structure
The structure is installed in advance so that the layers with which the frame will be filled have time to compact. Heavy structures (concrete, stone) are installed on the foundation.
Filling the bed
It is best to fill a bed that will be sown in the spring in the fall, but if this is not possible, work should begin in early spring, at least a month before planting.
DIY raised beds: from box to filling
If a summer resident gets tired in the beds, it means he needs to change the beds. The traditional method of gardening with deep digging of the earth, daily watering, treating plants with pesticides and weeding, which then causes back pain, should become a thing of the past, according to adherents of the “smart garden”. By the way, the traditional method of growing vegetables in “bare beds” harms not only the health of summer residents, but also the garden itself: the quality of the land decreases, the yield falls…. Raised beds (also called warm or smart) in which everything grows with minimal human intervention are gaining popularity precisely for these two reasons: they improve the quality of the soil and free the summer resident from hard work.
FORUMHOUSE told how to create smart beds using the method of the famous national agronomist Nikolai Kurdyumov. This article examines other methods tested by members of our portal.
How to make raised beds with your own hands: step-by-step instructions
To make raised beds with your own hands from scratch, step-by-step instructions are provided. The dimensions of raised beds, material (be it cement, wood or particle boards) and appearance may vary, but the same design principle is suitable for absolutely all beds.
Choosing a place for beds
Bulk beds are good because they can be located in any chosen location. It is only important that the plants have enough sunlight (if they are photophilous) or, on the contrary, they are shaded (if direct sunlight is contraindicated).
Small unevenness in the terrain can be smoothed out using the bottom layer - the mesh. Since raised beds are often also decorative, the location should blend into the overall design of the landscape.
Optimal sizes of raised beds
We make high beds so that they are comfortable to work on. This means that the height of the substrate should be such that you do not have to bend over.
Raised beds, dimensions:
- width 90-120 cm, so that plants can be planted in two rows and it is convenient to approach each one;
- layer height – from 15 to 70 cm.
Otherwise, the dimensions depend on the capabilities and desires of the owner of the site.
Layers of raised beds
How to make raised beds:
- A metal mesh that will protect against rodents that like to dig in the soil. Fine mesh can be replaced with thick cardboard or spunbond, but the mesh is much more functional.
- Branches, sawn timber, paper, which will not only act as a drainage layer, but also, when rotting, supply substances beneficial to plants into the soil.
- Shredded bark, sawdust, straw, grass clippings, corn stalks.
- Paper, thin cardboard or burlap.
- Mown grass, leaves, sawdust.
- Wood ash, compost.
- Sod land.
- Fertile soil.
If you think about it, you can find alternative options for how to fill the beds, but you need to try to stick to the basic principles.
Ash instead of chemical treatment
Every year my neighbors spray their cabbage beds with all sorts of chemicals to keep pests away. The smell of these chemicals is such that you can smell it even in my garden.
It would seem that with such treatment of my neighbors’ beds, I have nothing to fear for my cabbage, but the fact is that the neighbors still cannot completely get rid of fleas and butterflies. I solved this problem differently. As soon as the time comes when the pests begin to multiply and appear in huge quantities, after each watering, right on the wet leaves, I sprinkle the cabbage with ash. I repeat: I do this after every watering! My cabbage is all covered in ash. It may look dirty, but it is not damaged by fleas and butterflies, which try to stay away from such foliage.
Come visit my website
prostoisovetik.ru , where there is even more useful and relevant information about ways to make money on the Internet, a garden, a vegetable garden and the most delicious recipes.
Do you think I'm just cleaning it up? Nothing like that: before harvesting, I simply spray the plants with clean water from a hose, all the ash that has stuck over the summer can be easily washed off, and strong, healthy heads of cabbage appear in front of me in all their glory. By the way, the same protection method is used when growing radishes. The result in both cases (and over several years) is always beyond praise!
When is the best time to do it and what to plant?
Bulk beds need to be made in advance, preferably in the fall, so that the layers have time to cake, compress and each perform its function.
The raised soil layer warms up better, so you can plant any crops.
Plant rotation
The first year, with proper organization, promises a good harvest, so you can plant cucumbers, tomatoes, sweet peppers, zucchini, pumpkins, cabbage and other vegetable crops. Next year it is recommended to sow the beds with greens and herbs. And after another year, renew the top fertile layer and plant vegetables again.
High bed for strawberries
Strawberries have a root system located in the top layer of soil, so the fertile layer can be made small (15 cm). Cover the top of the bed with a dark film, make holes in it and plant strawberries. It is recommended to cover the plantings with spruce branches for the winter.
High bed for cucumbers and tomatoes
The principle of organization is the same as in other cases, but in the corners or on the side walls of the frame you need to attach bars and pull wire (string) to support the tendrils and creeping sprouts.
Using spandbond (agrofilm) for beds
Agrofilm is used as a covering material, stretched over arcs to prevent contact with plants. During watering, the film is removed.
Spandbond is more convenient and durable than polyethylene, its service life is 5-7 years.
Flat slate
The only thing: this material is called fragile, and beds made from it require careful handling (although many gardeners say that thick slate can withstand up to 50 freeze-thaw cycles). Another point that may confuse you is that working with slate is not so easy; you will have to drill bolts for corner and connecting fasteners.
It’s easier to make a box from DSP than from slate, “I screw it with screws through the fasteners and that’s it.” If you make 20-24mm CPS, such beds will last for many seasons, perhaps they will last for your entire vegetable growing career. They are also environmentally friendly, durable, and can be moved from place to place if necessary. It is better to tighten the beds at the joints of the sheets at the joints - without ties, the box may simply not withstand when it is filled with garden “garbage”.
Lime is suitable for the role of an antiseptic in terms of the fact that it has an alkaline reaction, and putrefactive processes, coupled with various fungi, occur in an acidic environment. As if everything couldn’t be simpler.
We create high beds on the slope.
With some skill, raised beds can be created anywhere. To install them, you first need to clear the area. You can strengthen the soil, but you should not terrace the entire area. Raised beds themselves form steps that strengthen the soil. The sides are made of wood. For additional fixation in the soil, their legs are properly buried. It doesn’t hurt to put a fine mesh at the bottom of such a bed to protect it from moles. The height of the bed is chosen depending on the fertility of the site. If the soil in the garden bed is good enough, a bed with a side of 20-25 cm will suffice. However, if the soil is not fertile, you will have to build a compost bed. Its height can reach 50 cm. Do not make the bed too wide. The best option is a two-row bed. On a slope it is much more convenient to place several narrow beds than one large one.
There is no point in giving up, even if the garden is not located in the most convenient place. If desired, even such a plot can be turned into the dream of any gardener.
DIY beds on a slope
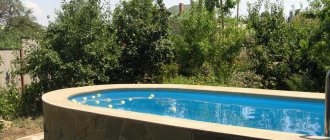
My dacha has a difficult terrain: in some places the slope reaches 30°. After many attempts to improve the site, I finally managed to find a successful solution, and for twenty years now we have been reliably served by comfortable bench beds that do not require any maintenance. (some, for example here, even manage to make a swimming pool on the slope)
Agree, when working in the country, you often have a desire to sit comfortably, relax, and admire nature. Carrying a folding chair behind you is inconvenient for this purpose.
And here - please, you not only relax where you work, but also work while sitting in comfort. You will appreciate the convenience of such a bed when you dig up the soil in it or water the plants: the slate walls prevent the soil from crumbling and water from draining when watering.
In addition to the listed advantages, there is one more thing - the low cost of its arrangement. Judge for yourself: you will need several small pieces of unnecessary pipes with a diameter of at least 5 cm, from 4 to 6 boards (depending on the length of the bed),
TOOLS FOR HOME AND GARDEN, HANDCRAFTS, ETC. PRICES VERY LOW
a few pieces of old slate and a few self-tapping screws. And the time required to construct them is nothing - 1-2 hours, provided that the building material has already been prepared. By the way, I have more than 20 such beds.
The operating procedure is as follows. First, you calculate the geometry of the bed: determine the line of convergence of the ground level plane in it with the topography of the slope and mark it directly on the ground.
Then, using a board, the length of which is equal to the width of the bed, mark the places for driving in metal pipes, for which one end is aligned with the line of convergence of the soil planes (it should be as close as possible to horizontal so that when watering the water spreads evenly over the bed), and on Place a plumb line at the other end.
After this, use a level to install the board horizontally, and the plumb line will show you the point on the installation line of the support pipes. Having marked 2-3 more points in this way, you can mark the line itself on the ground. All that remains is to determine where you want to place the ends of the bed, and you can begin driving the pipes into the ground.
When choosing their length, you need to remember the golden rule: the deeper the pipe is driven in, the greater the resistance of the bed wall (including to freezing of the soil).
Therefore, the length of the pipe must be equal to the height of the façade wall plus the depth of the depth, which depends on the height of the bed and the properties of the soil, but must not be less than the height of the bed itself.
And you can determine it using the same board and level. When marking the driving points, take into account the pitch of the slate wave so that the pipes fall into the recesses when installing it. The pipes should be driven in 10-15 cm above the height of the bed.
They are driven in to a level 10-15 cm higher than the height of the bed. Next, wooden plugs are inserted into them, and in the process of hammering them into the pipe, the latter deepens until its upper edge of the plug reaches the height of the bed.
Now you can begin assembling the bench frame.
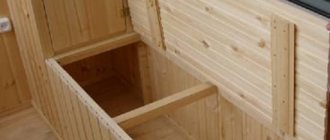
In Fig. 1 you can see that the boards are connected to each other in the form of the letter G. In other words, the façade board of the frame is vertically attached to the board on which you will sit, from below and to the edge.
This is done using self-tapping screws screwed into pre-drilled holes in the top board. Connecting with nails did not pay off - when the boards dry out, the nails come out and the frame warps. In Fig. 2 you can see how the boards are connected at the corners.
If their length is not enough for the bed, then the joints of the horizontal and vertical parts must be placed as far apart as possible, and the outer edges of the joints must be fixed to each other using self-tapping screws with a piece of picket fence, a metal plate or a corner. Then, when drying, they will not diverge.
The frame assembled in this way is installed on driven supports. Next, holes for self-tapping screws are marked on the boards above the plugs in the pipes and the frame is screwed to the supports. The final adjustment of the horizontalness of the bed is made by striking the frame at the points where it is attached to the supports.
This must be done carefully, placing a piece of wood so that the frame boards do not burst.
Now you can lay pieces of slate pre-cut to size using a grinder. They are lowered into a pre-dug groove along the line of installation of the supports (a depth of half a shovel bayonet is quite sufficient).
And their top must rest against the board of the bench (achieve this by changing the depth of the groove). After installing the slate, fill the groove with soil and compact it. All! You can sit on the edge of the bed-bench and make sure that it is strong, reliable and comfortable.
Now all that remains is to fill the bed with soil, while observing an important rule: the soil should not reach the horizontal boards by at least 5 cm, otherwise they will begin to rot.
Beds on a sloped plot - drawings
Author: P.G.Razomasov. Krasnoyarsk
TOOLS FOR CRAFTSMAN AND CRAFTSMAN, AND HOUSEHOLD GOODS VERY CHEAP. FREE SHIPPING. RECOMMENDED - 100% CHECKED WITH REVIEWS.
Below are other entries on the topic “How to do it yourself - for a homeowner!”
Subscribe to updates in our groups.
Let's be friends!
Reviews and comments: 5
Many of our beds are located on sloped areas. To prevent everything valuable from being washed out of the soil, we figured out how to properly cut the beds. So, on the slopes it is necessary to cut the ridges across, then the fertile layer is less eroded and precipitation is well absorbed. We make the furrows across in exactly the same way.
DIY herb beds in the garden My garden is located on a slope, and washing away the fertile layer with rain and melt water is an eternal problem. And the spring moisture quickly goes down. I turned to the experience of field farmers in the steppe regions, where they take moisture conservation and protect the soil from erosion seriously. After harvesting the field, a stubble harvester creates ridges - these are transverse windrows made of straw, stubble and so-called crop residues. They do not allow either wind or flowing water to roam the field, retain snow, absorb melt water, and by spring they themselves almost completely rot and turn into fertilizer. But I have a garden, not a field! There is no straw or stubble on it, and potato, tomato and other tops cannot be left on the beds, so that they do not become a source of disease. Therefore, all summer long I accumulate grass in stacks from mowing turf areas. There is no need to dry it for hay: if it is slightly rotten, that’s even better. I remove all garden residues, cultivate the soil, and apply autumn fertilizers. Then I lay rolls of rotted grass mixed with fallen leaves (from healthy garden trees) across the slope, 1.5-2 m apart. In the spring, I form the garden so that the remains of organic matter are buried at the base of the beds. There they will rot completely over the summer.
If the soil is light and loose, you can also carry out slotting: dig a narrow but deep (30 cm) groove in front of the ridge. Melted moisture from the snow retained by the ridge will flow into the gap and be distributed in the deep layers of the soil. But on my loams there is no great effect from this measure.
Plot on a slope - We got a plot with a fairly strong slope from north to south. On the one hand, this is a big advantage in our cool regions: it is this slope that is best warmed by the sun. But there is also a drawback. In spring and autumn, fertile soil from the upper and middle parts of the site is carried down by water flows. In summer, when watering, water flows down. We were advised to cut furrows and place the beds across the slope. Then the ridges and rows of plants will prevent soil from being washed away. But our soil is heavy, clayey, and during the rainy season the water stagnates at the ridges. Then we began to make the beds shorter and arrange them in a checkerboard pattern. This way the soil is not washed away, but excess water leaves. Across the beds in several places they installed cuttings on the edge until the ground was covered! juice. They retain water and fertilizer solutions. These same boards serve as convenient markers, separating different plant varieties. A pond was dug with an excavator in the lower part of the site. The water collected in it is enough to water the garden for the entire season. The biomass that we clean out of the pond every year serves as a good fertilizer for the garden. The garden also grows on a slope, so we leave the tree trunks covered with turf - this avoids the removal of soil from under the trees. Wherever possible, we leave grass to grow. It holds the soil well, and in order for the site to always have a neat appearance, it is enough to mow it from time to time. And for reliability, they also installed support walls in some places.
Sloping beds It’s good when you have a flat area, like a dining table, for your garden. And I have a dacha on the slope of a hill. The house was somehow built, trees were planted, but we didn’t even dream about harvesting vegetables. Water it, don’t water it, all the water flows down the slope... The idea of how to solve this problem was born when I saw terraces on TV in a mountainous country. And taking into account the fact that with age it becomes more and more difficult to work in the beds at an angle, I equipped each bed with a bench. I started by marking the ridges. I measured their width along the bottom edge and cut out corresponding sheets of slate. I took a metal pipe and cut it into equal parts. I installed slate vertically along the bottom edge of the bed and secured them with two pieces of pipe, digging them along the edges of the sheet. I drove a plug into the upper holes of the pipes and secured the board horizontally with self-tapping screws. This is how the bench turned out. To prevent the board from cracking and warping from rain and sun, I covered it with a special impregnation. I added soil and leveled the bed. I advise you to make the beds small, no more than 80 cm wide, so that it is convenient to work them while sitting.
I always wanted everything on my site to be beautiful and neat. And it doesn’t matter at all what is planted - petunia seedlings or carrot seeds. The main thing is to have neat beds with even rows of seedlings. To make the beds look exactly like this, this is what we came up with. Initially, we prepare the area for the garden bed. Its size is determined arbitrarily. To ensure that the length and width are even, we use two pegs and twine. Next, we level the area and make small sides so that water does not flow into the rows when watering. And then the most interesting thing - in order to sow at the same depth and at an equal distance between the rows, we use two boards. One is wide - 30 cm. The second is narrow and thin, with a pointed end. With the help of the first I move around the bed, and I use the second to make furrows for sowing. When the area for the garden bed is ready, I place a wide board, stepping back a couple of centimeters from the edge, and using a thin board, as if “driving” to the right, I make a shallow (1-1.5 cm) furrow. I first pour the seeds for sowing into a convenient plastic jar. In another jar I pour a remedy to combat the mole cricket (ready-made granules), since it also activates very quickly and can cause damage to the seedlings. I place seeds and granules into the resulting furrow, carefully level the soil with my hand and move the wide board so that its edge rests on the sown row. Next, I stand on the board, and under my weight the groove is compacted, and I make a new groove on the other side of the board and make a new sowing. Then I level the ground again and move the board, exactly covering the sown furrow. With this method of sowing, you can easily adjust the depth of planting the seeds (depending on their size), the soil is perfectly compacted, and the rows are even, with the same distance. After sowing, the bed looks beautiful and tidy, and the seedlings appear in even rows. At first glance, it may seem that fussing with boards requires additional effort, but in practice everything is very quick and simple.
Where to start working on a site with a slope
The first thing to start with is to survey the area. During the examination, specialists will reveal:
You can determine the groundwater level yourself quite accurately if you pay attention to the plants that populate your area. If horse sorrel, marigold, sedge, nettle, cattail, and foxglove grow well on it, then this indicates a high level of groundwater - no more than 2.5-3 m. If they are located at greater depths, then wormwood, clover, licorice and plantain will grow on your estate (land).
When you have a complete picture of what the land you have received is like, you can begin directly to work on the site.
Features of planting a garden on a slope.
If you really want to, you can even plant a garden on the slope. On gentle slopes and moderately steep slopes there are no special tricks when planting. It is enough just to choose trees with a powerful and branched root system. Apple tree, viburnum, rowan are suitable. Of course, you need to be careful when choosing a variety - different varieties of the same species can form different types of root systems. It will also be useful to add shrubs: raspberries, rose hips and others.
But if the slope is very steep, it is necessary to create a system of terraces on it. To strengthen them you need to use brick and concrete. Wood and slate, which are so well suited for beds, will certainly be broken by tree roots. That is why the walls of terrace steps need to be made as strong as possible.
Paths on a site with a slope
There is no way to do without paths in a garden with complex terrain. They serve as the connecting link of all zones located on the site.
The width of the path is usually 1.2 m - this is exactly what two adults need to comfortably walk around the garden. If you are counting on a group of people, then the width should be increased to 1.5-2.4 m. For a path along which one person will move, 95 cm is enough.
Paths are made from a wide variety of materials. The most in demand are concrete, tiles, stone and brick. Gravel, mulch and wood are also used for these purposes, which are pre-treated to extend its service life.
Not straight, but winding paths will look most harmonious. They look very natural among trees and bushes, creating a natural landscape.
As you can see, there are a lot of options for arranging a site that is located on a slope. All you have to do is choose the one you like and get to work.
↑ Construction for a high bed made of cinder block
There are many benefits to cinder block beds. That’s why they become more and more popular every year among gardeners and gardeners:
- The cinder block frame is assembled very quickly.
- Such beds will serve for a very long time. The frame will not require additional care.
- Cinder blocks do not heat up in the sun, the material is environmentally friendly and resistant to climatic conditions.
- If the need arises, such a bed can be easily and quickly disassembled.
- To erect the structure you need a minimum amount of building materials and tools.
- A cinder block bed can be easily converted into a greenhouse or greenhouse.
- You can assemble such a structure yourself, even without experience in laying cinder blocks.
- There is no need to make a concrete foundation. Due to the large mass of the blocks, the structure is quite stable.
The disadvantage of high cinder block beds is the large weight of one cinder block. For example, for a high bed 310x120x57 cm, the weight of cinder blocks will be about 600 kg.
Before building a bed, you need to take into account the material requirements:
- use expanded clay concrete (for walls) or ventilation double-hollow cinder block (40%) to build a bed;
- the blocks use the same parameters and have straight sides;
- block weight – 10 kg, dimensions: cinder block height 18.8 cm, width 19 cm, length 39 cm.
Depending on the required height and width of the bed, the required number of cinder blocks is calculated. Experienced gardeners (who have already tested a cinder block bed at work) recommend the following dimensions: height - 57 cm, width - 1.2 meters, length - 3.1 meters.
With these parameters, three rows of 20 blocks are laid. For such a ridge you will need only 60 cinder blocks. From additional material, you need to purchase 20 meters of reinforcing rod A1 12 mm. When purchasing, they ask to cut the reinforcement into meter-long pieces.
If the cinder block ridge consists of one or two rows, then the use of reinforcement is not necessary. The stability of the ridge will be achieved due to the own weight of the blocks.
Step-by-step construction of a cinder block ridge:
- The area where the garden bed will be built is cleared of vegetation. Level it out. A cord is pulled along the outer edges of the future ridge.
- Laying cinder blocks begins directly on the ground from one of the corners. The building level controls the horizontal surface being constructed.
- Next, cinder blocks are laid lengthwise perpendicular to the width of the ridge. Using a construction angle, set the angle of the bed to 90 degrees (straight).
- Laying out the first row will take more time than laying out the remaining one or two rows. When the first row is not laid evenly, gaps will appear between the cinder blocks.
- After laying the first row, a reinforcing rod is driven into the ground from the inside of each cinder block. This will give the structure stability. The rod should be placed closer to the inner edge. Then, after filling the soil, its pressure will not allow the cinder block to move.
- The second row overlaps the first row. This will increase the stability of the structure.
- After laying out two rows, geotextiles are laid on the bottom of the bed. The edges of the material are folded up to the second row. Then the last row of cinder blocks is laid on top.
- After this, compressed straw is placed into the erected cinder block structure. Its layer to the top edge should not reach 30 centimeters (the thickness of the straw layer depends on the crops that are planned to be grown).
The last layer is filled with fertile soil or leaf compost. The “filling” of the ridge is watered abundantly and allowed to settle for 3-5 days. After this, you can start sowing seeds or planting vegetables.
If the need arises, plastic pipes or fittings are inserted into the edges of the cinder block bed and a greenhouse is created without much effort.
Such a cinder block high ridge will last a long time. If necessary, it will take 10 to 15 minutes to move it to another place or remove it.
Raised beds have disadvantages. But they allow you to occupy the maximum area of the garden plot. And grow vegetable crops even in conditions where the soil is completely unsuitable for farming. You can build a frame for beds from a variety of materials, and the process of filling the beds is not particularly complicated.
Stream and waterfall
If your site has a slope, this is an excellent opportunity to create an artificial stream or waterfall. To do this, you won’t have to build an embankment or worry about water drainage; everything will happen naturally. A water cascade can also decorate a retaining wall supporting one of the terraces.
The slope is already there, all that remains is to take care of the bed of the future stream and think about where exactly your future river will flow
A cascading stream on a slope, surrounded by lush juniper thickets, looks very natural, it seems created by nature itself
Idea for a summer cottage: beds on a slope
Wooden beds on a slope
The landscape of a site, and in particular the presence of a slope, is not always ideal for a vegetable garden. But there is a way out, look at examples of how to make beds on a slope and take the experience into account.
Many people around the world face the problem of slopes in the garden and successfully solve these problems. Moreover, the slopes are arranged in such a way that they become a decoration of the summer cottage.
If you also have such a task, study the following homemade projects and repeat in your own way. First, you need to note that the slope should not be extended because On a smaller scale, projects turn out better, but for larger areas there are other recipes.
And secondly, of course, stone has been used for the construction of terraces for a long time in different civilizations, and this is justified because the tree deteriorates faster. Without treatment with special antiseptics, the beds on the slope will have to be repaired in a couple of years.
However, if we consider that wood is the most accessible material for country craftsmen and is quite cheap, then first of all we will pay attention to it.
— Let's start with an excellent example of arranging beds on a slope: Everything is made of 20*200 boards, which, if necessary, can be replaced with two smaller boards, for example from the same pallets. Dimensions allow the use of short boards.
As a result of construction, we get separate beds with easy access to each and a ladder for climbing the slope, plus separate stands for flowerpots. If desired, a children's slide can also be built into the same structure, as in the photo.
Of course, a lot depends on the size of the slope, the area and configuration of the slope.
It happens that it does not have the correct shape, as for example in the following example where the rise is in the corner of the site, the fence meets there: But as you can see, this problem was successfully solved by the gardeners - they made an inclined terrace with a wall and a central staircase made of wooden beams.
In any case, each slope must be considered separately, taking into account the specific landscape. Before starting construction, you should answer the questions: what kind of soil do you have, are there trees and boulders on the site, how are things going during the rainy season, and finally whether you can handle it yourself or whether you need to consult with knowledgeable people and possibly hire a professional. This needs to be done at least so that the result of the work pleases you and you get beautiful, stable beds on a slope.
As a bad example, I will give the following photo: It can be seen that the home-made workers did not very successfully use the gun carriage and tiles to build beds on a slope.
They did not take into account the characteristics of the soil - which turned out to be loose. It can be seen that the fences made from it are not made of a continuous frame; as a result, the soil crumbles and the beams slide. Neither powerful pillars, nor additional reinforcement supports, nor slabs helped. In general, an example of poor planning when constructing sloping beds is evident.
On such a site, a continuous stone terrace like this would be ideal:
But we are talking about accessible wood, so in this case, a structure like this with a solid frame made of boards would be suitable: It will not move apart and will hold loose soil.
Or this, more effective combination of logs and slabs - a solid stone staircase and high wooden fences will be more effective here: And it is better to “sod” the crumbling sections of the slope
I hope these ideas will help you create the perfect beds on a slope at your dacha. Good luck in terrace farming!