Features of the material
The advantages of using plywood sheets include:
- Good environmental performance. Plywood is a natural material that is safe for others.
- Possibility of pre-impregnation of plywood with antiseptic and moisture-resistant solutions. This approach will protect the product from moisture and pests.
- Ease of operation. Creating crafts requires only minimal skills from the master to work with tools.
Photos of plywood crafts presented in magazines or web resources can help you decide on a model. There you can also find ready-made drawings, diagrams and detailed descriptions of the work process.
Materials and tools for work
First of all, the master should take care of the proper organization of his workplace, sufficient lighting and rational arrangement of all small parts, fasteners, and tools.
The room for making crafts must be equipped with high-quality ventilation, which will provide sufficient air flow while working with paints and varnishes.
You will also need the following set of tools:
- Jigsaw.
- Files.
- Sandpaper.
- Construction pencil and tape measure.
- Acrylic varnish, stain, decorative paints.
- Fasteners (screws, self-tapping screws, nails, metal corners).
Wood glue can be used. You should prepare drawings of future plywood crafts, photos, and video instructions for carrying out independent work.
Tools and additional materials
To create original crafts, you may need the following materials and auxiliary kits:
- Electric file.
- Compasses and construction pencil.
- Ruler, pattern.
- Sharp knife.
- Sanding paper.
- Materials for painting the product.
- Solutions for pre-treatment of plywood sheets.
- Decorative elements (at the request of the master).
In the world of modern handicrafts, it is increasingly common to create structures from a combination of various types of materials: plywood and fabric flaps, metal structures.
Step-by-step making of crafts
Despite the huge range of finished products, their shapes, sizes and textures, all stages of creating crafts are similar to each other. The whole process can be divided into stages:
- Preparation of the drawing.
- Cutting out parts.
- Polishing and pre-processing of the product.
- Decorating crafts.
Each stage is carried out consistently and carefully, because it is necessary to avoid injuries, cuts, and rapid damage to the craft.
Preparation of the drawing
Drawings of almost any plywood craft can be found in the public domain. However, if desired, the master can make them himself. The diagram must reflect:
- The size of the future figure.
- The thickness of the plywood sheet.
- Basic and additional details.
- Mounting diagram (if provided for in this model).
The drawing reflects the entire sequence of actions of the master, and helps to create the product accurately, without errors.
Interesting piggy bank made of plywood
There are different piggy banks, but we present to your attention an unusual one - a piggy bank for banknotes. If you are saving for your own home, then such a symbolic and beautiful copy will not only hold the required amount of money, but will also remind you of the goal and will certainly motivate its achievement.
Thus, you can make a smaller, exact copy of the house project you dream of with your own hands or to order and literally start investing money in it. Isn't that an interesting idea!?
Cutting out parts
On a sheet of plywood, according to the drawing, the main and additional elements of the future craft are first drawn. The work uses a compass, a construction pencil, a ruler or a pattern to depict curly lines. Follow the instructions below:
We recommend reading:
- Crafts from plasticine: the best master class for children at school or kindergarten. 90 photos of the best ideas for creating plasticine figures
- Felt crafts - the best patterns and templates. Step-by-step instructions and master class for beginners (130 photo ideas)
- DIY crafts from egg trays - the best step-by-step master class, with description. TOP 100 photos of original ideas for crafts
- The plywood sheet is firmly fixed.
- The parts of the craft are cut out of plywood using a jigsaw.
- In hard-to-reach places, use a sharp knife or file.
The work should be carried out carefully, trying not to damage the working surface and not to cut off the edges of the parts.
Crafts made from plywood - “plasticine” for skillful hands and rich imagination
In modern interiors, natural materials that fit perfectly into trendy eco-styles are becoming increasingly common. Until recently, wood was the undisputed leader among them, but today it is being actively replaced by plywood, which has become the favorite material of designers. It is easier to work with it, giving it any desired shape, and some simplicity can be compensated by originality. You can learn how to choose a material from the article on cutting out of plywood, and in this collection there are some interesting ideas for those who like to make something useful.
Versatile storage system
The base is a sheet of plywood, rectangular in the example, but the shape can be whatever you want. If you are making it for a nursery, you should choose something themed. You can change not only the shape of the base, but also the number and location of shelves and hooks.
Through holes are drilled into the base, into which wooden pins are inserted, shelves are placed on them, and they are also used as hooks. The following elements were used in the original version:
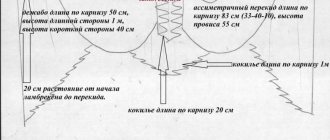
- Plywood sheet 110×65 cm, thickness 2 cm.
- Round wooden pins, 16 cm long.
- The board is 1.5 m long, 14 cm wide.
The fastening holes in the sheet are placed symmetrically, the distance from any edge is 10 cm, between the holes is 15 cm, resulting in 7 rows of 4 fasteners. The diameter of the holes depends on the thickness of the selected shaft minus a millimeter, so that the pin fits more tightly and does not start to “walk” when humidity fluctuates. The holes are drilled according to pencil markings, the edges are sanded, and the edges of the pins are also sanded after cutting. The fasteners are inserted into the holes 2 cm so as not to protrude beyond the base. The board is cut into three parts - 2 55 cm long and the remaining length is 40 cm, the edges are sanded.
Depending on the intended content, the shelves can be fixed to the base and fasteners with wood glue, but then they will be static. Or you can simply install and change the location of shelves and hooks as desired.
Stand/paper holder
From waste plywood you can assemble an original holder for various receipts, papers and a couple of pencils or pens so that you always have them at hand. The decorative effect of this organizer is ensured by the curved shape of the elements, and its manufacture requires a simple set of tools and a certain sequence of actions.
Preparation
Since the organizer does not require special strength, thin scraps (4 mm) of any type of plywood, rectangular in shape, are suitable. The dimensions of the blanks are arbitrary, a small variation in size is acceptable; the author of the craft has rectangles with a side within 20 cm. The number of blanks is also not critical; in the presented version there are 16 of them. To remove roughness and develop the design, the workpieces are cleaned on both sides with a grinder (P 120).
Molding
To bend plywood quickly and without problems, it needs to be steamed, and the best option is a “water bath”. If you don’t have a special device, a pan of boiling water is suitable; place a colander in it, place the workpieces on its edge and cover with a lid. On average, plywood begins to bend well after 4 minutes of steaming; if it does not bend, the time is increased. Since the sheets will be hot, do not handle them with your hands. The pieces are removed from the steamer one at a time so that they do not have time to cool before processing.
Bend the workpieces with your hands, taking dry rags from both ends, gently squeezing until an arc is formed. The radius, like the size, may not coincide exactly; more or less identical blanks, curved more than others, are needed for the edges; for the middle part, a very slight bend is enough. When the arc is formed, the workpiece must be held in one position for several minutes so that it cools a little and is fixed in a new shape; after formation, all elements must cool completely.
Assembly
When assembling, the most bent pieces are left for the edges; straighter blanks are placed in the middle until a stack is formed.
To drill holes for fasteners, clamp the stack in clamps and drill two holes along the edges.
Two metal threaded studs, lock nuts and washers are used as fasteners. Nuts are screwed onto the studs, washers are put on, the first sheet is strung, two washers on top and the next sheet, the last sheet is secured with a washer and a nut. To evenly clamp the stack, the washers are tightened on both sides at once (with wrenches or adjustable wrenches).
If necessary, the remaining rods are cut off. Bottom holes for writing instruments are drilled in the fixed stack.
To make the organizer more decorative, the blanks can be coated with clear or tinted varnish before assembling.
Painting/Lamp
Curly cutting on plywood will no longer surprise anyone, which is greatly facilitated by a large selection of jigsaws. But if you use not a jigsaw, but a drill and drill bits of different diameters, and even lighting, you will get a real exclusive: during the day - an unusual picture, and at night - an original lamp.
Required:
- Sheet of plywood.
- Drill.
- Drills (4 pieces, diameter can be reduced in 3 sizes).
- Sample.
- Varnish.
- Backlight.
If you don’t have artistic talent, the easiest way is to print the picture you like on a printer in black and white. The template is attached to the plywood with tape so that it does not move.
The outline of the design is drilled according to the template, large parts with a thick drill, and drawing with a thin one. It is easier to drill if you place a beam under the plywood on both sides. The template is removed, the holes are cleaned with an awl (toothpick, paper clip), the pattern is carefully sanded with fine sandpaper.
After sanding, the painting is coated with wood varnish in several layers or impregnated with another protective and decorative composition.
If you stick an LED strip on the back edge, at night the picture will turn into a lamp.
Original coffee tables and universal tables with a unique fastening system are also made from plywood. And with minimal modification it turns into modular furniture.
Sanding and pre-treatment
The edges of the cuts are carefully cut down and sanded using sandpaper. This process is very important for plywood crafts for kindergarten - sharp and jagged edges can damage the baby’s skin.
Also, great attention is paid to pre-processing of the workpiece, which includes:
- Impregnation with antipyretic and antiseptic. This procedure will help prevent the fire of the craft and ensure its safety.
- Treatment with antifungal solutions.
- Treatment with moisture-resistant preparations.
After drying the blanks, you can begin assembling the product and decorating it.
Tree 4 seasons
The work is aimed at the development of children. By collecting everything according to the instructions, you can easily help your heir understand the quirks of our world, understand what time of year it is now, and what will happen tomorrow.
Read here: Crafts from foam plastic: a master class on making, a review of original crafts and the best options for creating jewelry (70 photo ideas)
- Draw a tree template for the product in the amount of 2 pieces
- Cutting out a circle for the stand
- We carefully polish the parts
- Make a cut on one template from above, on the other from below
- Connect the parts crosswise and secure them to a round stand using self-tapping screws.
Each side symbolizes the season; we need to creatively decorate our tree with small details. The first side is summer, we glue butterflies, green leaves, sun, apples. The second is autumn, orange and red leaves, pumpkins, birds. Third winter - white snowflakes, cotton wool snow, snow woman. Fourth spring – we attach flowers, bugs, birds.
Make all the details with felt, paper, and decorative figures. It is better to attach it with double-sided tape. The result is very interesting designs for your garden plot.
- Interesting curly images
- Flower beds
- Newspaper collections
- House for tits
- A variety of fun fences
I like to update my garden with different figures made from practical wood. I take the moisture-resistant option and go!
The product must be treated with special paint or a moisture-repellent agent, otherwise you won’t be able to admire its beauty for a long time. Environmental influences are doing their job...
Here is a simple master class on crafts made from plywood.
For some reason, this unusual type of decorating one’s garden has become undeservedly forgotten. YOU will become the unique owner of a fairy-tale courtyard, for example, by decorating a small fantastic corner using this method.
Assembly and decoration
Lighter plywood crafts can be painted right away, but complex ones need to be assembled.
You can use strong glue to attach small parts. For house models or complex structures, you will need to use screws - they are safer than nails.
Decoration of finished products includes the following options:
We recommend reading:
DIY crafts from Kinder surprise eggs - 125 photos of exclusive options with step-by-step instructions, master class and videoCrafts made from twine - an overview of original design solutions. More than 100 photos of new products + step-by-step instructions for creating crafts with your own hands
- DIY crafts from candy wrappers: 150 photos of the best ideas from craftswomen. Simple instructions, master class, diagrams and video tutorials on creating crafts from candy wrappers
- Painting.
- Applying a transparent varnish that will create a glossy surface for the product.
- Decoration with beads, ribbons, beads.
Also used is the application of a decorative border and the creation of sides.
Plywood stands
This is one of the few things that you can cut out yourself using a jigsaw from a small piece of plywood. Stands are designed to make a person's life more convenient. For example, a laptop stand made of plywood, like the one below in the first photo. It can not only bring comfort, but also maintain health, because with its help you can work in different positions, not only sitting, but lying down and even standing.
And the option in the second photo will not only make working on a laptop comfortable, but will also protect the device from overheating.
These things won't cost much if you do them yourself. After all, plywood doesn’t cost a lot of money.
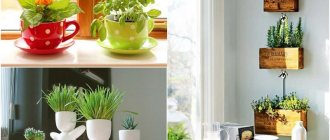
But a stand for bowls will make the life of pets comfortable. The simple design and availability of the material allows everything to be implemented very quickly.
For children, you can make such a creative stand for pens and pencils from plywood. The product is so original that the child is unlikely to notice what it is made of.
And so that your phone, keys, charger and other small things are not scattered throughout the house, this thing made of plywood will help maintain order. When everything has a specific place, it is always easier and faster to find the right thing.
As you can see, there is a lot that can be made from plywood scraps for your home. And here is the next confirmation - adults will already appreciate this wooden gift. The bottle holder is made from very narrow pieces of plywood, but it still looks stylish.
Therefore, if even narrow pieces remain, do not throw them away, it’s worth imagining with them, maybe you will be able to come up with something original. Even if you have everything, you can always make things out of plywood for sale, because today Hand-Made products are in demand and highly valued.
Alphabet letters for learning
Bright and light letters are perfect for an educational game. You can use both Russian alphabet layouts and templates for foreign languages. They are made in one piece and no further fastening is required.
It is recommended to paint items in contrasting colors to stimulate the baby's visual memory.
Christmas tree decoration
The working material is very light, so a Christmas tree craft made from plywood is perfect for decorating a festive interior.
The toys are made bright, varnished to add shine, and also decorated with an abundance of beads and rhinestones. Finish the work by making a hook or loop on the back of the toy.
DIY holiday crafts
A large selection of New Year's crafts can be made from plywood:
- A Christmas tree craft made from plywood that can be installed on a table, mantelpiece, or window sill. To create a festive tree you will need one template, two blanks of the same size. The parts are attached using dowels or strong glue, and then painted green (you can use acrylic paint and transparent glue).
- An original souvenir in the shape of a boot.
- Snowflakes made of plywood will decorate the front door.
Young parents can give their children a holiday feeling by cutting out several deer and a Santa Claus figurine from plywood. Bright colors and acrylic varnish will complement the cheerful look.
Figures for a summer cottage
In this model, great attention is paid to the pre-processing of the material, because garden figures can get caught in heavy rain. Careful processing will significantly extend the life of the product.
Most often they create swan figures, three-dimensional fairy-tale characters for children's playgrounds, or decorative figures for flower palisades.
We recommend reading:
- Crafts flowers - 125 photos of the best ideas from craftswomen. Instructions on how to make it yourself from A to Z. Simple and complex options for crafts + video tutorial
- DIY crafts: TOP-200 photos of the best ideas. Schemes, master classes, modern design, new products, instructions with descriptions
Crafts from plaster - 120 photos of the best ideas for creating original crafts with your own hands. Master class for beginners with examples and video lessons
Working with plywood is quite easy; all that is required is the precision and creativity of the craftsman.
Painted furniture
If you think that even a skillfully carved plywood ornament is not aesthetically pleasing enough for your home. Or you need bright furniture for the nursery, you can always use paint. And then the faceless plywood furniture is transformed, as if by magic. This way you can add the missing colors to the interior. Agree, such creative freedom when decorating your own home with your own hands is quite a valuable “option”.
Photos of plywood crafts
Did you like the article?
1+