This article and video are about what features are typical for the installation of in-floor water heating convectors. By installing such heating equipment in the floor, we improve the design of the room, get more efficient air mixing, and also get rid of understandable restrictions on the placement of furniture in the room. The placement of such products under the windows contributes to the formation of a full-fledged thermal curtain, which will prevent the windows from sweating and freezing.
Important tricks for installing convectors
So, the connections must be in the convector box. Let's look at all the nuances using the example of installing in-floor water heating convectors for a stained glass window with a large aluminum door. It is best when the convector is placed in a niche. The window has a sash, and ideally it is necessary to install the convector inside this sash. The trick is to ensure that the window curtains do not obscure the equipment . It is important that the distance at which the convector is mounted is no more than 300 mm. If the water convector does not go inside, you can try to move it behind the sash, but keep in mind that the window will also have to be moved so as not to exceed the 300 mm mentioned above. Convectors are placed exactly in a row so that they are at the same level - relative to the window, horizontally and vertically.
General information
Device
For connection, the inputs located on the convector come in handy. They are placed on the same level as the finishing coating. Case height from 50 to 150 mm depending on the power of the device. You can install electric ones if there is no possibility of connecting a coolant.
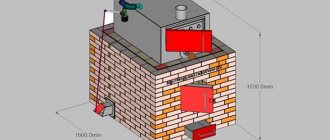
In its final form, the convector looks like a metal box 1.5-2 meters long. The appearance of the housing may differ whether it is a floor-standing or a built-in convector. The heat exchanger consists of aluminum plates, which are fixed to a plastic pipe, inside of which there is a coolant. It is often found that ventilation is built into the heat exchanger, which allows the room to be heated better and prevents cold air from spreading.
The body of the floor-mounted convector is highly durable and protected from corrosion. And the floor ones have an aesthetically beautiful appearance; they have many colors and types of gratings. For any design and interior.
Heat exchanger
A heat exchanger is located almost over the entire area of the housing. For convectors that are connected to the heating system, it looks like a coil made of copper or aluminum with transverse plates. For electric convectors, this is a heating element, which also has metal plates.
A tube at the ends with fittings for connection to the heating system using flexible hoses. The advantage is that it is possible to connect to an automatic system for maintaining and adjusting a certain temperature. But electricity bills will be significantly higher than with water heated floors.
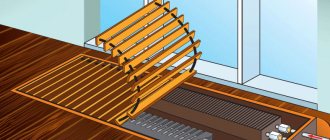
Grille and additional options
A grille is built in above the convector; they can be made of plastic, metal, wood, etc. Its appearance depends only on your wishes and the appearance of the room. It will not interfere with the movement of people, and at the same time will perfectly complement the warm air.
They may include thermostat sensors that require the building to be heated to a certain level before installation. Nowadays, many convectors are equipped with additional fans for more efficient heating - forced circulation.
Functions of a trench convector
- The air flow rises upward from the floor, creating a thermal curtain that prevents open doors and drafts from occurring in the room. This is especially necessary in rooms with panoramic glazing, since without a thermal curtain such a place will quickly cool down.
- This device will create comfortable conditions, even in a room with high ceilings.
- If it is installed along a glass wall, then it will prevent the appearance of condensation resulting from mold and dampness.
- For particularly large rooms, a convector built into the floor may become the only heating solution. Since it is able to evenly distribute warm air, thanks to additional fans.
Advantages and disadvantages
Advantages
- Possibility of installation in children's institutions. Eliminates the possibility of hitting sharp corners, freeing up space for running and playing. The grates above the convector will not heat up to dangerous temperatures, which also eliminates the possibility of burns.
- Improves the interior of your home and frees up a lot of space.
- A more efficient heating method compared to other heating systems.
- Heat loss is much less than that of conventional heating, so it is enough for the coolant to be at least 50 degrees Celsius for efficient operation.
An ideal option for panoramic windows or doors, it creates an excellent thermal curtain that prevents the room from freezing. An excellent choice of heating for a private home.
Flaws
- Air currents generate large amounts of dust. You will have to do wet cleaning more often.
- This is not possible when installed in apartments with low ceilings.
- High cost of operation.
- If installed incorrectly, there may be a draft on the floor.
It is best to start planning the installation of a built-in convector at the stage of construction or deep renovation. To think through to the smallest detail whether this type of heating is right for you.
Types of built-in convectors
- (KBE) Convectors in which natural air circulation occurs. There is no additional impact on the air flow. Air rises naturally. An absolutely silent heating method that does not require a network connection. If you want to buy a convector, remember that the room will heat up twice as slowly.
- (KVP) Built-in convectors in which additional air circulation occurs. Such devices have an additional fan, which forcibly pushes out a stream of warm air and, without allowing it to cool, sends it for heating.
- Dual-circuit. They have the function of both heating and air conditioning the room. But due to its high price, the demand for it is not so huge.
If several convectors in a row
The following nuance should be taken into account. In our case, 3 in-floor water heating convectors were installed, each of which reaches 1800 cm in length. The equipment is equipped with its own grilles. But if necessary, you can always contact the appropriate company and order a solid grille along with the convectors, which will hide the unsightly seams that form when connecting two convectors together. Such seams differ from the general lattice, which violates the overall aesthetics.
In a situation where the in-floor water heating convector is too long, the simplest solution is to simply cut a hole in the wall of the required shape, which will allow the convector to go deep into the wall, but this is not the best solution. Of course, you can cover up the remaining cracks, but do not forget about the mobility of the grate. If you pull it out once, a large gap will remain, which will certainly turn out to be a source of drafts, because there are always drafts behind the wall, especially if the installation was carried out in violation of the rules.
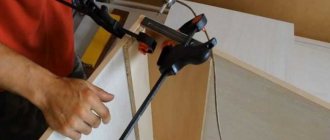
It is better to shorten the convector; it has rivets at the end that should be disassembled and drilled out. Next, the excess part of the equipment is cut off and everything inside is removed. We unscrew the slats, take out the decorative strips, and cut them off. We no longer put the rivets back; instead, we screw the bolts onto the nuts. We cut the bars and put everything in place. If there is the required distance to the heat exchanger, you can shorten the equipment on either side; choose the side that is more convenient for you to work with.
In general, ideally, all dimensions should be agreed upon at the stage of selecting in-floor convectors or other heating equipment, so that in the future you do not have to resort to additional manipulations. Such planning will avoid forced cutting of convectors. In order to install convectors correctly, you need to perform certain preparations. In addition to size, it is also important not to make a mistake when choosing the thermal power of the equipment.
How to maintain a trench convector?
Like any other heating equipment, trench heating convectors require periodic cleaning. This is done using a vacuum cleaner, after removing the protective grille. Clean the finned surface of the heat exchanger, using a brush if necessary, to remove dirt and dust. The grill itself can be washed with water.
During hydraulic tests, when the pressure in the heating system exceeds the nominal one, it is necessary to make sure that the convectors do not leak. To do this, just open the grille and inspect the box. If it is dry, it means that the convector has passed the test with honor.
Subject to the installation and maintenance rules, in-floor water heating convectors will bring warmth to your home without violating the overall design idea. A convector installed in front of the front door can trap up to 90% of cold air when it opens and create a thermal curtain. At the same time, they are silent, look stylish and, thanks to the variety of colors, fit perfectly into any interior, giving coziness and comfort.
With or without a fan?
Fans on in-floor water convectors significantly increase the power of the system as a whole, since they force air through the radiators. Using fans, you can absolutely precisely regulate the volume of air passing through and, accordingly, the air temperature in the room. Of course, such a system upgrade will take a little more money out of your pocket, but if you are ready to spend money for greater comfort, feel free to install it, you won’t go wrong!
Bottom line
A procedure such as making a niche in the floor requires a high level of skill and the use of special tools, as it is quite labor-intensive. Installation of a water heating convector involves laying supply and return pipes. When installing equipment, the level of finishing floor coverings is taken into account. Such work can be accompanied by a huge number of nuances that only a highly qualified master can provide.
If you need to install in-floor convectors in a room with a finished floor, the procedure becomes noticeably more complicated. After all, it is necessary to carry out the installation with minimal damage to the existing finish.
Many people call water convectors the best devices in the heating system. The most striking advantage is the use of the convection principle. Heat spreads by heating the air, not the housing. The convector is quite economical. You will not be afraid that a small child will get burned on it. Thanks to this device, condensation does not appear on the glazed surface, and the product does not corrode. Water convectors are characterized by heat transfer power. At the same time, the air does not dry out, and the room warms up evenly. As you can see, water-type in-floor convectors have numerous advantages over other heating devices. The devices surprise with their high quality and wide capabilities.
Installation technology
You can install the in-floor convector yourself. All work includes the following stages:
- Preparing a niche in the floor for the box.
- Box installation.
- Heat exchanger connection.
Installation diagram
Box installation
The preparation of a niche for the unit body is carried out after the brand of the convector has been determined and the dimensions of its body are known. First, determine the installation location of the unit. The recommended parameters are:
- The distance from the window to effectively blow glass is 5–15 cm.
- The distance from the walls (to the left or right of the heater) is 15–30 cm.
It is more convenient to equip a niche for a convector during the process of creating the floor at the stage of building the building. The depth and width of the niche is made with a margin of 1–1.5 cm. This takes into account the thickness of the future screed and finishing coating. The convector grille must be level with the finished floor.
If the heater is installed in an existing floor covering, it is necessary to remove the finishing layer and measure the distance to the rough base. It may be possible to find a unit whose dimensions will fit into the existing gap. If the distance from the rough base to the surface of the finishing coating is small, it is necessary to consider options for deepening the niche.
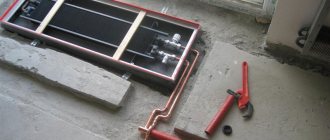
The heater tray is attached to the base of the niche through adjustable brackets. The horizontal position of the upper edge of the box is adjusted using the bracket bolts and set so that the grille is level with the finishing coating.
When pouring concrete into the box, it is recommended to use a weight pressing from above and install spacers to prevent its deformation.
Connection to the heating circuit
Electric models simply connect to the wiring. Water convectors must be connected to the heating circuit pipes. Before connection work, the fans must be removed. In most modern models they are attached using magnets or Velcro. The heat exchanger can be connected in two ways:
Flexible connection. Flexible hoses with metal braid are used. This installation requires most convector models that come with flexible hoses. This method is convenient because it is not demanding on the accuracy of the location of the supply pipes. The flexible connection makes cleaning the convector easier, since it is possible to lift the heat exchanger and remove debris accumulated under it. This connection method is suitable for models with natural circulation.
Flexible connection
Hard connection. This method is used for installing units with an electronic control system, equipped with a servo drive and a forced ventilation system. A servo drive and a thermostatic valve with a remote sensor are installed on the supply pipe, and a check valve is installed on the return pipe. A rigid connection is made using fitting elements. Supply pipes must be thermally insulated and laid in a screed.
Hard connection
The quality of the connection is checked by hydraulic testing: maximum pressure is applied and checked for leaks.
Models with a fan and an automatic control system are connected to the power supply.
After pouring the screed and installing the finishing coating, a decorative frame is installed and covered with a grille.
Video of how to install the convector:
During operation, the heat exchanger radiator is periodically swept with a brush, and the bottom of the box is cleaned with a vacuum cleaner. Such measures must be carried out at the beginning of the heating season in order to make the heater work as efficiently as possible.
Installation of radiators in a niche
We are considering the simplest convector built into the floor. This is a convector with natural circulation. The niche for the convector built into the floor is already ready, let's start installing the heat exchanger.
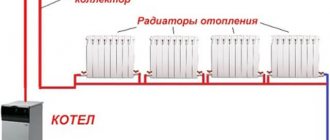
The coolant moves through a two-pipe heating system. It is supplied by one pipe, and by the second pipe it is removed from the radiator. A thermostat with a Mayevsky tap is installed at the input, and a shut-off valve is installed at the output. Everything is the same as when installing radiators on a wall, only in a horizontal plane.
The four-pipe heat exchanger is connected as in the photo, with a snake.
The system is tested at 25 bar. Working pressure does not exceed 15 bar. For the coolant, you can use antifreeze or other artificial “anti-freeze” coolants.
©Obotoplenii.ru