Installation and installation of an in-floor convector is one of the very first questions before you begin to decide on the purchase of an in-floor convector as a whole. So there are many questions about installation features, overall dimensions, depth of the convector into the floor, whether it will be possible to install the convector at all. Therefore, in this article we will try to answer the most common questions that our clients ask us. We have divided our article into several points.
Niche for convector
Convector connection
Fan placement
Spaces from windows and walls
Thermal insulation
Decorative frame
Convector grille
Installation photo gallery
Installation video gallery
- 1
Installing an in-floor convector is considered a fairly simple process, which can be done either with the help of a professional or independently. Before installing a convector built into the floor, you must carefully study the installation and use instructions for the heating device and carefully follow all prescribed recommendations. Not only your safety, the appearance of the room, but also the service life of the convector depends on correct installation. Depending on the room and the size of the window space, the optimal location of the convector is selected: on the floor, on the wall, inside the floor, inside the wall, in steps, in the window space (under the window sill). The first task is to choose the right place: convenient, safe and allowing you to use the capabilities of the convector to the maximum. It must be remembered that convectors cannot be installed under ventilation openings, behind curtains, blinds, doors, or screens.
Convector connection
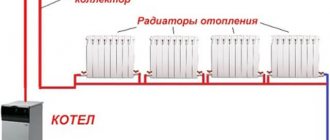
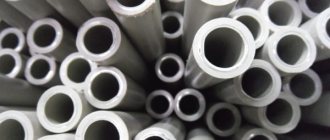
Hydraulic connection
There are two options for connecting to the heating system : flexible and rigid. Each type has its own advantages.
Flexible connection - the connection makes it possible to make a side connection and simplifies cleaning of the convector itself. The bottom line is that the connection is based on flexible hoses. In convectors where it is possible to raise the heat exchanger, this is very convenient for cleaning the convector from dust and dirt.
Hard connection - considered more reliable due to the materials used during connection. But in this case, it is more difficult to install the in-floor convector, since there is no way to lift the heat exchanger.
Electrical connection
You have chosen a convector with a fan, then you need to take into account such a thing as connecting to the electrical network. Since the fans used in convectors are usually 12 V, and the network is 220, you need to purchase a convector module (transformer). The module controls the room thermostat and vice versa. A room thermostat measures the temperature in the room using a built-in sensor and maintains its value at a set value. At the same time, it can control servos and smoothly regulate the fan rotation speed. Some manufacturers provide the possibility of placing the transformer in a box with a convector, which simplifies the work when installing it.
If several convectors in a row
The following nuance should be taken into account. In our case, 3 in-floor water heating convectors were installed, each of which reaches 1800 cm in length. The equipment is equipped with its own grilles. But if necessary, you can always contact the appropriate company and order a solid grille along with the convectors, which will hide the unsightly seams that form when connecting two convectors together. Such seams differ from the general lattice, which violates the overall aesthetics.
In a situation where the in-floor water heating convector is too long, the simplest solution is to simply cut a hole in the wall of the required shape, which will allow the convector to go deep into the wall, but this is not the best solution. Of course, you can cover up the remaining cracks, but do not forget about the mobility of the grate. If you pull it out once, a large gap will remain, which will certainly turn out to be a source of drafts, because there are always drafts behind the wall, especially if the installation was carried out in violation of the rules.
It is better to shorten the convector; it has rivets at the end that should be disassembled and drilled out. Next, the excess part of the equipment is cut off and everything inside is removed. We unscrew the slats, take out the decorative strips, and cut them off. We no longer put the rivets back; instead, we screw the bolts onto the nuts. We cut the bars and put everything in place. If there is the required distance to the heat exchanger, you can shorten the equipment on either side; choose the side that is more convenient for you to work with.
In general, ideally, all dimensions should be agreed upon at the stage of selecting in-floor convectors or other heating equipment, so that in the future you do not have to resort to additional manipulations. Such planning will avoid forced cutting of convectors. In order to install convectors correctly, you need to perform certain preparations. In addition to size, it is also important not to make a mistake when choosing the thermal power of the equipment.
Is the fan closer or farther from the window?
The position of the in-floor radiator fan in relation to the window opening depends on the intended purpose of the device . If the convector is installed only as a thermal curtain , the fan should be located closer to the room and direct the flow of warm air onto the glazing.
If the main function of a floor-standing convector is heating the room , then the fan must be installed closer to the window opening so that it directs cold air from the glazing through the heat exchanger into the room.
We recommend that you always install the fan closer to the glazing . Thanks to the increased power of these devices in this position, they will cope with both functions: heating and cutting off cold air.
Advantages and disadvantages of installing trench convectors in an apartment
Invisible structures built into the floor are an excellent interior and technological solution for housing with limited square footage. They are connected to the central heating system and cope perfectly with the heating function.
Advantages
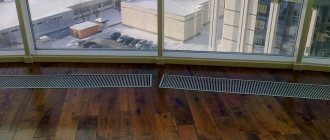
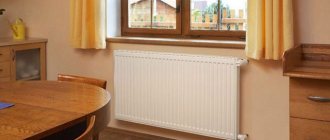
- They do not take up free space in the room. In-floor convectors do not need decoration or disguise; they occupy a prepared niche in the floor and do not clutter up the space. Unlike wall-mounted radiators, which require a decorative box on top. In addition, the size of a standard radiator depends on the size of the window, while an in-floor convector has certain dimensions and power.
- Uniform heat transfer. Let’s immediately look at this point in comparison with wall-mounted and floor-mounted radiators. They are removed at some distance from the floor and in this gap cold air is formed, causing a draft. Also, in rooms with such a heating system, the heat level gradually weakens towards the exit. In-floor convectors distribute heat evenly and drive air from floor to ceiling, warming it up at the same time.
- The most accurate temperature setting without overheating. Heating convectors built into the floor have a low level of inertia. Models with forced convection have a temperature controller that can operate from a general automated system.
- Prevents condensation from appearing on windows. This problem is very relevant for modern PVC windows.
- Relatively easy cleaning. Wall-mounted convectors tend to get dirty. It is much more difficult to remove dust from its gaps, so the classic option of vacuuming an in-floor heating convector is its significant advantage.
Flaws
- The need for regular cleaning of the premises. Dust accumulating inside the convector between the fans and the heat exchanger will constantly rise upward. If it is not removed in a timely manner, it will be very unpleasant to be in the room. In addition, a dense layer of dust reduces the level of heat transfer.
- High noise level. Classic in-floor heating convectors must have a fan in their design. Models produced several years earlier differ from modern ones in increased noise. At that time, this fact was considered normal and had nothing to do with the performance of the convector. Currently, products are equipped with tangential fans, the increased noise of which indicates contamination or improper installation (poor fastening, housing resonance, etc.).
- Low heat transfer. Let's just say that this is not a disadvantage, but a feature of a certain type of in-floor convectors. Clogged products, as well as models with natural convection (without a fan), have low heat transfer. However, as practice shows, it is quite difficult to determine the real need for a fan in a certain room. To avoid getting into trouble, supplement the design with a power cable for the fan, and the product itself can be connected separately if necessary. Of course, additional elements in the design will affect the cost - but such changes are minor compared to the potential need to replace the product. And the price of a water heating convector built into the floor is by no means small.
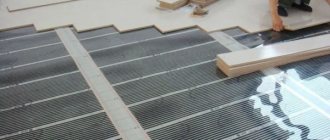
- Installation during construction. Due to the need for a fairly large amount of “dirty” work during the installation of the product, this is best done at the stage of construction or rough repairs. Installation according to a pre-developed technological map will cost approximately the same as installing classic heating radiators. But it is worth noting that the products can still be mounted on any type of floor covering.
- Permission will be required for installation. Since the design of an apartment building includes the installation of wall-mounted heating radiators, changing the system (reconstruction) will require permission from special services. You will need to submit a redevelopment project for approval, then obtain permission from the commission, carry out the necessary work and accept the installation.
Grilles for convectors
When choosing a grille for a convector, the question becomes: wooden or aluminum. It really all depends on individual preference. I would like to emphasize that wooden gratings are made only from natural wood. To protect grilles made of wood, it is recommended to use staining or varnishing. Aluminum gratings are considered more wear-resistant, as they additionally undergo an anodizing process. All gratings can withstand a load of 40 kg per bar. The only point is that a wooden grate is more susceptible to external wear, that is, abrasions from walking on it will be more visible.
Results
Convector heating is a very good option for heating rooms. Convectors can be recommended for installation both in small apartments and in large country houses. They have good performance and efficiency. published
Homemade - this word means that the product is made with your own hands, but sometimes it is used with some kind of disparaging connotation. Yet this is far from the case. The most expensive hand-built cars in the world are created according to individual projects. What should we call them? Homemade? Everything that ensures the life of mankind is created by human hands.
Most often, craftsmen begin creating a heating system by determining the type of boiler, creating drawings and then constructing the boiler. This work is not easy, therefore, without good knowledge of the structure and operating principle of the selected type of boiler, experience, availability of the necessary tools and materials for its installation, it is difficult to complete it.
Most often, the following types of boilers are manufactured independently:
Gas boilers are difficult to make on your own, since this is high-risk equipment and is subject to special technical requirements. Attempts to make a homemade one are limited by the need to obtain a quality certificate and permits from supervisory authorities. It is problematic to pass all the required checks for compliance with quality parameters. But repairing a convector with your own hands is acceptable. Most often, the central pipe of the coaxial output burns out and it can and should be replaced.
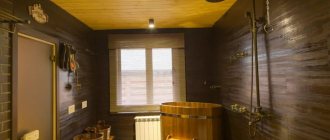
Decorative frame
Many manufacturers offer convector framing , this is necessary primarily in order to close the joints; often tilers do not perfectly fit the tiles to the convector and gaps and cracks remain, and in such cases the framing is installed. It comes in two types: U-shaped and F-shaped. The U-shaped one is less noticeable because it does not lie on the floor covering. The F-shaped one lies on top and is 1-2 mm wide, thereby completely hiding the joint between the convector and the floor, but in this case the grille is slightly higher than the floor, that is, a slight rise is formed. If without a frame, then the floor, convector and grille are on the same level.
comparison table
A trench convector is, first and foremost, a heating device and there is no doubt that the most important aspect when choosing convectors is its heating power.
Especially for your convenience, we have made a comparative table on the thermal output of trench convectors of different brands.
Natural convection
| Manufacturer | Model | Width | Depth | Length | Heat dissipation(70C) | Price | Lattice |
| Varmann | N 230.90.1000 | 230 | 90 | 1000 | 208 W | RUB 16,134 | + |
| Itermic | ITT 250.90.1000 | 250 | 90 | 1000 | 202 W | RUB 9,260 | — |
| Techno | KVZ 250.85.1000 | 250 | 85 | 1000 | 232 W | RUB 6,596 | — |
| Polvax | KE 230.78.1000 | 230 | 78 | 1000 | 241 W | RUB 12,150 | — |
| Carrera | S230.90.1000 | 230 | 90 | 1000 | 253 W | 13,500 rub. | — |
| Klima | TK 200.70.1000 | 200 | 70 | 1000 | 175 W | RUB 17,775 | — |
| Verano | VK15 230.90.1000 | 230 | 90 | 1000 | 188 W | RUB 18,375 | — |
| Minib | Coil P-80/243.1000 | 243 | 80 | 1000 | 183 W | 22,500 rub. | — |
| Kermi | KRN 91 210.1000 | 210 | 91 | 1000 | 205 W | RUB 20,150 | — |
| Eva | KTT 80/258.1000 | 258 | 88 | 1000 | 167 W | RUB 17,152 | + |
| Mohlenhoff | WSK 260.90.1000 | 260 | 90 | 1000 | 167 W | RUB 26,400 | — |
| Jaga | Jaga Mini Channel | 260 | 90 | 1100 | 237 W | RUB 21,700 | + |
Forced convection
| Manufacturer | Model | Width | Depth | Length | Heat dissipation(70C) | Price | Lattice |
| Varmann | Q 230.90.1000 | 230 | 75 | 1000 | 963 W | RUB 28,470 | + |
| Itermic | ITTB 250.90.1000 | 250 | 90 | 1000 | 504 W | RUB 14,370 | — |
| Techno | KVZV 250.85.1000 | 250 | 85 | 1000 | 536 W | RUB 11,248 | — |
| Polvax | KEV 230.78.1000 | 230 | 78 | 1000 | 907 W | RUB 20,700 | — |
| Carrera | СV 300.90.1000 | 300 | 90 | 1000 | 904 W | 19,500 rub. | — |
| Klima | TKV 200.80.1000 | 200 | 80 | 1000 | 525 W | RUB 37,800 | — |
| Verano | VKN5 280.75.1150 | 280 | 75 | 1150 | 2262 W | RUB 52,560 | — |
| Minib | Coil TO85/243.1000 | 243 | 80 | 1000 | 936 W | RUB 64,275 | — |
| Kermi | KRN 81 210.1250 | 210 | 110 | 1250 | 1871 W | RUB 47,628 | — |
| Eva | KB 80/258.1000 | 258 | 88 | 1000 | 1124 W | RUB 34,094 | + |
| Mohlenhoff | QSK 260.110.1250 | 260 | 110 | 1250 | 1946 W | RUB 49,708 | — |
| Jaga | Jaga Clima Canal | 180 | 85 | 1080 | 2075 W | RUB 80,478 | + |
How to connect a gas heating convector
Particular attention should be paid to the fact that when deciding how to calculate the power of a gas-type heating convector and how to connect this equipment, it is extremely important to call specialists, since working with gas requires caution and a qualified approach. Otherwise, manual installation can result in extremely unpleasant consequences.
Correct installation of a gas convector should proceed according to the following principle:
- using scraps left over from aluminum or steel pipes, it is necessary to construct the legs of the support;
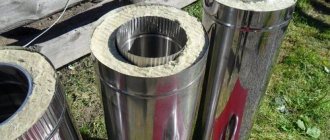
- then, using a drill or chisel, you need to make a hole in the wall with a diameter of 220 - 230 mm, while the size of the air duct will be 145 - 150 mm;
- after this, the wall is equipped with a special protective screen made of stainless steel, equipped with two layers of basalt thermal insulation;
- The outlet convector pipe should also be equipped with similar insulation;
- then the device body is fixed to the wall in a strictly vertical position;
- The process is completed by removing the pipe into the hole made and fixing it on the convector. Once the equipment is connected to the gas supply center, it is completely ready for operation.
The video shows one of the options for installing heating convectors:
Here you will learn:
Heating systems with classic radiators can heat a room in two ways - using convection and thermal radiation. If we talk about water heating convectors, they heat only due to natural convection, ensuring the circulation of warm air masses in the rooms. Fast and efficient heating of rooms is achieved. What are water convectors and how do they work? Let's talk about this as part of our review.
We will also look at:
- principles of operation of water convectors;
- types of devices;
- characteristics and properties of this heating equipment;
- installation principles.
After reading the material, you will receive all the necessary knowledge about these devices.