If you seal an open balcony, you can reduce heat loss in the house and even expand the living space of the apartment by a couple of meters. But such repairs have a significant drawback, which owners of insulated premises regularly encounter - high humidity. With cold glazing, condensation often forms on the balcony or loggia, which creates favorable conditions for the growth of fungus and mold. Therefore, if you notice droplets of moisture on the ceiling and windows that regularly fog up, there are two options for solving the problem: good ventilation and proper insulation. Let's look at them in detail.
From wet ceilings to mold and new renovations - one step
Reasons for the formation of condensation on a glazed balcony
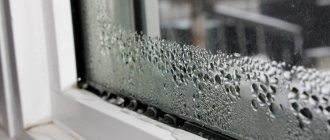
Precipitation on glazed loggias most often occurs during the cold season. Why is this happening?
Let's remember the basics of physics. Warm air indoors comes into contact with windows, walls and ceilings, whose temperature is much lower due to the influence of the external environment. As a result of this difference, the so-called “dew point” is reached, at which the air settles as droplets of moisture on surfaces in contact with the street.
The air is heated not only by the sun's rays. In the cold season, as soon as you open the door to the balcony, the heat from the apartment penetrates into the glassed room and quickly settles in droplets of moisture. An additional provoking factor can be increased humidity - flowerpots with plants or seedlings, drying clothes with the windows closed.
Humidity level and temperature difference at which condensation forms
The problem can be partially solved if you regularly ventilate the room and carry out glazing according to all the rules:
- Install double-glazed windows with 2 chambers (in mountains and other regions characterized by sunny, warm days and cold nights, 3-chamber windows are better suited).
- Use a good elastic seal and high-quality fittings.
- Make sure that during installation all seams and joints are carefully treated with foam and do not form cracks.
The larger the glass area, the colder it will be on the balcony
Even a loggia that is glazed in accordance with all the rules and building codes still needs ventilation. If the room is not regularly ventilated, air with high humidity quickly forms condensation, which settles on the windows and ceiling.
Causes of condensation
In physics there is such a thing as the dew point. It indicates the temperature at which the air must reach in order for the water vapor contained in it to reach such a degree of saturation at which it begins to turn into water, that is, to condense.
Let's look at exactly why condensation can form on the balcony:
- Condensation is formed when warm air saturated with vapor escapes from the apartment onto the balcony and comes into contact with cold surfaces - the ceiling, external walls and window glass.
Diagram of temperature changes as you move through the ceiling and insulation
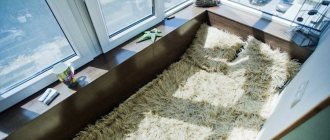
- Steam condensation on the balcony, as well as in the apartment itself, can occur due to oversaturation of air with steam, that is, at very high humidity . This picture can be observed in a bathroom that is not equipped with an exhaust vent.
How to get rid of condensation
>
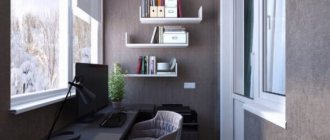
To reduce the temperature difference on the balcony, and at the same time heat loss during the cold season, you can insulate the room from the outside or inside (ideally, from both). External insulation can be done with your own hands only if the balcony or loggia is on the ground floor; in other cases, it is necessary to involve craftsmen with permission to work at heights and the appropriate equipment. But it’s quite possible to close the balcony from the inside yourself, regardless of the number of floors in your apartment.
External insulation
Finishing a balcony/loggia on the street side is considered the most effective way to retain heat and prevent condensation. An intermediate layer of materials with low thermal conductivity significantly reduces the temperature difference inside the room, the “dew point” moves outward and moisture no longer forms on the inner surface of the walls. This type of insulation is also preferable because it allows you to improve the appearance of the balcony from the street without reducing its usable area from the inside.
External cladding of a balcony above the first floor requires special skills and equipment
The work is done like this:
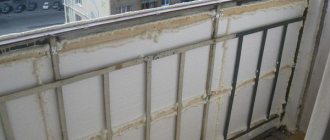
- The open parapet is reinforced with OSB slabs, bricks, gas blocks, and metal sheets. On a closed surface, all cracks are removed using polyurethane foam, plaster or the same OSB boards (depending on the condition of the coating, the length and width of the cracks).
- Polystyrene foam, mineral wool, penoplex or other insulation with low thermal conductivity is attached around the perimeter of the balcony.
- Joints and seams are sealed.
- The structure is lined with decorative material, for example, siding, clapboard, plaster.
If most of the decoration is occupied by glass, and the room is combined with a living room, you cannot do without heating. To ensure that condensation does not appear on the balcony after insulation, it is recommended to install an air conditioner or radiator, which in the cold season will become an additional source of heat and protect against excess moisture.
Internal insulation
If it is not possible to sheathe the balcony from the outside, you will have to solve the problem with condensation from the side of the apartment. The goal of the work is to minimize the contact of moist warm air penetrating from the apartment with cold surfaces. To do this, you will have to create a multi-layer structure with vapor barrier and insulation materials that will become a barrier to the cold and the formation of condensation on the ceiling on the balcony.
Insulation in this case ensures gradual equalization of temperature. And although the “dew point” is not carried outside the balcony, as with external insulation, condensation does not form on the walls and ceiling.
>
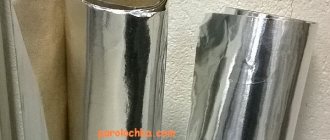
Foil materials are an excellent barrier that retains heat indoors
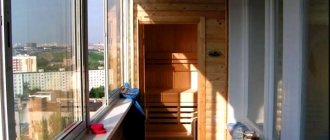
A significant disadvantage of this cladding method is the reduction in usable area. Most standard insulation materials (foam plastic, mineral wool) are effective with a thickness of 5 centimeters or more, so the “pie” design will take at least 10 cm on each side, which looks very noticeable on a narrow loggia or balcony. Therefore, if the room is not intended to be used in the off-season and in winter for housing, you can get by with penofol or other types of roll insulators, the thickness of which is much smaller (up to 100 mm).
Internal cladding is carried out in several stages:
- If necessary, the parapet is strengthened, gaps and cracks are eliminated.
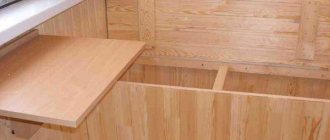
- The floor is leveled (and, if desired, raised to the level of the threshold) using expanded clay and a cement mixture.
- All surfaces intended for insulation are treated with waterproof impregnation and covered with moisture-proofing materials.
- A sublevel frame is built on the walls and ceiling based on wooden planks or metal profiles in increments of 50-60 cm. Beams (joists) are laid on the floor.
- The gaps are filled with insulation and the seams are sealed.
- If necessary, wiring for lighting fixtures is installed on the ceiling.
- A flooring made of plywood or cement-bonded particle boards with a thickness of at least 18 cm is mounted on the floor joists.
- The insulated surface is sheathed with moisture-resistant plasterboard followed by decorative finishing or materials that do not require additional cladding - wall panels, lining, siding, blockhouse.
Scheme of internal insulation of a balcony or loggia
If instead of standard insulation you chose thin penofol, you can simply attach it with self-tapping screws to the sheathing with the foil side facing the inside of the balcony and seal the joints with tape. There are also self-adhesive varieties of materials, for installation it is enough to remove the protective film and press the glued side to the wall, floor or ceiling. After this, you can cover the balcony with decorative cladding. To combat condensation on the balcony ceiling and walls, such insulation is quite sufficient, but for a room connected to a living space, it is better to sacrifice a few centimeters and additionally insulate the structure with a layer of mineral wool or polystyrene boards.
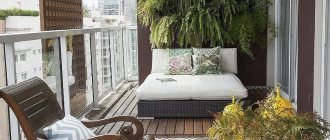
If we are talking about a glazed loggia, you can put insulation on the floor and cover it with decorative trim. But if the room is attached to the main area or a small room is planned in it, it is worth thinking about an electric heating system “warm floor” or installing a radiator.
Ventilation device
In some cases, even insulation carried out according to all the rules does not help; with the onset of cold weather, condensation again appears on the ceiling, windows, and the upper part of the walls on the balcony. The reason may lie in the large glazing area or savings on double-glazed windows (to reduce repair costs, many people buy cheap glass with a thickness less than the required 4 mm or with a cold profile). The second option is the incorrect layout of the insulation “pie” - if a hydrobarrier is not installed, moisture will penetrate into the materials, they will lose their heat-protective properties and will soon fail.
But even a perfectly sealed balcony has a problem - the accumulation of moist air vapor. They simply have nowhere to go, because all the indentations to the outside are securely closed with multi-layer insulation and impenetrable double-glazed windows. Therefore, if you used a vapor barrier during finishing, take care to regularly ventilate the room.
There are several options for providing a controlled flow of fresh air:
- The usual opening of windows is at least 2 times a day - in the morning and always in the evening, to let out the warm air that has warmed up during the day. But with this method, the room becomes very cool, and open doors become a high-risk area in a house with small children or animals.
- When glazing a balcony, you can install a system of supply and exhaust valves or mid-hung structures on 2-3 windows, which allow you to regulate the air exchange at your discretion by changing the angle of rotation of the sashes. But even in this case, heat loss is noticeable, and micro-slits may not be enough to fully ventilate the entire area of the balcony.
You can install ventilation valves yourself, but they are not suitable for all profiles, so it is worth considering this point at the glazing stage
- Organize a forced supply and exhaust ventilation system. True, the disadvantage of this option is that it should be thought out in advance, ideally at the stage of covering the balcony. If the insulation work has already been completed, you will have to violate the integrity of the structure (accordingly, reseal it).
Stagnant, humid air can not only cause condensation, but also a musty smell, mold, and mildew. Without regular ventilation, the performance qualities of materials are reduced, and the insulation effect gradually decreases.
Ways to deal with condensation
Let's take a closer look at how to remove condensation on the balcony in the most common cases.
Insulation of a cold loggia
Insulation is one of the ways to combat condensation.
If your loggia is simply glazed, then one of the options to combat moisture condensation is to insulate it.
An insulated balcony is less susceptible to condensation, since a microclimate with a constant positive temperature is established inside it. This prevents warm air from colliding with cold surfaces, which usually results in dew.
Exterior works
To create an effective thermal circuit, it will be necessary to insulate not only the front wall of the loggia, but also the side walls, floors and ceilings. Foam plastic, mineral board, isover and other heat-insulating materials are suitable for these purposes. Before installing the insulation, you should carefully seal the cracks, joints and other openings. This is best done using polyurethane foam. For greater efficiency, it is recommended to install insulation outside the balcony walls. With this technology, their freezing is prevented, and the dew point moves from the internal surfaces to the outside. That is, moisture condensation will occur on street surfaces, from where it will be removed naturally - through evaporation.
However, this method has one drawback - it is complicated. Renting an aerial platform will cost a considerable amount, and it is not always possible from a technical point of view. House lawns and narrow courtyard driveways often become an insurmountable obstacle to installing a mobile tower. In addition, the outer cladding of the loggia with thermal insulation can disrupt the overall architectural design of a residential building. In this case, housing departments and architectural services may have claims against you. Therefore, before starting work, you should obtain permission from the relevant authorities, which is not always possible.
To cover the outer walls of a loggia located at a height with thermal insulation material, you will have to resort to the services of special equipment.
Interior work
Be sure to install a vapor barrier inside the balcony.
If insulating the balcony from the outside is not possible, the only option remains is to install a thermal insulation circuit from the inside. The disadvantage of this method is that the dew point when insulating the balcony from the inside shifts inside the glazed room. The walls of the balcony freeze in winter, and condensation accumulates on the internal walls under the insulation and on glazed surfaces. Therefore, during interior work, a vapor barrier must be used to prevent the internal surfaces from becoming damp.
Condensation on a warm balcony
An effective way to get rid of excess moisture on a warm balcony is regular ventilation.
However, it happens that you have insulated the balcony, but condensation still appears. The reason here is clearly the increased level of humidity in the interior. Indoor plants growing on the balcony can serve as a source of moisture. If the loggia is structurally combined with the kitchen, then the air is saturated with moisture when cooking and washing dishes. What to do in this case? How to properly insulate a loggia so that there is no condensation, see this video:
An effective way to get rid of excess moisture on a warm balcony is to regularly ventilate it. This is a good solution at low sub-zero temperatures outside.
To glaze a loggia, it is recommended to use double-glazed windows with built-in ventilation valves
In winter, opening the windows wide open is not entirely comfortable, especially if there are small children. Windows with wooden frames provide natural ventilation and air exchange through microcracks and pores in the wood. But standard plastic windows, due to their sealed design, cannot provide proper circulation. Therefore, to glaze a loggia, it is recommended to use double-glazed windows with built-in ventilation valves. This will allow you to regulate both the level of air humidity and stabilize oxygen exchange. To learn how to deal with condensation, watch this video:
Installing heating devices on the balcony - air heaters or infrared heaters - can also help get rid of unwanted condensation. This will allow you to “dry” the air to acceptable levels, removing excess steam from it. However, it should be remembered that the installation of central heating radiators on loggias is strictly prohibited.
Such interference with public communications can result in substantial fines. Therefore, to heat the loggia, it is best to use auxiliary portable devices.
How to make a hood on a balcony and loggia with your own hands
It is quite possible to construct a supply and exhaust system with your own hands. In fact, you just have to install two fans, one of which will work for air supply, and the second for air output. And in order to place them correctly, let’s remember the simplest law of physics: warm air moves up, cold air goes down. Therefore, the supply unit is mounted near the floor, and the outlet unit is mounted closer to the ceiling.
It is advisable to design the ventilation openings diagonally to each other - this way the system is guaranteed to cover the entire room and prevent the formation of condensation.
Compact multi-zone ventilator
To work you will need:
- 2 fans of equal power for air intake and exhaust. The best option is to choose models that are immediately equipped with plugs that block access to air when the device is not working. Otherwise, in winter you will have to close the ventilation hole with homemade partitions.
- Electricity supply.
- Fastening systems.
- Hammer.
- Sealant, plaster mixture, spatula.
To install the fan, draw a marking for the diameter of its shaft, turn on the hammer drill to jackhammer mode and make a through hole outward. Then you need to connect the device to pre-installed wiring, install it in the prepared passage and treat it with plaster around the perimeter, masking the joints. When the mixture dries, you can apply a sealant around the perimeter to prevent air from entering from microcracks.
On a small square loggia, you can get by with installing one supply and exhaust fan. If the room is long, it is better not to take risks and mount two devices.
How to eliminate fungus and other consequences of condensation
If condensation was a frequent guest on the balcony, it is possible that mold or mildew may form on the ceiling and other surfaces of the room. Even if the finishing materials look quite decent on the outside, black spots and stains can hide right under the “inedible” lining panels.
Damp ceilings and walls near windows are a “favorite” place for mold to live
>
You need to get rid of the effects of condensation in stages:
- Remove contaminated materials from all affected surfaces. Of course, you can try to wash them off with various chemicals designed to combat mold, but, as practice shows, such a measure is short-lived. Fungal spores are able to penetrate deep into materials, and after a while the ceiling will “bloom” again.
- Apply a deep penetration antiseptic to the protected surface, allow it to dry completely, and repeat the treatment.
- Install a ventilation system on the balcony.
- Make vapor and waterproofing (you can use an insulating “pie” or simply treat all surfaces with bitumen mastic).
- Finish with decorative materials.
Waterproofing a balcony with bitumen mastic
Note! All antifungal drugs contain toxic substances, and the penetration of spores into the respiratory tract is fraught with unpleasant health consequences. Therefore, if you carry out work on cleaning the balcony yourself, protect yourself with personal protective equipment.
Useful video on the topic
Educational program: why condensation occurs
How to properly insulate a balcony and get rid of condensation:
Even seemingly harmless droplets of moisture can cause a lot of problems if they regularly appear on the inner surfaces of the walls and ceiling of the balcony cladding. Therefore, it is imperative to fight them. If you don’t have the time, energy or suitable equipment for large-scale work on insulation and cleaning a room from mold, seek help from professional craftsmen who will carry out this work in compliance with all building codes and are guaranteed to save you not only from condensation, but also lengthy repairs .
YOU MAY ALSO BE INTERESTED
How to deal with condensation using insulation
The method to eliminate condensation on the balcony may be different for each individual case. For example, if glazing is done only on the facade, and the side walls are covered with wall material, it will be effective to insulate the walls. And if most of the loggia is occupied by glazing, you need to focus your efforts on heating the room. Fighting condensation will be more beneficial when all available methods are applied.
Insulation of the balcony from the outside
The best option is to seal seams and joints and externally insulate the walls. All joints are foamed with construction foam, and the walls are sheathed with foam plastic or penoplex followed by decorative finishing. The insulation material protects the walls from freezing, so condensation does not appear on the inner surface of the walls. The cold simply does not penetrate through the insulation, which has a very low degree of thermal conductivity.
But this type of insulation is not always possible due to the height at which the balcony is located, and then it is carried out from the inside of the balcony.
Insulating the loggia from the outside
Insulation of the balcony from the inside
When it is not possible to carry out external insulation, you can do it from the inside of the loggia. In addition to insulation, the internal insulation must also contain a vapor barrier, which will prevent the formation of moisture. You can use not insulation and vapor barrier separately, but a material that combines both of these properties.
Materials for insulating the loggia from the inside:
- Foil penofol;
- Polystyrene foam covered on one or both sides with film or glassine;
- Mineral wool + vapor barrier.
After laying the insulation, the inside of the walls is covered with any finishing material: plasterboard, plastic panels or clapboard. Internal insulation is carried out and when you only need to close the parapet under the window frames, there is no point in carrying out high-rise work to insulate a small area.
Insulation of the loggia from the inside