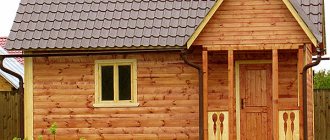
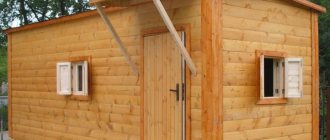
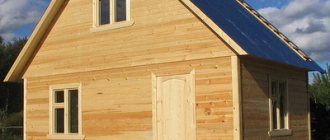
To build a bathhouse, you can choose the traditional option - cut down a small log building or build a steam room using frame technology. A sauna that looks much more attractive and original is a barrel made with your own hands from specially prepared boards. Since the method of assembling a house-side structure is of interest to many homeowners, we suggest considering the manufacturing procedure in this article.
Choosing wood for a round bath
Making a barrel sauna requires a careful approach to the selection of wood that will be used in construction, since there will be no additional internal lining.
It is strictly forbidden to use coniferous wood for construction, which contains a lot of resin, which, when heated, can burn the skin and negatively affect the respiratory system.
The only exception is cedar wood. Such a board for a barrel bath will be one of the best options, because it has a healing effect on the body due to the content of essential oils and other components. In addition, cedar wood does not crack or change shape when heated, and is resistant to high humidity and bacterial attacks. And the beautiful textured surface gives the room a special aesthetics and charm.
Oak wood is very good for making bath-barrels, as it is characterized by great strength, durability and hardness. And under the influence of moisture, oak becomes even stronger. However, oak boards are quite expensive, so they are used more often for making furniture in a bathhouse than for building walls.
The appearance of oak wood is very attractive - a deep dark shade combined with a beautiful texture. All these indicators, combined with the healing properties of oak, make it very suitable for baths.
However, most often the assembly of a barrel bath is made from linden. It gives the room a pleasant aroma and a special healing atmosphere. Linden has substances that can cure diseases of the respiratory tract, kidneys and liver, tidy up the skin, rejuvenate and cleanse it.
It is noteworthy that linden accumulates heat well. In addition, it does not shrink much and is easy to process. Read also: “Which barrel sauna is best for home and garden.”
However, due to the low density of wood, linden is very susceptible to fungal diseases and rot, so such a bathhouse will last less than one made from harder types of wood.
Aspen wood is also suitable for building a barrel sauna. In terms of its characteristics, it is similar to linden, however, when properly prepared, it is not subject to cracking, deformation and is not so susceptible to moisture, but, on the contrary, becomes stronger over time.
This wood is the cheapest of all the options presented, that is, it belongs to the economy class.
Although birch, alder or fir are often used for the construction of traditional baths, they are not suitable for barrel baths for a number of reasons.
What types of barrel baths are there?
Depending on preferences and functional purpose, barrel baths can be divided into three large groups:
- Finnish sauna
with dry steam and high temperature. It is preferable that next to the steam room in such a bath there is a font or a wooden bucket with cold water. - Russian steam room
with wet thick steam and brooms. Such a bathhouse includes two rooms - the washing room itself and the steam room. - Japanese
traditional barrel bath - ofuro. This is a kind of large wooden bathtub, which is constantly heated by a stove built into it.
Advantages and disadvantages
Positive aspects of the barrel sauna:
- fast construction;
- compact dimensions;
- rapid heating of the room;
- original look;
- savings on materials needed for construction;
- mobility (the building can be transported).
Flaws:
- there is little space in the building;
- the structure needs to be additionally insulated;
- boards cannot be impregnated with powerful antiseptics against rotting.
If you need a small steam room, a barrel sauna is the best option.
Russian bath
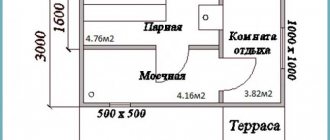
The use of a Russian bath includes two stages, therefore, it consists of the following premises:
- Steam room - in it, thick wet steam is formed by splashing water or herbal infusions onto heated stones.
- Washing room - here, after preliminary steaming and massage with brooms, they take a shower, washing off sweat and stuck leaves, and gradually cooling down.
During installation, barrel baths of this type are provided with a slight slope so that water can drain from the drainage system installed in the floor and not stagnate.
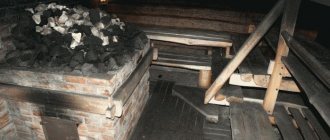
In this case, the stove for a barrel bath is installed between the rooms so that the mesh with the heater goes towards the steam room, and the heating tank is located in the washing room.
At the same time, the firebox itself is also located in the washing room, behind a protective screen. Since there is not much space in a barrel sauna, the stove must be compact. It is imperative to install heat-resistant panels on the walls around it to protect the wood from fire.
Furnace installation
When choosing a stove, you need to remember that it must correspond to the volume of the steam room. When installing a stove in a bathhouse, be sure to follow fire safety measures . For pipe penetration, you need to use basalt mats and, using special sheets, hide heating devices from the wooden surface of the barrel.
The barrel can be assembled in a few days. After each use of the bath, it must be ventilated. About once a year, the barrel needs to be treated with protective agents inside and out.
Dry steam room
You can set up a steam room with dry light steam in one room, providing a container of water at the outlet into which you can plunge. If there is no river or swimming pool nearby, you will have to build a plunge pool, since it is necessary to cool down and rinse off.
This Finnish sauna from a barrel is much easier to build with your own hands than a full-fledged large-sized structure. It should be practically airtight, without cracks or crevices. No drainage hole is required. True, you need to provide a ventilation valve under the ceiling or in the floor with a special valve, which can be opened if necessary.
In such a barrel bath there are only beds that can be made wide - it will be quite comfortable to sit on them, as well as a stove with a heater. If desired, you can drop essential oil or herbal infusion onto the hot stones for therapeutic purposes.
The barrel-shaped sauna can be located both vertically and horizontally. In the latter version, there is much more space inside.
Ofuro
This type of bathhouse is quite new for Russia. This is a traditional Japanese bathhouse in the form of a heated barrel. It is very easy to use and place.
The ofuro bathhouse does not have a roof, however, it can be used regardless of the time of year.
The ofuro is placed on a wooden platform, and inside the barrel there are wooden seats and a stove covered with a partition to prevent burns.
According to Japanese philosophy, in such a bath a person’s emotional and physical health is restored, he comes into harmony with himself and the world around him (read: “Japanese bath - types and features”).
As a rule, ofuro has an ellipsoidal shape, which allows the stove to be placed in the safest way for humans. Alternatively, heating pipes can be installed inside the barrel, and the stove itself can be moved outside the bathhouse.
However, such a design will require more time and resources to heat up and maintain temperature.
The duration of procedures in the Ofuro bath is usually 10-20 minutes. After such a bath, the skin should be rubbed with a hard glove, performing a massage similar to Russian brooms.
Preliminary work with bath material
Even if you know how to make a barrel sauna with your own hands, you still need to prepare the material for work in advance.
If you have the skills and equipment to process wood yourself, bath boards should be purchased with parameters of 90-95 mm width and 45-50 mm thickness.
Otherwise, you should provide the master with drawings of the barrel bath indicating the dimensions, according to which he will prepare the required amount of material, which will be perfectly fitted and processed.
It is worth noting that the number of boards directly depends on the size of the barrel bath. To calculate this indicator, you should draw a drawing to scale, calculating the circumference and dividing it by the width of one board. The length of the boards affects the size of the future room. As a rule, round baths occupy from 2.5 to 6 meters, depending on the type and layout of the building.
In addition, you need to prepare the wood for the back and front walls with the doorway. The stands for the barrel are made of durable wooden beams, machined to the desired shape according to the drawings. To ensure the strength of the entire structure, the walls will need to be tightened with iron strips that resemble hoops on barrels.
The fitting of window frames and door panels must be done as carefully as possible to ensure the tightness of the structure. The benches and floor inside the barrel bath are also made of wood, so they will need to be trimmed and sanded.
To ensure thermal insulation of the furnace, you should purchase a special material, such as mineralite. Since the bathhouse must breathe and be ventilated, it is provided with a special window.
Even before making a round bathhouse, you need to decide on the type of chimney, as well as the material from which it will be made.
In the case of a Russian bath, before construction you need to prepare pipes for drainage, tanks for heating water, as well as trays if you decide to equip a shower.
Depending on the type of future roof, material for it is prepared. You can use soft roofing material laid directly on top of the barrel ceiling. A more complex gable roof will require the installation of rigid supports.
All elements will be fastened with stainless steel screws or nails.
In some cases, in barrel baths, a small veranda is installed in front of the entrance, which will also require building materials.
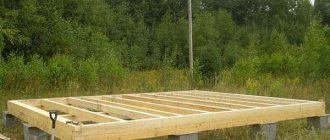
Stage 1 - preparing the base
Creating the base of a barrel sauna
As already mentioned, there is no need to dig a pit and pour a foundation. It is enough to install it on a flat surface so as to prevent contact of the tree with the soil. Preparing such a site is quite simple if you compact and level the area and fill it with gravel or crushed stone.
The base for such a bath can be made from floor slabs.
If there is no such level area, you can make a base of concrete. To do this, remove the top layer of soil, 15–20 cm deep. Install the formwork, pour sand into the base, making a cushion of 5–10 cm, and compact it. Then lay the reinforcement and fill everything with concrete. After 3 weeks you can assemble the bath, that’s when the solution will completely strengthen.
Now you need to make a wooden base. Transverse parts will be made from edged boards 200 mm wide. If you decide to cut them yourself, then cut a rounded notch in them that follows the contours of the barrel. To ensure everything is even, use the pattern as a reference. The workpiece should be cut no more than half the width, that is, 100 mm. The number of such boards is determined by the length of the bath. As professionals advise, they need to be installed in increments of 1–1.5 m.
For reliability, the transverse parts can be connected with boards, which are screwed along the embedded boards using screws.
Discharge of wastewater from the bathhouse
Since a large amount of dirty water will form in a bathhouse with a washing room, it must be properly drained. If you use the bathhouse infrequently, you can get by with a hole in the floor. However, this method is not suitable for intensive use of a barrel bath, since excess moisture under the structure will lead to the appearance of fungus, rotting and damage to the floor, and an unpleasant odor.
Therefore, initially the bathhouse is installed at a slope towards the drainage hole connected to the pipe through which the waste goes into the drainage pit. This pipe should be carefully insulated so that in winter it does not crack and the water in it does not freeze.
For ease of movement in a round bathhouse, a grid-like flooring is arranged on the floor. Through the cracks in such a lattice, water will flow freely towards the low tide, and the boards will be able to dry well, and the structure will take on a finished look.
I’ll tell you how it usually happens – “from project to launch”
- You choose a manufacturer (I’ll write about this at the end of the article), decide on the model and filling, after which it is assembled for some time. Yes, of course, make a partial advance payment.
- Due to its light weight, a powerful foundation is not needed and therefore there will be no large costs for its arrangement. And if seasonal use is expected (spring-autumn), then perhaps everything will be limited to concrete blocks or wooden logs, or even just gravel backfill.
- Then, you need to take care of the foundation. Typically, the manufacturing company issues standard designs, but in any case they must take into account the characteristics of your site. I mean the topography and soil characteristics (freezing depth, presence of groundwater, etc.). Therefore, the standard design may be changed.
- When ready (and this can be from a week to a month), you are notified, and on the appointed day a car arrives, on the loading platform of which your bathhouse will be. The “kit” comes with a truck crane.
Of course, you should arrange for the equipment to arrive at the unloading site. A very important point, because if it is impossible, the responsibility is yours. Take care in advance. However, this is probably stated in the terms of the contract. A team of workers will install the finished bathhouse trailer on the foundation. All. All that remains is to connect the communications and the house will come to life.
Perhaps the manufacturer will offer you a turnkey service. That is, it will itself build a foundation, install a bathhouse and connect communications (which must be brought to the “landing” site in advance). Think about it - it could be profitable. In addition, you will receive a guarantee not only for the house with the filling, but also for everything else. Although you will also have to overpay.
Step-by-step construction instructions
After the procurement of materials is completed, the wood must be treated with protective antiseptic impregnations, dried thoroughly, after which the assembly of the structure can begin.
Laying the foundation
Before you make a barrel sauna, you need to lay the beams for the base, which will bear the entire load of supporting the building above the surface.
The base beams are laid as follows:
- Prepare the required number of beams 3.5-4 cm thick and 30-35 cm wide - from 2 to 4 pieces, depending on the length of the building. In them, according to the drawings, recesses are cut into which the boards of the lower part of the barrel for the bath will be laid and secured.
- Next, the beams are placed at equal distances from each other, positioned in such a way that the first supports the wall with the doorway, and the last is under the back wall.
- At the end, all laid beams should be fastened into a single rigid frame so that during installation and operation of the bath they cannot move to the sides.
Working with front and back walls
At the next stage, they begin to manufacture the bottoms of the future barrel, that is, its front and rear walls. They should be smooth and even, without cracks or defects. They need to be marked for windows and doorways. Depending on the location of the openings, bars will be fixed to the walls, along which the boards of the sides of the barrel itself will be sewn. These bars are fixed across the structure.
First of all, they assemble a frame from bars and sew a board onto it to get a square. Having calculated its middle, a circle is drawn on the surface and a circle is cut out along the contour. Both walls are marked in the same way.
Next, in each circle, markings are made for one or two windows and a doorway, after which holes are cut out. If necessary, the resulting holes are reinforced with bars.
Marking boards for the side walls of the bathhouse
Further actions will be related to the preparation and marking of boards for the side walls of the barrel bath. In those places where the front and rear panels will be adjacent to the sheathing, you need to cut special grooves that match the width of the boards in the walls and reach 8-10 mm in depth. The so-called bottoms will be inserted into these recesses.
And if the bathhouse consists of two adjacent rooms, in the place of the partition between them, grooves must also be provided in the cladding boards to secure the wall.
Window and door frames
Since windows and doors must close absolutely hermetically and not let air out of the steam room, not everyone can cope with this task on their own. Therefore, it is recommended to place an order for ready-made windows and glass doors, which will be produced in compliance with all standards.
This way, you will receive high-quality products so that you can create an optimal microclimate inside the barrel bath and get the maximum benefit from the process.
How to assemble a barrel sauna
The assembly of a round bathhouse begins with the installation of support beams on a prepared site, located slightly at a slope, to which communications for drainage are connected. They will subsequently be connected to the low tide from inside the bathhouse.
In each of the cut out recesses of the base, a center is marked to which the first bath board is attached.
Next, the remaining boards are sequentially secured on each side until the base arc is filled. In this case, you should pay attention to ensure that the grooves located on the boards form a single contour. Thus, the floor of the building will be sheathed.
The next step is to fix the front and rear walls of the bathhouse in the grooves. They should stand firmly and not require additional support. At this stage, it is already possible to determine the shape of the future building.
After installing the walls and internal partition, they move on to covering the sidewalls. All subsequent boards are fixed directly to the walls. They are laid out and fixed parallel on both sides of the barrel.
When the fastening of the boards is completed, the entire structure must be secured with metal tape. Such rims can be installed in several places from two to four. Holes are made at both ends of the tapes and, after inserting bolts and nuts into them, they are tightened, tightening the ends.
After this, you can install windows and doors.
At the last stage of construction, the roof should be arranged. It can be made of flexible tiles or soft sheet metal laid directly on top of the barrel on a waterproofing substrate. As an option, you can install a gable roof covered with corrugated sheets or metal tiles.
If you install benches outside the building on both sides of the front door, you will get an impromptu veranda.
Stage 3 - frame assembly
Frame assembly
Next you should lay the embedded boards on the prepared base. All elements are connected using the tongue and groove method.
Boards pre-cut to the required size are laid on the bottom. Fasten them along the required circumference until it is sufficient to install the end partitions. The boards must be nailed to the base or screwed.
Once this height has been reached, install the end partitions in the desired places and continue assembling the structure, securing the boards around the partitions. Each board must be nailed or screwed to the end of the partition.
To simplify the task of installing partitions on the inside of the embedded boards where the partitions will be installed, you need to cut grooves whose width is equal to the width of the partition. Then installing it will be much easier and faster.
The barrel is tightened with clamps
After you have laid the last board, you need to ensure the rigidity of the structure. To do this, the barrel is tightly tied with iron hoops. To connect the ends of the hoop, use iron clamps. After a long period of use, when the wood dries out a little, the clamps need to be tightened so that the gaps are minimal.
Interior work in a round bath
It is advisable to coat all wooden elements inside the bath structure, both walls and floors, as well as furniture, with linseed oil so that the wood is less susceptible to moisture.
The already completed bathhouse building needs to be filled with the necessary furniture and functional details:
- A recess is made in the floor for connection with pipes for draining water.
- Plank flooring is laid on the floor for ease of movement - it must be removable.
- There are shelves on the sides.
- The surfaces near the stove - floor, ceiling and walls - are sheathed with a layer of thermal insulation.
- Install the stove and chimney. At the point of contact with the ceiling, the pipe is covered with thermal insulation.
- Connect a tank for heating water if the design provides for its installation separately from the chimney.
- Water supply pipes are installed - if possible and necessary.
- If a shower is installed, a tray and associated plumbing equipment are installed.
- Set up a table if space allows.
- Lay the wiring with waterproofing and connect it to the electrical network.
- A font is placed near the bathhouse for rinsing after staying in the steam room.
If you want to steam not only in summer, but also in winter, you should think about how to insulate the barrel sauna from the outside so that the heat does not leave it too quickly. In addition, insulation will allow you to save on fuel for heating the bath in the winter. However, when carrying out such a procedure, it is necessary to comply with all standards and lay layers of vapor and waterproofing materials.
Note that the process of building a barrel bath is not as simple as it might seem. Therefore, if you are not confident in your skills, but want the bathhouse to be of high quality and comfortable, it is better to order the production of a barrel bathhouse from construction companies. After delivery and installation of the structure on your site, you will only need to connect the communications system. And then you can light the stove and use the steam room.
Design and requirements
Features of the barrel bath:
- Cylindrical shape.
- The presence of two end panels, which are sheathed with boards.
- Tightening boards with an internal frame with metal banding tape.
- Installation of wooden doors and partitions
- High level of thermal insulation as the floor is above the ground.
Design requirements:
- Safety for visitors. There should be no emergency elements or coatings. Building elements must be securely held.
- Environmental friendliness of materials. They should not emit harmful substances when heated strongly.
- Arrangement of a separate place for the stove. The surrounding surfaces are sheathed with sheets of non-flammable material to avoid fire.
Design model of a barrel sauna
The structure must be sealed so that steam does not escape outside.