Carrying out major repairs of premises is inextricably linked with ensuring the quality of the floor base. Standard technology involves sealing local defects and leveling elevation differences. The horizontal surface is formed using dry or wet technology. In this case, the cement composition is evenly distributed over the area of the room. Floor screed beacons will simplify the process of creating a level base and facilitate construction work. Let's consider the types of guides used, as well as the specifics of their installation.
Preparatory work for installing beacons
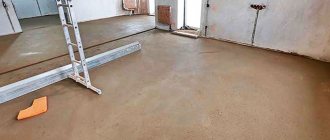
Floor screed guides should be installed on the prepared surface. The performance characteristics and service life of the screed being performed depend on the correct execution of work to prepare the room for installation of guides. The strength of the poured base and its appearance are also determined by the quality of preparation of the floor surface.
Beacons for floor screed
Sequencing:
- Remove skirting boards around the perimeter of the room.
- Clean the old base from the worn coating.
- Eliminate oil traces, greasy stains, and dirt on the surface.
- Clean the base with a vacuum cleaner.
- Sand protruding areas and local irregularities.
- Seal deep cracks and cavities with the repair mixture.
- Cover the surface with primer using a roller.
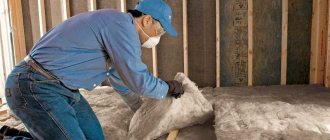
- Place the waterproofing material on the dry base.
Careful preparation of the base allows you to mount the beacons under the screed. After completing the preparatory operations, a base level should be determined that allows the formation of a horizontal plane. Let's look at how to complete the task correctly.
Types of beacons for dry screed
Before deciding how to correctly position the beacons for floor screed, you should complete a full range of preparatory measures, calculation work, preparation of equipment and materials.
The base must meet technical strength indicators
To install the guides, you will need the following as tools and materials:
- perforator and drill;
- tape measure and level;
- U-shaped profile 60×27 mm;
- cord, dowels and screws.
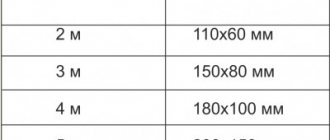
If the thickness of the concrete mixture is small, the 60×27 mm profile can be replaced with 28×27 mm or use a plaster T-shaped analogue measuring 22×20 mm. When using timber, it is better to use material with a cross-section of 50 or 60 mm.
Beacons for floor screed - the main stages of installation and pouring the mixture
The sequence for installing beacons for liquid concrete screed will look like this:
- The starting point of installation is the highest point on the floor surface. In this area, using a hammer drill or a drill, we drill a recess for the dowel. At the other end of the room, the exact same recess is made. A plastic dowel is inserted and hammered into the resulting holes.
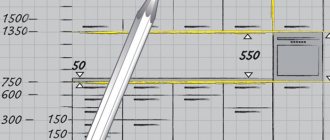
- We carry out the necessary calculations, according to the length of the room and in compliance with the basic rules. According to the data obtained, schematic markings are made on the floor surface using a level and a pencil.
- At the beginning and end of each line, a hole is drilled and dowels are driven in, as was done in step 1.
- Markings are made for self-tapping screws, in the center of the U-shaped profile. To do this, use a pencil and tape measure. After marking, the self-tapping screw is screwed into the profile to its full length.
- The profile with self-tapping screws is installed into the driven dowels and lightly fixed using a drill. Next, at the beginning and end of the room, a cord or wire is pulled along the “zero level” line.
- Adjustment is made according to the tension of the cord. To check, it is advisable to use a building level. Then repeat the operations performed for the remaining guides.
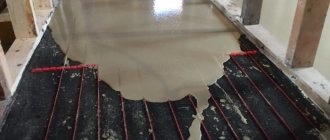
- Prepare cement or concrete mortar with the addition of alabaster. Next, place the required amount of mixture under the profile so that it can be freely pressed into the solution, while maintaining the required level along the upper edge.
- After fixing all parallel guides, perform a final check according to the level. Remove the stretched cords and wait for the cement mortar to dry.
For fixation, it is recommended to use a mixture of cement, sand and alabaster. The drying time of the mixture is usually quite long, and adding alabaster will help reduce it to a minimum.
When setting guides for other types of screeds, you can use a similar method. The stages of preparation and tightening the screws can be omitted altogether and focus on the stretched cord. But this approach requires experience in placing beacons and is not recommended for beginners.
The types of screed beacons are determined by its density, the load on the guides, the skill of the builders and the financial capabilities of the customer.
The use of point beacons and benchmarks is also undesirable. In the first case it is very difficult to level the surface, in the second there are difficulties in using the benchmark itself.
How to install beacons for floor screed using dry mixtures? Linear beacons are used here.
Metal U-shaped profiles can be used as guides. They are laid on the base of the floor with sharp edges up. Alignment along the screed line is carried out using alabaster, which dries very quickly, or by placing pieces of plywood, plastic, tiles and other similar materials under the profile.
This type of beacon cannot be dismantled. Therefore, its height should correspond to the thickness of the backfill, approximately 27-30 mm, and the profile should be thick so that its edges do not deform under load. If this condition is ignored, the evenness of the screed is disrupted.
Beacons are used in individual construction:
- from reinforcement;
- slats;
- profile pipes;
- T-shaped profile.
All of them must be removed, and you can walk on the screed only on gypsum fiber sheets (GVL) having dimensions of at least 50 x 50 cm. There are some peculiarities in the construction of beacons for floor screed when using special Knauf dry building mixtures.
Here, guide rails are used to level the surface.
They are laid on the dry mixture and aligned along the backfill line. Work starts from the wall. After leveling the passage with a leveling bar, the far rail is removed and transferred to the other side, forming a second section. By shifting the slats alternately, the entire surface of the base is leveled. Moving along the loose layer only on sheets of plywood or gypsum fiber board.
Which beacons are better? The specific choice of their type depends on the family budget and the work experience of the performer.
Photo of beacons for dry floor screed.
Dry screed, which is characterized by ease and speed of installation, is becoming increasingly popular. For the most part, fine-grained expanded clay is used for dry screed, on the leveled surface of which GVL slabs are laid.
But since expanded clay is a loose mixture, it needs to be leveled. For this purpose, dry screed beacons are used.
READ MORE: How to properly make a concrete screed for an electric heated floor, how much is the thickness of the base, does it need to be reinforced and insulated?
The minimum layer should not be less than 3 cm, so a regular factory beacon will not suit us. I advise you to use a metal profile for plasterboard 60 by 27 mm.
We already know how to prepare the base and set the floor level, so we will immediately begin installing the beacons.
The profile can be laid with the flat side down and then it does not need to be removed. It will remain in the floor and will act as a lag for the gypsum fiber sheets. With this position of the profiles, expanded clay will fill the space between the walls.
Or you can lay the profile with the flat side up and after the expanded clay is leveled, remove the profile and then fill it with expanded clay.
Conclusion
Well, that's all, friends.
We have discussed with you the installation of beacons for floor screeds. As you can see, all the work can be done with your own hands, without resorting to the help of specialists, and I hope this article will help you with this.
I wish you success!
How to determine the zero level of the future floor?
Determining the correct location of the base mark is a serious operation that affects the quality of the future screed. The technology for performing the work provides for the possibility of using the following control devices:
- hydraulic level gauge. Using an inexpensive device that is common among craftsmen, it is easy to mark the perimeter of the walls of the room;
- laser level. It is used mainly by professional builders, and allows marking with a high degree of accuracy in a limited time.
Laser level ADA 6D Servoliner
Carry out marking activities using a laser level, following the given sequence of operations:
- Step back one meter from the base level in the vertical direction and place a base point on the wall surface.
- Mark 3 points at a meter distance from the surface of the floor slabs on each of the remaining walls of the room.
- Compare the distance from the beam to the floor on each of the 4 walls, find the most distant point.
- Draw a horizontal line through the mark with the greatest distance from the floor level.
- Step back from the drawn line one meter down vertically and draw a closed line parallel to the top one.
The resulting line corresponds to the location of the zero mark. Setting the required thickness of the screed to be formed is easy. You should move upward from the base level by the thickness of the future screed, which is 30-40 mm, and mark a line along the contour of the walls - a guideline for the upcoming pouring.
How to place beacons under a floor screed made using dry technology?
Due to the increased popularity of dry screed, developers are interested in how to properly install beacons for screeding using dry technology. Let's consider the features of using beacons for dry foundations and the procedure for installing a U-shaped profile.
Using beacons to level the base surface
Making screeds using dry technology involves the use of bulk mixtures, among which expanded clay is the most common. Shaped metal profiles of various sections are used as guides for such bases.
Metal profile for beacons
It is important to pay attention to the following nuances:
- the guides are installed permanently, as they cannot be dismantled after filling the space with bulk material;
- the height of the metal profile is selected in strict accordance with the thickness of the dry backfill;
- eliminates the possibility of using thin guides due to possible deflection;
- It is prohibited to fix beacons using self-tapping screws that violate the integrity of the moisture-proofing material;
- metal products for work that are not deformed under the weight of the backfill are used as guides.
Compliance with these recommendations will have a positive effect on the performance properties of the dry floor and its durability.
U-shaped guides for floor screed
The use of U-shaped metal profiles for screeding using dry technology is the optimal solution. The use of guides with a height of 2.7 cm or more guarantees the required layer thickness. Install the metal profile in the following order:
- Install the beacons with the larger side facing the base, with the sharp edges facing up.
- Fill the free space between the profiles with building compound.
- Level the mixture by moving the rule along the protruding edge of the profile beacon.
U-shaped guides for floor screed
Observe the following requirements when installing profiles:
- ensure the distance between the beacons is 150-200 mm less than the length of the rule;
- Maintain a parallel arrangement of metal profiles and equal spacing.
After the excess material is evenly distributed, the edges of the profile together with the backfill will create a horizontal base for laying gypsum fiber sheets.
Wood slats
Filling a floor using wooden beacons is done very rarely today, and dry screeding on them is done more often. This method is now almost never used. The guides are wooden beams (30 mm thick), which must be thoroughly soaked in water before use. After completion of the work, such beacons are pulled out of the set solution, and the resulting voids are filled with fresh mixture. The level is maintained according to the laid screed. To correctly position the beacons, their height is adjusted using wooden wedges, pads, and self-tapping screws.
Today this is the most common method of arranging a not very high screed. Along the line of future placement of the guides, self-tapping screws are screwed into the floor, by screwing in and unscrewing which the height of the profiles is set. To control the horizontal position, a thread, cord or fishing line is pulled between the screwed-in screws.
The zero level of the future floor is drawn, and tubercles of solution are laid out around the thread. To make the mixture harden faster, alabaster is sometimes poured in. Simply, cement-sand mounds dry out in 2-3 days (the composition with additives sets within 3-4 hours). Quite often the role of beacons is performed by plaster profiles.
READ MORE: Minimum thickness of floor screed
Experts recommend fixing the profiles with the same mixture that is used to make the entire screed (without additives, alabaster breaks down quite quickly). It turns out to be much more reliable, but often special plaster compounds are used to attach the guides. Profiles are laid on such tubercles and pressed into the mixture to the required level.
U-shaped profiles for drywall are also used to display beacons. First, self-tapping screws are screwed into the base (the step should be 40-50 cm). Their size is chosen so that at least half fits inside the dowel. Self-tapping screws near the walls are set to the zero level of the future floor (adjustment is made by screwing in or unscrewing).
To make it convenient to install the guides, a thread, cord or wire is stretched between the walls. U-shaped profiles are placed with the base up on top of the screws. The remaining screws are twisted along the stretched thread to align the guides to the zero level of the future floor. The rule checks the correctness of the horizontal, as well as the correct placement of the profiles among themselves. Beacons can be installed in a similar way:
- on wooden blocks;
- bricks;
- tubercles from solution.
Then, where the screws are located, a solution is placed under the guides.
After the mixture has set:
- the correctness of the horizontal is checked;
- the beacons are removed and sealed with mortar.
When the mixture is completely dry, screed is poured around the profiles.
How to make beacons for floor screed formed using the semi-dry and wet method?
The technology for forming wet screeds, as well as semi-dry screeds, allows the use of various types of guides. Let's look at this in more detail.
Installation of the profile on cement mortar
It is not always possible to purchase commercial beacons. In this case, builders use existing metal pipes, as well as profiles made of plasterboard. They are easy to install. How to set up screed beacons using available materials? Follow the following algorithm:
- Make the markings and mark the locations of the profiles.
- Prepare a cement solution, lay it in slides according to the markings.
- Install tubular or plasterboard beacons on the cement mortar.
It is important to install the guides at the same level. The height is adjusted using wooden blocks or pieces of brick placed under the profile. Calculate the ingredients before pouring. Foam placed under the guides will make it easier to install them at the required height.
Installation of the profile on cement mortar
Fastening guides with self-tapping screws
The use of self-tapping screws to fix the guides allows for faster installation. Install the profiles onto the screw fasteners, following the sequence of operations:
- Mark the coordinates of the location of the metal profiles.
- Screw the screws to the required height along the markings at equal intervals.
- Place the beacons on the screws, placing pads under the guides.
Self-tapping screws also allow you to fix wooden blocks to the base, simplifying the further installation of the guides. It is important to maintain the level when installing the beacon. Once we install the beacons for the screed, this is the result we will get when pouring the floor.
Combined method of fixing guides
The combined use of cement mortar and self-tapping screws allows for the installation of guides using a combined method. Carry out installation following the following procedure:
- Make holes in the base, hammer dowels into the channels at intervals of 1 m.
- Screw screw hardware into the dowels, ensuring the required level.
- Pull the cord between the outer screws.
- Place cement mortar between the screwed screws to the required height.
- Place the profile on the mortar so that it touches the screw heads.
Attaching guides to self-tapping screws for floor screed
A rule or construction lath will help you plan the surface of the laid mortar to the required height.
Using the solution as beacons
The surface formed by the hardened cement solution acts as a guide for screed using semi-dry and wet technology.
The procedure for installing such guides:
- Mark the location of the beacons based on the area.
- Install two screws on the extreme sides, stretch the wire between them.
- Prepare the cement mortar, lay it in slides along the markings.
- Form the required height of the base by moving the rule along the stretched wire.
The resulting platform, after the solution has hardened, can be used as guides. The hardening process will take no more than two days, after which further work should begin.
Using mortar as floor beacons
Guides for semi-dry base
It is convenient to use cement mortar as guides for a semi-dry base. Preparing the guides is not difficult:
- Place heaps of cement mortar in the corner areas of the room.
- Level out the cement mounds to form a horizontal platform.
- Wait for it to dry and fill the space between the guides with the compound.
- Plan the semi-dry screed according to the level of the guides.
When forming cement beacons for screed, consider the length of the rule used.
Guides for arranging a floating screed
When making a floating screed, the sand-cement mixture is laid on a foam base, which improves the thermal insulation characteristics of the base. The role of guides is performed by screws screwed into the floor. 24 hours after pouring the composition, perform the following work:
- Remove the screwed landmarks.
- Fill the screw holes with compound.
Regardless of the type of guides used, one day after the work is completed, the guides should be dismantled and the cavities should be filled.
Regardless of the type of guides used, they must be removed after a day
Method for installing beacons without a laser level - video
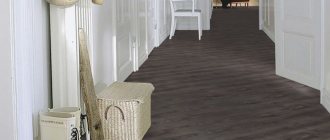
Such markings will allow you to install floor screed beacons without errors in the future. This is the main stage of work, without which you can ultimately forget about the high-quality installation of the future final version with linoleum, laminate or parquet.
If this convexity of the floor turns out to be excessively high relative to the depressions on the floor located in the same room, it is better to cut it off a little with a hammer drill or any available means, even a chisel. Otherwise, the layer of solution that will fall on top will be too thin.
The sequence of actions is as follows:
- We remove the baseboards at the border between the wall and the floor (if they still exist).
- We select a relatively flat area of the floor, place a laser level there, and then, choosing a place 1 m above the floor, set the first control point.
- Also, retreating from the lower points, we place the same marks at a height of 1 meter along the entire perimeter of the walls.
- Connect all marks with a solid line. This way you have created a basic level.
- Now you need to go down 1 meter and place marker points near the floor, connect them with a straight line, creating a zero level.
- Now, based on the differences in the floor and the future thickness of the screed, from this lower level go up 2, 3, 4 cm, depending on how thick your screed will be, draw a third, working line, thanks to which it will become clear how to install beacons for floor screed.
There are two ways to determine the level of floors - using a laser level and without one.
- How to Determine Floor Level Using a Laser Level
We install the laser level in the middle of the room. If available, it is better to use a laser barrier builder.
Using a tape measure we find the highest point. It will be the starting point in calculating the minimum thickness of the screed. To find out how to calculate the thickness of the screed, read this article.
We add the height of the screed to the zero point and get the level at which the beacons will be placed.
- How to determine floor level without a laser level
If you don’t have a laser level, you can do without it. Next to the doorway we mark a point at a height of 100 mm. We mark a line from it along the entire perimeter of the room with a building level.
Using a tape measure, we find the highest point and make a mark taking into account the thickness of the screed.
Now we beat off the found screed level around the perimeter of the room.
We drill several holes on the sides of the walls (the number depends on the area of the room), install self-tapping screws and stretch nylon cords, along which the level of the beacons will be set.
Let's look at the main types of beacons for wet and semi-dry screeds and how to install them.
A very productive and fast method of installing beacons, as it does not require time for the mixture to dry. First you need to purchase mounts for beacons. The most common are Knauff “crammers” and Zubr fasteners. The kit includes:
- self-tapping screw with plastic dowel
- direct fastening, consisting of two parts
Work order:
- Mark the locations for drilling holes in 30 cm increments
- We hammer in the dowels and screw in the screws to the required level.
- We put the lower part of the mount on the screws and install the beacon in it.
- We fix the beacon with the upper part of the fastener.
As you can see, it's fast and practical.
Installing beacons on the solution is not difficult. If the first method required special construction beacons, then for the solution you can use improvised means. For example, I used a 20 by 40 mm profile pipe.
Work order:
- Using pieces of drywall or wooden backing, we set the beacons to the level.
- Mix the solution and secure the beacon
3. If you use factory-made beacons, then first throw on the “bloopers” from the solution in increments of 40 - 50 cm, and then recess the beacon into them to the desired level.
4. The remaining solution is carefully applied to the beacon for better adhesion.
- Combined installation option
The combined option for installing beacons is a mixture of the first and second methods. It’s just that instead of attaching beacons, a solution or mixture is used.
Work order:
- Drill holes and screw in screws until they are level.
- Mix the mixture and apply it directly to the screws.
- We recess the beacon until we hit the self-tapping screw.
- Distribute the remaining mixture evenly throughout the lighthouse.
There is still a debate among builders about whether to leave the beacons in the screed or not. So, particularly smart installers figured out that it was possible to make beacons from a building mixture. And we will adopt their method.
Work order:
- We install self-tapping screws along the entire length of the room to the level of the screed.
- We spread the mixture along the entire length of the lighthouse.
- We turn the building rule over and push it down to the screws.
- Carefully remove the remaining mixture with a spatula, forming a beautiful plaster beacon.
How to make a lighthouse from plaster on the floor - video
- Beacons for semi-dry screed
Semi-dry screed has a number of advantages over wet screed. This includes speed of installation and hardening time. The installation technology is similar to the creation of mortar beacons.
- We form “bloopers” from semi-dry screed, placing them level.
- After they harden with the reverse side of the rule, we form a beacon along the entire length and wait for it to harden.
- Beacons for floating screed
When carrying out renovations, many people want additional insulation for their floors and use penoplex for this. The screed that lies on top of the insulation is called floating.
How to properly install beacons on penoplex - video
Work order:
- We screw in the screws, adjusting from level to level.
- We install beacons using either a mixture, as in the combined method, or fastenings for beacons.
How to install beacons with semi-dry and wet screed? Several types of beacons can be used here:
- linear;
- cement-sand;
- pin (point).
Each of these types has advantages and disadvantages. The ideal option is pin beacons: easy to install, they allow you to pour any type of screed, including under heated floors. A significant drawback is that only professionals work on them. Without experience, you can make irreparable mistakes - the work done will have to start all over again.
Mortar beacons are also easy to make. Height adjustment is made either by cutting the pile, or by adding a solution to it. Minuses:
- easily damaged by careless movement;
- does not allow for monolithic filling;
- it takes time to set, which delays the work of pouring the screed for 5-8 days.
READ MORE: Brand of concrete for floor screed - selection and preparation nuances
Profile beacons are more difficult to install, but the work of leveling the surface of the mortar is easier; even a novice builder can do it with his own hands. It is enough to follow the rule along the guides of the lighthouse. The disadvantage is the impossibility of monolithic filling.
Let us consider in detail the technology for installing each type of beacon.
Types of beacons for linear floor screed:
- profile on self-tapping screws;
- profile on the solution.
Selection and installation of guides for self-leveling base
Quite often, home craftsmen, when pouring the self-leveling base themselves, deliberately do not use screed beacons. Craftsmen believe that the material itself will fill the base without height differences or deviations from horizontality. Professional builders advise using benchmarks, as well as ordinary self-tapping screws, for self-leveling floors.
We use benchmarks to level the surface
Structurally, the benchmark is a tripod with an adjustable position of the vertical rod. The bottom plane of the rod is adjusted to the filling level according to the previously made markings. Benchmarks for self-leveling floors are installed quite simply. They are placed on a primed surface in various parts of the room with an interval of 80-100 cm. Having completed pouring and leveling the base, the benchmarks should be removed.
Beacons for leveling the floor, made using self-tapping screws
A self-tapping screw screwed into the floor is also used as a guide when pouring self-leveling bases. It is installed at the required height in different areas of the room, like a benchmark, at equal intervals. After leveling the filling composition, the screws should be unscrewed.
Final Recommendations
Beacons for floor screeds can significantly simplify the process of screeding, as well as ensure the horizontality of the formed base. It is important to control the horizontal installation and ensure a fixed position. To increase the strength of the formed base, a screed with fiber fiber is used. To increase water resistance, add liquid glass to the cement screed. The proportions for concrete and mortar must be observed. Knowing how to calculate a cube of concrete, it is easy to determine the amount of material to fill the base.
On our portal, novice developers will be able to obtain comprehensive information on how to insulate the base and how to calculate the amount of bricks per base.