Do-it-yourself shower design options for a summer residence: photo examples
Building a shower is considered a great idea for those who spend the summer in the private sector. This structure can have a stationary structure with a foundation or be a “temporary structure” installed only for the summer season. Let's consider possible options that can be arranged in the yard of your own home.
Metal frame option
This product is made up to two meters or more in height. For construction, a welding machine and a metal profile will be useful. You can use plastic or lining as a fence and upholstery. It is permissible to install such a structure directly on a paved sidewalk, having previously equipped it with a drainage system.
A simple lining can be an excellent screen for an outdoor shower PHOTO: roomester.ru
Wooden shower with space for a tank
The structure is made from any type of wood. You can even use previously used boards, subject to their further waterproofing and painting.
A classic wooden shower can always be complemented with interesting accessories PHOTO: yandex.ru
The main part of the summer shower is made with blank walls; the top can be made in the form of a lattice. A metal profile is laid on top of the structure (old pipes can be used). It will serve as the location for installing the tank.
Polycarbonate shower
This option is based on a metal frame, on top of which a polycarbonate casing is fixed. A flat tank with an already organized watering can is installed on the roof. The floor in this shower is made of wood. It is advisable to place the structure on concrete or in a special place where water is discharged into the sewer.
Polycarbonate can be used in rounded or rectangular booths PHOTO: 1000000diy.ru
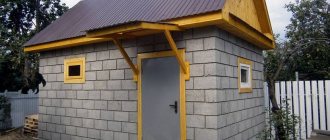
Shower in the form of a chic hut and a budget option
On a summer cottage decorated with landscape design, a shower stall made in the form of a wooden house will look original. This shower has a roof and is often equipped with heated water.
When installing a permanent shower, wooden walls have to be varnished PHOTO: krasimsami.com
As for the budget option (temporary), it can be made from a wooden frame. The role of the screen will be played by small twigs of trees or reeds. Forest brush will do. Instead of a door, it is advisable to hang oilcloth on rings. Slatted layers with holes for water drainage are laid at the bottom. The water tank is installed on the roof with a pre-constructed base for it. Water is heated by solar heat.
Pros and cons of a summer shower
Today, summer showers of various designs are used to furnish summer cottages and houses. Each of them has its own advantages and disadvantages. This is worth considering when choosing a design. Popular options include:
- Film shower. The structure consists of metal and wooden elements that are covered with film. The disadvantage of such a shower is its fragility. As for the advantages, we can highlight ease of installation and mobility. If desired, it can be easily moved from one place to another. Metal corners are often used for construction.
- Frame construction. The shower is a stable and monolithic product that has a long service life. The design is well ventilated, and the water heats up quickly. It is easy to serve and comes off just as quickly. As for the disadvantages, it is worth highlighting the vulnerability to negative environmental factors. During operation, the structure loses its attractive appearance.
One of the most durable solutions is a summer shower made of polycarbonate Source demidovo52.ru
So, having analyzed all this, we can note several main advantages of a summer shower:
- efficiency;
- ease of installation;
- practicality.
As for the disadvantages, among them we can highlight the limitation of use. The fact is that in such structures, water heating is most often carried out from solar energy. Therefore, they cannot be used in the cold season or in bad weather.
DIY portable country shower
A portable shower for a summer residence is a convenient design that can be moved to different places from time to time. For example, if the place of the previous installation is already quite damp, and there is no hole to collect moisture. To organize a quick wash after working on the site, you just need to move the structure to the desired place and start bathing.
Such devices sometimes include a frame and a screen. But they also cost more PHOTO: zacaz.ru
For such a shower, a special foot pump is usually purchased, which is driven by the muscular power of the legs. At the same time, it pumps moisture from a nearby container through a special pipe. The device is quite mobile; the main thing is to think in advance how the screen will be arranged.
Decorating the shower in the country house inside and outside
Preface
When finishing a summer shower, performing external work, it is important to choose a material that is resistant to precipitation.
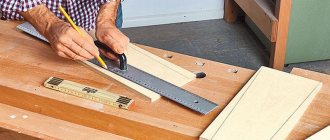
Required tools and materials
Lining Roller Nails Primer Planed board Drill Grout for tiles Stone Pencil Brush Claymer Plastering ladle Ditch Lighthouse Stain knife Tile Tile cutter Scraper Tape measure Square Extension Level Plaster mixture Screwdriver
Expand
When finishing a summer shower, performing external work, it is important to choose a material that is resistant to precipitation. It is also desirable that the exterior decoration be successfully combined with other country buildings. When decorating a shower in a country house, the same materials are used inside as for showers located in the house. Among the leading ones are plastic panels and traditional tiles.
Exterior wall decoration for shower
After the construction of a brick summer shower for finishing the walls on the outside, the walls can be plastered. It is recommended to start plastering from the top. To do this, moisten a small area with water and, using a grater, carefully apply first a less thick layer of solution, and then a thicker one.
The thickness of each layer should not exceed 5 mm. The plaster must be applied evenly over the entire surface, otherwise it will not dry at the same time, and the layer will be uneven.
After a few minutes, use a trowel in a circular motion to grout the plastered surface until it becomes even and smooth. If the solution has already hardened and will not rub well, then it needs to be moistened with water by sprinkling the surface with a matting brush. This process must be repeated in the same sequence until the work is completed.
Plastering the corners of the walls must be done using a wooden strip attached to them. Approximately 7-10 minutes after applying the solution, the lath should be carefully removed, the corner should be corrected and rubbed.
Here you can see photos of the shower finishing inside and outside:
Do-it-yourself stationary summer shower for a summer house: construction features
A permanent cabin can be supplemented with a bathroom right inside, if space allows PHOTO: yandex.uz
The first thing you should take care of when installing a stationary shower is the availability of space for water drainage. The question often arises whether it is possible to drain into a sewer pit prepared for a toilet. Still, it’s better to abandon this idea and make a separate one. Its arrangement also has its own subtleties.
- The size of the recess should be at least 60x60x60 cm. However, if you plan to use the shower intensively, then the depth should be greater.
- On well-drained soil, the finished pit is filled with expanded clay or broken brick for better absorption.
- If the hole is dug on sandy soil, then it must be secured with a wooden frame to prevent the walls from collapsing when filled with water.
- The drainage hole in a stationary shower stall should be located in the middle. The floor in this place is arranged with a slope.
The pit for an outdoor shower can be reinforced on the sides with mesh. Under no circumstances should you use materials that are subject to rapid rotting (thick cardboard, plastic, rubber). They tend to generate an unpleasant odor upon contact with used water.
Drawing of a summer shower with your own hands: designation of all the details
Before building a shower, a drawing must be completed, in which only the frame is usually drawn. If we talk about standard parameters, they should be as follows:
- frame height - 210 cm;
- width - 100-110 cm;
- the presence of a crossbar at the bottom of the frame (10 cm from the base);
- flat and durable crossbar for the tank;
- concrete base 10-15 cm high.
Detailed explanation of dimensions in the drawing PHOTO: kanalizaciya-stroy.ru
It is most convenient to make a door from a metal profile, fastening the sheets at the corners by welding. For a standard shower, the door height should be 160 cm and the width 94 cm. If possible, the top and bottom should be left open. Canopies are attached to the inside of the door frame. It is important that they are placed at the same distance above and below the edge of the door.
Tools and materials that will come in handy
An outdoor shower is built with your own hands using tools that every owner has. Additionally, you do not need to purchase anything except consumables. To build a cabin you will need:
- metal or wood for the frame;
- wooden beam for pallet;
- raw materials for sheathing (oilcloth, tarpaulin, slate or polycarbonate);
- grinder, drill with drills;
- bolts with nuts, screws or self-tapping screws.
The connection of the metal frame can be made with special spacer corners PHOTO: zmeevar.ru
Please note that the choice of material for the upholstery of the finished shower frame also depends on the technology of its fastening.
To install a shower floor, you may need a drill and a hammer drill PHOTO: gidproekt.com
On a note! To build an outdoor shower, choose only dry material. The raw material will gradually begin to dry out in the sun, so cracks and divergence of joints may form.
Laying the foundation for a garden shower at the dacha with your own hands
For a stationary garden shower, first of all, it is necessary to build a foundation. It will strengthen the structure and prevent it from collapsing under the influence of seasonal weather conditions.
The drain can be made extensive so that there is no stagnation of water on the pan PHOTO: pinterest.ru
There is no need for a serious foundation here, since the booth itself is light in weight. For the foundation, you can use special blocks up to 20 cm high. They are pre-dug in or concreted for immobility. A frame is placed on top of such a base.
Draining water in an outdoor shower for a summer residence
It is acceptable to use two options for the waste system:
- into a cesspool;
- away from the cabin.
If you are installing a shower with a drain into a cesspool, then as a tray you can use an option made of waterproofed wooden slats with small gaps between them. All water will be removed very quickly without stagnating in the cabin.
Plan in advance what the pallet will be like. Its dimensions should be taken into account when constructing the frame PHOTO: m-strana.ru
When you plan to simply drain dirty wastewater to the side, it is recommended to install ready-made shower trays with a factory-installed siphon. The drain pipe is then simply lowered into the trench to drain the water.
How to arrange a frame
When making a metal base for a shower, you need to know how to work with a welding machine and a grinder.
The pan must be above ground level, so for proper water drainage it is installed on a frame PHOTO: urojay.by
To join metal profile parts together, it is better to use welding. To prepare the door mounting points, you need to drill the required number of holes in the stand and door. Then, using self-tapping screws or bolted connections, we fasten the door with awnings into place. Upon completion of all joining work, the base is painted and treated with waterproofing.
It is necessary to have crossbars for a more reliable, rigid connection PHOTO: sk-nvkz.ru
For detailed information about the production of a metal frame, see the video below.
We do the shower lining with our own hands
Creating opaque walls in a shower stall can be done in different ways. The main condition is to correctly determine the size. Let's look at what can be used and how to attach it.
- Oilcloth or dark film as a budget option. Not durable. Typically, such coverage is only enough for a season. Can be fixed with double-sided adhesive tape to metal or with buttons to wood.
- Special impregnated fabric. The fixation features are the same as those of the film. It lasts one season, then starts to come apart at the seams.
- Summer shower made of polycarbonate. This material requires mandatory waterproofing of the sections, since water gets into them and over time it begins to deteriorate. The canvases themselves are translucent, so it is better to choose options with good shading.
- Flat slate. It is mounted on large diameter bolts into specially prepared holes on the frame. On one side, a washer is installed, and on the other, the part is secured with a nut.
Arched shower cabins are considered warm and unventilated PHOTO: roomester.ru
It is better to choose corrugated sheeting in light colors, since dark ones get very hot. There is a risk of getting burned PHOTO: mastervdome.com
To ensure that wooden walls are well ventilated and dry, they are mounted with a gap of 2-3 mm PHOTO: balkans.kp.ru
Heated shower tank
Tanks with a built-in heating element are more often idle in the summer. However, during the rainy season they are very useful. Such devices operate on electricity, so it is necessary to think in advance about how the current will be supplied, taking into account safety precautions.
It has a convenient design and, thanks to its flat sole, is easily attached to the booth PHOTO: vodoley-spb.ru
How does water fill the tank?
Containers for summer showers are usually equipped with special fittings for filling liquid. If you connect a stationary water supply to them, water will be drawn every time the tap is opened. There are options in which pumps are installed.
It is advisable to install a float inside the tank, which will show the amount of water PHOTO: stroychik.ru
Organization of heating water in the tank for a summer shower
When water enters the heated country shower, the heating process is started by the heating element, which operates until the liquid reaches a certain temperature. After this, the thermostat turns off the heating elements, which remain idle until the water cools down again. You can heat water in the shower using a solar panel.
On a note! A heated summer shower for a summer cottage can be used regardless of weather conditions. You just need to set the temperature parameters.
What should a watering can be like for a summer shower?
The shower head is made of plastic and includes fittings and nuts for reliable fixation. A shut-off valve is also installed on the nozzle of the watering can. To attach the device to the tank, you must:
- wrap fum tape onto the thread of the outlet pipe;
- install gaskets and washers, depending on the type of connection;
- Screw the watering can into the mounting thread.
A watering can can be made from available materials PHOTO: econet.ru
The watering can be made of stainless steel or plastic PHOTO: mosdobrostroy.ru
Also, watering cans can be made together with a mixer. Such models are appropriate for devices that receive water from a stationary water supply. Sometimes they come with a tank for a summer shower.
Organization of water drainage in a summer shower
There are several ways to arrange a drain in a summer shower. Thus, water can be discharged into a filtration well or into a filtration field. In the latter option, channels are installed between the beds. This will allow you to irrigate the area at the same time without any special costs.
Diversions are carried out in open and closed ways. In the first option, ditches are made at a slight slope from the collection site. This option is often used on moisture-resistant soils. The closed method involves laying pipes in the ground.
We need to decide where the used water will flow, given that it will be soapy. Source pol-exp.com
Features of building a summer shower with your own hands for a private home from different materials
The shower stall can be installed directly on the lawn PHOTO: bathroomexpert.ru
To build a shower in a private home with your own hands, taking into account all the parameters and preferences, you need to choose the appropriate material and follow the technology.
How to make a summer shower with your own hands from wood
First, let's prepare the material for the wooden shower:
- three-meter bars 5x5 cm - 8 pcs.;
- jigsaw;
- screwdriver, screws, corners.
The table provides step-by-step instructions.
| Illustration | Description of action |
| We cut fragments 200 cm long from the bar | |
| We make a “half-tree” carpentry joint, to do this we cut grooves at the ends of the bars | |
| Using a screwdriver and self-tapping screws, we mount the mounting angles from the inside of the connection | |
| We install jibs to strengthen the structure. We use 135º angles for fixation | |
| We fasten the entire frame in the same way. | |
| At the top of the frame we mount crossbars that will hold the water container | |
| We take a tank and install a watering can in it |
All that remains is to install the summer shower, made with your own hands from wood, on a pre-prepared foundation and cover it with shading material.
How to build an outdoor shower at the dacha with your own hands at the dacha from pipes and polycarbonate: video
A do-it-yourself polycarbonate shower cabin in the country with a durable pipe base not only looks chic, but is also durable. We invite you to watch a video that talks about the nuances of constructing a summer shower from a profile pipe.
The frame is connected using a soldering iron on plastic PHOTO: plastcom.kz
How to make a summer shower at the dacha with your own hands from brick
A brick shower necessarily requires a shallow foundation. Its construction is based on several stages.
- A trench up to 40 cm deep is dug along the perimeter of the future cabin. The width of the recess must be at least 20 cm.
- After the screed has hardened, brickwork is erected using a special adhesive base.
- Wooden blocks are laid on top, which will serve as support for installing the roof and installing the tank.
It is better to additionally equip a shower with blank walls with a window PHOTO: 1000000diy.ru
Brick construction is one of the most durable and original. This design is built for a long time.
How to build a summer shower from corrugated sheets
Handles for shower stall doors are attached to the frame PHOTO: koffkindom.ru
The shower stall can also be made from corrugated sheets. This material is considered durable, attractive and quite affordable. The finished structure will retain its bright appearance for a long time. The work is done in a few simple steps.
- Assembling a metal frame.
- Sheathing with corrugated sheets (choose roofing material for this).
- Installation of doors and tank.
- Installation at the required location with a prepared pallet.
The corrugated shower has very sharp ends. Therefore, it is recommended to close them; for this purpose, you can use a special sealant.
Insulating a summer shower
Why insulate a simple summer shower if it is used in the warm season? The fact is that carrying out thermal insulation work will significantly extend the life of this structure. The main thing is to properly insulate the perimeter. For this use:
- Mineral wool. This is an environmentally friendly material that is very easy to install. The mats are laid into the frame, after which it is sheathed from the inside. To prevent moisture from entering the material, it is covered with an impermeable film.
Shower frame prepared for installation of insulation Source seattlehelpers.org
- Glass wool. If desired, it can be used to insulate the shower at the dacha. Of course, you need to be careful when working with it and carefully follow the installation instructions.
- Waterproof foam. It is a modern material that is optimally suited for insulating outdoor showers. To do this, it is enough to use slabs 5 cm thick. They are laid in a frame, on top of which the interior walls are finished.
The insulation of the structure allows it to be used even in bad weather. Of course, it is worth understanding that thermal insulation is only relevant in the case of closed shower stalls.
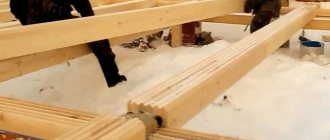
Step-by-step instructions for building a shower with a wooden frame
Step 1. Mark the concrete base slab. To simplify water drainage, it is recommended to leave a recess in the middle of the shower for natural moisture absorption. The fertile layer should first be removed from the ground, a sand cushion 10–15 cm thick should be poured, compacted and leveled.
Step 2. Prepare the formwork. You need to make two square boxes. One with a square side of approximately 100×100 cm, the second inner one with a square side of approximately 60×60 cm. The height of the formwork is at least 10 cm; for manufacturing, use boards approximately 20 mm thick and 10–15 cm high. If you are afraid that the boards will bend under load concrete, then reinforce the formwork around the perimeter with wooden or metal pegs. Check the corners with a square; the formwork can be assembled using ordinary nails.
Step 3. Install the formwork on the prepared site, check its position. The small box should be located exactly in the center of the large one.
Formwork
Step 4: Prepare the concrete for pouring. For manufacturing you will need cement, sand and gravel in a ratio of 1:2:3. The accuracy of the proportions does not matter much; the strength is quite enough for light loads. Fill the formwork with concrete and use a level lath to level the top surface horizontally. Allow approximately 10 days for the solution to set.
Step 5. Dismantle the formwork and begin making the frame. It will require bars measuring 50x50 mm or more; the amount of material can be easily calculated. It is necessary to add the length of four vertical posts to the sum of the two perimeters.
Step 6. Make a base for the vertical posts. The bars can be connected in half a tree; a jumper should be made in the middle of the base; it will serve as an additional support for the wooden shower grate. Make sure that all corners are right; you can connect the bars with nails or self-tapping screws. The base bars (frames) should lie approximately in the middle of the concrete slab; the specific dimensions do not matter.
Bars on a concrete slab
Important. Be sure to soak the base several times with an effective antiseptic. There is no need to install waterproofing between the frame and the concrete; it will only cause harm. The fact is that water gets on top of the insulation and cannot be absorbed into the concrete. As a result, wooden structures are in contact with water for a long time.
Step 7. Saw off the vertical posts to size, you need 4 of them. It is better to cut with a hand-held electric saw; if you don’t have one, you can use an ordinary hacksaw.
Step 8. Begin installing the vertical posts. For fixation, it is better to use galvanized metal corners. They greatly simplify and facilitate the work and guarantee proper stability of the structure. It is impossible to install vertical racks yourself; hire an assistant. Temporarily secure the racks with any pieces of boards; later they will be replaced with real stops. Constantly check the verticality of the racks, use a level.
Fixing vertical posts
Step 9 . Make a second square from the bars, the dimensions are identical to the first, a water tank will be installed on it. If the container has a large volume, then you will have to install several additional jumpers; the distance between them depends on the size of the container.
Step 10. Using corners, secure the top square to the vertical posts. Check all frame elements with a level and correct errors if necessary. You can place wooden wedges at the joints; this will not affect the strength and stability of the structure.
Jumpers
Frame post strapping
Step 11. One by one, remove the temporary spacers and install the permanent ones. Use the same bars as for making the frame. The length of the spacers should be equal to the distance between the vertical posts; saw the ends at an angle of 90°. For fixation, use the same galvanized metal corners. Spacers are the most critical component of the frame; take all measures to ensure maximum strength.
Roof sheathing
Step 12. The frame is ready - start covering the side surfaces. Any material can be used for cladding. You can make doors to enter or use a retractable curtain. If the cladding is solid, then windows should be provided under the ceiling. Leave ordinary holes; you can cover them with glass or film. It is recommended to seal the sheathing cuts at the outer corners with even edged boards.
Flooring
Step 13. Place a container of water on the roof of the frame.
Shower tank
We put a tank on the roof
Cladding the walls with clapboard
Inside view
Shower watering can
Practical advice. If you plan to take a shower in rainy weather, then the roof should be covered with a piece of metal profile, and a hole should be made under the outlet of the shower head.
Step 14: Paint the wood surfaces with durable exterior paint.
Lining after applying impregnation. Curtain hung
You can install electric heating elements in the tank to heat water, but you must certainly follow the rules of the Electrical Regulations.
Comparative characteristics of various design options
To make it easier for inexperienced builders to choose the best option for a garden shower, we present a table of the most commonly used designs with a brief description of their characteristics.
| Name of structural element | Technical description |
| Frame | Can be made from wooden blocks or rolled metal. The dimensions of the bars are approximately 50x50 mm; slats measuring at least 20x30 mm are used to make side stops. It is better to make a metal frame from square or rectangular pipes measuring at least 20x20 mm. |
| External surface cladding | All types of lining are suitable, including natural ones. Profiled metal sheets, cellular or monolithic polycarbonate are widely used. The cheapest options are plastic film or thick fabric. |
| Water drainage | Some options may have special septic tanks, and most do not require storage tanks. Several tens of liters of water are quite successfully absorbed into the soil, especially if its composition is sandy or sandy loam. |
| Water tanks | Both metal and plastic containers are used. The best option is to buy shower containers in specialized stores. The minimum container volume is 100 liters, external surfaces must be painted black. |
| Water heating | Sunlight or combined with the use of electric heating elements. It is recommended to make a specific choice taking into account the climate zone of residence and the time of use of the shower. |
Garden shower
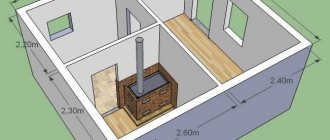
The construction of a shower consists of several stages; compliance with them allows you to avoid many troubles.
An example of a summer shower design
Step-by-step instructions for building a shower with a metal frame
To make the frame you will need a metal profile pipe, an angle grinder, a welding machine, a tape measure and a level.
All tools should be at hand
After manufacturing, it is recommended to protect metal surfaces from corrosion processes with paint for exterior use. The amount of metal is determined based on the dimensions of the frame, as we described above. It is better to use a purchased water container; the length and width of the structure are adjusted according to its size.
Step 1. Draw a sketch of the frame indicating the length of each element. Take your time, carefully consider ways to strengthen the vertical posts. To strengthen loaded units, you can use pieces of rolled sheet metal with a thickness of at least 1 mm. Prepare squares or triangles with a side of 10–15 cm from it. Make sure that the angle is right and the cuts are even.
Step 2 . Cut the blanks with a grinder. It is necessary to cut in compliance with all safety regulations; the grinder is a very dangerous tool. If you have many identical parts, it is recommended that you first accurately measure and cut one, and then use it as a template. This increases the accuracy of the elements.
Important. Make sure that the cutting disc rotates in the desired direction. If installed correctly, the sparks should fly towards the master, but for some it is inconvenient to work this way and they change the direction of rotation. This is very dangerous; while biting, the grinder is thrown onto the worker, which can cause serious injuries. It is impossible to hold the tool with your hands; the ejection force is too great.
Step 3. Start welding the frame. In order for the weld to be strong, maintain the welding conditions. The electrode thickness and current indicators depend on the profile parameters. For the frame, it is enough that the pipes have a wall thickness of 1–2 mm; such rolled products have the required physical strength and will fully withstand the load of a water tank. For welding, we recommend using a Ø 2 mm electrode; make sure that the slag is evenly blown off the surface of the molten metal and the seam is continuous.
How to weld a structure correctly?
- Prepare a level workspace; the dimensions should be such that the largest elements can fit freely.
- Place the two parts to be welded on the workbench and check their position under the square. As we already mentioned, the angle should be right and the parts should lie in the same plane.
- Tack the parts on one side, the length of the tack is no more than a centimeter, give the metal time to cool. During cooling, the unit will move to the side and the correct position will be disrupted.
- Using a hammer, trim the corners and turn the pieces over to the wrong side. Check the dimensions and spatial position again.
- Carefully weld the parts on the other side, now you can make a seam along the entire length.
- Turn the assembly over again and make a full tack weld. Weld metal pipes on all sides at the same time.
- Remove slag from the surface of the weld and check the quality of the weld. If there are large shells, then re-suture.
- Use a grinder to remove sharp metal stains.
Thus, you can independently prepare two side planes of the frame; all that remains is to connect them into a single structure. It is very difficult to do this alone; it is better to call an assistant. One will hold the elements, and the second will weld them. You need to constantly check the corners, don't rush. Practice shows that reworking an incorrectly welded frame always takes much more time than carefully checking the dimensions and spatial position during the preparation of structural elements.
Welded frame option
It is better to make vertical posts and a platform for the tank from a rectangular or square pipe; with the same dimensions as a round one, they have significantly better characteristics of physical strength in bending and compression. As jumpers, in addition to sheets at the corners, you can use any wire rod, square or reinforcement. There are pieces of profile pipe of sufficient length left - use them.
Vertical racks
Metal frame for summer shower
Mounting unit for a vertical post and two cross beams (connection option if there is no welding machine)
Attaching the angle to the cross beam
Step 4. Weld a platform below for the sheathing boards. The dimensions do not matter, it is intended only for support. The grille can be made non-separable or assembled from individual elements. For manufacturing, take smooth lumber; the thickness of the boards or slats should support the weight of the washable ones. If you have thin materials, then make several jumpers for them.
Step 5: Install the frame over the shower location. This can be a concrete platform or ordinary temporary stone stops. The second option is preferable for several reasons. Firstly, there is no need to engage in excavation and concrete work. Secondly, at any time, if necessary, the shower can be moved to another place.
Summer shower foundation
Foundation for a summer shower. Measuring diagonals
Metal frame - old lattice, wound with wire
Shower foundation. Cover with large construction waste
Preparation of concrete. Mix the mixture in a trough
Preparation of concrete
Add crushed stone to the cement mortar
Poured foundation
If you weld legs with support platforms made of sheet steel at the bottom of the vertical posts. The dimensions of the platforms are approximately 20x20 cm, this is enough to guarantee the stability of the structure. Such a platform makes the shower more mobile when moving; for installation you only need to slightly level the ground under the supporting platforms; this work takes a few minutes.
Practical advice. Many people are concerned about water drainage. If your cabin is located next to the entrance of the house, and there are sidewalk paths everywhere on your personal plot, then it is recommended to make a dirty water storage tank. If the shower is located at the back of the buildings, then you don’t have to waste time and effort on building outlets. For hygiene procedures, 10–15 liters of water is enough for one person; such a small amount will be absorbed into the ground without any problems. For complete peace of mind, you can dig a hole under the shower for 2-3 car tires, water will accumulate in it. After moving the frame, the tires are removed and the hole is filled with earth.
Step 6. Level the cabin, make sure that the racks are strictly vertical and the platform for the container is horizontal.
Attaching a vertical post to a corner of the foundation
To fasten the parts of the structure, ordinary M6 bolts of different lengths, corresponding washers and nuts were used. But the nuts are not quite ordinary, but with plastic sealing rings
Step 7. Clean the surface of the metal structure from rust, oil stains and dirt, and check the stability of the frame with your hands. Everything is normal - you can start painting. Choose the color of the paint as desired, the main thing is that it is suitable for painting metal surfaces and for outdoor use. Don’t be too lazy to do the painting very well, use brushes, carefully rub the paint into the frame. If one layer is not enough for uniform coverage, you will have to repeat.
First you need to degrease the surface with white spirit, kerosene
Treating a metal frame with a rust converter
Metal frame after treatment with a rust converter
Metal frame coated with primer
Primer for metal
Step 8. Place a water container on the top platform and attach a shower head. If desired, you can make an additional outlet for collecting warm water for various household purposes.
Water supply to shower
Water supply through a tee with taps on taps
If there are no doors in the cabin, and only a plastic curtain is hung, then the wind can blow it inside the cabin. This creates some inconvenience when taking a shower. There are several ways to correct the situation:
- Attach to the curtain in several places of attachment. Two approximately in the middle of the height is enough.
- Hang any “hangings” next to the plastic curtain. The main selection criterion is weight. The heavier they are, the better they will hold the curtain.
Vertical threads with wooden beads hang under the curtain
If you want to increase the comfort of taking a shower, then it is better to attach a door. For its manufacture, you can use both lumber and rolled metal. The design of the doors is elementary; they are hung on vertical side supports.
Experienced summer residents strongly recommend adding an additional compartment next to the shower for changing clothes and storing bath accessories.
Additional semicircular compartment
When making the frame, think about this point; little material and time will be required, but the convenience of using the shower will increase significantly. The compartment also needs to be equipped with wooden gratings for the feet.
Making a wooden grate for the floor
Lattices
Wooden floor gratings
Silicone mat to prevent feet from slipping on wet boards
If children will use the shower, be sure to install a shower head with a flexible hose for them. Place the water supply switch tap at such a height that children can reach it without any problems. Read the seal for the glass curtain in the bathroom on the website.
Good reliable lock on the summer shower