Everyone knows what cast iron radiators look like. They are rightfully considered long-livers in the heating market. Invented back in 1855, they are still popular among buyers. Despite the huge selection of imported and domestic radiators of various shapes and designs, many still settle on cast iron models. After serving for some time, the batteries begin to leak and heat up worse. What is better - to change them or repair them? Experts believe that repairing cast iron batteries makes sense. If they are put in order, replacement can be delayed for several more years.
Design and principle of operation of cast iron radiators
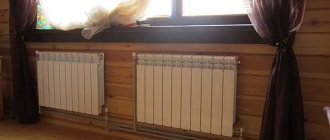
Radiators have a sectional design. In appearance, the sections resemble metal columns, inside of which there are channels for coolant. These elements are connected to each other using a nipple system. The joints are sealed with paronite or rubber gaskets. The height of the devices is 350-1500 mm, the depth reaches 65-500 mm. The power of radiators depends on the number of sections and heat transfer area. Indoors, cast iron batteries are placed under window sills. Usually wall mounts are brackets, but there are floor models with legs.
Depending on the model, cast iron radiators have a power of 100-300 W. Approximately 25-35% of heat is transferred by radiation (radiation), part by convection. Thanks to radiation, heating is better: the radiator heats objects, not just air. Warm layers of air rise upward, and radiation provides heating to the lower part of the room. This creates the most comfortable temperature conditions.
What and why can break in the radiator
Cast iron tolerates the alkaline coolant environment well, is slightly susceptible to corrosion and has high mechanical strength. Heating devices have a simple design and are very durable, so breakdowns due to simple metal wear are a rare occurrence. A striking example of a potentially possible service life is working pre-revolutionary batteries that have been preserved in the homes of some St. Petersburg residents. But cast iron batteries also have weak points; it is in them that the “root of evil” lies.
The most common causes of battery problems
- Heavy weight, bulky
Cast iron batteries are large and heavy, which becomes a problem during installation. The slightest flaws in the installation can lead to malfunctions during operation. If you do not take care of a sufficient number of powerful brackets, the batteries may become distorted over time, which will also lead to negative consequences.
- Insufficient resistance to high pressure and water hammer
Cast iron has good technical and operational characteristics, but the load that domestic heating networks can create may be too great. Due to water hammer, leaks are possible at the junctions of sections.
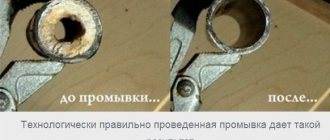
Along with hot water, foreign impurities, small particles of dirt and rust circulate through the pipes, which leads to blockages in the internal channels. Batteries must be washed promptly, otherwise malfunctions in their operation are inevitable.
- Wear of intersection gaskets and threaded nipples
Joints are always a “risk factor”. Nipples and gaskets last much less than cast iron. They need to be replaced periodically. After this, you can forget about heating problems for a long time.
Signs of a broken cast iron radiator
- The room doesn't warm up well
If during the heating season the room temperature is lower than usual, check how things are with your neighbors. If they have no complaints, it's time to tackle the heating. Perhaps regular flushing of the channels will solve the problem.
- There is a coating on the radiator
It usually forms at joints. The reason is the low quality of the coolant. When the gaskets wear out, they leak fluid. After drying, a residue similar to scale remains.
The most obvious sign of malfunction is the appearance of leaks. Repair involves sealing and applying a metal clamp. If there are several leaks in the radiator, it is better to replace the device.
The most common problems with cast iron radiators
First of all, it is necessary to outline the range of problems that can be solved using cold welding or adhesive when repairing heating radiators.
Traditionally, cast iron batteries are considered the most vulnerable. Here, many problems lie in the design and properties of the metal itself. First of all, cast iron, unlike steel radiators or bimetallic batteries, is very fragile. Yes, cast iron is very strong, but at the same time it is a fragile material - it can withstand great pressure, and with a small impact it can crack.
The second point is the property of cast iron - it is a porous material, which contributes to the formation of craters on the inner surface and the gradual destruction of the wall.
Third, when assembling modern radiators, sections are connected using internal nuts, and the space between the sections is treated with a special compound that reliably cements the connection. In the recent past, flax and red lead were used to seal these joints, which over time led to a breakdown in the tightness of the joint.
So based on the above, the most common problems with cast iron radiators are:
- Violation of the tightness of the battery section after mechanical impact - an impact from the outside or a sharp increase in pressure from the inside;
- Leakage through the body of the radiator due to the formation of a hole in the wall due to metal corrosion;
- Failure to seal the connection points of the radiator sections, pipe supply points, and plug nuts.
As for other types of radiators, similar problems are less common; here, most often the cause of damage to the body of the section is metal corrosion or mechanical deformation of the walls when the battery freezes, when freezing water ruptures the metal.
Do-it-yourself repair of cast iron radiators
Usually the location of the leak is easily determined. If difficulties arise with diagnostics, remove the radiator, immerse it in a bath of water and monitor the appearance of air bubbles. The place from which they rise is not airtight. When the leaking area is identified, materials and tools should be prepared:
- thin metal cable;
- putty;
- a piece of fabric;
- a metal clamp or something that can replace it: electrical tape, wire, etc.
Work order
- Cover the floor with oilcloth and place a rag on top to absorb excess moisture.
- Using a thin cable, clean the leaking area of the radiator down to the metal, degrease it with any solvent or gasoline.
- Seal the leak. Apply the putty to a strip of fabric and wrap it tightly around the damaged area in several layers. If metal powder or epoxy resin is used as putty, then 2-3 layers are enough. If zinc white is 4-5. Cold welding is also used as a putty. It doesn't need fabric.
- Place a metal clamp over the putty and tighten with bolts and nuts. Make sure that the connection is on the side opposite the leak. If electrical tape is used instead of a clamp, wrap it in several layers and secure with wire.
Repairing cast iron batteries is not difficult and does not require special knowledge and skills, but if you have doubts about your abilities or the leak is really serious, it is better to contact specialists. It makes sense to replace old radiators that have leaked more than once, otherwise their repair will become a constant task during each heating season.
DIY repair
Not all cases require the help of an emergency team. Sometimes even a home handyman can cope with the situation. In order to seal the resulting leak, use known methods.
How to fix a leak between two sections
It can sometimes be very difficult to determine where exactly the moisture is oozing from, since the water floods a large area. You have to wipe away the liquid, trying to find a fistula or crack. Once this has been done, the shut-off valves are closed. But residual pressure still remains. To bleed it, open the Mayevsky valve located at the end of the heating device.
After making sure that the water has stopped leaking, proceed with the repair:
- The surface of the damaged area is thoroughly cleaned with a wire brush or coarse sandpaper to remove dirt, rust, and paint.
- After this, epoxy mastic is applied, consisting of two components: a hardener and a thinner, which are mixed immediately before use. You can use “cold welding”. It comes in the form of a “sausage” or in a set of two tubes, the contents of which are thoroughly mixed before application. The “sausage” must be kneaded thoroughly, since it consists of two parts: the hardener is located inside the filler. When kneading, the two components are mixed together, forming a homogeneous mass. To prevent the composition from sticking to your hands, it is pre-wetted under the tap.
- After installing the seal, it should dry well. Only then is it possible to open the shut-off valves to restore the flow of coolant. Do not cover a crack under pressure.
There is another way - the “old-fashioned” one. If the leakage is dripping, pour a couple of pinches of ordinary table salt onto a rag. A rag is wrapped around the damaged area. Salt must come into contact with it. After a few days the rag will be dry.
Cold welding prices
Battery crack
This malfunction is rare, but a hairline crack in one of the sections can cause the heating radiator to leak.
The problem is solved in the same way as when eliminating a leak between adjacent battery cells:
- The highway is blocked.
- The pressure is released.
- The damaged area is cleaned and covered with a repair compound. Epoxy for metal is preferable as it dries in 3-5 minutes. Before application, take the required amount of epoxy resin. A few drops of hardener are added to it. The composition is thoroughly mixed and applied to the crack or fistula. “Cold welding” will take 2-3 hours to set.
Video: heating battery repair
I begin preparing for the new heating season as soon as the previous one ends. First, I inspect the radiators for rust and leaks. In the summer I will begin repairs, if any are required. I usually make do with my own resources, and the work is limited only to cold welding and touch-up. There was a case when a rubber gasket came out at the connection of two sections of a new battery, then they called a technician to replace it. But I consider clamps to be a temporary measure, which is used when it is impossible to turn off the heating and replace a section or the entire battery. In the summer I always change the problem area so that I don’t inadvertently flood my neighbors during the next heating season.
Thank you very much for the useful site!)
what is the size of the gaskets? (internal diameter and outer diameter? what is the thickness of the gaskets separately from rubber and separately from paranit? I tried to find gaskets for repair and did not find them. Neither in our village nor in the regional center. Now I have made a die cut and will try to make them from car inner tubes .
To prevent repairs from becoming force majeure, it is better to carry out diagnostics and maintenance of the system before the heating season begins
The optimal time to start repairing heating radiators in an apartment is the warm season. The heating season has already ended, the new one has not yet begun, and you can restore the damaged appliance without haste. However, troubles often happen when you least expect them. So, the battery can break through in winter. It’s good if someone is at home at this time, then you can quickly react and prevent the neighbors below from flooding. If a breakdown occurs during the heating season, it will take a lot of effort and patience to restore. For some time you will have to turn off the heat supply and live in a somewhat uncomfortable environment. It is also important to warn your neighbors about the upcoming work and ask them to be more tolerant, because you all want to quickly get the same comfort and coziness.
If the repair of heating batteries cannot be delayed, do not hesitate and start repairing. The amount of effort and money spent depends on the efficiency and thoughtfulness of actions.
If you are not very agile and do not know how to repair a heating battery yourself, it is better to seek the help of a professional. However, if you have the necessary set of tools and the desire to repair the damage yourself, get down to business. First you just need to understand the features of different types of radiators.
Elimination of leaks at joints
Very often, the coolant begins to leak where some elements are joined - for example, a pipe and a radiator are connected. There can be quite a few reasons for this. Most often, the problem is the wear of the material with which the threads were sealed during installation.
If the coolant does not gush out like a fountain, but only drips slightly, and for some reason you do not have the opportunity to stop the heating system to carry out a full repair, then you can try the following method. Drip a small amount of alcohol onto the tow that is wrapped around the joint. Then apply BF glue there.
When interacting with alcohol, it will become liquid and can flow into the connecting element, and then harden there. But the disadvantage of this method is its low reliability. In addition, someday later you will have to take a very long and painful time to disassemble such a glued joint.
Therefore, it is still advisable to ensure that you have the opportunity to undergo normal repairs. It consists of disassembling a leaking threaded connection and then reassembling it, making it better. Naturally, this procedure can only be carried out after stopping the supply of coolant to the segment of the system being repaired.
- Carefully unscrew the nut. This must be done slowly so as not to damage the thread.
- Once the thread surface is free, remove all sealants that were used during installation. As a rule, this is tow or FUM tape. Don't forget to clean the sealant as well. You can go through the sandpaper a couple of times, bringing the cleanliness of the thread to perfection. Finally, it is advisable to degrease the surface using acetone or the like.
- Next, do everything in reverse order. Screw on a new FUM tape, wrap flax tow on top, lubricate the whole thing with a high-quality sealant and assemble the connection. Tightening the nut must be done no less carefully than unscrewing it. This is especially true for old radiators, where the elements are already on their last legs.
If your heating system is equipped in a modern way - that is, special fittings are used to connect the elements - then the work is much easier. Pressed varieties can be simply tightened, threaded ones can be tightened. If the pipeline (and, accordingly, fittings) is made of polypropylene, then in this case there is only one way out - you will have to remove the leaking section and replace it with a new one.
If a leak occurs at the junction of radiator sections, the problem is usually deformation or wear of the sealing gasket. Ideally, this element should be replaced with a new one. To do this, the battery needs to be disassembled into sections - step-by-step instructions for carrying out this work are on our website. To disassemble you will need a special plumbing wrench and quite a lot of patience, but it is quite possible to complete all the steps.
After disconnecting the sections from each other, clean the joints from all contaminants - of course, initially remove all old sealing materials. Then install new gaskets. It is better to choose non-rubber and non-silicone ones, since they do not withstand high temperatures very well and, as a result, do not last very long. The best option is paronite, which will perform its functions perfectly for many years.
After installing the new gaskets, reassemble the radiator and connect it to the system. If during disassembly you find that the problem is not in the seal, but in damage to the section itself, then the best option would be to replace it.
We recommend reading:
If it is not possible to disassemble the connection, you can perform the same gluing using the method described above. Before starting work, be sure to clean the area to be repaired from dirt and paint. The troubleshooting procedure is carried out in exactly the same way: we smear the area with adhesive, tightly wrap a strip of fabric, smear it again, etc., and finally tighten the edges with clamps.
Instead of regular epoxy, you can use special products called cold welding. Working with them is done in much the same way. Some compositions can be used even on wet surfaces, that is, if it is not possible to stop the flow of coolant.
Cold welding can be liquid or solid. In the first case, the work is carried out according to the same principle as with conventional epoxy glue. In the second case, the product is kneaded and then used as putty. When using it, be sure to wear gloves, since the composition is chemically active and can adversely affect the skin.
Regardless of what product you use to seal the leak between the sections, remember that this solution is temporary. After the end of the heating season, you will still need to take this issue more seriously, disassemble the connection and fix the problem. Good luck!
Types of radiators
The material from which the radiator is made affects the methods of repair and maintenance
We present the main types of radiators and describe their features.
Cast iron sectional batteries are a durable and well-known type. They are durable, reliable and heat-intensive. Not subject to corrosion. The quality of the water circulating through them does not matter. Due to their heavy weight, such heating devices are difficult to install and maintain. In such batteries, the intersection gaskets often wear out, resulting in a leak.
Aluminum batteries are characterized by an aesthetic appearance, low weight and high heat transfer. However, they have characteristic disadvantages: water quality matters and damage is possible due to pressure surges. If chemical impurities in the heating fluid have accumulated, repairing aluminum heating radiators is impossible. When the water quality in the room is constantly monitored, then it is possible to install aluminum models.
Steel batteries are characterized by low weight and high heat transfer. It is not recommended to install such models in houses with centralized heat supply, since they are susceptible to corrosion and have a short service life.
Bimetallic radiators are characterized by a pleasant appearance and corrosion resistance. They provide a high level of heat transfer and are designed for high pressure (up to 40 atmospheres). Repairing bimetallic heating radiators with your own hands allows you to eliminate leaks, replace gaskets, adjust or replace regulators, and flush/clean pipes.
Selecting a heating device
The selection is made based on the following factors:
- number of floors and room location;
- the need for shut-off and control elements is determined;
- pipe material;
- temperature regime of the system;
- selection of installation scheme;
- heating system wiring;
- region of residence.
In addition, when choosing, you need to take into account the dimensions of the batteries. Having counted the number of sections, you can begin installing the heating device. The sales consultant, based on the size of the room, will suggest the required number of sections. However, you can perform such calculations yourself. If the apartment's ceiling height is no more than 3 m, then 1 section will heat 2 square meters. m. If during the calculations you get a non-integer number, round it up.
Common causes of radiator failures
- Incorrect selection of model. The choice of battery type depends on the diameter of the pipes, pressure and temperature of the coolant.
- Repair of heating radiators may result from incorrect connection to the pipes.
- If the coolant contains a large amount of chemical impurities or pressure changes occur too often, the battery metal will corrode.
- Low-quality water contributes to the formation of plaque at the joints of radiator sections and also clogs the pipes, which entails the need for cleaning.
- Repair of heating batteries is often necessary due to the destruction of threaded nipples. To prevent a leak from catching you by surprise, it is important to systematically change the gaskets.
- Battery noise - if you hear clicks, this does not always indicate a malfunction. However, it is better to call a team of plumbers who will carry out soundproofing.
- Air locks are formed due to low pressure or due to leaking pipes.
- Due to scale in the boiler and leaks at the pipe junction, the pressure drops.
How to seal a heating radiator
How to seal a heating radiator
Miraculously, a problem with an aluminum heating radiator arose when frosts hit all over Russia. Moreover, the radiator leaked late at night. I woke up several times at night because the heating radiator was making noise. I also thought that this was not without reason and was very similar to depressurization. Alas, I was not mistaken - in the morning there was a decent puddle under the radiator on the laminate floor. Initially I thought that the problems were related to the faucet, but then I discovered swollen paint on the side of the radiator from under which water was oozing.
It was possible to determine the location of the leak by the swollen paint
After removing the swollen paint with a flat screwdriver, I saw the cause of the leak - two small holes.
Two holes in the left section of the radiator
Most likely, the microscopic hole appeared a long time ago, since just a year ago, a noise similar to a clicking emanated from this battery. I kept blaming Mayevsky's damaged faucet, but even after replacing the faucet, the noise did not stop.
Repair of cast iron heating radiators
Repair of cast iron heating radiators has features
There is a peculiarity in repairing cast iron radiators. Most of them were installed in Soviet times, so unscrewing their plugs is a difficult task. In those days, ropes soaked in oil paint were used for sealing. Over time, they hardened, so the joint must first be heated in order to disassemble the connection.
If a puddle of water has formed under the battery and the humidity level in the room has increased, then it’s time to fix the leak. If the breakthrough is small, a clamp is used, which is fixed to the required density. If you don’t have one at hand, use a rubber gasket and wrap it around the leakage area several times.
Cold welding also works great on small holes. Cut a small piece of “plasticine”, knead it with your hands to a homogeneous consistency and stick it to the leak site.
Another “chemical” method is to apply epoxy glue to the bandage. The battery will stop leaking once the glue sets.
Quick repair of a heating battery with your own hands is also possible using sealant. It is resistant to elevated temperatures and does not evaporate.
All of the restoration methods listed are not long-term. In any case, you should contact specialists who will either replace the old device with a new one or carry out welding work.
Fistula removal
Any breakdown occurs due to a reason. A fistula on heating system pipes or on a radiator is no exception. If a small brown spot appears on parts of the heating system, do not think that it is just paint peeling off. This is the beginning of an irreversible process. But if you know how to remove a fistula in a cast iron battery, you can prevent destruction and extend its service life.
Causes of corrosion:
- Given the constant increase in the cost of utilities, some, in order to save electricity, connect a neutral cable to the heating circuit. Currents move through the pipes using the coolant method and provoke corrosion. This situation can only be saved by the appropriate service, which will find the offender and make repairs;
- a high level of water acidity harms even corrosion-resistant cast iron;
- The batteries have expired, or deposits on their walls have damaged the metal. Even a small fistula or crack under the influence of water pressure will cause the battery to rupture and hot water to flow from it. If the battery drips a little, you can use a clamp. If it runs in this stream, it is better to use a double-sided clamp.
We recommend: What types of regulators are there for central heating radiators?
If the coolant has ruptured the place where the fistula is present, then the question arises, is it possible to weld the battery? Cold welding is usually the emergency solution. But even if it has restored the tightness, you need to call specialists from the heating network to check the condition of the heating equipment.
Repair of cast iron batteries can be done independently with the help of tools and the necessary materials, but only if non-critical breakdowns are detected. Cold welding is an easy and quick way to restore a heating device, but even it will not guarantee that nothing terrible will happen in the future. To make sure that the heating device and all its parts will serve for a long time and will not cause harm to people, it is necessary to either completely replace the repaired device after the end of the cold season, or call specialists to check its stable and reliable operation.
YouTube responded with an error: The request cannot be completed because you have exceeded your quota.
- Related Posts
- How to install central heating on a balcony?
- What is the normal temperature of water in central heating radiators?
- Which central heating batteries to choose?
- How do solar panels work for heating a home?
- What characteristics do central heating radiators have?
- What is the pressure in central heating radiators?