Ariston boilers are one of the most common options installed in apartments. These boilers are very reliable, have high efficiency rates and are affordable for most consumers. But even high-quality equipment from well-known companies sooner or later breaks down and needs repair. In this article, we will look at the possible causes of such breakdowns, figure out how to correctly identify and understand what exactly has stopped working, and therefore assess the cost and need for repairs yourself or with the help of specialist services.
CAUSES OF PROBLEMS
Of course, various circumstances can trigger a breakdown, including natural wear and tear of the tank during operation. But among the most common malfunctions of an Ariston water heater are:
- Voltage fluctuations in the network.
- The occurrence of corrosion processes and scale inside the boiler.
- Incorrect connection or installation of the device.
- Presence of a manufacturing defect.
- Lack of periodic inspections of the tank in order to detect faults that can be eliminated in a timely manner and parts that are time to be replaced.
It is also worth considering the cause of the breakdown, such as improper inspection or self-repair. In most cases, boiler users do not have sufficient knowledge and experience to eliminate system errors on their own. An inept approach to any equipment that has begun to malfunction may not only not help fix it, but also aggravate the problem by increasing the cost of repair work. That’s why it’s so important to contact a professional when you first suspect a problem with your boiler.
WHAT SHOULD YOU BE WORRYING ABOUT?
Is it possible not to let things break down? In some cases, yes. Much depends on the specific situation. Sometimes boilers simply stop working at once, without any apparent reason. But it also happens that an impending problem can be noticed. Here is a list of the main signs to look out for:
- Unusual sounds that the boiler has not made before - clanking, creaking, buzzing and others;
- Leak, even small;
- A sharp change in the composition of the water flowing from the tap, the appearance in it of pieces of scale, a hint of rust, an unpleasant odor and similar new characteristics;
- Unexpected shutdown of gas heating or any other system functions and their subsequent activation without user intervention.
- Tank overheating, automatic shutdown.
- Errors displayed on the machine's electronic display.
All these signals should certainly attract attention and serve as an impetus to contact a specialist - after all, the sooner repairs and replacement of outdated elements are carried out, the cheaper it will end up costing.
In some cases, you can only cope with software failures on your own, the codes of which the boiler itself displays on the screen.
ERROR CODES FOR ARISTON WATER HEATER
Here is a description of the most common boiler failures and their numbers. In most cases, to restart the machine, you simply need to turn off the power for 30 seconds by unplugging the cord from the outlet or pressing the button located on the case. Sometimes additional steps may be required. If after them the code continues to be displayed, then this is a sure sign of a malfunction and the need for technical inspection.
The list of frequently appearing codes and solutions to the problem with each of them includes:
E01 – a malfunction of the control board has occurred. It is necessary to exclude a common system error; to do this, just turn off the boiler for 10 minutes. If the code appears again, inspect the board to see if visible condensation has appeared on it.
E10 – problems with the temperature sensor. It is necessary to ensure the integrity of the wiring and the good condition of the output contacts. If you have a multimeter available, you can use it to test all potential weak points. If the sensor cannot be returned to operation, it is replaced with a new one.
E11 – the temperature exceeded the normal value of 105 degrees. The reasons for this may be scale, a malfunction of the heating element, or a breakdown of the temperature sensor. The heating element must be removed, cleaned of salts and deposits, and then checked using a special tester. You can simply replace it with new elements.
E12 is a designation indicating that the permissible temperature is exceeded by 12 degrees. The reasons and methods for debugging here are the same as in the case of E11.
E13 – problems with the touch differential. The difference in temperature sensor readings is more than 50 degrees. Sensors are tested and new parts are installed if necessary.
E14 – water heating is very slow. The problem may be low voltage in the network, as well as scale formed on the heating element.
E15 – there is no water in the tank. You need to check the valves and pressure in the water supply. If a broken part is found, it is replaced.
E20 – the temperature sensor has shorted or a communication failure has occurred. In this case, you can press the ON/OFF button to restart the device. You also need to check for condensation on the temperature sensors. If a break occurs, the elements are replaced.
E21 - water overheating occurred. The temperature has exceeded the permissible operating level. Here you can also solve the problem by restarting and cleaning the internal parts from salt deposits. If the temperature sensor or heating element is broken, then there is a need to install a working one.
E22 – general system overheating. The solution is a restart and the same sequence of actions as with E21.
E23 – differential error. Solved in the same way as E13.
In some models, the same errors may be displayed using other indicators. In order not to reconsider the same difficulties, below are images in which the codes are indicated in highlight and methods for deciphering them are described.
DIAGNOSIS OF ERROR BY DISPLAY
This is not all, but the most common errors of the Ariston water heater. Since the company is constantly expanding its range, releasing new models and equipping them with other breakdown signaling systems, it is impossible to list all the existing options for notifying the user that something in the system is not working.
You can find more errors on the manufacturer's official website. And if there are any doubts about the correctness of determining the cause of the breakdown and how to eliminate it, you should contact a specialist. This will save time and money spent on repairs.
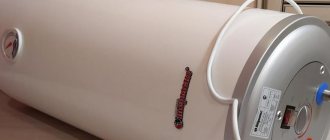
Typical malfunctions of the Thermex heater
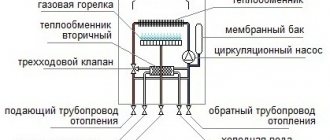
The wide range of Thermex models allows you to choose a 100-liter boiler for a large family, a 10-15-liter boiler for use in a small kitchen, etc. The device is a metal heating tank with a heating element located inside. The operation of the heater is controlled by a relay, as well as a thermostat. The magnesium anode helps to “soften” tap water.
It is worth noting that modern water heaters are equipped with a control unit that has a self-diagnosis function. The system detects the faulty unit and displays an error code. Having deciphered the meaning, you can understand where to look for a breakdown and how to fix it yourself.
Error table for Thermex water heaters
| Error codes | What does it mean | How to fix it yourself |
| E1 (Vacuum) | Insufficient filling of the tank with water. Premature switching on. | This can lead to combustion of the heating element. To correct the situation, turn off the device and wait for normal filling. After this, reconnect. |
| E2 (Sensor) | There are problems with the temperature sensor. | Try disconnecting the boiler from the network by rebooting. If after this the code is displayed again, then test the sensor with a multimeter, and if there is a malfunction, replace it. |
| E3 (Over Heat) | This error indicates that the water has heated to a critical temperature (95 degrees). | The thermostat is probably broken. Replace it. |
The video will help you deal with error E1:
Other problems with an electric water heater include:
If you notice one of the signs, then proceed with inspection and repair.
WHAT YOU CAN DO YOURSELF
If the display does not show an error, and the breakdown occurred unexpectedly, there are a number of methods that you can use to try to cope with the situation on your own. Such situations include:
1) THE WATER HEATER JUST STOP TURNING ON
There are two possible options here - the problem is in the power supply or in the device. If, after checking the network voltage and contact density, the problem was not detected, then the RCD should be checked. To test it, you can press the RESET button on the control panel. If the light comes on, everything is fine. Then press TEST and RESET again. If the light turns on, it means that the RCD definitely does not need to be changed.
2) TANK IS LEAKING
First of all, you should check all the hoses and auxiliary elements - fastenings, connections to the water supply. If the source of the leak has not been found, inspect the tank itself. Before doing this, you should disconnect it from the system, open the lid and carefully examine the contents. Is there corrosion? Perhaps everything is covered with a layer of salts? Here, repairs are carried out as necessary - cleaning, replacing rusty parts.
3) THE WATER STOPPED HEATING
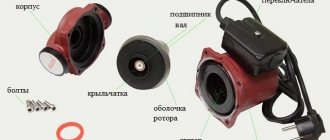
If there are no visible corrosion damage or causes of failure, you should check the contacts and the serviceability of the heating element. To do this, you need to drain the water from the tank and remove it from the wall. Unscrew the bolt that secures the flange, twist the element and pull it out of the housing. For diagnostics you will need a multimeter.
4) THE WATER IS HEATING, BUT VERY SLOWLY
If the reason is scale, then Ariston may not display any errors on the display. But you can notice this yourself. You can clean it. It's also worth checking the thermostat. When rebooting, the normal heating rate should be restored. If this does not happen, you need to repeat the test using a tester. This is the maximum of actions that you can do yourself. Even they require some experience and understanding of the principles of operation of technology. In more complex cases or if you lack the necessary skills, you should entrust your equipment to professionals.
DIY repair
You can fix some problems yourself. The main thing is to follow our recommendations.
Water heater does not turn on
First of all, check if there is voltage in the network. You can check this with a screwdriver with an indicator: it should light up on “Phase”, but not on “Zero” and “Earth”. If the cable insulation is damaged, it is not recommended to carry out repairs. It is better to replace the element immediately, but make sure that the new cable matches the old one in terms of parameters.
To diagnose the socket, connect another device. If it also does not work, the outlet is faulty. It is better to call an electrician to replace it.
A short circuit or lack of grounding leads to permanent shutdown of the RCD. A breakdown of the heating element on the body also leads to similar consequences. In this case, the element is diagnosed and replaced.
The RCD machine could break. To confirm your guesses, press RESET on the instrument panel. Is the light on? This means food is being served. Then press TEST and RESET again. If the indicator lights up again, the RCD is working normally.
Boiler does not heat water
Check the tightness of the contacts between the plug and the socket. If everything is in order and the voltage is supplied normally, you need to check the heating element. Do you have a storage type of boiler? Then drain the water from it first. A volume of water of 50-80 liters can be removed through the tap. It is better to drain 100 liters or more using a valve.
Remove the housing from the wall. Now you need to pull out the flange to which the heating element is attached. In Ariston 80 liter models, the flange is secured with only one bolt. In other cases, you will have to unscrew 5 bolts.
Disassembly is done like this:
- Rotate the flange along the axis.
- Take it out of the tank.
WHY YOU NEED TO CONTACT US
Our service has been providing boiler repairs for several years, including from Ariston, after the end of the warranty period. We carefully check all possible causes of problems with equipment and find a solution quickly and efficiently.
Our service employs specialists with many years of experience who not only understand the structure of boilers, but also know very well how to carry out repairs quickly and with minimal costs. We always have branded parts for Ariston equipment in stock. Therefore, after replacing any element, you can be sure that the new one, if used correctly, will last a long time. And it only takes a specialist a few hours to carry out repairs. This means that you will receive your boiler in absolutely working order very soon and will not experience discomfort from the lack of hot water in the apartment.
You can order a visit from a specialist and view the full list and cost of services on our website.
Where to begin
Of course, from mounting the boiler on a supporting surface and arranging a drain from the cold branch of the home water supply.
The last operation - arrangement of the outlet - is carried out as follows:
- A separate branch of cold water supply is routed from the collector to the intended location of the boiler using ½-inch fittings.
- If the system does not have a collector, then you need to divide the section of the water supply system closest to the boiler by installing a standard tee at the cut site.
- The installation pattern of the tee depends on the structural material of the pipes. That is, plastic tees are fixed using a pipe soldering iron, metal fittings are attached to the thread, pressing the joint with a lock nut, fittings for metal-plastic pipes are mounted on collet clamps.
- A ball valve is installed at the free end of the tee or a specially equipped branch of the water supply system, shutting off the cold water supply.
Installing the boiler on a supporting surface is even easier:
- A counter plate is applied to the wall - a part from a standard set for mounting a boiler - it is aligned with the hydraulic level and the dowel placement points are marked.
- At the marked points, drill holes with a diameter of 16 millimeters and a depth of 80 mm using a drill or hammer drill. Then polymer inserts are driven into the holes.
- The counter plate is attached to the wall by driving the dowels from the kit into the inserts or screwing in self-tapping screws.
- The tank is hung on a bar using mounting brackets welded onto the boiler body.
How to connect an Ariston water heater to the electrical network
The next step is connecting to the power grid. Moreover, you will have to allocate a separate line for the boiler by installing a standard RCD included in the delivery set in the central distribution board.
Electrical diagram for connecting the boiler
The connection process itself is as follows:
- An RCD is installed in the shield, connecting its input to the output of the central automatic fuse.
- From the output of the RCD to the point where the boiler is placed, a three-core 2.5x3 cable is pulled, hiding the line in a groove or an external box.
- A 16 Ampere fuse is installed near the boiler, packaging this “switch” in a miniature cabinet with a removable front panel.
- The wire from the RCD is pulled to the input of the 16-amp fuse.
- The bottom cover of the boiler is removed and a three-core wire of the same cross-section - 2.5 mm - is connected to the contacts of the heating element.
- The wire from the boiler is connected to the fuse output.
The grounding line - a two-color core in the wire - is connected to the corresponding connector of the central panel. The phase line - a brown or red wire - is pulled from the phase of the central panel to the corresponding connector in the boiler. The “zero” line - the blue wire - is pulled from the zero bus in the panel to the desired connector in the boiler.
Connection diagram of the Ariston boiler to the water supply
The next step is connecting the boiler to the water supply. Before doing this, you must disconnect the power supply line.
Connection diagram of the Ariston boiler to the water supply
After this you will have to do the following:
- Extend a vertical pipe with a diameter of at least ½ inch from the water supply shut-off assembly - the ball valve on the tee or elbow under the boiler - to the inlet of the water heater.
- Screw the American connector onto the “cold” fitting, the right one on the side of the front panel.
- Screw the drain valve onto the drain.
- Screw a one-way safety valve onto this fitting, reducing the inlet pressure to 6-7 atmospheres.
- Attach a filter to the lower end of the valve to reduce the water hardness level.
- Attach a vertical pipe from the valve on the water supply to the filter outlet.
- Install a check valve into the pipe to prevent hot water from draining into the cold water supply.
- Place a hose on the free end of the valve, leading it to the sink or sewer.
The boiler manufacturer recommends using polymer tape as a sealant. In this case, all joints between fittings and pipeline fittings must be collapsible (threaded).
How to connect a boiler to a hot water supply circuit
The final stage of the boiler connection process - installation of an outlet to the DHW circuit - is carried out according to the following plan:
Connection diagram of the boiler to the hot water supply circuit
- First, an American connector is screwed onto the “hot” - left side of the front panel - fitting.
- Next, a drain valve is screwed onto the drain.
- A DHW system collector is placed under the tap, the number of outlets of which must match the number of hot water taps in the house (plus a shower and/or bath).
- A vertical section of pipe of the required length is pulled from the tap to the collector.
Further wiring - from the collector to the point of consumption - is carried out as needed, installing a ball valve on each outlet.