Stoves are traditional designs for complete, uniform and high-quality heating of buildings. However, they are often installed for houses that are large in size and have several rooms located quite far from each other. In this case, one stove will not be able to provide uniform heating of each room due to insufficient power. In this situation, the most optimal solution is a coil, which is also called a heat exchanger. It is connected to a heating device, after which it is carried out throughout all rooms of the building itself, as a result it ensures their optimal and uniform heating.
Selecting material for the upcoming work
The coil is usually created using a pipe of suitable length and diameter . When choosing, it should be taken into account that all parameters of this element will directly affect the quality of heating in the house, as well as its efficiency. Therefore, the material from which the heat exchanger will be formed must have good thermal conductivity.
The most popular types of pipes for these purposes are:
- copper products whose thermal conductivity is equal to 380;
- steel pipes with thermal conductivity equal to 50;
- elements made of metal-plastic, the thermal conductivity of which is equal to 0,3.
Most often, copper pipes , from which a high-quality coil is obtained that has all the necessary elements. The material is plastic, so if necessary, it can be given absolutely any shape and configuration, for which the bending process is used. It is considered quite simple, so it’s easy to implement all the steps with your own hands. Also, copper pipes differ in that various fittings are simply connected to them.
However, often for complete heating in each room of the house, owners prefer to use improvised elements to connect to the stove, which have previously served for other purposes. For this, old heating radiators or instantaneous water heaters can be used, however, working with these items is quite difficult , in addition, they will not provide an ideal heating result.
DIY making
To implement stove heating combined with the radiator system of a private house, 3 types of stoves with a water circuit are used:
- metal - steel and cast iron stoves with a built-in coil for heating the coolant;
- fireplace inserts with a heat exchanger - water jacket;
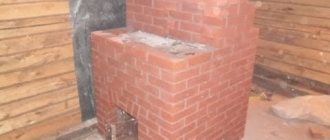
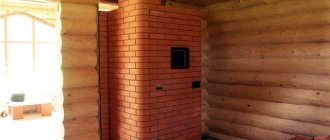
- heating and cooking stoves made of brick with a built-in boiler.
We suggest you familiarize yourself with How to properly paint a wooden door with varnish
Water-filled pipes pass over the flame and receive maximum heat.
This also includes an alternative option - steel wood-burning heaters made by yourself. Such products deserve attention because they are not inferior to factory ones in terms of reliability and heat transfer, but they are much cheaper. The appearance of a potbelly stove does not always play an important role.
We propose to consider the stoves of each group separately, focusing on the disadvantages and advantages that are important for the homeowner.
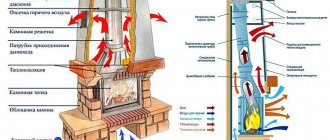
In factory-made wood stoves, the coolant is heated in three ways:
- A water-tube heat exchanger is installed in the upper zone of the firebox or near the flue gas outlet.
- One of the walls of the combustion chamber (top or side) is in contact with a water layer, reminiscent of the jacket of a solid fuel boiler.
- Several coolant pipes go around the semicircular walls of the firebox. The ends are welded from below and above into common collectors, as shown in the drawing.
Modification of the convective heater "Breneran" (analogue of the well-known "Buleryan") with a water-tube heat exchanger
Manufacturers often supply stoves with an additional heater - a heating element with a power of 1...15 kW. The goal is to maintain the temperature of the coolant and air in a private house after a portion of solid fuel burns out. Some models are equipped with a hob with 1-2 burners.
The real advantage of metal heating units is the low cost of the product and speed of installation compared to laying a brick oven. Example: the price of a 3.5 kW Breneran-Aquaten heater is approximately 270 USD. e. (without chimney). When installing a potbelly stove with your own hands, you will spend another 50-100 USD. e. on materials used for installation and strapping.
The Hydraulic series of heaters from the famous Termofor brand are equipped with a water jacket and pipes surrounding the firebox
Now let's look at the disadvantages:
- no matter what manufacturers and sellers claim, the maximum efficiency of air-water stoves using wood and coal is 60%;
- the unit heats up and cools down equally quickly;
- the heat exchanger is usually enough to heat 2-3 small rooms (1 radiator in each);
- The water circuit needs a circulation system.
It is not easy to maintain cleanliness and beauty around the stove, which serves as the main source of heat in the house
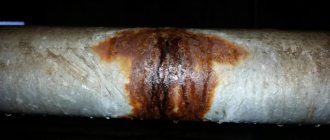
. Let us clarify the last point. If the flow of water through the coil stops, the element will overheat. First, the coolant will boil, then evaporate and break the nearest weak connection. Later, the heat exchanger will burn out and finally fail.
To be fair, let us mention the issue of aesthetics. By constantly using a potbelly stove to heat your home, you will not get the beautiful picture that manufacturers like to show in the photo. The stove will quickly become dirty, wood and coal dust will appear in the room, and the smell of smoke will appear.
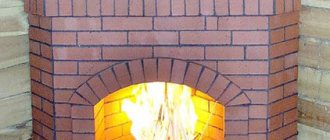
A rectangular stove with a water circuit, made in the form of a fireplace, is structurally much closer to a TT boiler. The side walls of the fuel chamber are washed with coolant, the front and top parts heat the air in the room. The bottom receives little heat, so it is not taken into account.
Positive aspects of fireplace inserts equipped with a water heat exchange jacket:
- fuel combustion efficiency – up to 70%;
- reasonable cost (compared to brick buildings);
- simple and quick installation;
- A fireplace stove equipped with a transparent door will fit perfectly into the interior of a living room.
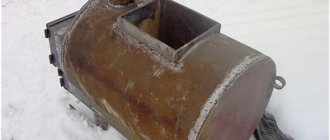
The boiler tank surrounds the combustion chamber on the sides and partially on top.
The disadvantages of metal fireboxes are similar to the disadvantages of furnaces:
- the fireplace heats up and cools down quickly and requires continuous circulation of the coolant;
- provides heat to a limited number of batteries;
- due to temperature changes, condensation forms on the internal walls and soot deposits are deposited;
- complete resemblance to a natural fireplace is achieved through design - decorative brickwork or plasterboard sheathing.
When using a fireplace insert as the main source of thermal energy, do not count on long-term combustion from 1 start. Example: the useful volume of the combustion chamber of the aforementioned Aquarius is only 62 liters, but it will not be possible to completely fill the firebox with firewood. You will have to add logs every 3-4 hours.
Over time, the walls of the firebox become covered with soot, and the panoramic glass becomes covered with soot.
Heat exchangers are installed inside the stove in two ways - in the firebox or in the flue, along the path of the hot combustion products. Each option has its own nuances:
- the boiler in the combustion chamber quickly warms up under the influence of the flame, but forms condensation and soot on the walls;
- in the event of boiling and steam formation, the tank may rupture right in the firebox and destroy the brickwork;
- the heat exchanger inside the smoke circuits is much safer, but heats up more slowly because it receives less heat.
Location of the water circuit inside the combustion chamber (left) and chimney channels (right)
The main disadvantage of any brick heater is the high cost of materials and masonry work. Suppose you decide to save money and build the stove yourself. This will require experience, time and technical capabilities - starting construction in the middle of a habitable house is not easy. The best option is to lay the foundation and furnace at the stage of wall construction.
Why are stone stoves with a built-in heat exchanger valued:
- service life is incomparably longer than any heat generator - at least 50 years;
- the ability to accumulate heat and heat adjacent rooms for a long time after extinguishing;
- maximum efficiency – 70…75%;
- in a heated stove, the soot that forms on the walls of the tank and in the chimney burns out well;
- some brick stoves - Dutch duct, Swedish, Kuznetsov's bell-type stove - can easily heat a two-story house.
We suggest you familiarize yourself with How to make a heated floor in a bathhouse with your own hands?
First, before you start building the stove, you need to prepare the foundation. To do this, you need to dig a pit, the depth of which is 150–200 millimeters. Fill the bottom with layers of broken brick, crushed stone and rubble. Then fill everything with cement mortar. The foundation should rise several centimeters above the floor. Place waterproofing material on the screed.
Construction process of a water loop furnace
The stove must be built from quality materials. Walls can be built from bricks with normal firing, but for the firebox, purchase refractory bricks.
- Before starting laying, the bricks must be wetted. To do this, immerse them in water for a while. When air bubbles stop coming out of them, you can start laying.
- All rows and corners must be tied.
- Apply the cement mortar to the entire rad at once. Its layer should be about 5 millimeters. Refresh the mortar on the end right before laying brick on it.
- When you get to the firebox, don't apply the clay with a trowel. Do it with your hands.
- Every five rows, carefully cut off excess cement from the seams and wipe them with a damp sponge.
- The walls of the stove must be vertical and horizontal. Use a spirit level constantly during laying to check this.
Homemade copper heat exchanger coil
Making a decision to make it yourself, as a rule, indicates the presence of some tools and skills in working with them. Ideally, you need a full-fledged workshop with a vice, welding (of two types), a workbench, an anvil, etc. If the equipment leaves much to be desired, it is possible to assemble the simplest modification - a copper spiral coil.
The advantages of this option:
- Copper is relatively easy to bend and solder.
- The coil does not contain connections subject to high heat.
- The spiral shape is simple, versatile, and does not require complex equipment to create.
- Installation of such a heat exchange device will not require major modernization of the furnace structure.
A sauna stove with such a heat exchanger will cope with everything that can be expected from it: it will ensure the operation of 2 - 3 heating radiators, and heat water in a small tank. However, the heater is responsible for the microclimate in the steam room.
Consumables
Manual pipe bender
Of the special tools for working with copper, only a gas torch is needed. A professional will need a pipe cutter, a bevel remover, and a metal brush of the required size. However, all this is replaced with a grinder, a file (rasp), and a soft abrasive sponge. You will also need a minimum of consumables:
- annealed copper pipe in a d32 coil, 3.5 - 4.5 m long (depending on the d of the chimney);
- adapter water sockets (thread-soldering) d32 * 1.25” – 2 pcs;
- ordinary low-temperature and hard copper solder for medium-temperature soldering (650 – 750°C);
- flux paste;
- soft abrasive sponge;
- propane-butane gas for medium-temperature soldering – 1 cylinder (0.5 l);
- washed, sifted fine sand – 5 – 6 kg;
- pipeline, taps, Mayevsky valves, radiators.
Structural elements of equipment
As a rule, a complete system is used to create complete heating for a home. It consists, first of all, of a metal tank , which has a fairly significant capacity. Special pipes are connected to it. This element does not come into contact with open flame in any way. Using furnace equipment, water is heated , after which it flows through a coil into individual rooms of the building. In this case, uniform and high-quality heating of the entire house can be ensured. Here it is important to correctly connect the equipment to the oven, and the device itself can be connected outside or inside the oven.
Justified design choice
Choosing a high-quality heat exchanger that is suitable for all parameters is not so easy, since on the modern market various elements are presented in numerous varieties. It is important to focus on the fact that the entire structure must ensure uniform and constant heating of the premises. At the same time, it is important that the elements are created from high-quality materials that are resistant to various influences, since in this case the equipment will last a long time, during which there will be no need for regular and complex repair work .
It is important to choose the right coil. Lately, coil registers have been considered the most popular. They are created from pipes whose diameter is approximately 45 mm. , and they also have smooth walls. In appearance they look like an L-shaped grille . They are made using not only smooth pipes, but also profile ones. The hot water outlet, as well as the return, can be connected to such coils from different sides. However, here it is important to understand what design features the stove itself has, as well as the easiest way to install pipes in the heating system with your own hands.
Installation options for heat exchange structure
Installing a heat exchange device of any kind involves a considerable amount of work, especially if its efficiency is of serious importance. For example, the simplest spiral on a chimney may heat up poorly, and there will be no circulation at all without a pump. Then you have to take measures, including abandoning such a design.
- cast iron or steel U-shaped register in the firebox;
- water jacket around the firebox or at any of its surfaces;
- U-shaped diplomat in the firebox;
- diplomat directly above or behind the firebox, with maximum contact;
- water jacket around the heater;
- register, diplomat or coil in the heater;
- diplomat or coil behind the heater;
- water jacket on the chimney.
A coil on a chimney is conventionally the least effective option. However, the simplicity of the device often offsets the disadvantages. In addition, efficiency is increased in various ways. Among them are lining the coil with a thermally insulated casing and filling the voids with sand, or installing the structure directly into the heater.
A wood stove or fireplace with any heat exchanger is only part of the system. For its energy-efficient operation, coolant circulation remains a key factor. Even when the use of a pump is clearly necessary (for example, in a large two- or three-story house), natural circulation is important. Thanks to it, the pipes will not burst due to defrosting too quickly, and the water will not boil so easily if the electricity goes out. To improve circulation, it is advisable to adhere to the following rules:
- the higher the height of the heat exchanger pipes, the better;
- the expansion tank is placed as high as possible, next to the stove;
- a pipe goes to the tank from the top pipe;
- the pipe from the expansion tank goes to the lower inlet of the radiator;
- all horizontal sections are made at an angle (at least 3 mm per 1 m);
- The outlet from the radiator is only on the opposite side or diagonally.
We suggest you familiarize yourself with How to secure a sandwich pipe on the roof with guy wires
Another important point is the permeability of the pipeline. The higher it is, the better. Therefore, you should not narrow the diameter, build in extra elbows, fittings, or use rusty or plastic pipes from the inside.
Design and installation rules
A coil for creating high-quality, uniform and optimal heating in a house is considered an excellent solution. If you wish, you can build it yourself, but it is important to take into account the following rules and requirements:
- There may be voids in the heat exchanger; their size should not exceed 5 mm. , since otherwise the water in the equipment may boil under the influence of hot gases from the furnace equipment.
- The pipes from which the coils are made must have a wall thickness exceeding 3 mm. , since only then can you be sure that the elements will not burn out in any way.
- Between the furnace wall and the equipment itself, if it is installed inside the furnace, it is necessary to provide a gap of 12 mm. , which will provide compensation for the expansion of the metal elements of the device during water heating.
Self-construction
Independent work without the involvement of specialists brings not only saving money, but also the indescribable pleasure of your own victory. Every craftsman will not miss the opportunity to install a water circuit for a fireplace with his own hands. To do this, all work must be divided into two parts: the construction of the building, the role of which is played by a brick fireplace, and the installation of a heat exchanger.
Construction of the building
The construction of any facility requires thorough preparation. First you need to find the necessary drawings showing the orderly laying of the fireplace. It is important to select only those materials that will allow you to build a fireplace with a water jacket in the form of separate channels. The walls of the jacket are framed with steel sheets for tightness.
Construction begins from the foundation. To do this, dig a pit, the area of which is slightly larger than the area of the future fireplace. To fill the foundation you will need the following material:
- crushed stone;
- sand;
- boards for formwork;
- cement;
- roofing felt
Initial stages of construction
The foundation level must be raised to the floor level. Before laying the fireplace, the surface is lined with sheets of roofing material for waterproofing. The fireplace body is lined with refractory bricks, and the firebox itself is lined with heat-resistant fireclay bricks. A clay mixture is used as a solution.
Preparing the solution is a long task. You will have to first test the clay for fat content, and then soak it to prepare a fine mixture of clay and sand. Today you can purchase already prepared and dosed mixtures, which just need to be diluted according to the instructions and they will be suitable for laying fireplaces. Due to the wide variety of mixtures, carefully read the instructions, which describe the scope of application.
The laying of the fireplace begins with horizontal rows that serve as the base. This is standard procedure for all models. At this stage, it is important to respect the horizon of the constructed foundation. Then the formation of the ash pan begins, as a mandatory part for all solid fuel fireplaces. The beginning of the construction of the firebox is also similar to most projects, but the finalization of this stage is distinctive. The fact is that you need to install the heat exchanger right now, otherwise there will be no such opportunity.
Heat exchanger
The simplest model of a heat exchanger is a small tank with two flanges to which pipes will be connected. One pipe will supply cold water, and the other will drain hot water. Flame has a destructive effect on metal. In addition to temperature differences, one should not forget about the chemical effect of combustion products. The material for the heat exchanger can be metal, about 4 mm thick. A smaller thickness will significantly reduce the life of the container.
Construction of a fireplace
More precise dimensions of the heat exchanger depend on the specific design of the fireplace. According to the established dimensions, the sheet of iron is cut. You must know how to use welding to construct the tank.
If you have enough experience in welding, then immediately think about increasing the efficiency of the device by making it from sections, registers, in the form of a labyrinth or a coil. The labyrinth is made from pieces of metal pipes and turning angles of the same diameter.
Basic nuances of operation and use
Most often, stoves in buildings are used exclusively for heating the house. However, they are often used to generate hot water supply in a building. In this case, the heat exchanger should receive no more than 10 percent of the heat generated from the furnace equipment.
The coils must be made from high-quality pipes of suitable diameter, then they will be able to provide optimal heating of various rooms in the structure. Therefore, it is important to approach this issue responsibly. Also, the material from which the pipes are made must be resistant to high temperatures, since it is used to create a heating system.
Thus, the use of a coil is considered the optimal and expedient solution for a house in which a stove is used for heating, which is not capable of independently providing uniform and efficient heating of each room in the building.