The efficiency and safety of a stove, fireplace or heating boiler directly depends on how competently the chimney was installed in a private home. If earlier this depended on the professionalism of the stove maker, today it is a matter of wise choice of the owner of the house. Sandwich chimneys, which can be installed independently to any type of heating equipment, are in great demand, and deservedly so. It is important to choose the right pipes and install them, observing all the necessary conditions.
Rules for installing a chimney in a private house
Each type of fuel has its own rules and regulations for smoke removal and installation and repair of heating equipment. They are set out in official documents:
- SNiP 41-01-2003;
- NPB 252-98;
- VDPO.
It is necessary to strictly follow these standards in order to protect the building from fire and the lives of household members from poisoning. During combustion, hot gases, ash and soot are formed, which must be removed through the pipe immediately. If the chimney in a private house is installed improperly, overheating of the walls or ceiling is possible.
The second danger is the entry of carbon monoxide into the room. Carbon monoxide is odorless and colorless. It is heavier than air, so it concentrates closer to the floor. If inhaled, leads to poisoning and death. Formed from a lack of oxygen in the furnace (poor draft). The common name is “the silent killer.”
Basic rules for installing a chimney:
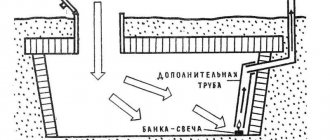
- The stove must stand on a platform independent of the structure. This is necessary so that if the foundation of the house subsides, the heating equipment does not “lead” or be destroyed.
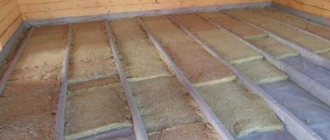
- Combustible materials of walls, ceilings or roofing must be at a distance of no closer than 38 cm from the wall of the sandwich pipe. The space is filled with a heat insulator. Additionally, wooden structures are insulated with an asbestos or galvanized screen.
- The fewer turns, the better the traction.
- A rotation of 90 degrees is replaced by 2 by 45 degrees.
- The height of the pipe depends on the proximity of the roof ridge when exiting. Near the ridge, the pipe is brought up 50 cm. With a distance to the ridge of 1.5 to 3 m, the pipe is sufficient to reach the ridge. When the distance of the pipe outlet from the ridge is more than 3 m, the calculation of the height of the pipe is based on the ratio of the angle between the horizon of the ridge and the top of the pipe. It should be 10 degrees.
We recommend that you read: Features of using a single-pipe heating system with forced circulation of coolant
Note! When calculating the height of the chimney, one should proceed from fire safety standards for the nearest objects - attic or dormer doors, windows. During combustion, hot sparks fly from the chimney, which can cause a fire if the instructions are neglected.
Installing a chimney in a private house as close as possible to the ridge is more structurally complex than venting through a wall. However, this option allows you to install an ideal chimney, without turns and horizontal sections, with the shortest pipe.
Briefly about the main thing
Installation of sandwich chimneys is carried out according to the assembly type of the designer.
The type of steel in the pipes must be selected depending on the fuel.
Installation can be done indoors or from the street.
The system can be assembled “by smoke” or “by condensate”.
You can do the installation yourself by preparing the necessary tools. During installation, special attention should be paid to the passage through the roof, walls and sealing the joints between parts.
Ratings 0
Parts for prefabricated chimney
The sandwich pipe can be installed both on a house under construction and in an existing building. Often new heating is installed when renovating a house or when a brick oven fails. The convenience of a stainless steel pipe is that it can be installed anywhere.
Note! Upon purchase, you will receive a product passport, which should indicate the steel grade (the corresponding markings should be on the parts themselves), pipe wall thickness, diameter, other quality characteristics, and purpose.
To install the chimney you will need the following parts:
- The pipe segments that are connected into a socket have different lengths, but not more than 1 m.
- Elbows (45 and 90 degree bends) for installing chimney bends.
- Gate - a furnace damper for adjusting the draft and shutting off the pipe when the furnace is stopped.
- Transition adapter – for mounting the transition from a single section to a sandwich pipe.
- Inspection (tee) to clean the pipe from condensation and possible internal deposits.
- Head (deflector) on the top of the pipe.
- Crimp clamps to strengthen connections.
- Brackets for attaching the pipe to the wall if installation is not carried out through the roof.
- Galvanized sheet or stainless steel for installation of insulating boxes.
- Thermal insulating materials: mineral (basalt) wool, asbestos sheets.
- Heat-resistant sealant for processing joints.
- Support brackets for installing and fixing the chimney.
We recommend that you read: How to select and install ventilation clamps for securing air ducts
Additionally, you can purchase ready-made parts for installing passages through the ceiling and roof, and flanges for external waterproofing of the chimney outlet to the roof.
Assembling the smoke exhaust structure begins from below, from the stove. According to the design, the segments are connected sequentially, strengthening the connections with crimp clamps. To prevent air from being sucked in from the outside, all seams are coated with heat-resistant sealant.
How to choose
Since different boilers produce different combustion temperatures, in each case the composition of the steel from which the inner and outer pipes are made can play a role. After burning, sulfur, sulfuric and hydrochloric acid may remain on the walls of the chimney. Temperatures also differ depending on the type of fuel used.
Sandwich chimney details Source www.stroimdom.com.ua
When learning how to properly assemble a chimney from sandwich pipes for a home or bathhouse, you need to know that different grades of steel react differently to aggressive influences. The most common:
- AISI 304. High temperature resistant steel alloy. It has a high content of nickel and chromium. It is used at elevated temperatures up to 1000C, since at low temperatures around 600C it becomes brittle;
- AISI 316. High alloy molybdenum stabilized alloy that is acid resistant. Characterized by the absence of corrosion;
- AISI 321. High alloy steel alloy stabilized with titanium. Suitable for use in the average temperature range, up to 800C. Corrodes when interacting with sulfur;
- AISI 430 . It is used at low temperatures, as it has a low level of resistance to aggressive influences. May be corroded. It is used in the use of inexpensive budget models.
Sandwich chimney components Source www.rus-dimohod.ru
Since it is most often impossible to determine the type and grade of steel with the naked eye, a magnet can be used to determine the type. When learning how to properly assemble a chimney from sandwich pipes for a stove or boiler, it is necessary to take into account the characteristics of steel. If the steel is of high quality, then it will not be attracted, but if the alloy is of low quality, then attraction will arise.
Installation of chimney passages
The most difficult and critical areas when installing a chimney in a private house are passages through the ceiling, roof or wall. If the house has several floors, then a passage through the interfloor ceilings is added. The rules for installing chimney passages through flammable materials provide for a minimum distance between the pipe and building elements.
Installation of a passage through the attic, interfloor ceilings
A ceiling-passage unit for installing a chimney through wooden ceilings can be purchased ready-made or made independently. The finished unit is a pipe with thermal insulation, which is put on the pipe. The homemade one looks like a square box, the dimensions of which depend on the diameter of the chimney. A hole is cut out in the center of the box into which the pipe is inserted directly.
Note! A single segment of pipe must pass through the ceiling penetration assembly. All chimney joints are located below or above the interfloor ceiling.
Transition box arrangement:
- a box of such a size is mounted from asbestos-cement or iron sheets that the pipe does not reach 40 cm from the walls;
- a round hole is cut in the center into which the pipe is led;
- the space of the box is filled with mineral wool with heat resistance characteristics of 700 degrees;
- the floor of the upper floor (attic) and the ceiling below are equipped with special metal flanges-overlays, which perform an aesthetic and thermal protective function.
Note! If the attic space is used, it is mandatory to install an additional protective casing with ventilation holes on the chimney.
Installation of a wall crossing
When the chimney is exited through a wooden wall, a transition box similar to the interfloor one is also installed in it. The difference is that the horizontal outlet is easier to install and is a priori protected from moisture.
We recommend that you read: How to weld a gate from a profile pipe with your own hands?
Installation of a chimney in a brick private house through a wall does not require thermal insulation. A hole is made in the wall for the pipe, a metal sleeve is inserted into it and the chimney is led into it. The chimney elbow at the exit from the building through the wall requires the installation of additional support. Most often, a corner bracket is used for this.
If the stove is located in a corner, then the adjacent wall should also be protected from possible heating. To do this, install a protective screen made of non-flammable material with a heat-insulating layer at the height of the structure’s exit.
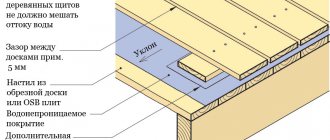
Installation of outlet through the roof
This passage can be called the most critical in the entire structure. Here it is important not only to install high-quality thermal insulation, but also to mount protection against the penetration of atmospheric precipitation. Installing waterproofing on a sandwich chimney is not particularly difficult, since all components are sold ready-made.
Thermal insulation looks the same as the transition through the attic floor, adjusted for the slope of the roof. The passage box here has the shape of a rectangle, although its projection remains square.
Particular attention should be paid to the roofing. If this is a flammable material, then a metal sheet will be required to install a larger external trim (10-15 cm on each side). Accordingly, a large area of roofing is removed. The sheet is placed under the roofing material in its upper part, the side and bottom edges are placed on top.
The final stage is installation of waterproofing and installation of the top cap. This is an elastic or metal conical roof that is installed on top of the cutting sheet. All seams are treated with sealant.
Sandwich pipe connection options
If you are interested in the question of how to assemble a sandwich chimney, another question will probably arise: how to join the system pipes together. There are two possible options, and each of them has its own name:
- “By smoke”, when the lower pipe goes inside the upper one. In this case, combustion products have no way out and are freely discharged upward;
- “Ppo condensate”, when the inner upper pipe is inserted into the lower one. External pipes are assembled with the top side facing out.
It is believed that in the second case the risk of moisture getting into the insulation is reduced, but if the tightness is broken, then some of the combustion products may enter the room.
Connection for smoke and condensate Source www.rusovent.rf
Conditions for normal operation of the chimney
- The length of the smoke exhaust channel must be at least 5 meters.
- The thickness of the steel for the inside of the sandwich is from 0.5 to 1 mm. Optimally – 8 mm.
- It is prohibited to install more than 3 turns.
- The diameter of the chimney should not be narrower than the stove flue pipe.
- The horizontal section of the pipe should not be longer than 100 cm.
Remember that the rules are created on the basis of qualitative tests and negative operating experience. Failure to comply with the nuances of installing a chimney in a private house is fraught with fire or poisoning.
Advantages and disadvantages
Technological progress has made it possible to move away from the use of heavy foundations when building a house and to build on prefabricated pile-screw and drill-fill foundations. And if previously heating a house could only be done using a heavy Russian stove or fireplace made of brick, now they have been replaced by modular structures made from a portal with a firebox weighing about 500 kg.
Sandwich chimney in a bathhouse Source spskamin.ru
When wondering how to assemble a chimney for such systems, you need to know the advantages and you need to know their advantages and disadvantages:
- When used, only the internal part of the system becomes very hot. Thanks to the compensation layer of mineral wool, the outer pipe has an acceptable temperature, which significantly reduces the risk of burns;
- after heating the chimney, the draft increases significantly;
- the steel surface of the chimney is not susceptible to soot settling as in systems made of brick or ceramics;
- due to the rapid removal, combustion products do not accumulate in the chimney, which does not lead to the accumulation of condensate on the walls;
- the design of the chimney provides maximum protection: on the outside it is protected by the outer diameter of the pipe from deformation under direct influence, the inner pipe does not allow heat and combustion products to pass through, and mineral wool is a protective layer from fire since it is not hot;
Installed sandwich chimney Source petropech.ru
Since the sandwich chimney system is relatively light in weight, its installation does not require the installation of a special foundation. It is advisable to strengthen the structure of the subfloor with additional lags, but if this is not possible, this may not be done. With proper care, the system will last a long time, but after about ten years, areas with partial depressurization may appear in the seam area.