The heat accumulator is built into the heating system so that the temperature throughout the apartment or house is uniform, and the coolant releases its heat gradually. This can be achieved due to the fact that the heat accumulator very quickly accumulates thermal energy, which is generated during the operation of the solid fuel boiler.
This energy is designed to minimize heat loss at home and, if possible, compensate for it by supplying a certain amount of heated coolant to the radiators of the heating system.
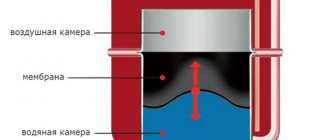
So, the operating principle of this device is as follows: the coolant is directed into the battery in the upper part, and the cooled coolant is removed from the bottom. Due to this connection, no mixing occurs. With the passage of time and circulation of the coolant, cold water gradually leaves the battery.
Due to this design, the radiator and boiler operate independently of each other and are able to function normally in their own mode. It is worth noting that the radiators in this case will work on approximately the same principle as in a centralized heating system.
With the help of heat accumulators, you can not only maintain a comfortable temperature in the room, but also provide residents with hot water and greatly reduce the financial costs of heating itself
Where is a heat accumulator used and how is it designed?
A thermal energy storage device is nothing more than an insulated iron tank with pipes for connecting water heating lines. The buffer tank performs 2 functions: it accumulates excess heat and heats the house during periods when the boiler is inactive. The heat accumulator replaces the heating unit in 2 cases:
- When heating a home with a stove with a water circuit or a boiler that burns solid fuel. The storage tank works for heating at night, after wood or coal burns out. Thanks to this, the homeowner can relax in peace, rather than running to the boiler room. It is comfortable.
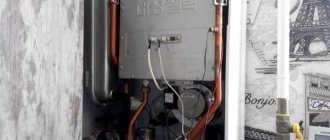
- When the heat source is an electric boiler, and electricity consumption is recorded using a multi-tariff meter. Energy at the night rate is half the price, so during the day the heating system is completely powered by the heat accumulator. It's economical.
On the left in the photo is a 400 liter buffer tank from Drazice, on the right is a Kospel electric boiler complete with a hot water storage tank
Important point. Tank - hot water accumulator increases the efficiency of a solid fuel boiler. After all, the maximum efficiency of a heat generator is achieved with intense combustion, which cannot be constantly maintained without a buffer tank that absorbs excess heat. The more efficiently wood is burned, the less it is consumed. This also applies to a gas boiler, whose efficiency decreases in low combustion modes.
A storage tank filled with coolant operates on a simple principle. While the heat generator is heating the rooms, the water in the tank is heated to a maximum temperature of 80-90 ° C (the heat accumulator is charging). After the boiler is turned off, hot coolant from the storage tank begins to flow to the radiators, providing heating for the house for a certain time (the heat battery is discharged). The duration of operation depends on the volume of the tank and the outside air temperature.
How does a factory-made heat accumulator work?
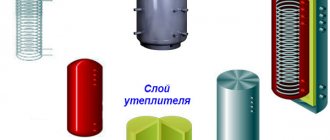
The simplest factory-made storage tank for water, shown in the diagram, consists of the following elements:
- the main tank is cylindrical in shape, made of carbon or stainless steel;
- thermal insulation layer 50-100 mm thick, depending on the insulation used;
- outer skin – thin painted metal or polymer cover;
- connecting fittings embedded into the main container;
- immersion sleeves for installing a thermometer and pressure gauge.
Note. More expensive models of heat accumulators for heating systems are additionally equipped with coils for hot water supply and heating from solar collectors. Another useful option is a block of electric heating elements built into the upper zone of the tank.
Scope of application of the heat accumulator
Some people think that a heat accumulator is not particularly needed in the house, because it rarely works. However, the equipment plays an important role in the heating system and is used in several cases.
If the house is heated by a stove that has a water circuit, or by a boiler, which must be heated by adding firewood and coal. So that the owner of the house sleeps peacefully at night and does not run to the stove to add fuel, the heat accumulator starts working.
When the house is heated with an electric boiler, the electricity bill will be a considerable amount. Everyone knows that at night the tariff is half as much, so it is advisable to use a heat accumulator during the day.
And, of course, when the main heating source is turned off, for example, in the event of a breakdown, the thermal energy storage device will be very useful.
Solid fuel heating boiler and heat accumulator
Very often, heat accumulators are used precisely to preserve the heat generated by a heating boiler. This is due to the fact that the boiler does not always emit heat equally during the period of fuel combustion; in order to balance the heating process and make it as even as possible in terms of the temperature regime in the house, heat accumulators or, as they are also called, buffer tanks are used.
Devices for monitoring pressure and temperature in the heating system are installed next to the heat accumulator, and a stable base is equipped for the buffer tank and boiler.
The operation of heat accumulators has its drawbacks: the house takes too long to warm up during the initial startup of the system, high cost, and requires high boiler power.
Pumps that increase pressure - review of 2021 models, recommendations for choosing parameters for the heating system (105 photos)
Heating pressure testing pumps - manual and automatic models for modern heating systems (90 photos and videos)- Repair of the circulation pump - main types of faults, disassembly, repair and assembly of the pump in the heating system (video + photo)
Heat accumulator device
The base of the storage tank is a regular tank, with pipes at the bottom and top, to which a coil is attached. At the bottom, the tank is connected to the heat source, and at the top – to the heating system. The unit has a high heat capacity of water. The battery works according to a certain principle.
There are two pipes in the side walls of the tank. One is a conductor of cold water from the water supply system, the second is needed for the coolant to flow into the heating radiators.
The upper coil is connected to a pipe through which cold water flows, and the lower coil is connected to a hot water pipe.
Principle of operation
Hot water circulates through the coil and heats the liquid in the heat storage tank. If the boiler turns off, the water in the pipes gradually cools, but circulation continues. The cool liquid entering the storage tank begins to push the hot storage tank present there into the heating system, due to which the rooms continue to be heated for some time, even if the boiler is turned off.
In order for the coolant to move through the pipe, you need to equip the tank with a circular pump.
How to make a heat accumulator with your own hands
This question arises when a person finds out the price of such equipment, depending on the number of coils and the material of manufacture, it ranges from 400-1500 cu. Which is not affordable for everyone.
Device diagram
TA is a cylindrical or rectangular container made of metal. The dimensions are determined by the required volume obtained as a result of the calculations given earlier. Wall thickness 2-3 mm.
The sheet is cut using a plasma cutter, grinder, guillotine or welding machine. It is also sewn together using welding. Maximum weld quality is ensured by gas welding, but inverter welding can also achieve the desired result. In any case, the quality of the welds will need to be checked under pressure of up to 4 atmospheres. The end walls of the cylinder are closed with flat metal circles of the same thickness.
Steel or stainless steel
Today on the market you can purchase such containers from both black steel and stainless steel. Manufacturers claim that it is worth taking only the last option since it is not subject to corrosion, but it also costs 2-2.5 times more. What to choose? In fact, there is no money for stainless steel, feel free to take ferrous metal. A thickness of 3 mm will last for many years, since this container is constantly filled with water and the oxygen it contains is not enough for corrosion to form.
The only problem is that when the water is drained, dampness remains inside for a certain time. But the metal thickness reserve is enough for this not to be a problem. From my experience: heat accumulators have been in operation for about 10 years, no problems with corrosion were found during the audit.
A curved smooth or corrugated pipe acts as a heat exchanger. Purchasing a magnesium anode will eliminate the danger of quickly covering the structure with corrosion.
Example drawing
It is necessary to prepare a drawing in advance and mark the inlet and outlet openings for inserting the heat exchanger and two more connections to the main circuit. Input on top, output on bottom. Fittings cut into the walls. Two additional holes with pipes must be made in the bottom and top cover. One for draining the coolant, the second for the air vent (will eliminate excess pressure inside the tank).
To ensure that the container, especially if the shape is not cylindrical, does not swell after filling, stiffening ribs are installed around the perimeter, at a distance of 320-380 mm from each other (outside the tank). They are made from a metal strip 3 mm thick. Inside, each ring is tightened by two diametrical wall reinforcements, perpendicular to each other. The same is done with the end walls (the amplifier connects the centers of the circles).
The entire structure is welded. Supports will be required for installation. They will be fitted to the bottom. In these places, additional stiffening ribs from the same strip are attached to the outside of the tank so that the bottom does not deform under the weight of the tank. The fittings are threaded (if the connection to pipes is planned to be made using couplings). This can be done before installing them on the TA.
As an alternative, a welded contour connection is used. This is inconvenient from a maintenance point of view. If the TA fails, the pipes will have to be cut. The coupling can be unscrewed, and after repair, everything can be re-installed. If alloys of non-ferrous metals are used as a coil, argon welding will be required.
When the system involves the use of several heat exchanger spirals, they are installed one inside the other. That is, the diameter of the first is less than the diameter of the second. A design with an arrangement one above the other is possible, if the height of the ceilings in the room allows it.
The material for the tank can be carbon steel with an anti-corrosion coating applied by galvanic method. It's cheaper than making a stainless steel tank. But the latter will last longer. The only weak spot is the welding seams. It's better to process them. Naturally, the welding machine must be able to weld stainless steel.
As an additional equipment, you can install an electric heating element. By turning it on, you will reduce the startup and warm-up time of the system. Control and measuring instruments will also not be superfluous (thermometer, coolant level controller, etc.). A safety air release valve is used as a device to ensure the safe operation of the heat accumulator. Such a system is reliable, durable and unpretentious.
Types of heat accumulators
There are several types of thermal accumulators.
Standard buffer capacity. The battery is an ordinary metal tank. In order for it to retain heat longer, the tank must be covered with a layer of insulation. If the structure is not insulated, you can do it yourself.
Hot water storage tank. In order for the heat storage tank to heat water, it must be equipped with a coil. The coil serves as a conductor of cold water from the water supply to the tank; it is placed in the upper or lower part of the structure or, in general, along the entire perimeter of the heater. It is not recommended to pour water directly into the tank, as deposits form on the walls of the battery and bacteria spread.
The coil is carried out not only from the water supply, but also from the sun's rays by so-called solar collectors. The coolant enters the storage tank from special panels heated by the sun, leaves heat in the tank, and returns along the coil to the panels to reheat.
Water heat accumulator with heat exchanger. Like the coil, heat exchanger
Thermal accumulators
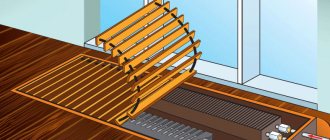
used for hot water supply. Due to its high thermal conductivity, corrugated pipe is perfect for connecting to solar collectors. The heat exchanger is also used for underfloor heating systems. The pipe can withstand pressure up to 10 atmospheres.
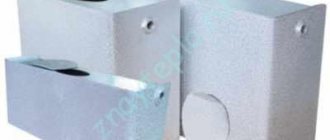
Tank-in-tank design. Such a heat accumulator is called a full-fledged boiler inside a technological tank. To increase the heat exchange area and help clean the tank walls from scale, ribbed stainless steel is used to make the structure.
How to make a heat accumulator for a solid fuel boiler from a barrel
You must first calculate the volume of the required container and make a drawing . The drawing should show a standard barrel containing two pipelines. One of them transports coolant from the boiler heat exchanger, and the second transports hot water to the heating radiators. All that remains is to calculate the dimensions of the barrel, or rather, its volume. Knowing the volume, it is easy to determine the diameter and height using reference data.
If you need to calculate the volume of a container, knowing the height and one of the following parameters: radius, diameter or base area, then it is most convenient to use a calculator that performs calculations online.
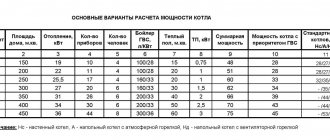
Let's start the calculation. Let's assume that our solid fuel heat generator is completely inactive at night for 4 hours (after cooling), and the area of our small country house is 30 square meters. m. Consequently, the barrel should deliver approximately one tenth of its area per hour - 3 kW. Total, 12 kW per night. In this case, we will take the temperature difference between the barrel and the heating to be a maximum of 40 degrees (for example, if the water in the tank is heated to 90, then in the radiators - at least to 50).
According to the school physics course, m=Q/Ct, where
- Q is all thermal energy, for us it is 12 kW,
- C is the specific heat capacity of the agent, that is, water, equal to 0.0012 kW/kg x g. Celsius,
- t is the temperature difference.
We get this formula: m = 12/0.0012x40 = 250 kg. Thus, we can take the volume of water equal to 250 liters. It turns out that, under the given conditions, a metal barrel of 250 liters is suitable for us as a heat accumulator for a solid fuel boiler. The approximate dimensions of such a barrel are 600x900 mm. That is, the diameter is 0.6 m, and the height (length) is 0.9 m.
What to take
For the manufacturing process of our heat accumulator, it is necessary to prepare the following materials and tools.
- An ordinary metal barrel, you can buy it in a store,
- welding machine with mask and electrodes,
- power tools such as grinders and grinding and cutting discs, drills and drill bits, metal bits.
- two standard steel heating pipes, each with a threaded end, usually 3/4 inch,
- mineral wool.
It is better to start the procedure with the participation of an assistant. In addition, the drawing must already be ready.
Drawing of a heat accumulator
Step-by-step DIY production
- The barrel is first thoroughly cleaned from the inside. This is necessary to prevent constant contamination of the coolant with rust and scale. Cleaning can be done using a grinder and grinding wheels.
Barrels cleaned from the inside
- Next, you need to drill two holes - inlet and outlet, to the diameter of the supply pipes. To do this, first use a drill with a metal drill, and then it is better to use a crown.
- Next, pipes for the inlet and outlet of the coolant, that is, heated water, are carefully welded inside the resulting holes. These pipes must have threads on the ends that are not welded. Later, ball valves will be screwed onto this thread for insertion into the general heating system.
- After this, the top cover is welded very conscientiously. All welds must be sealed to avoid leaks.
- Finally, the heat accumulator is insulated from the outside with mineral wool; for this, the barrel is wrapped in layers of mineral wool, after which these layers wrapped around the barrel are carefully tightened with rings of metal fastening tape.
- All we have to do is install the unit into the system using ball valves. The heat accumulator should be located immediately after the boiler, and at a level higher than the radiators, so that the thermal agent can replenish them well from our container.
This is important to know! Do not use a plastic barrel. It is not able to withstand the operating temperature of the thermal agent, reaching 90 degrees Celsius. The walls of such a barrel will simply begin to melt during operation in the system. An exception may be plastic containers on which the manufacturer indicates a maximum temperature of the contents above 90 degrees. But in this case, you still need to decide how to attach the pipes.
A few more notes
So we made a simple heat accumulator for a small heating system. As a result, here are a few more important notes. For our example, the required barrel volume was 250 liters. However, when the house is large, a much larger storage unit may be needed. In this case, it would be better to weld a cubic box. In addition, it is easier to insulate it with special materials.
Budget storage tank made from cylinders
For those homeowners whose boiler room area is very limited, we suggest making a cylindrical heat accumulator from propane cylinders.
Homemade heat storage device paired with a TT boiler
The 100 liter design, developed by another of our masters, expert Vitaly Dashko, is designed to perform 3 functions:
- unload the solid fuel boiler when overheating, taking in excess heat;
- heat water for household needs;
- provide heating of the house for 1-2 hours in case of extinguishing of the TT boiler.
Note. The battery life of the heat accumulator is short due to its small volume. But it will fit in any furnace room and will be able to remove heat from the boiler after a power outage, since it is connected directly, without a pump.
This is what a tank made from cylinders looks like without lining.
To assemble a storage tank you will need:
- 2 standard propane cylinders;
- at least 10 m of copper tube Ø12 mm or stainless corrugation of the same diameter;
- fittings and sleeves for thermometers;
- insulation – basalt wool;
- painted metal for cladding.
You need to unscrew the valves from the cylinders and cut off the caps with a grinder, filling them with water to prevent the remaining gas from exploding. We carefully bend the copper tube into a coil around another pipe of a suitable diameter. Then we proceed like this:
- Using the presented drawing, drill holes in the future heat accumulator for pipes and sleeves for thermometers.
- Secure by welding several metal brackets inside the cylinders for mounting the DHW heat exchanger.
- Place the cylinders one on top of the other and weld them together.
- Install a coil inside the resulting tank, releasing the ends of the tube through the holes. Use gland packing to seal these areas.
- Attach the bottom and lid.
- Insert an air vent into the lid and a drain valve into the bottom.
- Weld the brackets to secure the casing. Make them different lengths so that the finished product has a rectangular shape. It will be inconvenient to bend the cladding in a semicircle, and it will not be aesthetically pleasing.
- Insulate the tank and fasten the casing with self-tapping screws.
Connecting the tank to a TT boiler without a circulation pump
The design feature of this heat accumulator is that it is connected to a solid fuel boiler directly, without a circulation pump. Therefore, for joining, steel pipes Ø50 mm are used, laid with a slope, the coolant circulates by gravity. To supply water to the heating radiators, a pump + three-way mixing valve is installed after the buffer tank.
How and what to make a buffer tank from
The heat accumulator is made according to the drawing of the factory tank. The internal structure is completely identical. The tank consists of the following components:
- internal capacity;
- thermal insulation layer;
- outer protective shell;
- heat exchanger for the container, usually a copper coil;
- control and shut-off valves: drain valve, safety valve, air valve, thermometer.
To make a buffer tank yourself, you just need to assemble the battery like a factory module. It should be remembered that different heating systems (open and closed type) require tanks of different designs. It will also be necessary to select the material for the manufacture and insulation of the container.
Type of heat storage tank design
There are several types of containers, classified by shape and design. Homemade heat accumulator tanks are:
- Cylindrical - a classic design used in the manufacture of drives in factory conditions. The shape has many advantages: it can withstand thermal loads and water hammer. Practical for closed heating systems with high pressure in the pipeline. The main disadvantage is that a cylindrical tank is difficult to manufacture.
- Rectangular - in production they use metal 2 mm thick. To strengthen the structure of the buffer tank, corners (stiffening ribs) are welded, pulling the opposite walls together. The rectangular shape of the heat accumulator copes worse with pressure. General installation requirement: install the drive above the radiators. The rectangular tank design is widely used due to its ease of assembly. To reduce the load on the walls of the battery, an air vent and a relief valve are installed into the heating system. When the coolant boils (a common occurrence in solid fuel boilers), the fittings will prevent the occurrence of emergency pressure.
For a gravity heating system, only an open buffer tank is suitable. The difference is in the design: the presence of a pipe in the upper part of the container, communicating with the atmosphere.
Material for making a battery tank
There are many options for manufacturing. The most common:
- Stainless steel tank - metal and welding work are expensive. Due to its high cost, stainless steel is practically not used, except when using ready-made containers.
- Plastic barrels are an important operating condition so that the material can withstand heating up to 100°C. To strengthen the body, you can make an edging from metal strips.
- A buffer container made from a Eurocube is not recommended. The reason is simple, the maximum heating temperature of the tank is only 70°C. When the coolant overheats, the walls become deformed and leak. But as you can see from the video, heat accumulators are also made from “Eurocubes”.
- Aluminum container - use ready-made containers with sufficient volume. You can only make a tank from aluminum yourself if you have a properly qualified welder. Not all professional craftsmen undertake processing of this metal.
- Heat accumulator made from barrels (metal) - disadvantages: thin-walled steel, flat lids. A good alternative is to take a steel pipe blank and make a tank by welding the bottom and top.
- A steel container for a heat accumulator (cylindrical) is the best option, requiring a minimum amount of material costs. Made from sheet iron 2 mm or thicker.
In addition to the manufacture of a welded tank structure, ready-made containers are used. Suitable: old boilers, receivers, liquid nitrogen storage tanks, liquefied gas cylinders, etc.
How to insulate a buffer tank
In factory storage tanks, insulation is laid between the inner tank and the outer casing. Homemade buffer tanks for solid fuel boilers use the same thermal insulation method.
The walls of the heat accumulator must be insulated. It is recommended to use mineral or basalt wool with a thickness of at least 6-8 cm. Cotton wool is easy to work with. The mineral thermal insulation of the tank allows moisture and condensation to pass through (breathes) without accumulating liquid inside the fibers.
Another plus. As practice shows, buffer containers insulated with cotton wool do not like mice. When insulated with polystyrene foam or expanded polystyrene, rodents often settle inside the heat-insulating layer. The holes that appear lead to rapid heat loss and a decrease in the efficiency of the drive.
Modernization of the heat accumulator
The classic design of a heat accumulator was previously described, but there are several basic tricks that can be used to make the operation of this device more efficient and economical:
- Below you can place another heat exchanger, the operation of which will be based on the use of solar collectors . This option is suitable for users who prefer green energy;
- If the heating system has several operating circuits, then it is best to divide the inside of the barrel into several sections. This will allow you to further maintain the temperature at a very acceptable level for as long as possible;
- If financial resources allow, then polyurethane foam can be used as insulation. This material is much more expensive, but it retains heat much better. The water will maintain its temperature for a very long time;
- You can install several pipes at once, which will make the heating system more complex , equipping it with several circuits at once;
- It is allowed to install an additional heat exchanger together with the main one. The water heated in it will be used for various household needs - this is quite convenient.
Stages of heat accumulator assembly
First you need to prepare the barrel. If it is old, then clean it of dirt and traces of corrosion.
We take thermal insulation material and wrap it around the outer walls of the tank, after which we secure the insulation with tape wrapped in several layers. Mineral wool is perfect for insulation, but the use of extruded polystyrene foam is not recommended, due to the fact that mice can live under such cladding in the cold season. They are indifferent to mineral wool.
To wrap the barrel, you need to take a foil film and secure it with adhesive tape. A homemade heat accumulator can be sheathed with a sheet of metal.
The next step is to make the coil. To do this, you will need a copper tube 8–15 meters long (the length depends on the volume of the tank) and a diameter of 20–30 meters. Bend the pipe into a spiral and place it inside the barrel. When connecting the coil to the boiler, the spiral will heat up, and accordingly, the water in the storage tank will heat up.
To move water, we need to make pipes, which we will equip with taps. Taps are needed so that, if necessary, you can quickly shut off the water circulation.
The last stage is the installation of a heat accumulator. The tank is installed on a concrete base. You can use a ready-made slab or fill the formwork with concrete mortar yourself.
This type of design is suitable for a single boiler heating system. If there are several boilers, it will be difficult for a beginner to make the correct unit on his own.
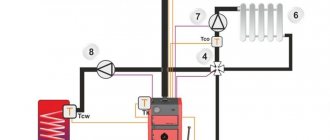
How to connect
At the initial stage, the boiler should be installed according to the diagram. A special safety group and a three-way valve will need to be installed on the pipe that will go to the storage tank to prevent condensation from occurring. In the future, a heat accumulator should be connected to the system, and a three-way mixing valve will need to be connected to the pipe coming out of it.
The heat accumulator cannot do without installing a circulation pump, which must be equipped with a relay thermostat with an immersion sleeve. Two check valves should also be installed.