What fuel is used
The modern market offers the following types of solid fuel:
- Firewood, or its European variety, made from pine or deciduous sawdust.
- Biopellets in granules. We are talking about pressed sawdust, peat, waste from the woodworking industry and agriculture.
- Hard coal and anthracite.
- Waste from wood processing or agricultural industries.
To increase the profitability of heating, the priority is factory-made or home-made boilers of a universal type, capable of consuming all of the above types of fuel. In this regard, combined equipment has proven itself very well, for the operation of which alternative fuel is suitable. The switching procedure is very simple and does not take much time.
Combination boilers are:
- Electric.
- Solid fuel.
- Universal.
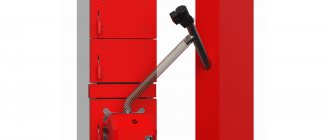
Long-burning boilers - add firewood twice a day!
This design will appeal to those who are not often at home or do not want to constantly load fuel. Long-burning units are a type of solid fuel boiler in which the combustion process (smoldering) occurs in the upper part of the fuel layer, respectively, and air is supplied from above. There is a built-in water circuit along the entire diameter of the housing, thanks to which the coolant warms up well no matter at what depth the combustion occurs. Due to the combustion of only the top layer, the boiler can operate for up to 30 hours on one load of wood, and some models that are suitable for any type of fuel can operate on coal for almost a week! Most boilers do not contain any energy-dependent equipment; moreover, they are relatively inexpensive and can be designed independently.
True, such designs also have disadvantages, in particular, it is impossible to add fuel while the boiler is burning. Wet firewood is not suitable for burning; it must be well dried to at least 20% humidity and cut into short pieces. If you heat with coal, then only high-quality coal with a low slag content. Another significant disadvantage is the limited capacity of the units. Most of the most popular models operate within 40 kW.
Let's also mention pellet boilers - this is a type of solid fuel boiler, with the only difference that instead of firewood or coal, fuel pellets from waste from the wood processing industry are used. Most units are equipped with a special hopper, from where fuel enters the combustion chamber automatically.
Design features and operating principle
The operation of a solid fuel boiler is based on an extremely simple principle: air sucked in from below circulates through the walls of the chamber. Once inside the room, hot air begins to heat the surrounding space. Long-burning units are supplied with air in very measured doses.
To reduce the combustion rate and reduce the free space inside the firebox, when laying fuel they try to achieve maximum density. For work, you need to prepare the following materials and tools: a 30-50 mm pipe, a 0.8 mm steel sheet, a metal corner, fittings, a pipe with a cross-section of 250 mm (an old gas cylinder will do), a grinder and a welding machine.
Features of use
In solid fuel boilers, such types of fuel are often used that it is impossible to do without a forced increase in air supply - sawdust or peat burn poorly without blowing. A complete heating process here is only possible with the help of a smoke exhauster.
The hood, unlike pressure units, allows fuel to be supplied to the boiler continuously, which increases its performance and prevents gaseous combustion products from penetrating into the room.
Use of hoods:
- improves the efficiency of boilers, leads to complete combustion of firewood;
- prevents the accumulation of smoke in residential premises, eliminates unpleasant odors;
- prevents the return of exhaust gases into the room when the door is open;
- reduces the amount of deposits on the walls of chimneys;
- With proper installation and regular maintenance, the service life of the smoke exhauster can be equal to the duration of use of the boiler.
How to make a boiler with your own hands - manufacturing technology
Before you make a solid fuel boiler with your own hands, you need to understand all the details of the design. The procedure for constructing a long-burning solid fuel boiler with your own hands:
- Manufacturing of air supply controller. For this purpose, the pipe is equipped with a welding bolt. After this, using a grinder, you need to cut a circle from a steel sheet, the diameter of which corresponds to the pipe. Its edges are equipped with holes in such a way as to achieve free immersion of the bolt for fastening the cover with a regular nut. Using this circle, it will subsequently be possible to dose the volume of incoming air, controlling the intensity of the flame.
- The same pipe is decorated with a series of small horizontal gaps. They will act as air vents.
- Another circle is made from a steel sheet: its diameter should be 5-10 mm smaller than the cross-section of the firebox. A hole is made in the center of the circle for a tube with a plug, with further welding 20-30 cm from the edge.
- The body is made. If an old gas cylinder is used for this purpose, it must first be freed from the upper part (where the tap is). When using a 250 mm pipe, it is first plugged at the bottom.
- To build a chimney, a cutout with a diameter of 100 mm is made on top of the cylinder (10 cm from the edge), and a pipe with thick walls is welded into it.
- To install the vent for the boiler, the bottom of the furnace is equipped with a hole for the pipe: it must be inserted in such a way as to ensure that the vent for the solid fuel boiler exits outside the body. Be sure to place it below the level of the chimney: this will ensure good air circulation.
- The heat dissipation screen is constructed from a sheet 10 mm thick. A circle with a diameter of 200-220 mm is cut out of it. For ease of use, a reinforcement handle is welded onto the screen.
- The convection casing has a cylindrical shape. It is made of sheet metal: the diameter of the structure should be 50-70 mm greater than the firebox. To assemble the structure completely, the base of the boiler and the convection chamber are welded together.
- To make the top cover of the device, you can use a previously cut part of the cylinder. If sheet metal was used, then a circle of the same diameter is made from it, with welded handles made of reinforcement.
Pyrolysis equipment
A pyrolysis type boiler differs from a conventional one in that its design has two combustion chambers: one for fuel, the second for afterburning flammable gases. They are separated by a grate that allows air flow to pass freely. A good material option for this is reinforcement. Under no circumstances should you make a blind partition, otherwise the device will not work.
To make a long-burning pyrolysis-type solid fuel boiler, you will need the following materials and tools:
- Sheet metal 4 mm.
- Pipes with a wall thickness of 2 mm.
- Welding machine.
- Grinders, drills, and accessories for them.
- Metal strips, fittings and corners.
When starting to independently construct such serious equipment, you need to acquire a detailed diagram of the unit. It is advisable that the project be developed by a person with extensive experience in the field of heating engineering. When performing a test run of a homemade long-burning coal boiler, you need to determine its efficiency. The easiest option is to use smoke coming out of the chimney for this. If there is no smell of carbon monoxide, this indicates high efficiency of the equipment. The entire range of operating capacities requires such testing.
Installation of a homemade solid fuel long-burning boiler must be carried out according to all the rules. In this case, it is no longer technical goals that are pursued, but security considerations. Violations result in significant fines, putting people's lives at risk. To install a heating unit, you will need a non-residential premises (boiler room). A brick or concrete base is constructed as a platform for the boiler. The floor in front of the fireboxes is laid with sheet metal 1.5-2 mm thick.
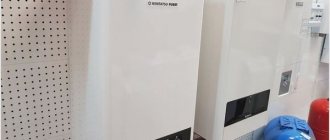
Solid fuel boilers of the new type are significantly different from their previous counterparts. They have a modernized control system, which simplifies the operation of the unit, additional functionality, and an increased number of options.
From an ergonomic point of view, setting the required operating parameters is quite beneficial: you perform the action once, and there is no need to periodically adjust it.
The cost of a solid fuel boiler is influenced not only by the availability of high-quality components, but by an improved version of the control unit: the more expensive, the more modern the automation.
The automatic control system is aimed at automating control over the combustion process in a heat generator of this type.
The control unit and fan serve to implement the following tasks:
- maintain the specified temperature of the coolant in the system.
- Provides high efficiency.
- Helps improve efficiency levels.
- They work regardless of fuel quality.
Making a classic model
Building a reliable TT boiler that can last more than 15 years requires the use of the following materials:
- low-carbon steel sheet grade St10-20, 4 mm thick, for the manufacture of a firebox;
- the same, 3 mm thick - for the water jacket and doors;
- metal strip with a cross section of 20 x 3 or 20 x 4 mm;
- a piece of pipe with a diameter of 150 mm for the chimney;
- pipe Ø57 mm with a wall thickness of at least 3.5 mm for the heat exchanger;
- profile pipe 6 x 4 cm for the air duct;
- a corner with a shelf width of 5 cm made of thick metal (4-5 mm) on a grate;
- thin sheet steel with powder painting for external cladding.
Additional materials will require basalt fiber with a density of 80-100 kg/m³ for thermal insulation of the body and asbestos-graphite cord for sealing the door ledges. The automation kit and fan, which were mentioned in the previous section, are made in Poland, model KG Elektronik SP-05. There are also Chinese analogues on the market, they are cheaper.
Step one - welding the body
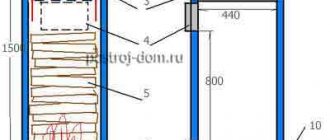
To weld the fuel chamber, it is necessary to cut 4 mm metal into blanks according to the dimensions indicated in the drawing. Start assembling from the bottom of the ash pan - grab the side walls and lid to it, and then form frames for the loading and cleaning door, as done in the photo.
Then follow this algorithm:
- Weld supports for the grate inside the firebox, and weld clips from a steel strip outside for mounting the water jacket.
- Install and weld the 3mm outer lining sheets of the water jacket. Note that it originates from the top of the ash chamber.
- In the upper compartment, which will subsequently be filled with coolant, cut 4 flame pipes Ø50 mm, and place the same pipes for connection to the heating system.
- Attach legs from pieces of any rolled metal to the unit and install a chimney pipe at the outlet of the fire tube heat exchanger.
Please note that the flame tubes converge in a bundle towards the chimney pipe
Stage two - installation of hanging elements
The doors of the fuel and ash chamber are made by bending the edges of the blanks and welding the internal frame, where the basalt insulation is laid. The insulation is hermetically sealed on top with a lid, and an asbestos-graphite cord is tightly inserted into the resulting groove along the perimeter of the sash.
What else needs to be done:
- Attach the handles and hinges to the body, and cover the doors with heat-resistant enamel.
- Weld a grate from the corners and put it in place.
- Make an air duct with a counter flange and weld it to the rear wall, as shown in the photo.
To insulate and line a homemade TT boiler, it is necessary to weld embedded parts made of any metal at the corners of the water jacket, as long as its width does not exceed 20 mm (on the back wall - 4 cm). Also provide stands for mounting the ECU on the top of the unit.
Final assembly of the heater
Thermal insulation of the boiler tank is simple - the walls are lined on the outside with basalt wool slabs, which are secured with a cord. Make sure that the insulation fits tightly to the frame of the loading and ash opening, as well as to the profile pipe of the air duct.
This is how the control unit and fan are mounted
The last step is to cover the heat generator with polymer-painted metal, screwed with self-tapping screws to previously welded embedded parts. After this, the doors are hung and an automation unit with a fan is installed. An original video from the developer of this long-burning TT boiler, Vitaly Dashko, will help you understand the assembly process:
Principle of operation
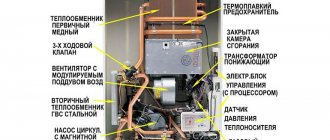
If in older models of solid fuel units, to regulate the air supply, it was necessary to open or close the ash door manually, and monitor the temperature visually using a thermometer, then in new boilers an automatic draft regulator is installed. This device is energy-dependent; its functions include opening and closing the ash pan damper depending on the temperature of the water in the container.
Taking into account the inaccuracy of the settings and the dependence of the operation of the unit on natural draft in the chimney, instead of an ineffective thermostat, a fan was installed to supply the required volume of air to the combustion chamber. And the operation of the fan is ensured by a controller that receives information about the state of the coolant from the sensor.
The controller consists of a screen and a control panel, designed to set the required coolant temperature. Models that do not have such a kit can be equipped with it; the fan is installed on the mounting plate, but you must first disconnect the ash door.
The coolant temperature is adjusted regardless of external conditions.
Both wired and wireless methods are suitable for connecting them. Thanks to the information received from the sensors, the selected temperature regime in the house is maintained. This is the most rational method.
Safety valve
Modern automatic models have an ignition system, flame control, and continuous fuel supply. For ignition, an electric incandescent element is provided, which turns on after the pellet screw container is fed into the burner.
A stable flame, recorded by a photosensor in the form of a pulse transmitted to the controller, is a signal to turn off the electric ignition. During operation, granules are fed into the auger from a bunker, the volume of which is capable of providing heat to the room for several days, without human intervention.
Solid fuel units with an automatic control system, in addition to the above devices, are also equipped with safety devices, in particular, a safety valve.
It is necessary to discharge water from the boiler tank in case of overheating, to stabilize pressure, and also provides reliable protection of the casing from destruction. The boiler can be equipped with an overheating sensor, which signals if the temperature is exceeded at the initial stage.
So, boilers can be equipped with:
- Traction control sensor.
- Water level sensors in the jacket.
- Fan - smoke exhauster.
- Pressure recorders.
- Circulation pump.
- Fuel and water consumption sensor for domestic hot water.
- Sensors for the level of pellets or coal in the container.
All these devices are interconnected with a controller that performs control and signals emergency situations. The most sophisticated devices have a remote control function, where you can control automation via the Internet and mobile applications.
Connecting the boiler to the heating system
The last stage is connecting the pyrolysis boiler and piping it. As with all solid fuel installations, it is necessary to prevent the formation of condensation on the internal walls of the firebox during heating. This phenomenon shortens the service life of the furnace body, since the condensate contains sulfur inclusions and will cause intense corrosion of the metal. For this reason, the piping of the heating boiler must be done according to a scheme that does not allow cold water to enter the jacket during heating.
Below is a classic diagram for connecting a pyrolysis boiler to a heating system with a balancing valve between the supply and return pipelines.
The jumper forms a small circuit in which the coolant is driven by a circulation pump. The piping of a pyrolysis heating boiler shown in the diagram allows water to circulate through a small circuit, warming up along with the unit. The thermostatic three-way valve will begin to add cold water from the system at the moment when the water temperature in the small circuit reaches the set value, usually 45-50 ºС.
The operating temperature in the heating system is in the range of 60-80 ºС; it is rarely necessary to raise it higher. If your home is cool when operating in this temperature range, then you need to look for the reason in the system itself. It makes no sense to increase the temperature; this will only increase the consumption of firewood in the pyrolysis boiler.
Features, Pros and Cons
The main functions of the automatic control unit include:
- Dosed supply of combustion air.
- Control over the performance of the heat generator.
- Indirect regulation of thermal power depending on the temperature of the coolant.
- Direct control of power relative to the air temperature in the house or weather conditions.
- Ensuring the operation of the water heating installation in a safe mode.
- Automatic fuel supply.
- Ignition and extinguishing of the furnace of the unit.
Combustion air supply methods
Increased requirements are placed on the height and diameter of the chimney when the air supply circuit in the pyrolysis boiler involves the use of conventional draft. It should be enough to overcome the resistance of the gas-air path of the installation and the chimney pipe, as well as to create a vacuum in the firebox of 16-20 Pa. You can select the diameter according to the outlet pipe, and the height should be at least 5-6 m.
Forced air supply to both chambers can be carried out in three ways:
Typically, the design of a pyrolysis boiler involves installing a fan in pressure mode. This is explained by the fact that a conventional blower is more affordable than a smoke exhauster, since the latter must extract exhaust gases at high temperatures. For this reason, its structural elements are more expensive.
Leading manufacturers of pyrolysis boilers install smoke exhausters on their products at the exit of combustion products. The reason is to ensure safety for the person who opens the firebox door in operating mode. The smoke exhauster creates a vacuum, so the flame will not blaze through the open opening into a person’s face.
For high-power installations, manufacturers use fans for both types of boilers, at the inlet and outlet of the gas-air duct.
In order to understand how a pyrolysis boiler works, we recommend watching the following video.
Types and selection criteria
The automatic control unit is available in both mechanical and electronic versions.
Advantages of a mechanical control system:
- Does not require connection to an electrical outlet.
- Convenience and ease of use.
- Regarding electronic automation , its price is several times lower.
- It is reliable.
- There is no need to call a specialist for installation.
The electronic type of automation is the most efficient, but is a volatile device.
When choosing automation for a heating system, it is recommended to familiarize yourself with its parameters:
- Thermal operating mode.
- The required degree of adjustment of the temperature regime of the coolant.
- Real economic effect.
- Compatibility of the device and the specific boiler model.
Installation and configuration
The installation process of an automatic control system includes:
- Connection of the blower fan. As a rule, the turbine is located on the lowest door of the boiler, where the damper is located. But there are models of units where it is installed on the side wall, or in a special place on the top of the boiler, it all depends on the design features. Everything is simple here: the damper is removed, and a fan is put in its place; four bolts are used for fastening. If there are no holes for mounting, they need to be drilled. For fans with a damper, installation is carried out in such a way that the damper is closed when the fan is off.
- Installation of the controller. First of all, you need to decide on the place where the device will be installed. The main requirement is that it should not heat up. On models without a hob, the automation is mounted on top. If the design of the unit allows, you can install the unit on the side wall. Don't forget about the length of the cables.
- Connecting the temperature sensor. A correctly installed temperature sensor will ensure the normal functioning of the entire control unit. If the model does not have a special place for the sensor (hole parameters: diameter 10 mm, depth 60 mm), then it can be mounted on the output metal pipe. A clamp is used as a fastening material; it can be supplied with the device.
- Connecting connectors. To do this, you need to connect the turbine connector to the control unit connector. Finally, you need to connect the device’s network cable. The automation is ready to perform its functions.
Design and principle of operation
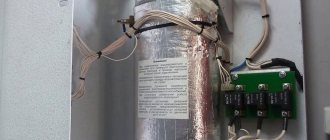
An exhaust fan for a factory-made boiler includes the following elements (the device is shown in the diagram, the positions coincide with the points):
- Metal heat-resistant impeller with blades bent at 90° relative to the impeller.
- Mounting plate.
- Low-performance electric motor (20…50 W).
- Power cable connector.
- Remote control with controls and controls.
- The flask and capillary tube of a temperature sensor connected to an emergency thermostat.
- Power cord with plug.
Note. The boiler smoke exhauster DM-01 from Kalvis is taken as an example. The design of other types of fans differs in the shape of the housing - volute, box, hemispherical landing pad. The set of parts is similar.
The unit is attached to a special box located on the rear panel of a domestic TT boiler next to the chimney pipe. The temperature sensor bulb is inserted into the immersion sleeve of the water jacket, the remote control is placed separately.
Price and reviews
The cost of an automated system is influenced by the technical indicators and functionality of the device. Thus, the price of the simplest mechanical model varies within 1.5 thousand rubles.
The price range of more progressive options is from 25,000 rubles to 100,000 rubles. The more expensive the model, the higher the ergonomics of the heating system will be, and the resource consumption will be correspondingly lower. Therefore, it is more advisable to give preference to more expensive options.
Reviews:
Nikolai Viktorovich. “The control unit from the Krypton company is one of the best devices today. It is distinguished by the quality of its components; the kit includes a sensor, cords for connecting to the fan and pump, a clamp, and adapters. A reliable device from a Polish manufacturer.”
Fedor. “On the recommendation of a friend, I installed the ATOS automatic, its performance characteristics are excellent.”
Anatoly Yurievich. “The Proton automation surprised me with the presence of additional components in the package (a clamp for attaching the sensor, a stand for the unit, self-tapping screws). The device is efficient, reliable and easy to use. ”
DIY making
The thermostat, as an automatic device for regulating the operation of the heating system, can be purchased at the electrical goods retail chain. At the back of this device there is a heat removal plate; it will need to be pressed against the exposed part of the unit.
The thermostat has three contacts inside: common, normally open and normally closed. By rotating the adjusting knob, you can change the positions of the contacts.
So you need to set the handle to the minimum mark and connect to the open contacts:
- to the general one .
- We connect one wire from the turbine to the open one
- to the second wire from the turbine .
An automated control system is rightfully considered not only convenient, but also an effective device. With its help, you can significantly simplify the process of operating the heating system.
Solid fuel, such as firewood, has been considered excellent since ancient times.
A wood-burning boiler is perfect for country houses to heat your home. Of course, with the pace at which technology is developing, you can see that firewood has given way to other fuels. But even at the moment, wood-burning boilers continue to fully perform their duties and help out those who do not have the opportunity to connect to gas equipment or use home electricity.
Solid fuel wood boilers: main types
Modern solid fuel boilers, which operate on solid fuel such as firewood, have become almost perfect devices. Thanks to the development of modern technology, they have undergone some changes.
At the moment, you can find 3 types of boilers on sale:
It is better to buy solid fuel boilers using wood if you have a place to store firewood
A pyrolysis installation can use not only firewood, but also the gas that is released as the final result. A pellet boiler operates on special pellets, which are obtained from wood processing by industry. And the last option is fireplaces, they are most often used as an aesthetic installation, but can also be equipped with a heat exchanger.
Wood boilers: pros and cons
First of all, it should be noted that modern wood-burning boilers have become an improved type of the old wood-burning heating stove. The principle of operation of such an installation is very simple, in addition, it has a number of positive aspects.
Among the advantages are:
- Such boilers are independent of electricity. In this situation, the user does not have to worry about the fact that there will be a power drop or that it will turn off altogether.
- They are environmentally friendly. The energy generated by the boilers is completely environmentally friendly. As a result of the combustion of the material, no harmful waste is released. This means harm to human health or nature.
- Availability of raw materials. This is a very important detail, because those who live near a forest can purchase it affordably, and sometimes even for free. In addition, household solid waste of organic origin can also be burned in boilers of this type.
- Affordable pricing policy. The equipment is affordable in relation to other installations. You can also take into account that heating savings increase several times.
- Installation and use are available to every user.
Of course, along with the positive aspects, there are also disadvantages. This is not to say that they are too significant, but they still exist.
This may include:
- If you are the owner of wood heating, then you will not be able to leave the house for a long time, since it requires the constant presence of a person. Today, this drawback is corrected by automation, but it still needs to be taken into account.
- Absolutely all boilers, both factory-made and home-made, are not light in weight. The reason for this is their creation from cast iron. However, if you look from the other side, cast iron is the most durable material.
- High consumption of solid fuel. This fact occurs because wood is a material that releases a small amount of thermal energy during combustion.
- A significant drawback is the lack of temperature regulators. This means that you will not be able to set the optimal indicator.
- Dimensions. Wood burning boilers are quite large in size. This is explained by the fact that wood is a raw material with a low calorie content, which means that in order for sufficient heat to be generated, a larger amount of fuel is needed, and therefore a larger boiler size.
As mentioned above, these shortcomings cannot be called significant, but we have not yet taken into account the fact that firewood needs to be prepared for the winter, and work in this plan is very hard work. In addition, firewood must not only be split (of course, if you don’t buy it), but also stored in a certain room, and this is not a small amount, since one portion is designed for only a few hours of boiler operation.
Blower for the boiler: why install a blower
Installing a blower for the boiler is necessary to create forced draft. Thanks to this installation, the required amount of air will be supplied into the chamber continuously.
Thanks to the boiler vent, you can speed up the combustion process
Why else do you need a blower:
- If there is not enough air, the full operation of the boiler may be disrupted. The fuel will no longer burn completely, and the chimney will become clogged more often. This will lead to additional cleaning costs.
- If the fuel does not burn completely, the insulating materials will begin to burn out, and their regular replacement or repair will lead to an increased cost of operation.
- Due to the decrease in draft, the room will begin to become saturated with smoke. This will result in the owner needing to install additional ventilation.
It is for these reasons that it is better to initially purchase a blower, spending a certain amount on it once, and you can do the installation yourself.
How to install an electric blower for a boiler
Electric blower for a wood-burning boiler works in combination with an automation system or, as it is called, a control unit. It is this unit that will control fuel combustion and the set temperature regime.
As for the electric blower itself, it is installed according to the following steps:
- Fix the fan on the pipe that supplies air to the boiler;
- Connect by blowing to the control unit;
- Connect all devices to the network;
- Adjust the blowing parameters according to your needs and the temperature regime of the coolant in the system;
- Place the firewood in the chamber so that it lies as tightly as possible;
- Light the fuel and place an air supply unit with a fan installed on top.
- Wait about 5 minutes and start blowing.
As soon as the system reaches the temperature that you set, the control unit will automatically turn off the blower. After this, the whole process will be repeated again.
Installing the deflector
Once installed, the deflector is bolted to the roof to prevent it from being blown away by the wind.
Homemade and purchased models are assembled into a finished product at the bottom, before installation on the pipe. The aerodynamic structure is bolted to a round metal asbestos pipe; usually, 3 holes are made in the pipe for this purpose. If there is slight play, a clamp is used.
An adapter is used to mount the deflector in a brick pipe of rectangular or square cross-section. The device is tested after installation. The spark arrestor is made independently from a thin metal mesh or stainless steel sheet.