- June 22, 2019
- Repair Tips
- Lyudmila Frolova
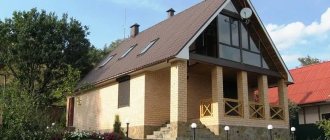
When planning the construction of a private house, many future owners are interested in projects that include an attic in a residential building. There are many options for such a solution. Moreover, in some of them the attic is provided for living space, while in others it is not. But most people are still attracted to those rooms that can be adapted to everyday needs, expanding the usable space of the house. Apartments located on the top floor can easily become a rather cozy and attractive place for the whole family.
How to decorate an attic with your own hands in a country house or in a residential building so that it is not only practical, but also modern? Let's look at the most popular options for this solution.
What is an attic?
Almost every private house has an attic. This room, based on its characteristics and design, can either be suitable for human habitation or not. The main feature of the attic is the presence of skylights and a sloped ceiling.
A residential attic is the part of the house that is located between the upper floor and the roof, suitable for human habitation. But sometimes it is impossible to arrange premises here for people to stay in them. In this case, this part of the house is considered non-residential.
For the first time, the French architect Francois Mansart began to use the space located under the roof for economic and residential needs in 1630. It was from his last name that the name of this part of the house came. In the 9th century, as a rule, poor people, as well as servants, lived in rooms located directly under the roofs of residential buildings.
Today, according to regulatory documents, an attic is a floor located in the attic space, one of the surfaces of which is formed by a roof - curved, inclined or broken. The attic has a heating system and sufficient lighting.
Such a room should be distinguished from an attic. This term is also used to refer to the space located under the roof of a house and limited by walls and roof slopes. Moreover, it can be insulated by placing heat-insulating material on its surface. It is possible to install utilities in the technical attic.
Between themselves, these two types of rooms differ in height. Its minimum value in the attic is 1.5 m. But building codes do not impose such requirements for the attic. Its height may well be even lower.
The attic has undeniable advantages compared to the attic. After all, the owners of a house with such a room, without investing significant financial resources, can get another floor, which will increase the space they use.
Residential or non-residential?
The presence of an attic in a house does not mean at all that it is possible to arrange apartments in this space for the owners to live in. After all, in order to become residential, it must have certain features, including:
- ceiling design that can withstand additional loads from partitions, equipment and furniture;
- type of insulation;
- heating type;
- type of ventilation.
In order for an attic to be considered residential, the roof structure of the house must be quite strong, because it will have to withstand the weight of insulation and insulation. In addition, the residential attic is separated by a special partition from flammable roofing materials. Such a partition must have a high fire resistance class.
In addition, it is necessary that the premises equipped in the residential attic have proper ventilation, heating and other necessary communications. You will also need a supply of daylight. To do this, windows are installed in the attic rooms, the size of which is approximately 1/8 of the floor area. When arranging a residential attic, you will also need to pay attention to the stairs. It is recommended to make it not foldable, not steep, safe, preferably with one span.
When deciding to turn a non-residential space under the roof into a residential one, how to finish the attic yourself? What materials should I use? Let's look at the most popular ways to solve this problem.
Errors during work
Here are a few:
- When insulating, you cannot use a layer of material with the same thickness as the house walls. A smaller figure is also not welcome. In the summer, the attic heats up more and cools down quickly in the winter, and therefore the insulation must be more powerful.
- When working with vapor insulation, you need to attach it with the correct side. Hard-to-reach areas at abutments and joints can also let in the cold. The work must be done efficiently.
- When arranging the ventilation layer, it is necessary to take into account the obstacle in its path. This barrier may be attic windows.
By following step-by-step instructions and choosing the right materials, you can create comfortable living conditions in the attic. The article highlighted the basic technological principles of roof insulation with sloping roofs.
Lining
How to decorate the attic inside? Today, the construction market offers a wide variety of materials. You can choose them to suit every budget and taste.
One of the most common materials is lining. These are narrow boards that can be fitted tightly together using grooves and tongues. Previously, this material was used to decorate the walls of carriages. And today such boards are the most suitable option for use in residential premises. Their main advantages are:
- absence of emissions harmful to health, which are typical for most modern materials;
- the presence of a beautiful natural pattern on the surface;
- low thermal conductivity, which is especially important when arranging flooring.
If, when deciding how to decorate the attic from the inside, the owners decided to opt for lining, then with such cladding they will provide a very cozy atmosphere in the room. In terms of these indicators, no material can compare with wood.
However, it is worth keeping in mind that the lining has the following features:
- has a relatively high cost;
- capricious to changes in temperature and humidity conditions (if conditions deviate from the norm, the tree dries out or warps);
- needs periodic sanding due to its low strength.
Wood, regardless of its type and species, needs protection from mechanical wear and moisture. To do this, you will need to treat it with one of three different compounds:
- Varnish. This product can provide the most durable and lasting protection. The disadvantage of this coating is the inability to carry out local repairs. That is, if you replace one panel, varnish will have to be applied to the entire wall or floor.
- Oil. Impregnation with this product will cost owners less than with varnish. Moreover, such a coating will not require restoration over the entire surface after local repairs. However, such protection is significantly inferior in durability to varnish. In addition, it practically does not protect the tree from mechanical wear.
- Wax with additives. This type of coating began to be used relatively recently. This product combines the positive qualities of the types described above. That is, it can be partially restored and at the same time almost as reliable as varnish.
Clapboard as the easiest way to cover
So, the preparation of the room is done, now you need a good idea for the design of your room. The number of ideas is huge. It all depends on the function that the room should perform and what combination of colors should be present in it.
Lining is a cladding board made of natural wood of various types with a tongue-and-groove joining system. Average parameters: length from 5 to 6 m, width from 5 to 14 cm, thickness from 12 to 20 mm.
Clapboard finishing
Divided into 4 classes:
- “Extra” - wood of the highest quality without any defects;
- “A” - average quality, roughness, fused knots, small cracks;
- “B” - the quality is below average, there is curvature, the lower part of the groove is damaged;
- “C” - the lowest quality, the presence of cracks and knots.
Before installation, the lining is treated with a protective compound and varnished. A wooden frame is constructed with a section of bars of 30-60 mm and a pitch of 40-50 cm. Fastening is done to the frame with staples or nails, they are driven into the ridge of the element being mounted. The lining can be placed on the surface in different ways: horizontally, vertically and even in a herringbone pattern, and also allows you to zone the room, painting each zone in its own color.
Block house
How to decorate the attic from the inside? Another type of wooden cladding is a block house. What is this material? Many people are familiar with croakers. They represent the sidewall of a rounded log. This part is cut off when turning the trunk into timber or when dissolving the tree trunk into an unedged board. Croaker is a waste product from such production, which is why it is sold inexpensively.
Another thing is a block house. This material is a calibrated slab made specifically for interior decoration. The block house boards are the same width, and they all have a smooth edge. There are grooves cut into the back of this material. Their presence allows you to relieve the internal stress of the cladding, which prevents it from cracking.
How to decorate the attic walls? Owners who want their premises to look like they were made of logs are recommended to purchase a block house.
In this case, how to finish the inside of the attic (photo below)?
It is worth keeping in mind that narrower boards are used for such work. Due to their slight convexity, they will not take up much space. Wide boards should not be used in this case. They are usually used for cladding the outside of buildings.
Design with other materials
Attics do not have correct angles. There will always be irregularities, curves and slopes. These geometric imperfections can easily be transformed into stylish decorative elements. When designing, it is permissible to use rafters, ceilings, beams and chimneys.
How to decorate the attic besides the lining? It is not necessary to decorate the attic with one material. Wood paneling of the walls goes well with plasterboard ceiling cladding and block house finishing. They also use mahogany, wallpaper and simple plaster. Popular design options are where the ceiling is lined with clapboard, the walls are lined with plasterboard, and the chimney is lined with brick.
Often different types of eurolining are combined in one design. For example, the ceiling is sheathed with a standard, and the walls with a block house. You can experiment with colors by choosing contrasting shades.
Drywall
Suitable for flexible design solutions. Covering the attic with plasterboard allows you to smooth out the unevenness of the room and hide wiring and communications. The main disadvantage of the material is its low moisture resistance, so you need to select in advance a special type of drywall that does not absorb moisture. The advantages include:
- environmental friendliness;
- improved sound insulation;
- ease of installation.
The material is easily deformed and is not suitable for heavy loads.
Drywall sheathing begins with cladding. Horizontal fastening visually increases the width of the attic in the country, vertical fastening - height.
Single-layer sheathing is secured with screws with an insertion depth of 100 mm, double-layer sheathing with screws of 350 mm. Gaps of up to 5 mm are made between the sheets of drywall, which are subsequently sealed with putty or reinforcing tape. Gypsum craton is attached to a wooden or metal frame using dowels and screws at a distance of 250 mm.
Block house
This popular type of eurolining is used to decorate interiors in a rustic style. Imitation of a log wall allows you to recreate a classic Russian hut. Advantages of finishing with a block house:
- resistance to moisture and mold;
- aesthetic appeal;
- environmental friendliness.
We recommend: Using lining in the design of room cladding
The block house is thicker than lining, so it is more resistant to insects. And if you choose material from coniferous species, you can protect it from various respiratory diseases. The effect is achieved due to the content of natural antiseptics in the composition.
The finishing of the attic with a block house is carried out according to the following algorithm:
- The beams and panels are treated with an antiseptic.
- The panels are fixed on a wooden frame with beams with a thickness of 40 mm.
- Caracas is moved away from the wall to provide heat and sound insulation.
- At the end of the cladding process, the block house is coated with varnish or primer.
The material is suitable for decorating an attic for a library, kitchen or living room.
Imitation of timber
Raised timber is a thin pre-processed wooden board, the ends of which are provided with tongues and grooves for reliable fastening. When creating, they use natural solid wood. It is environmentally friendly, easy to install, and lasts a long time. When covering the attic with imitation timber, it will be possible to smooth out any unevenness in the walls.
Finishing is done in one of two ways:
- Monolithic method. The walls, floor and ceiling of the attic are lined with false beams. At first glance, the option looks the most advantageous aesthetically. But such cladding has its own technical difficulties, since to obtain a monolith it is necessary to level all surfaces and joints.
- Combined method. It involves cladding the attic not only with imitation timber, but also with other building materials in combination with wallpaper, tiles and fabric. This option allows you to realize extraordinary design ideas.
The cladding process is in many ways similar to lining an attic with clapboard. It should be remembered that before installation, printed panels are dried for 5 days.
Plywood
Budget option for attic cladding. Plywood is not suitable for finishing cladding because it does not have the required aesthetics. It is used as a base for wallpaper, paint, primer and decorative plaster. Plywood allows you to level out curved wall surfaces.
The sheets are easy to install. They are environmentally friendly because they are made of natural wood.
Flaws:
- easy flammability;
- low moisture resistance;
- fragility.
When sheathing, the sheets are secured at a distance of 300 mm using nails. First, the gables and inclined planes are covered, then they move on to the ceiling. It is not recommended to cover the attic with plywood if the room is too humid, otherwise there is a risk of deformation of the joints.
MDF panels
They are obtained by pressing wood chips, which are then added to a special solution. The material is much safer than chipboard due to the absence of resins and harmful compounds.
MDF panels give the room a strict look, so they are rarely used in living rooms. They are suitable for covering a gym or office. They are often used in combination with wallpaper and plaster.
The main advantages of the material: good heat and sound insulation, ease of installation, wide selection of colors, low cost. Besides:
- MDF panels are easy to install yourself;
- with their help you can smooth out uneven walls without preliminary surface treatment;
- during installation the amount of chips and dust is minimal;
- if scratches and other mechanical damage occur, it is enough to replace the damaged profile without resorting to major re-cladding;
- MDF panels are easy to clean, the material is resistant to household chemicals.
We recommend: Cladding a house with brick panels
OSB boards
In the production of oriented strand board, water-resistant resins are used to provide protection against rotting. This is a flexible, durable, eco-friendly material that is not only as good as wood, but also superior to wood, because it has no knots, wormholes or bending fibers.
OSB boards do not crack and serve as an excellent base for painting or pasting. They can be attached directly to the attic rafters using nails, without resorting to the construction of a frame. This is the main advantage of the material.
Before applying paint or wallpapering, OSB boards must be primed or puttied with latex. For further decorative surface treatment, only acrylic and oil paints are used. Aquatic species can cause the surface to buckle.
During installation, a gap of 3 mm is made between the plates in order to provide for surface deformation when the humidity inside the room changes.
Imitation of timber
What is the best way to decorate an attic? Owners of private houses should take a closer look at imitation timber. This material resembles clapboard. Only its boards are wider and have cut corners on their front side. Like a block house, this decoration is an imitation, but not of round logs, but of rectangular beams.
If you are interested in how to finish an attic in your country house as quickly as possible, consider one important detail. It lies in the fact that when using imitation timber, which has a larger width than lining, you can reduce the time required for cladding the walls.
How to decorate the ceiling and walls in the attic? Both a block house and imitation timber are perfect for this, because these materials are made from soft coniferous trees. Due to the high resin content in these boards, they are highly resistant to moisture, microorganisms and insects.
Finished attics (see photo below) visually expand when choosing a light finish.
The use of lining, block house or imitation timber made of maple, spruce, fir or ash will visually expand a cramped room.
Selection of finishing materials
When the attic floor is reliably insulated, the question arises: how to decorate the attic from the inside? There are many materials for covering a room on the construction market - let’s look at the most popular ones.
Lining
Plastic lining is one of the most inexpensive and popular materials for interior cladding of buildings. It can also be used to decorate the attic. The material provides ample opportunities in implementing the design of the room, in choosing colors and patterns. Sheathing with plastic lamellas is done very quickly and does not require special installation skills. The disadvantages of plastic lining include its fragility - the material can crack from an impact.
Cladding the attic with clapboard (plastic)
Advantages of natural wood lining: unique colors, natural texture, environmental friendliness. Decorating the attic walls with wood allows you to create a beautiful and “warm” room that is pleasant to be in.
Among the disadvantages of wood: poor resistance to moisture and temperature changes. Therefore, use wooden lining for cladding the attic only if you are sure that the room is reliably insulated and insulated.
We suggest you familiarize yourself with How to properly install a heater stove in a bathhouse and sauna
Beautiful attic decoration with clapboard: photo example
Blockhouse
A good idea is to cover the house with a block house. Such a mansion will resemble a fairy-tale mansion, because the material creates an imitation of timber. Externally, the cladding of a house with a blockhouse looks like a real log house. But this material has one advantage over natural wood - cracks do not form on such cladding over time.
The only drawback of a blockhouse is that such cladding “steals” several centimeters of attic space.
Elegant attic decoration with a blockhouse, photo
Plywood
If the question is how to sheathe the inside of the attic cheaply, then plywood is quite suitable for these purposes. As a rule, this material is used to level surfaces for finishing, but it can well serve as an independent cladding. Among the advantages of plywood are lightness, ease of installation, cost-effectiveness, and strength.
Attention: plywood can be used to finish an attic space only if the humidity level and temperature meet the standards established for residential buildings.
Covering walls and ceilings with plywood is an excellent basis for wallpaper and textile finishing. And if plywood is used as an independent finishing material, then in order to protect it and enhance the decorative effect, you can coat the material with varnish or paint.
Varnishing plywood sheathing will highlight the texture of the material
Drywall
Many owners of private houses use plasterboard to finish the attic floor. Among the advantages of covering with this material: its lightness, non-flammability, low cost. Using sheets of plasterboard, you can quickly level any surface, be it walls or ceilings. But, since there may be high humidity in the attic, it is better to use moisture-resistant material for its finishing.
An example of what multi-level structures can be built - finishing the attic with plasterboard, photo
Plasterboard sheathing can be covered with wallpaper, putty, or decorated with ordinary or decorative plaster.
The illusion of floating in the clouds will be created by beautiful photo wallpapers - an option for finishing an attic, photo
If the attic is not heated in winter, you need to choose sheathing that can withstand temperature changes. But not all types of interior decoration are designed for this.
Wood, edged board or clapboard will do. Materials based on it are also used: plywood, OSB and others. The ceiling can be painted or covered with plaster.
With tension fabrics the situation is more complicated, it all depends on the material. The fabric will easily withstand frost; it can be used in a cold attic, on a balcony, and on a veranda. PVC film, on the contrary, is designed for use in heated rooms. In the cold, it loses its elasticity and then cracks.
But there is one exception. These are Cold Stretch ceilings, or cold stretch. They are installed without heating, at room temperature. And later they tolerate frosts down to -30°. At the same time, the ability to retain water in the event of a leak is maintained. But this film is only available in white color and matte texture.
Particle boards (MDF, OSB, chipboard)
How can you decorate the attic cheaper? It will be less expensive to use particle boards, which are made from wood processing waste. This material is a mixture of chips or shavings with a binder. All these elements are connected to each other passing through the press. But it is worth keeping in mind that compared to solid wood, such slabs are more susceptible to loads, especially bending ones.
How to decorate the walls in the attic? Chipboard is also suitable for this. This is a domestic version of the slabs. They have a chaotic arrangement of chips. By finishing the attic with chipboards, the owners have an excellent opportunity to save money.
In OSB, chips or shavings are arranged in three layers, and sometimes more. In each of them it is only in one direction. In adjacent layers, the arrangement of shavings or chips is perpendicular. That is why this material was called OSB, which means “oriented strand board”. This design allows it to more resistantly withstand bending forces. That is why when home owners are wondering how to decorate an attic ceiling that has a complex structure, they should pay attention to OSB boards.
But it is worth keeping in mind that in the manufacture of the wood-based materials described above, phenol-formaldehyde resin is used. And it is a substance that emits harmful fumes. That is why for residential premises it is necessary to purchase slabs that correspond to a certain emission class of toxic elements. These are E0 and also E1. In this case, the material must be covered, for example, with ordinary wallpaper.
MDF boards are also made from shavings. However, they differ from previous materials in that:
- binders are paraffin and lignin, harmless to health;
- During its production, a decorative cladding (melamine film or veneer) is applied on one side of the slab.
MDF boards are environmentally friendly. That is why they can be used directly for finishing. The wood-based material OSB and chipboard is rough and needs to be covered with a decorative layer.
PVC panels
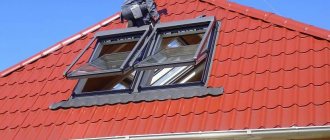
How to decorate the attic inside (see photo below)?
For this you can use PVC panels. This material consists of two plates, which are separated from each other by stiffening ribs. Such panels, as a rule, are produced with a structural element, with the help of which one part can be connected to another. Construction stores offer this material in a wide range of colors. A huge range of panels allows you to use them to implement a wide variety of design solutions.
How to decorate an attic inexpensively? To do this, you should pay attention to plastic panels. In addition to the low price, they also have a number of other advantages, namely:
- waterproof;
- smooth surface that is easy to care for;
- softness, which makes it easy to handle the panels when installing them;
- ease of installation, which you can easily do yourself.
However, in addition to the impressive list of advantages, this material also has some disadvantages. Among them:
- the likelihood of releasing harmful substances hazardous to health, which is especially important in the case of panels made of cheap plastic;
- fire hazard and the release of toxic smoke during combustion;
- low strength under mechanical stress;
- lack of comfort in a room decorated with plastic.
PVC panels are a budget material for interior decoration. But most often they are used for rooms where permanent occupancy is not expected and hygiene and moisture resistance are required. That is why such panels are in demand in bathrooms, on balconies and in hallways. It is still undesirable to use them for finishing residential attics.
Options for finishing the attic from the inside
Before finishing the attic with your own hands, you should insulate the end walls of the attic space, as well as heat and vapor barrier the roof slopes.
Advice: the comfort of this room in the future depends on the quality of insulation and insulation. If a mistake is made at this stage, it can negate the entire cladding of the attic.
You can finish the attic floor yourself. In this section we will describe how to cover an attic with plasterboard.
Since the attic space is located directly under the roof, it is often exposed to atmospheric influences: rain, wind, snow, scorching sun. Therefore, before finishing the inside of the attic, it is necessary to take care of reliable vapor barrier and insulation of the structure, paying special attention to the thermal insulation of the roof.
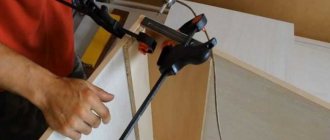
- To cover the attic with plasterboard sheets, you need to build a frame. For this, wooden blocks or metal profiles are used. They are installed in increments of 40-60 cm.
The first profile is fixed level
- After the horizontal profiles are installed, begin marking and fixing the vertical ones.
CD profiles are attached in increments of 40 cm
To securely fasten the cladding material, each self-tapping screw must enter the slab at least 1 cm
- After all surfaces are sheathed, the gaps between the sheets of drywall are puttied.
An additional reinforcing mesh can be applied to the joints between the plates, and the joints with other materials are treated with acrylic putty
After covering the attic with plasterboard, they begin its finishing. This can be puttying and painting, wallpapering.
The main attention at the preparatory stage should be paid to the floor. Is its structure strong enough, will it withstand the additional load in the form of furniture? It wouldn't hurt to calculate the expected load. If necessary, you need to strengthen the floor by laying additional beams. In brick or stone houses, the tightness of the floor is checked, and if it is not there, work is carried out to additionally waterproof it.
Such actions are necessary to prevent leaks to neighbors below in the event of an emergency on the top floor. These manipulations can be combined with additional sound and heat insulation, which will definitely be useful for both the upper and lower inhabitants. In order for further finishing of the attic ceiling to be carried out easily, it is necessary to prepare its base. To do this, beams are attached to the rafters at the required height, which will serve as the basis for the material from which the ceiling will be made.
The walls and ceiling of the attic must be carefully insulated, and care must be taken to insulate them against wind and heat. Special thermal insulation boards are attached to the inner surfaces of the roof so that later you can live comfortably in the attic without fear of severe cold and sweltering heat.
Imitation of timber
Remember the slogan: The people and the party are united! This is how drywall and repairs are inseparable; it is an almost universal material that can be used to quickly repair and level surfaces. In addition, the specific characteristics of the material make it possible to make a structure of any shape from it, so plasterboard is indispensable both in simple repairs and in the implementation of complex design solutions: arches, niches, elaborate three-dimensional figures.
To finish attic rooms, you should use moisture-resistant plasterboard. Drywall needs finishing, which on the one hand adds costs, but on the other hand, opens up endless possibilities for decorating the attic. Surfaces finished with plasterboard can be covered with wallpaper, decorative plaster, stone, cork, bamboo, or painted with textured paints.
In this article we will not teach you how to properly nail the lining; if you have taken up the cladding yourself, then you probably know how to hammer nails and screw in self-tapping screws. But we will dwell in detail on the question: how to decorate an attic with your own hands. Be sure to watch the video, where the finishing of the attic with clapboard is discussed in detail; the photos will illustrate the main stages of the cladding.
The simplest option is horizontal cladding of the attic with clapboard, starting from the bottom, joining the tongue and groove, increasing the height of the rail by rail. Either vertical cladding, starting from the far corner, straightening the first rail in level, the correct geometry of the entire lining depends on this. The lining can be attached to nails, which are driven into the tenon at an angle, or it can be clamped with clamps, but this will require additional costs.
Lining is “plasticine” in the hands of creative and creative people. The options for finishing the attic, the photos demonstrate this well, are limitless. If you gravitate toward beauty and originality, you will have to work hard, but the result will be much more impressive. For example, the lower part of the walls can be sheathed vertically, this way you will visually raise the height of the attic, and the upper slopes – horizontally. Graphics will appear in the interior of the attic room.
We suggest you familiarize yourself with what should be the distance from a metal fireplace with a closed firebox to the wall of a frame house?
Non-standard decoration of attic walls, figured lining with clapboard allows you to create an interesting interior using simple materials
You can also divide the length of the walls into odd parts so that you start and end the cladding in one direction. Decorate one section vertically, the other horizontally. If your attic is elongated, then the long wall can be divided into three zones, the two outer ones sheathed vertically, the middle one horizontally, this design technique will not only straighten the geometry, but also help to correctly zone the space. See examples of beautiful finishing and decoration of the attic with clapboard in the photo gallery.
The fastest way to cover surfaces is to finish the attic with plasterboard; video tips will help you understand the intricacies of such covering.
The sheathing should begin from the bottom, from the side walls, then the slopes, then the front walls. The process of installing drywall is simple and comes down to three steps. Using a utility knife, cut the sheet to the size you need, install it close to the frame, and screw it with self-tapping screws every 20 cm.
Next, all joints should be sealed with putty, reinforcing tape should be applied along the seams, which is covered with another layer of putty. The surfaces are primed with an adhesive compound to increase the adhesion of the materials. After drying, you can begin finishing and arranging the attic.
Drywall
How to finish an attic? You can also use drywall for this room. It is a cheap sheet material used for rough cladding. It is plaster covered with cardboard. The material can be:
- ordinary;
- fire resistant;
- moisture resistant;
- moisture- and fire-resistant.
You can decorate an attic with plasterboard in a very original way.
Elements of rather complex and bizarre shapes can be constructed from this material without much difficulty. If you make perforations in a layer of cardboard using a needle roller, and then moisten the sheet with water, it will become flexible. This will allow you to make an arch, a multi-level ceiling with curved outlines and other complex structures.
Do-it-yourself attic finishing
How to finish an attic? The process of arranging this room must be carried out according to the instructions with strict adherence to the sequence of stages of work.
The first step when finishing an attic should be preparation for this process. Considering that the rafter system will subsequently be closed from view, it must be checked for cracks, rotten areas, corrosion of metal fasteners and other defects. It is also necessary to check the condition of the roof. Leaks after installation of the cladding will ruin the material used. Those elements that cannot be repaired will need to be replaced. To protect the wood, it is recommended to impregnate it with an antiseptic, even though a similar procedure was already carried out during the construction of the house.
If the roof did not have insulation, that is, the attic was cold, waterproofing and insulation would need to be installed. The latter is recommended to be purchased with soundproofing properties. This will somewhat muffle the drumming of the rain. This requirement is fully satisfied by slabs made of mineral wool, which, moreover, is not liked by rodents.
For the waterproofing layer on which the insulation is laid, you can purchase a special membrane. It will not allow water to penetrate into the room, but at the same time it is vapor permeable. Such a film, if the technology is followed when arranging the roof, should already be under the roof on top of the sheathing. But if this material is not available, it should be laid under the rafter system. Mineral wool is laid between the rafters.
We finish the attic with our own hands, proceeding to the next stage. It consists of insulating the gables. The method of carrying out such work will depend on the type of structure. If it is wooden, then mineral wool can be placed from the inside between the ridge post and the outer rafters. If it is impossible to complete the work in this way, then the insulation should be temporarily fixed before installing the frame, using a stretched nylon cord.
The pediments, which are a continuation of the main wall, are reinforced from the outside. But it is worth keeping in mind that in this case the service life of the insulation will be significantly reduced. When using foam plastic for exterior work, the pediment is lined with a vapor barrier from the inside. In its absence, condensation will begin to form on the surface of the wall, which, when frozen, will destroy the insulation.
The cladding of the gables is done in the same way as the slopes. Namely:
- waterproofing and insulation are installed;
- a frame is installed, which is covered with facing material;
- finishing is being done.
The arrangement of the frame is made using wooden slats, the cross-section of which is 45x15 mm. You can also use metal profiles made of galvanized steel. Regardless of the type, the material is screwed or nailed directly to the rafters in a position perpendicular to their direction, namely horizontally. Frame elements are attached in increments of 40-60 cm.
When mounting the frame, a vapor barrier film is laid on top of the insulation, which is pressed with purlins. Carrying out this work will not allow water vapor to condense on the surface of the mineral wool.
How to finish the attic at the next stage? On top of the frame you will need to attach the sheet material chosen by the owners for the cladding. To do this, use self-tapping screws in increments of 20-25 cm. With their help, the cladding is attached to the frame. When using plasterboard, which is fragile, when installing sheets, a gap of 5 mm should be left between them. If this is not done, then when the rafters are deformed due to wind or snow loads, the material will certainly crack.
In the case where neither lining nor MDF boards were used to finish the attic, you will also need to lay the finishing coating. This could be paint, wallpaper, fabric drapery or plaster.
How to decorate the attic from the inside - practical lining and modern drywall
Almost every owner of a private house has an attic space. Sometimes it is used as a warehouse for various things, sometimes it sits completely empty. But when the issue of expanding living space arises, many people think about the attic. After all, there is no need to add anything to the house - it is enough to insulate and equip the attic floor, and carry out the interior decoration of the room.
In this article we will demonstrate the most common options for finishing the attic floor, and also introduce you to the complete technology for performing the work.
To avoid unpleasant consequences, it is better to think through the insulation and finishing of the penthouse at the stage of designing the house. This will help to correctly organize the sequence of preparatory work. Unlike the construction and insulation of the attic floor, which must be carried out by specialists, it is quite possible to finish the attic with your own hands.
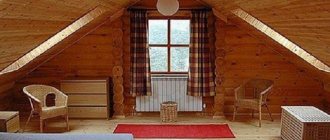
Until now, lining remains the most popular material for finishing attic spaces. It impresses with its relative cheapness, environmental friendliness, ease of installation and ease of maintenance. In addition, it is chosen by romantic people who are nostalgic for the charming rustic comfort and warmth. Well, really - how can you resist here?
The fact is that the upper floors of wooden (and not only) houses often move. This movement is not noticeable to the naked eye, but for a fragile and inelastic material it can be destructive. It is based on the above considerations, as well as thanks to the inertial adherence to traditions, that the problem of choice is solved in favor of lining. After finishing, the lining can be painted, varnished or coated with a special impregnation.
Finishing work with plasterboard is carried out only after preliminary insulation of the attic space. If this is not done, it will not be possible to live permanently in the attic - after all, drywall does not retain heat at all. For finishing, only moisture-resistant and fire-resistant material is used. It can be combined with wood or a block house.
Plasterboard boards can be attached to a wooden or iron frame, or directly to the rafters. In order to find out the possibility of working with rafters, it is necessary to evaluate the degree of rigidity of their fastening. To prevent rotting of the material under plasterboard slabs, it is recommended to treat wooden elements with protective impregnations.
Lining and drywall are the undisputed leaders in terms of interior design of attics. But there are other options.
- Finishing with ordinary wood - why not? Cheap, environmentally friendly, simple, almost practical. Why almost? Wooden finishing will be practical if the material is well prepared and processed. If perfectly sanded boards are painted or varnished, the result will not be inferior to the “lining” design.
- The top floor is finished with plywood sheets no worse than plasterboard. The plywood is also attached to the frame or to the rafters, the cracks are filled with putty, and the top is decorated with wallpaper or fabric.
- Siding and block house are no less practical and inexpensive finishing materials. They give the room a neat, stylish look and go well with other types of decoration. Unlike drywall, siding and block house are quite easy to work with - even a beginner can work with them.
When decorating an attic, you can give free rein to your imagination and creative ideas, but you shouldn’t forget about taste. Too many colors, mixing incompatible styles and materials - you should try to avoid this.
And finally: when carrying out any transformations in your attic, do not forget about the electrical wiring. Do not sew wiring inside walls, ceilings and floors - this is very dangerous. The best option would be to lay it open or place it in special metal sleeves. The cross-section of the wire must also correspond to the expected loads.
The living environment also dictates its conditions in the decoration of the attic; in the city, the interior is subordinated to the lifestyle of the metropolis; these are increasingly ordinary apartments under a roof, decorated with plasterboard, plaster, wallpaper and other modern materials. But in a country house or dacha, wood is traditionally used to decorate the attic floor.
Interior decoration of the attic, photo of a combination of cladding with imitation timber and lining
Wood is a warm material, it breathes, its beautiful texture is a decoration in itself. Today, there are different types of wood to choose from; if more expensive, with a pronounced texture, then ash, oak, larch, or simpler ones - linden, pine and other coniferous species. The woodworking industry keeps up with modern trends in construction and renovation, so the market is flooded with all kinds of offers: plywood, corrugated wall panels, imitation timber, blockhouse, lining.
Please note that all wood requires additional processing before cladding. To ensure that the wood finish of the attic lasts a long time, does not become infected with fungi, and does not deform from the influence of the specific microclimate in the attic, impregnate it with antiseptic and fire-resistant compounds, and then on the back side, and especially the ends, with 2 layers of PVA putty.
We invite you to familiarize yourself with bath tiles for the floor: selection, installation and advantages of porcelain stoneware
Important: All materials have a length from 2 to 6 m, which allows you to choose the board size for finishing that suits the size of your room, so that as little waste as possible remains.
Finishing the attic with a blockhouse, covering the cladding in a light tone allows the use of massive materials even in small attics
Lining
Lining is the most popular material for finishing the attic, a comfortable, shaped strip with a polished surface. For interior cladding, two types of lining are used: strip, which is mounted end-to-end, and eurolining - tongue-and-groove strip, 1.25 cm thick, 9.6 cm wide with a lock, tongue-and-groove lock. Along the back wall, along the length of the board, there are two recesses for condensate drainage.
Block house
A blockhouse is a modern imitation of a log, a segment with a convex upper part, 2.2 - 4.2 cm thick, the greater thickness is due to the arched shape of the material. The width of the blockhouse is 9.0 - 19.5 cm, wide beams are used for finishing large attics, while narrow beams are suitable for cladding small attic rooms. Equipped with a tongue-and-groove lock, usually mounted horizontally. Blockhouse cladding gives the feeling that the room is built of logs.
Finishing attic rooms, photos of traditional cladding technologies and competent additions of color
Imitation of timber
Imitation timber is such a large lining, like Gulliver in the land of Lilliput. Premises decorated with this material acquire a monumental appearance and solidity. The boards are equipped with a tongue-and-groove lock, up to 19.5 cm wide and 2.0 – 3.5 cm thick. Relevant for finishing large attics, or in combination with lining and blockhouse. Due to the relatively large weight, imitation timber is rarely used for cladding the attic ceiling.