Step-by-step master classes on making roses from foamiran
The rose is deservedly called the queen of the garden. The variety of its shapes and colors evokes delight and a desire to touch this miracle.
Do you want to know how to make a rose from foamiran?
In terms of grace, it is not inferior to the real one and will delight you with its unfading beauty for a long time.
Peony option
If the previous method of forming a flower seemed too complicated to you, pay attention to this master class. By following the step-by-step instructions, you can create a beautiful peony rose.
Necessary materials:
- foamiran (yellow, preferably two shades, and green);
- sharp scissors;
- glue gun;
- wire;
- thick hook;
- ball on the handle;
- thick foam rubber covered with dense, lint-free material.
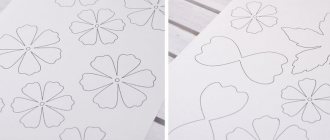
The first step is to prepare the petals and leaves. You can use a cardboard template, or you can immediately cut them out of foamiran. A slight difference in the shapes and sizes of the blanks will only add realism to the product. We cut out 12 of the smallest petals in the main color and 6 in another shade of yellow. If you do everything only in yellow, it’s okay.
Now you can give the blanks a natural shape. Place all the petals, except the largest ones, one by one on a heated iron. Place the hot plastic piece on the foam rubber and press it in the middle with a hook.
Heat large petals in the same way, place them on foam rubber and roll them with force into a ball. If you don’t have such a ready-made tool, you can attach a large bead to a wooden skewer or knitting needle.
Place the sepal on a toothpick and place it on the iron. The tips of the petals should curve slightly.
We evaluate the result.
Take a thin wire. Cut 4 pieces, bend a small loop at the end of each.
Glue 3 small petals onto each wire. Their edges should face the same direction.
Now glue 4 petals of the following size onto these blanks.
Form the third layer by gluing 3 more petals onto each piece.
Twist the pieces in pairs.
Twist the resulting blanks again into one common center of the flower.
Glue the bottom in a circle, first 4 darker ones, and then light petals. Next, fix the largest ones, each new petal should half cover the previous one. Lastly, attach the sepals.
To make the flower more realistic, add small bright petals to the middle of the rose using a toothpick.
If you want to achieve perfection, you can slightly tint the edges of the petals with yellow (use dry pastel or acrylic paint).
The masterpiece is ready. You can add leaves to the rose, attach a pin to it and use it as a brooch, or glue it to a hairband. The choice is yours.
Templates for a full-length rose flower
We take one sheet of foamiran and fold it in half twice, cut it into 4 squares measuring 35*30 cm, we will need 6 pieces. Therefore, we cut out 2 more squares from the second sheet.
We fold the 35*30 pieces in half and cut out petals from them.
White flowers from foamiran: master class
These are the petals we cut out.
From the rest of the second sheet of foamiran we cut off 5 cm and cut in half, we got 2 squares 30*30 cm. We will need 6 such squares. Therefore, we cut out 4 from the third sheet of foamiran.
From these squares we cut out petals of the same shape as the largest ones; these petals turn out to be 5 cm smaller.
We take 4 sheets of foamiran, divide it into three parts on the 60 cm side, we get rectangles of 20*70 cm, on the 70 cm side. We measure twice 26 cm each and cut it off. The result is rectangles 20*26 cm. 6 pieces and cut out petals of the same shape as the large ones.
These are the size petals we cut out.
This is what rose petals from foamiran look like when spread out.
Wreath of small roses
If one rose doesn’t seem enough for you, you can collect a whole bouquet of them. Be patient - as a result of simple but painstaking work, you will get a gorgeous headband of unopened rose buds.
Prepare materials:
- foamiran for flowers and leaves;
- thin wire for roses and thicker wire for the base of the wreath;
- wire cutters and pliers;
- glue gun;
- green tape;
- nail scissors;
- quick-drying glue;
- optional - print for leaves and paint for petals.
You can choose the color of the roses at your discretion. Cut out petal blanks approximately 1.5 cm long at the rate of 6-8 pieces per flower. You can tint them for more realistic coloring.
Place the petals one by one on an iron heated to 100 degrees, then twist them around their axis. Then straighten the blanks and form bulges with your fingers.
Cut the thin wire into pieces of 4-5 centimeters. Bend a loop at the end of each. Using a gun, coat the petal with glue and wrap it tightly around the wire.
Wrap the second petal around the first, glue the third in the same way.
Add further petals, placing them at the same level. As the bud grows, glue the blanks less tightly. The photo shows a finished rose of 8 petals.
Cut out leaves and sepals from green foamiran. Make small notches along the edges of each pattern.
Heat the sepals on an iron and twist. After heating, immediately press the leaves onto the print to create a relief. You can simply press out the veins with a toothpick.
This result is worth the effort.
String a sepal onto the wire with the bud and secure it with glue from a gun. Secure the leaves to the wire using quick-drying glue.
Similarly, continue making small closed roses from foamiran. Their exact number depends on the volume and collection pattern of the desired rim.
To form a wreath, attach blanks with roses to thick wire, securing them with tape. The type of finished product depends only on your desire.
You can complement the composition with white or contrasting large roses.
Make loops at the ends of the wreath and thread a ribbon through them to adjust the size, or simply connect the ends of the wire. Your shiny accessory is ready.
Do-it-yourself realistic rose from foamiran
To make a rose we will need:
1. A sheet of foamiran of your preferred color. It will take less than 1/5 of a sheet.
2. Patterns (see below)
3. Glue gun.
4. Iron.
5. Scissors.
6. Toothpick or non-writing pen.
7. Paints and a nanotechnological device made from a sponge and clothespins (in my case, from paralon).
So, patterns. These are scans from some book on fabric colors, alas, I don’t know the name.
For the core you will need two whisks and one half whisk from here. By the way, this same pattern is well suited for making a rosebud using a small cone-shaped topiary.
And 7-9 petals 1 and 2 from here:
It’s better not to do less than 7, because otherwise the flower will turn out oblique. I usually just print out the images, cut them out and use them as a pattern. To reduce/increase the size of a flower, it is better to scale the pattern rather than adding extra petals. Otherwise, the result will be strange.
Next I tint the petals. Usually they use pastel, but I love acrylic (especially on fabric). Apparently because I have a lot of different ones. Almost any paint will do. This is already red, but I tinted it with a darker shade. This makes the flowers look more natural.
Let the petals dry.
Now heat up the iron. As practice has shown, everyone’s irons are different, and ultimately produce different temperatures. I heat the petals on three and count to ten, but some people work on other modes. It's better to try it on scraps.
We take the corolla and fold it petal to petal, and heat it on both sides.
We crumple and twist four at once.
We straighten and stretch the petals in the center, giving it a natural shape. I can’t take pictures, I do it with both hands, and now I have a camera in one.
We also heat one half-crown, but here it’s better to heat the petals one at a time, it’s more accurate.
We also crumple and twist. We warm the petals, twist them and shape them.
We do it until we win. As a result, you should have: two corollas, one half-corolla and 7-9 petals of two sizes.
So, let the gun warm up and start assembling. First of all, take the half whisk and twist it into a tight tube and glue it in a couple of places so that it does not fall apart while you glue everything else to it.
When I make flowers not on wire, but for various brooches, wreaths and accessories, I trim the base of the core so that it is flat. Approximately.
Take a whisk, drop a drop of hot glue into the middle, place the core and wait a minute for it to dry. This will turn out neater than if you just glue it in.
Glue the petal to the center of the one opposite the gap.
Then we glue the opposite petal by dropping glue onto the base of the leaf. Repeat with the other two. We glue the second corolla in the same way, only we glue the petals in a circle, without missing anything.
This is how the core turned out. Now we begin to glue all the smaller petals first, then the larger ones in a circle. The petals overlap each other and fall into the gaps of the previous row.
We do it until we win. And in the end we get a rose.
If desired, glue leaves, a clasp, a hairpin to it, or collect wreaths. This is what happened to me.
Small unopened bud
If you want to try your hand, but starting with large projects is scary, take note of a simplified method for creating roses. In this MK, the tools and materials are similar to the previous versions, and you will make the base of the flower from ordinary foil.
The result of the work is a closed, goblet-shaped bud that will decorate a hairpin, barrette or hair tie.
Beautiful rose in step-by-step pictures
For novice florists, another method for creating realistic, beautiful roses will be useful. They turn out lush, and you can vary their size at your discretion.
Thanks to step-by-step photos, it is very easy to learn how to create masterpieces. And don’t be afraid to experiment with color: blue and purple vintage roses will look no worse than the usual pastel and red ones.
