Characteristic
The most common is the two-pipe heating system, despite some advantages of single-pipe structures. No matter how complex such a pipeline with two pipes (separately for supplying water and returning it) may be, most people prefer it.
Such systems are installed in multi-storey and apartment buildings.
Device
The elements of dual-line heating with lower pipe insertion are as follows:
- boiler and pump;
- auto vent, thermostatic and safety valves, valves;
- batteries and expansion tank;
- filters, control devices, temperature and pressure sensors;
- Bypasses can be used, but are not necessary.
Advantages and disadvantages
The two-pipe connection diagram under consideration reveals many advantages when used. Firstly, the uniformity of heat distribution throughout the entire line and the individual supply of coolant to the radiators.
Therefore, it is possible to regulate heating devices individually: turn them on/off (you just need to close the riser), change the pressure.
Different rooms can be set to different temperatures.
Secondly, such systems do not require turning off or draining the entire coolant if one heating device breaks down. Thirdly, the system can be installed after the construction of the lower floor and not wait until the whole house is ready. In addition, the pipeline has a smaller diameter than in a single pipe system.
There are also some disadvantages:
- more materials are required than for a single-pipe main;
- low pressure in the supply riser creates the need to frequently bleed air by connecting additional valves.
Single-pipe heating system with bottom wiring, diagram
The simplest and most effective heating system is used for small rooms. In order to more easily understand installation technology, you need to understand what it is and how to calculate the number of batteries. After a brief introductory introduction to these issues, we will move on to a specific step-by-step installation.
Single-pipe heating system with bottom wiring
Contents of the material
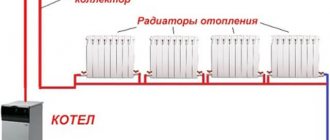
What is a one-pipe system with bottom wiring
From the name it is clear that all batteries are connected to one pipe, laid underneath along the perimeter of the heated premises. The batteries are connected to the pipe in series, the input/output in the batteries can be bottom or diagonal (the second option has better heating efficiency). All batteries can only work at the same time.
Radiator connection example
To expand the possibilities of temperature control in each room, a bypass system is used - the batteries are connected in parallel to one pipe, they can work separately and simultaneously, and the heating temperature of each battery is additionally regulated.
Connecting a heating radiator
According to the type of circuit, a single-pipe system can be open or closed.
- The open one has an expansion tank to receive an increased volume of water and drain the excess.
The tank is connected to the atmosphere, which gives the system the name open. Open type expansion tank Open expansion tank An open expansion tank contributes to increased evaporation of the liquid, and, as a result, it is necessary to constantly monitor the replenishment of this liquid - In a closed system, the expansion tank is a closed type, the entire system is under pressure.
To prevent emergency situations from occurring in a closed version, a safety group is mounted on the system: a pressure gauge, an air vent and a safety valve. Construction of closed expansion tanks Membrane-type expansion tank Expansion tank for heating
A one-pipe system with bottom wiring can only work with forced movement of the coolant (with a pump), and even then the length of the circuit is limited. Or rather, not so much the length of the circuit as the number of connected batteries and their actual heat dissipation.
Single-pipe heating system for a private house
This knowledge is needed in order to understand the principle of operation of the system and know what can be achieved with its help. Such knowledge makes it possible to carry out installation more consciously; it will be clear why each pipe and each tap is needed. The bypass system significantly improves the characteristics of single-pipe heating, but is more complex in installation, more expensive in terms of the number of components and costs. In addition, it can only be installed above floor coverings, otherwise the adjustment needle taps will be inaccessible.
Bypass prices
Video – “Leningradka” – heating system
How to calculate the optimal number of radiator sections
Climatic indicators in the premises must meet the requirements of SNiP 41-01-2003, and the calculation methodology is also given there. These are quite complex calculations, and it is impossible to do them without serious knowledge of heating engineering. We list only a few initial data that are taken into account during the calculations.
File for download – SNiP 41-01-2003
SNiP 41-01-2003 (Heating, ventilation and air conditioning)
- Around the premises. Volume, thermal conductivity of walls, ceiling and floor, climatic zone of location, maximum temperature values, number and characteristics of window and door openings, air exchange rate of ventilation systems, spatial arrangement of the room, etc.
- For heating systems. Coolant inlet and outlet temperatures, speed and type of coolant, physical characteristics of heat exchangers, total boiler power, etc.
Approximate calculation of the number of aluminum radiator sections per room
Table of approximate calculations
This means that you cannot make accurate calculations yourself. For such cases, there are general recommendations from practitioners, which are quite sufficient for heating installation. Moreover, today it is possible to regulate the heat transfer power on each battery, taking into account actual conditions.
Although the radiator heats the volume of air, for simplicity of calculations, square meters of the room are used, and the standard height of the rooms is taken. For buildings whose heat loss coefficient does not exceed the requirements of existing regulations, it can be assumed that 100 watts are sufficient to heat 1 m2.
Taking into account the specific architectural characteristics of the premises, you can more accurately determine the cost of thermal energy using the formula
KT (amount of heat) = 100 W/m2 × P × K1 × K2 × K3 × K4 × K5 × K6 × K7 , where
- P – room area in square meters;
- K1 – glazing coefficient of window openings, can be in the range of 1.27÷0.85 depending on the characteristics of the double-glazed windows. For singles – 1.27, for doubles – 1.0, for triples – 0.85;
- K2 – thermal insulation coefficient of external walls. From 1.27 for walls one and a half brick thick to 0.85 with high thermal insulation. Determined by eye;
- K3 – ratio of window area to floor area.
Next, the minimum temperature (K4), the quality of the external walls (K5), the type of attic (K6) and the ceiling height factor (K7) are taken into account. The total heat demand must correspond to the boiler power, so that the boiler does not constantly operate at critical conditions - it is better to make a power reserve of approximately 20%.
Calculation of the number of sections of heating radiators
Of course, none of the “amateurs” do such simplified calculations, and this is not necessary. Our advice is to take approximately 120 W/m2, take into account the heat transfer of one section of the battery (given by the manufacturer), calculate the total number of sections for each room and relate it to the power of the boiler. Don’t be alarmed that the temperature will be too high and large payments for coolants will occur - each battery can be separately regulated.
The correctly selected number of sections will ensure optimal heat transfer and create the most comfortable conditions
Installation of a single-pipe heating system
To carry out installation work, in addition to ordinary tools, you also need to have a special apparatus for welding propylene pipes; it is not very expensive, and learning to work with it will not be difficult. The standard set includes scissors for cutting pipes - they are very convenient to use, and the cut is smooth.
Complete set for welding Pipe shears
How to install a heating system? The work should be divided into several stages.
Stage 1
You need to make a sketch of the heating system, think about the location of the boiler, where and how the pipes will lie, how many, where and what kind of radiators need to be installed.
Drawing of a single-pipe heating system
Do not expect that the sketch will turn out right the first time; after the first attempts at marking, there is a high probability that you will have to make changes. It may be necessary to create multiple circuits to drain cold water, which will require the purchase of additional plumbing fixtures and fittings. When drawing up the sketch, take into account the boiler power requirements and the optimal physical characteristics of the heat exchangers.
Single-pipe wiring
Stage 2
Purchase of materials. Count the number of all turns, tees and transitions, couplings, ordinary ball and needle valves, monitoring and control systems, and the length of polypropylene pipes.
Polymer pipes and fittings
Split fitting structure
An important note - if you have an open heating system, then you can buy ordinary pipes; if the heating system is closed (works under a pressure of 1.5 atm), then the pipes must be reinforced with foil. If the circuit is located under the floor, you need to purchase insulation.
Modern thermal insulation of pipes Insulation for heating pipes
When all the calculations are done, increase the total number of pipes and fittings by 10%, this will cover unproductive waste and possible errors. In the end, it will be much cheaper to increase the amount of materials than to have to “freeze” them during work and once again go to the store to buy what is missing.
Recommended pipe diameters depending on the expected power of the heating system.
| Nominal diameter in inches | Maximum coolant throughput | Maximum thermal load |
| ½ | 5.7 l/min | 5.5 kW |
| ¾ | 15 l/min | 14.6 kW |
| 1 | 30 l/min | 29.3 kW |
If the calculated pipe diameter is larger than the standard diameter on the radiator, purchase the appropriate adapters.
Prices for polypropylene pipes
Stage 3
Mark the site, stretch the pipes, arrange batteries, fittings and taps, and check all the components again. Make the markings carefully, use a level.
Everything has been prepared, checked and recalculated, the heating system design plan has been drawn up, the final goals are clear, and installation can begin. If you are installing a heating system during the construction of a building, it is better to lay the pipes under the floor; if the building is already standing, you will have to attach them to the bottom of the wall. Pipes under the floor should be insulated; there are special insulation materials for this; they are very effective and easy to install.
Concealed installation in the wall or floor
One more point - are you going to make an ordinary one-pipe insulation system or a bypass one? The second is somewhat more complicated and requires more reinforcement. But it allows you to regulate the temperature of each battery and, if necessary, repair or replace them without completely shutting down the system.
Bypass in the heating system
Bypass with a one-pipe system Bypass for heating - has a simple device Diagram of a heating system with bypass
Our advice is that for a small country bathhouse with one or two rooms you can use an ordinary system; for buildings with three to four rooms it is better to install a bypass system.
Preparatory work
Start with the boiler; when choosing an installation location, take into account the free space and the possibility of exhaust gases. There is no single algorithm for installing boilers; much depends on its type and design features. Boilers can be floor-mounted or wall-mounted, with different technical characteristics, dimensions, etc. The main rule is to strictly follow the manufacturers’ recommendations for installation and exhaust gas removal, take into account the requirements of SNiP II-35-76 and SNiP 2.04.05-91.
BOILER HOUSES. Updated edition of SNiP II-35-76. BOILER UNITS. Official publication
Updated edition of SNiP II-35-76
Heating boiler installation
Heating boiler piping
Step 1: Choose a location. The boiler must be located as close as possible to the existing water supply system, and problems with the chimney must be resolved. Fix the boiler on the wall or place it on the floor, keeping it horizontal. When installing the chimney, follow basic fire safety rules.
GAS STEEL HEATING BOILERS “DANKO” TYPE. MANUAL
Instructions for the boiler
Installation and service instructions for VIESMANN specialists
VIESMANN – installation instructions for a gas boiler
Step 2. If the heating system is open, you need to make an expansion tank with a drain. This can be an ordinary metal square container of about ten liters. It is connected to the boiler at the hot water outlet, and the tank should be located above the boiler and radiators.
Open expansion tank for heating
The system has forced water circulation, so there is no point in placing the tank very high. The tank must have a constantly open drain pipe to drain excess water during heating and prevent the formation of a vacuum while the coolant cools. A closed type expander is mounted in the same way.
Prices for expansion tanks
Video - Membrane type expansion tank
Video - Connecting a membrane expansion tank to polypropylene
Step 3. Installation of the security unit. It is installed only for closed-type heating systems in an accessible place, in most cases next to the boiler. The control and safety unit consists of a pressure gauge (shows the actual pressure in the system), an air release valve and a safety valve. The safety valve is automatically activated when the maximum permissible pressure values are exceeded.
Video – Security Group
Step 4. Install the pump.
Pump assembly Installation of heating unit
The pumps are sold together with the boilers; in all modern gas and electric boilers they are mounted in the housing; no additional actions are required. If the model being installed does not have a built-in pump or you have a solid fuel boiler, you will have to purchase it separately. Installed in any convenient place at the inlet of cold water from the heating system to the boiler.
Pump installation using a check ball valve Pump installation option Pump installation example
Installing a pump in a heating system How to remove air from the circulation pump before starting Installation diagram
Video - Installing a GRUNDFOS circulation pump in a heating system
Step 5. Filter installation. There are nuances here. The fact is that many heating boilers have two hot water circuits, one is used for heating, and the second is used for domestic needs: showering, washing dishes. If water is taken from the boiler frequently, then the likelihood of various mechanical impurities entering the boiler increases; it is recommended to install a filter. If the boiler operates only for heating, then it is not necessary to install a filter, water is not taken from the system anywhere, and no impurities will enter it. There is an option - water at the dacha is supplied by floating pumps from wells. In this case, a filter must be installed when installing the pumps. If this is not done, install a filter at the water inlet to the boiler.
There is an axiom in mechanics - the more different equipment is installed, the more vulnerable the system is, and the likelihood that some device will fail increases. Experienced engineers try to install only critical machinery and equipment, leaving everything else unused. This also applies to the filter - there are no such anywhere else or the probability of impurities getting in tends to zero - there is no need to install filters. These are extra connections, extra casings and filling, and each connection can leak. Keep this rule in mind when installing any systems.
Filter for heating system
Practical advice. All existing filters (except for very expensive ones with molecular filters, so-called osmosis-type filters) purify water only from mechanical impurities. This is good, but they don’t happen in pipeline water anyway. The boiler is afraid of deposits of calcium salts on the walls - heat transfer is significantly reduced and efficiency decreases. To prevent such phenomena, we recommend using ordinary liquid Calgon (used during washing). Pour it into a closed heating system during filling at the rate of approximately 1 liter per 100 liters of water - problems with calcium will be solved.
Prices for circulation pumps
Installation of heating pipes and marking for installation of radiators
| Step, No. | Illustration | Description or explanation |
| Step 1. Drill holes for clips (pipe fasteners) and holes for pipes to pass through ceilings or walls. | It is better to drill concrete walls with a special drill or diamond tool | Depending on the material of the walls and ceilings, you need to use an ordinary drill or hammer drill. |
| Step 2: Pull the pipes through the holes. | Pipe laying | It is very important that when pulling pipes, you need to close their holes, otherwise there is a possibility of foreign objects getting inside. It is impossible to remove objects from the pipe later, and they can create many problems. Is the pipe very long and difficult to pull through? Figure out where you can install couplings, measure the distance and cut the pipe into several pieces. Cut the pipe with a margin; you will never be able to accurately measure the optimal length of the pipes right away, then make the adjustment on the spot. |
| Step. 3. Marking the installation location of radiators. | Initial markings to determine the radiator mounting location Required clearances when installing a radiator in a niche | All radiators must be placed at the same height; work should be carried out level. Each type of radiator has its own differences; to make marking easier and faster, make a simple template from a piece of board or plywood. Mark the position of the upper and lower mounting brackets on it, and drill holes in these places. Next, just place the template on the floor, lean it against the wall and mark the places where the brackets are attached. Do all marking work very carefully; the quality and speed of further work on installing the heating system largely depends on this. |
| Step 4. Preparing radiators. | Preparing the radiator for installation Assembly of aluminum heating radiators | Nowadays cast iron radiators are not used; aluminum or bimetallic ones are held in high esteem. Their advantage is that, despite their smaller dimensions, they have a significantly larger heat exchange area. This same advantage is also a disadvantage that manufacturers do not indicate. Aluminum radiators have a lot of different jumpers (to increase the area), which are located in hard-to-reach places. It is impossible to remove dust from there. If the thickness of the dust reaches one millimeter, then the heat transfer efficiency is halved. Where has the dignity gone? A rhetorical question, but the high price remains. Advertising is often used by manufacturers in order to sell products more expensively and quickly, rather than to do something useful for the consumer. This applies not only to radiators, remember that. Unscrew the factory fittings (some types of radiators may have plugs), seal the threads with sealant, tow or a modern tape seal. Attach valves and tees in the same way, if they are needed according to the technological scheme. |
How to work with polypropylene pipes
We have already mentioned that these pipes have excellent characteristics and a very reasonable price; these qualities are the reason for their high popularity. Soldering of pipes is carried out with a special soldering iron, the melting point of polypropylene is +270°C, this temperature should be set on the device’s thermostat. The heating time of pipes depends on their diameter. The table shows approximate parameter values.
Pipe heating time
| Pipe bore diameter, mm | Approximate heating time, sec. |
| 20 | 5 |
| 25 | 7 |
| 32 | 8 |
| 40 | 12 |
| 50 | 18 |
| 63 | 24 |
| 75 | 30 |
The soldering iron has two nozzles, with the help of one the inner surface of the pipe is heated, with the help of the other the outer surface of the pipe is heated. Both surfaces need to be heated at the same time; as soon as the specified time has passed, the pipe sections are removed and inserted into each other with a little force. It is very important that when joining the pipes, it is forbidden to rotate them; the forces must be only axial. After connecting, you need to hold the connections for some time (ten seconds) to cool down.
As you gain experience, you will get a neat edging. The strength of the connections is almost the same as that of solid pipes; leakage and depressurization during operation are excluded. When cutting the pipes, do not forget to add a centimeter on each side; this length will be used for the connection. We never tire of repeating that any work requires intelligence and attentiveness.
Don’t rush to glue everything together, think, plan your actions several steps ahead. There are times when you need to skip the area to be treated and glue the pipes in front, and then return to the original place. This is due to the fact that then it will not be possible to get to the workplace with a soldering iron. In a word, think through the soldering technology several steps ahead - which segment needs to be rotated for soldering, whether this will be possible later, etc.
The more competently the scheme for installing polypropylene pipes is worked out, the less welding will have to be done “on weight”
Radiator installation
One of the most difficult types of work when installing a heating system. We have already made markings on the wall, now we need to hang the batteries.
Step 1. Drill holes for dowels according to the markings. For drilling, you need to use a drill with pobedite surfacing (for brick and concrete). The drill should be set to perforation mode. Select the diameter and length of the dowels taking into account the dimensions and weight of the batteries.
The photo shows an assortment of fastening devices for radiators. The bracket for the radiator is installed.
Step 2. Screw the Mayevsky tap, tap and plugs to the battery.
Mayevsky tap in the heating system Mayevsky tap
Please note that the plugs can be installed in different places, depending on where you installed them, the coolant flow can be diagonal or horizontal. If you have a bypass heating system, then you need to solder tees in the right place, make a branch to attach a jumper that allows you to completely disconnect the battery during repair or replacement.
We cut a thread on the pipe We wind flax on the thread You can screw on the faucet
One more thing - to be able to regulate the temperature of each battery in the bypass heating system, it is necessary to install a needle valve near each radiator, with the help of which the strength of the coolant flow will be regulated (in this way the temperature of the battery changes). Why a needle tap? Because it provides smooth and precise adjustment of the coolant flow rate.
When soldering, keep the direction of the tee in line with the direction of the radiator taps. To avoid mistakes, before starting work, make special marks for yourself with a pencil, check their correctness, and only then start soldering. If you still make a mistake, it’s unpleasant, but not fatal. Cut off the wrong section and repeat the operations in the correct order; it is for such situations that you bought all the elements with a reserve.
Step 3. Tie the batteries for the bypass sections. We have already mentioned that they increase the versatility of the system. This operation applies to the bypass system only.
Checking that the radiator is installed correctly
Starting the system
Starting the system
For your information, industrial heating projects for commissioning work provide up to 10% of the total estimate. This means that commissioning work is very important and complex. To insure you against making mistakes, we will give you some practical advice.
- Before filling the system with water, open all valves and venting devices. Please note - not after filling, but before. Let a little water spill on the floor, it's not scary. Close them only after water appears.
- Fill the system slowly, do not open the water tap all the way. The fact is that rapid filling can cause the formation of air pockets in places from which it is impossible to remove them - you have to drain the water and start all over again. This does not always happen, it all depends on the correct installation of the system, but for beginners such embarrassment does happen.
Video - Starting and filling the heating system with coolant
It is advisable to install a single-pipe heating system with bottom wiring in small buildings; the further the battery is from the boiler, the lower its heating temperature. If permanent residence is not planned in the country house, then in winter, when you are away, the water must be drained and refilled upon arrival. Not everyone wants to do such things. The solution is to use antifreeze as a coolant, but this is expensive.
Coolant (antifreeze) for heating system Antifreeze
If desired, you can install a single-pipe heating system in the bathhouse. But why? There is no need to heat the steam room; batteries are installed only in the dressing room. For this room, one or two radiators are enough. The system will be used several hours a week. Is it worth losing so much time and money over this? Perhaps for a small bath it is worth purchasing an ordinary heater. It is expedient and cost-effective to install a heating system in a large bathhouse complex or a bathhouse combined with a residential building.
Electric heating boiler in the bathhouse
Comparison with other types
In the lower insert, the supply line is laid from below, next to the return line, so the coolant is directed from the bottom up along the supply risers. Both types of distributions can be designed with one or more circuits, dead-end and associated flow of water in the supply and return pipes.
Natural circulation systems with connections at the bottom are used very rarely, since they require a large number of risers, and the point of inserting pipes in this way is to reduce their number to a minimum. Taking this into account, such structures most often have forced circulation.
Roof and floors - meaning
In the upper supply line, the supply line is above the radiator level. It is mounted in the attic, in the ceiling. The heated water flows to the top, then through the supply risers it evenly spreads over the radiators. Radiators must be located above the return line. To prevent air accumulation, install a compensating tank at the very top point (in the attic). Therefore, it is not suitable for houses with a flat roof without an attic.
The wiring from below has two pipes - supply and discharge - the heating radiators must be higher than them. It is very convenient for removing air pockets using Mayevsky taps. The supply line is located in the basement, in the basement, under the floor. The supply pipe must be higher than the return pipe. An additional slope of the line towards the boiler minimizes air pockets.
Both wirings are most effective in a vertical configuration, when the batteries are mounted on different floors or levels.
Principle of operation
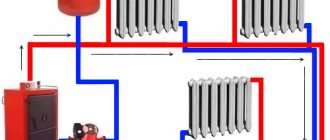
The main characteristic of a two-pipe system is the presence of an individual water supply line to each radiator. In this scheme, each of the batteries is equipped with two separate pipes: water supply and outlet. The coolant flows to the batteries from bottom to top. The cooled water returns through the return risers to the return line, and through it to the boiler.
In a multi-storey building, it is appropriate to install a two-pipe structure with a vertical main line and lower wiring. In this case, the temperature difference between the coolant in the supply pipe and the return pipe creates strong pressure, which increases as the floor rises. Pressure helps water move through the pipeline.
In the lower pipe connection under consideration, the boiler must be in a recess, since the radiators and heating devices must be higher to ensure uniform delivery of water to them.
The air that accumulates is removed by Mayevsky taps or bleeders; they are mounted on all heating devices. Automatic vents are also used, which are fixed on risers or special air outlet lines.
Scheme "Leningradka"
The Leningradka heating system is an improved single-pipe system.
Both considered schemes have one common drawback - a drop in temperature in the last radiators. In the case of a horizontal circuit, we have cold radiators in horizontal chains, and in the case of a vertical circuit, in vertical chains. That is, in the latter case it is the entire first floor.
The Leningradka heating circuit in a private house allows you to compensate for the cooling of the coolant when passing through the next radiator. How is it implemented? This circuit provides bypass jumpers located under the batteries. What do they give? The jumpers allow you to direct part of the coolant bypassing the radiators, so the coolant at the outlet is as warm as at the inlet (minor deviations can be neglected).
Advantages and disadvantages of the Leningradka scheme
Leningradka promotes more uniform heating of rooms.
Each scheme has its own advantages and disadvantages. What are the advantages of the Leningradka scheme?
- More even heat distribution throughout the house.
- Relatively simple upgrade.
- Possibility of adjusting the temperature in individual rooms (as in two-pipe systems).
- limited length of the line - if there are many radiators in a horizontal chain, then there will still be losses;
- the need to use large diameter pipes for more uniform heat distribution.
The last drawback can be eliminated by installing a circulation pump in the system.
Features of installation of "Leningradka"
Connection options for Leningradka in a single-pipe vertical circuit.
When creating heating systems for private houses with their own hands, many people actively use the Leningradka scheme. How is it laid? To create a circuit, it is necessary to place radiators and lay a pipe under them, from which branches are made to the inlets and outlets of the radiators. That is, a jumper is formed under each radiator. In addition, we can install three taps on each radiator - the first two taps are installed at the inputs and outputs, and the third is installed on the jumper itself. What does this give?
- Taps can be used to regulate the temperature in individual rooms.
- The ability to exclude any radiator without shutting down the entire system (for example, if one radiator is leaking and needs to be replaced).
Thus, the “Leningradka” scheme is the optimal scheme for small one-story and two-story houses - you can save on materials and achieve uniform heat distribution throughout the rooms.
Kinds
A two-pipe heating system can be of the following types:
- horizontal and vertical;
- direct flow - the coolant flows in one direction through both pipes;
- dead-end - hot and cooled water moves in different directions;
- with forced or natural circulation: the first requires a pump, the second requires a slope of the pipes towards the boiler.
The horizontal scheme can be with dead ends, with a passing movement of water, or with a collector. It is suitable for one-story buildings with a significant length, when it is advisable to connect the batteries to a horizontally located main pipe. This system is also convenient for buildings without piers, in panel-frame houses, where risers are conveniently placed on a staircase or corridor.
According to experts, the most effective was the vertical scheme with forced water flow. It requires a pump, which is located on the return line in front of the boiler. An expansion tank is also mounted on it. Due to the pump, the pipes can be smaller than in a design with natural movement: with its help, water is guaranteed to move along the entire line.
All heating devices are connected to a vertical riser. This is the best option for high-rise buildings. Each floor is connected to the riser pipe separately. The advantage is the absence of air pockets.
Installation
Conventionally, several stages of work can be distinguished. First, the type of heating is determined. If gas is supplied to the house, then the most ideal option would be to install two boilers: one gas, the second a spare, solid fuel or electric.
Next, you should agree on the installation of the heating system in the project documentation and begin purchasing the necessary materials, devices, and preparing tools.
Stages
Briefly, installation consists of the following points:
- a supply pipe is led upward from the boiler and connected to a compensating tank;
- a pipe from the upper line is removed from the tank, which goes to all radiators;
- a bypass (if provided) and a pump are installed;
- the return line is drawn parallel to the supply line, it is also connected to the radiators and cut into the boiler.
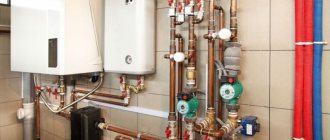
Boiler
For a two-pipe system, the boiler is installed first, for which a mini-boiler room is created. In most cases, this is a basement (ideally a separate room). The main requirement is good ventilation. The boiler must have free access and be located at some distance from the walls.
The floor and walls around it are lined with fire-resistant material, and the chimney is vented to the street. If necessary, a circulation pump, distribution manifold, control and measuring instruments are installed near the boiler.
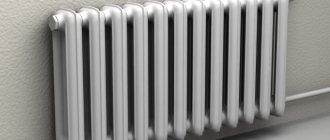
Radiators
They are installed last. They are located under the windows and fixed with brackets. The recommended height from the floor is 10–12 cm, from the walls – 2-5 cm, from the window sills – 10 cm. The inlet and outlet of the battery is fixed with shut-off and control devices.
It is advisable to install temperature sensors - with their help you can monitor temperature indicators and regulate them.
If the heating boiler is gas, then it is necessary to have the appropriate documentation and the presence of a representative of the gas industry at the first start-up.
What to consider when installing any system
Heating boiler operating diagram.
It is important not to forget to install regulating thermal valves at the inlet and outlet of the radiator, as well as a drain valve, which is usually located at the lowest point of the heating structure. Purchasing used or “cheap” pipes and fittings in any heating system can later result in very serious problems requiring major repairs not only of the entire heating structure, but also of the house itself due to the possible rupture of hot water pipes and its flooding. Purchasing used or “cheap” pipes and fittings in any heating system can later result in very serious problems requiring major repairs not only of the entire heating structure, but also of the house itself due to the possible rupture of hot water pipes and its flooding
Purchasing used or “cheap” pipes and fittings in any heating system can later result in very serious problems requiring major repairs not only of the entire heating structure, but also of the house itself due to the possible rupture of hot water pipes and its flooding.
Two-pipe heating distribution is possible for a private house with any number of floors. And its operation can occur without the use of a circulation pump. But these systems have rather low efficiency and are no longer used by many people nowadays.
https://youtube.com/watch?v=IVHMLLJRL6M
When deciding to place a two-pipe distribution system with a collector in a house, you need to carefully consider and plan the placement of the coolant distribution unit, the so-called comb. It will be correct to make the length of the pipes extending from it commensurate, since a significant difference in length from the comb to the radiators can lead to a significant difference in pressure. And this will complicate the adjustment of the system as a whole. The best solution for placing the comb is such that there is approximately an equal distance from each of the radiators.
Pipes for heating installations can be copper, steel, polypropylene and metal-plastic, but in no case should they be galvanized. The required type of pipes is selected depending on the construction project and the preferred characteristics: economic, environmental. But hydraulic characteristics should be a priority.
The flow rate of the pipes required for laying this system will depend on the chosen heating distribution scheme (two-pipe or one-pipe). Private houses with a large area require the equipment of a two-pipe system, into which a circulation pump is also installed. Temperature control in each room is carried out using thermostats.
Adviсe
The expansion tank is located at or above the peak point of the main line. If there is an autonomous water supply, then it can be integrated with a supply tank. The slope of the supply and return pipes should be no more than 10 cm per 20 or more linear meters.
If the pipeline is at the front door, it is appropriate to divide it into two elbows. Then the wiring is created from the location of the highest point of the system. The lower line of a two-pipe structure must be symmetrical and parallel to the upper one.
All technological units must be equipped with taps, and it is advisable to insulate the supply pipe. It is also advisable to place the distribution tank in an insulated room. In this case, there should be no right angles, sharp breaks, which will subsequently create resistance and air pockets. Finally, we must not forget about the supports for the pipes - they must be made of steel and cut in every 1.2 meters.