What is a radial wiring diagram for a heating system?
To implement a project to equip a house with a heating system, both newly built and reconstructed, there are the following methods of connecting heating devices:
- Circuit with tee (perimeter) wiring.
- Beam (collector) connection.
The first method is cheaper, since the total length of the installed pipes is much less. But in many other respects, the standard linear circuit is inferior to the collector circuit, in which separate independent pipelines (beams) are allocated to connect each convector.
Radial diagram for connecting radiators
In a collector system, the heating elements are separately, in a parallel circuit, connected to a distribution unit (comb), which is connected through the main line to the central heating or heating boiler.
The role of the collector is to evenly distribute heat flows along the rays of the system and, due to natural or artificially created circulation, collect and return them, in the form that has given off heat, to the heat source.
Radiant wiring and heated floors
The radial scheme can also be used to install a “warm” floor system. With a well-designed project, taking into account all factors, you can abandon radiators, making the heated floor the main source of heating.
Heat flows will be evenly distributed throughout the room, without creating a convection effect, unlike radiators. As a result, there is no circulation of dust in the air.
Before you take on the idea of installing water-heated floors, it is important to consider the following features:
- a reflective screen with a layer of thermal insulation is laid on a concrete or wooden base;
- pipes are laid on top in a loop-like pattern;
- Before pouring concrete, a hydraulic pressure test of the system is carried out throughout the day;
- The finishing layer is screed or flooring.
The manifold of each circuit must be equipped with flow meters and thermostatic valves, which allow precise control of coolant flow and regulation of its temperature.
When routing pipes, you can use thermostatic heads and servos. These devices allow you to automate the operation of a heated floor. The system will respond to changes in room temperature, adjusting a comfortable mode for each room.
Radiant wiring for underfloor heating requires equipping the collector with several components that allow you to control, automate and manage underfloor heating to achieve maximum comfort and energy efficiency
During installation, it is extremely important to properly fix the pipes before filling everything with screed. To do this, you can use insulation with grooves, reinforcing mesh or staples.
Before laying the pipeline, it is necessary to clearly define the route that the coolant will travel to heat the floor (do not allow pipes to cross). It is best to cut the pipe only after it has been completely laid and connected to the return and supply manifolds.
It is important that the pipeline is under pressure when filling. Until the concrete mixture hardens completely and three weeks have passed, coolant cannot be supplied at operating temperature. Only then we start with 25ºС and after 4 days we end with the design temperature.
How does a beam circuit work?
*
The collector unit is responsible for the circulation of the coolant through individual circuits. Structurally, this is a section of pipe with outlets for each battery.
The operating principle of the collector system is as follows:
- The coolant flows through the input unit to the supply comb of the manifold;
- through the comb, thermal energy is distributed along the wiring with convectors included in it;
- Having passed through the convector, the cooled coolant is discharged through the outlet pipeline to the return comb of the manifold and again returns to the boiler for reheating.
The supply and return combs make up the collector group.
Heating system manifold unit
The number of circuits connected to the comb is selected individually for a specific heating scheme and the number of convectors. Typically the manifold supports from 2 to 12 circuits.
Pros and cons of beam scheme
Having chosen a collector-beam heating system, you need to take into account all its aspects.
Advantages of the collector circuit:
The beam scheme has the following advantages:
- One diameter of pipes from combs to convectors.
- The number of fittings, especially when laying pipes in the floor, is minimal, which makes the entire system more reliable.
- Hydraulic stability and balanced heating.
- Repair of individual sections or radiators is carried out without disconnecting from the system and draining it.
Flexible pipes of the system that do not have connections can be easily hidden under the floor, due to which the interior of the room does not deteriorate, and the floor does not need to be dismantled to repair the system.
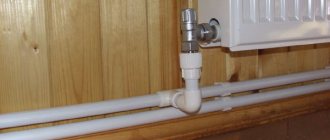
Manifold pipe routing
*
Another significant advantage of the radiant system, which makes heating an apartment or private building more energy efficient and with a temperature comfortable for any room, is the ability to adjust heating parameters separately for each circuit, in manual or automatic mode.
What disadvantages need to be taken into account
In addition to the material consumption of the beam circuit, some other disadvantages should be taken into account:
- equipment for additional space for installing a manifold cabinet;
- installation of circulation pumps in each independent circuit to compensate for high hydraulic resistance;
- use of additional special devices.
Installation of these elements, in addition to increasing the cost, also requires accurate calculations.
In what cases is the radiation system justified?
The beam circuit operates on closed-type systems and, as an option, is used to equip heated floors in apartments.
Radial scheme for heated floors
Attention! The optimal option for using a beam scheme is for an individual two-story house.
Each level in such houses is equipped with a collector unit. Depending on the number of rooms, not one block of combs is installed, but several.
Features and diagrams of a beam system in an apartment building
*
The main difficulty of using a collector-radial circuit in an apartment building, in which the coolant is supplied according to a traditional vertical two-pipe circuit, is the influence of the radial circuit of an individual apartment on the heat load of the apartments above, in which this circuit is not implemented. Such apartments will not receive enough heat.
There are some ways to connect the collector to the common house system without harming the neighbors.
Use of a heat exchanger in a radiant system
The heat exchanger has no hydraulic resistance and is connected like a simple radiator through which the coolant passes without the participation of a circulation pump.
Option for connecting the collector to central heating via a heat exchanger
Heat flows passing through the collector circuit in which the heat exchanger is installed do not mix with the central heating coolant.
Connection with primary-secondary rings
With this connection, the central heating system of the house serves as the primary ring, and the collector-radiant heating system plays the role of the secondary ring.
The connection is made to the pipeline coming from the convector.
The algorithm for constructing such an insert is as follows:
- To directly supply coolant to the collector, the first cut is made at a distance of 30 cm from the radiator jumper.
- The return contour line is cut in at a distance of 60 cm from the jumper.
- Shut-off valves are mounted on the tie-ins.
- A three-way valve and pump are installed.
- A valve is mounted on the return pipe, through which coolant flows in only one direction.
Hot water passes through the collector through loops of the circuit, then part of it is supplied to the central heating return pipe, and part is returned to the collector through a three-way valve. This valve is responsible for the distribution of coolant.
With this scheme, the coolant is withdrawn evenly, without creating a vacuum in the central heating pipeline and without changing the heat balance of the apartments.
To insert into the common heating riser of a residential building, individual design and permission from the management company are required.
Radiant heating system for a two-story house is the best choice
At the moment, a more efficient and economical floor heating system for two-story private country houses than a two-pipe radial scheme simply cannot be found. By choosing the equipment correctly, as well as calculating all the nuances and performing installation as required by the instructions, you can ensure comfort and coziness in your home.
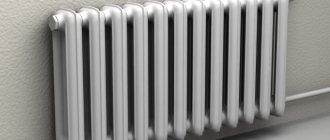
It is important to point out the fact that the main heating devices in a radial double-circuit system are traditional radiators. Regardless of the size and material (and this can be either cast iron or aluminum), such units must be installed correctly:
Regardless of the size and material (and this can be either cast iron or aluminum), such units must be installed correctly:
- Heating radiators must be installed only under window openings;
- All heating radiators must be mounted at the same height;
- The fins of the battery are located only vertically - otherwise normal coolant circulation will be impossible;
- It is imperative to provide a drain system through which the coolant will be replaced.
Two-pipe heating system for a house with two floors
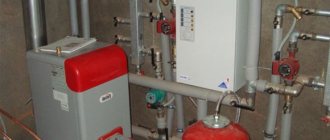
The boiler also means a lot (see how to choose a gas heating boiler)
For normal operation of the double-circuit system, it is important to choose modern and efficient boilers. Such equipment (and even equipped with automation) will make it possible to ensure optimal heating of each room of a two-story house, significantly saving fuel and money and obtaining hot water
The heating system of a two-story building with a two-pipe radiant heating circuit is not only quite productive and efficient, but also demanding for the first start-up.
For example, before starting direct operation, it is important to correctly balance the system and adjust the fluid flow for each loop of supply and return pipelines. This is the only way to achieve fuel savings and ensure the highest possible level of heating
What equipment and materials to use
*
There is no universal design for radiant heating, so the use of equipment and materials in such a scheme will depend on the choice of a specific heating circuit design option. This could be standard heating with radiators or, for example, a warm water floor.
In general, the following basic equipment is required for radiant heating:
- collector block (comb);
- external or wall-mounted manifold cabinet;
- circulation pump;
- pressure gauge;
- air valve;
- thermostat;
- shut-off and control valves;
- rotameters;
- mixing units;
- membrane expansion tank.
In terms of volume, the tank is selected to be 10% larger than the total volume of coolant in the system.
To install a radiant heating circuit, additional elements are also required.
Additional parts for connecting the manifold
- Air vents.
- Adapters.
- Corners.
- Cranes.
- Sgony.
- Fitting.
- Fittings.
For the construction of heating beams, it is better to use cross-linked polyethylene pipes in coils.
Remember! Pipes must be flexible so as not to make unnecessary connections, tensile strength and have good heat resistance.
The diameters of the installed pipelines are selected taking into account the parameters of the equipment to which they are connected (outputs of the central main line, manifold comb). Most often, pipes with a diameter of 20 mm to 32 mm are used.
The manifold kit can be equipped with useful devices - servos.
Servo drive for heating manifold
These devices make the heating system “smart”, automatically maintaining the specified heating parameters through the control unit.
Main stages of installation
*
A frequently used method of laying heating according to a radial scheme is bottom routing, with pipes installed in the floor screed. Therefore, it is better to carry out this work during new construction or reconstruction of a house and in the absence of a finished floor covering.
Main stages of work:
- preparation of the subfloor base;
- laying pipes and a layer of insulation (penoplex or polystyrene foam);
- fastening pipes to the base with mounting tape or plastic clamps;
- installation of an expansion tank;
- installation of circulation pumps;
- installation of automatic balancing valves for air removal;
- hydraulic tests of the installed system.
The work is completed with a pipe screed, which will serve as the basis for the finished floor.
Screeding device for heating pipes
When pouring concrete, pipes must be kept under pressure. Coolant at operating temperature is supplied only after the solution has completely hardened.
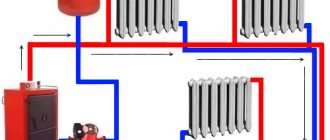
Beam wiring diagram
When choosing a heating scheme, in most cases they choose a radial floor-to-floor pipeline layout. All pipes are hidden from view in the thickness of the floor. The collector - the main distribution body is installed in a niche of the wall fence, often in a special cabinet located in the center of the house/apartment.
In the vast majority of cases, the implementation of beam distribution requires a circulation pump, and sometimes several, installed on each ring or branch. Its necessity is described above. Radial wiring of the heating system assembly is most often performed on the basis of one- and two-pipe installation, almost completely replacing the tee type of connection.
This is a simplified radial wiring diagram, in which each radiator is connected to a manifold connector for direct and reverse coolant supply
On each floor, supply and return manifolds are installed near the riser of the two-pipe system. Under the floor, pipes from both collectors run in the wall or under the floor and connect to each radiator within the floor.
Each of the contours should have approximately the same length. If this cannot be achieved, then each ring must be equipped with its own circulation pump and automatic temperature control.
In this case, the change in temperature conditions will be completely independent on each circuit and will not affect each other. Because the pipeline will be under the screed; each radiator must be equipped with an air valve. The air vent can also be placed on the manifold.
What needs to be done before installation?
Before starting work, the owner’s task is to correctly select all components and equipment locations, namely:
- determine the location of radiators;
- choose the type of radiators based on pressure indicators and type of coolant, and also determine the number of sections or panel area (calculate heat losses and calculate the thermal power required for high-quality heating of each room);
- schematically depict the location of radiators and pipeline routes, not forgetting about the other elements of the heating system (boiler, collectors, pump, etc.);
- Make a paper list of all the items and do your shopping. In order not to make a mistake in the calculation, you can invite a specialist.
So, to proceed to the next stage, it is necessary to take into account the rules for installing the beam system
Rules for installing beam wiring
If you choose to lay pipes under the floor, follow several rules that will help avoid heat loss and freezing of the coolant. There should be enough space between the rough and finished floors (more on this later in the description).
When installing pipes into the floor, it is important to take into account several requirements, one of which is the presence of sufficient space between the finished and subfloors
The subfloor can be a concrete foundation slab. A layer of insulation is first laid over it, then a pipeline is installed. If you lay pipes without a heat-insulating backing, the water in these areas may freeze, losing a lot of heat.
As for pipes, it is better to opt for polyethylene or metal-plastic models, which are highly flexible. Polypropylene pipelines do not bend well, so they are not suitable for beam distribution.
In most cases, a pipe with a diameter of 16 - 20 mm is used (if the radiator power is over 1.5 kW, then 20 mm), on which a thermal insulating corrugation is placed to reduce heat loss and compensate for thermal expansion.
The pipeline must be attached to the base so that it does not float while pouring the finishing layer of screed. You can secure it using mounting tape, plastic clamps or other available methods.
The pipe under the screed must be insulated in order to reduce heat loss to a minimum, and on the first floor it is imperative to lay a layer of thermal insulation
Then we lay insulation around the pipeline with a 50 mm layer of polystyrene foam or polystyrene foam. We also attach the insulation to the base of the floor using dowel nails. The final stage is pouring a 5-7 cm layer of mortar, which will serve as the base of the finished floor. Any flooring can be laid on this surface.
If pipes are laid on the second floor and above, then installation of a thermal insulation layer is optional. Remember one important rule: there should be no connections in the sections of the pipeline located under the floor.
If there is a circulation pump of sufficient power and performance, the collector is sometimes placed on the floor below relative to the level of the radiators.
If the collector is located on the lower level (basement), then you need to take into account several rules for the correct installation of pipes from the comb to the radiators, which are located on the next level
From the collector, the pipes rise vertically to the ceiling. Then a bend is made and the pipeline along the ceiling is brought to each radiator with another 90 degree bend. The pipes must be secured to the ceiling. Thus, a vertical pipe through the ceiling is connected to each heating device.
What do experts recommend?
When installing radiant heating, you must follow the advice of the experts:
- air vents must be installed both on the direct and return flow of the collector;
- The optimal location for installing the compensation tank is on the return pipeline, before the circulation pump.
- It is better to install circulation pumps on each circuit.
Installing pumps on the return line, where the coolant temperature is lower, will slightly increase their service life.
Circulation pumps in the heating system
Equipping a home with a radiant heating system, despite its apparent complexity and cost, in fact, if all technologies and recommendations are followed, will be a winning solution both in terms of energy efficiency and the comfort provided.
Features of installation of the system for wooden houses
When installing a radial heating system in a wooden ceiling, there are some peculiarities. The pipes must cross the floor joists or subfloor joists. To do this, holes are drilled in them that exceed the outer diameter of the pipe by 2-3 mm. This will avoid temperature deformations. The pipes should be routed so that the finished floor structures do not put pressure on the pipes.
Radiant heating system for a wooden house
The pipes should be fixed to the subfloor structures. A layer of vapor barrier is laid on the subfloor, then a layer of thermal insulation material with a foil reflective layer. As when laying on a concrete base, all fittings and connecting fittings must be placed above the level of the finished floor and floor covering.
The radiant heating system is gaining increasing popularity among owners of houses under construction or reconstruction. Despite the high costs of purchasing materials and installation, it allows you to save on operating costs. In addition, this scheme allows you to individually regulate the thermal regime in each heated room.