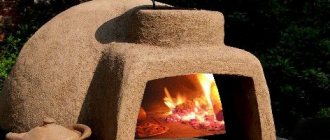
What is a Russian bathhouse without a stove and steam? The whole essence of bath procedures comes down to obtaining healthy, scalding steam. The construction of a heater allows you to obtain the required amount of moist air and heat the steam room to high temperatures.
The hot stones of the heating device are able to accumulate and release heat into the environment, and the water falling on them turns into healing steam.
Varieties
To get heated moist air, it is enough to perform a simple action: splash water on hot stones located in a special niche - a heater. At the same time, the temperature in the steam room rises and a special microclimate is created.
Depending on the design of the heater, there are 2 types of stoves:
- Open type. This design is suitable for a small bath. In this case, the room warms up quickly, but if you pour water on the stove, it immediately begins to cool down. In a device with an open heater, stones are placed above the fuel chamber.
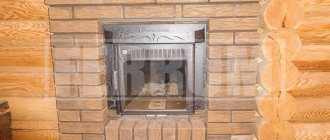
- Closed type is a more common version of the device. This model has a door. During combustion, it is in the open position. If you open the door slightly, you can speed up the heating of the steam room. The stove with this type of heater begins to be heated long before the start of the bath procedures, since it will take at least 2 hours to warm up the room. But the heat in a closed heater can remain for several days.
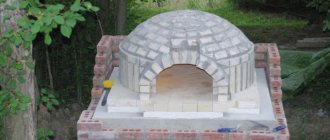
Step-by-step construction of a heater stove
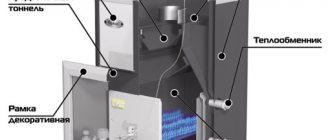
Each heater stove model differs in the size of the structure, firebox, tank volume, and decorative elements. In principle, every owner can build a stove of the type he wants, but all models have a common construction principle: where to insert the doors, pipe, water tank; how to place stones, how to equip soot cleaning devices. You can get information using the ordering diagram, where you can clearly see how the internal rows of the furnace are arranged in cross section.
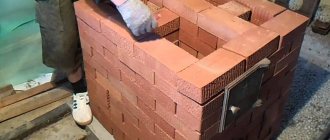
Inexperienced craftsmen are advised to first build the oven dry without using a bonding solution. At the same time, you will see the operating principle of the stove in full size: where the smoke goes, how the stones are heated, how the steam gets into the bathhouse. If you have to adjust the brick by cutting off some part of it, then it is recommended to fold all rows separately during disassembly, numbering each part.
If there is not enough refractory brick for the entire building, you can use it only where high temperatures are created (firebox, around stones). In this case, it is impossible to place bricks of different types in one row, since due to unequal expansion of the material, the entire masonry may collapse under the influence of heat.
Furnace diagram:
- Blower door.
- Grate (for ash).
- Firebox door (for firewood, coal).
- Plate.
- Gate valve (heat saving after combustion).
- Metal box.
- Stones.
- Steam door.
- Fire brick.
- Cauldron (saucepan).
Advantages of the stove
Each model of a heating device with a closed type heater is distinguished by the following properties:
- Preventing the penetration of carbon monoxide into the steam room. This is ensured by the fact that the fuel chamber, like its door, is located outside the steam room. Thus, instead of specific smells in this room there is the aroma of herbal infusions and brooms.
- Uniform heating of the entire furnace structure, creating optimal conditions for producing light steam. The steam room creates a pleasant microclimate for a comfortable stay in the room.
- If we compare two types of heaters from the point of view of safe use, then the closed type device has great advantages. In this case, the possibility of burning with steam when pouring water over the stones is eliminated. In addition, the fuel chamber located in the adjacent room ensures safety during bathing procedures.
- Maintaining the temperature at a given level for a long time even after stopping the combustion process. This is achieved by slowly cooling the closed heater.
Stones for a closed heater
It is necessary to choose special types of stones that can withstand high temperatures and sudden changes. Preference is given to dark stones, the size of which is close to the size of a human fist. It can be:
- diabase;
- basalt;
- crimson quartzite;
- river cobblestone;
- soapstone, diked;
- jade;
- peridotite
These are precisely the types of stones that, after heating, are able to fill the space of the steam room with life-giving air. Many people think that cobblestones will do, which is sufficient near the railway track. This is a durable stone, but it is subjected to special treatment and the vapors of such a substance in the bathhouse pose more of a health hazard than a benefit.
The heater needs to be maintained regularly, especially if it is made of brick. Temperature changes lead to the fact that the masonry either narrows or expands. This can cause minor damage at first, and if they are not eliminated in a timely manner, the consequences will be much more serious, and repairs will be more expensive.
Learn more about which stove is better - with a closed or open heater - in the video below.
Rules for successful masonry
The efficient operation of the furnace largely depends on how well the masonry technology was followed. This is influenced by the quality of the bricks, the method of doing the work, the binding solution and the degree of moisture of the material. The result of proper masonry will be a solid structure. An unsatisfactory result is considered to be a structure made without bandaging the joints, separated by vertical lines of seams.
During the work, one important requirement must be met: it is necessary to prevent the gases formed during combustion from escaping to the outside. In addition, air entering the furnace structure is also not welcome.
Careful selection and adjustment of the material will help make the masonry beautiful and durable. It is important that the bricks are split and hewn. Before starting work, the cobblestones need to be soaked in water, lowered into a container for 10 seconds, then laid in a row on a layer of clay.
Craftsmen advise applying the mortar by hand, and using a trowel only when doing external masonry.
The brick laying process is as follows:
- take the block in one hand, grab the clay with the other and apply a thin layer to the brick;
- level the surface;
- place the product in a specific place;
- while pressing on the cobblestone, perform forward and backward movements;
- remove excess mortar on both sides of the masonry with your hands;
- with the next brick, repeat the above steps, in this case it is necessary to apply the solution also to the end of the block, with which it will be pressed against the first one.
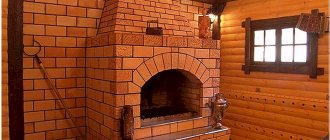
Wood-burning sauna stoves made of brick in St. Petersburg
Dear customers, if you have a desire to have a brick wood-burning sauna stove , then you have come a long way since you have come to understand this. Nowadays there are a huge number of iron and cast iron stoves that are easier to install and much cheaper in price, and it is very difficult for brick sauna stoves . But connoisseurs and those who understand what benefits such a stove will give you have long ago realized that health is the most precious and valuable thing that can be in our lives!
Quite recently I built such a stove for a wood-burning sauna out of brick , and in confirmation of this, my work No. 130. The stove turned out to be interesting, and using its example I will describe all the features of brick sauna stoves . And if, for example, with outdoor barbecue ovens everything is much clearer to customers, then there is no way to do without sorting things out.
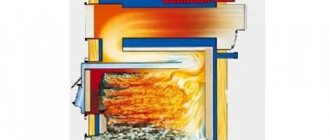
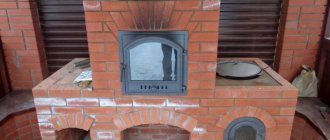
A brick stove with a closed heater, complemented by a hot water tank
This model is the best option for a large private bath. It is designed for alternate bathing procedures for several families.
Brick stove with a closed heater and a side-mounted water tank: 1 - water heating tank; 2 - oven; 3 - chimney; 4 - stones; 5 — heater cover; 6 — hole for water supply; 7 - metal arch; 8—screen; 9— grate; 10— firebox door; 11 - ash door.
The number of stones required for the stove is calculated using the following formula: per 1 cubic meter. m steam room will require about 30 kg of cobblestones. It turns out that for a room with a volume of 10 cubic meters. m will need at least 300 kg of stones. This calculation is only for a brick oven with a periodic operating cycle. If the operating principle of the device is based on constant maintenance of the combustion process, then the mass of stones is reduced by almost 2 times. This is explained by the fact that the process of burning wood maintains the heat of the stones.
Let's consider the option of a reliable and heat-intensive structure - a brick oven with a closed heater. To make the body of the device, a piece of metal pipe is taken, obtained by cutting lengthwise. The parameters of the product are as follows: diameter is 40 cm, length is 60 cm. The stove structure is supplemented by a reservoir for hot water, located in the side of the structure.
Sheets of steel with a thickness of at least 5 mm are welded onto the pipe. They perform a supporting function when placing a piece of a round product inside the stove masonry. To ensure the tightness of the housing, metal sheets are welded to the end of the pipe on both sides. A metal screen is attached to the junction of the chimney with the stove body. It will prevent hot air from escaping through the chimney.
A hot water tank is installed on the side of the stove with a closed heater. Its parameters are 50x37x35 cm, capacity - 45 liters. To make the tank, you can use steel with a thickness of 5 to 10 mm, while the side in contact with the firebox must be made of a ten-millimeter steel sheet.
Inside a stove for a Russian bath with a closed heater, a chimney pipe equipped with a round damper is mounted on the side. At one end the product is installed on a metal tank, while in the brickwork it is fixed using wire clamps.
At the top of the stove structure there is a sauna heater, in which stones weighing up to 200 kg are placed. At the top of the device there is a cover made of galvanized sheet. It can be opened slightly to release moist air. An opening of 20x25 cm is made on the side of the stove, where water splashes onto the stones to generate steam.
The proposed model of furnace equipment is universal: it can operate in both continuous and periodic firing modes. When a stove with a closed heater operates under constant firewood conditions, the mass of stones is halved.
Do-it-yourself sauna stove with a closed heater
Before starting construction work and installing furnace equipment, you should decide on its type and size. The size of the oven depends on the volume of the steam room, the type of bath, and the number of people visiting the establishment.
Installation begins with pouring the foundation. The base is made of cement mortar. Lay at a depth of 50 cm below ground level. The concrete layer is covered with waterproofing. Brickwork is placed on top.
Important! The foundation is required for brick kilns. Miniature factory models can be installed without a foundation. Brick floor protection is required. The requirements are specified in fire safety standards. It is possible to replace the brick base with metal sheets.
The walls of the firebox are mounted at an angle. Burnt wood and coals fall onto the grate at an angle. The grate is mounted in the center under the boiler.
Install the blower door. The element regulates the air supply to the ash pan. Using the door, the burning power of the wood is adjusted.
The ash pan is installed under the grate. Remnants of burnt materials fall into the compartment: ash, coals, garbage.
The water tank, stone grate and coil are placed inside the oven. The stones are laid on top of the grate. The quality and quantity of steam depends on the choice of stones.
Important! The number of stones is taken from the calculation: 1 cubic m of steam room will require 35 kg of stones.
Round or oval stones the size of a fist are suitable for the heater. Form plays an important role. This will allow the steam to penetrate evenly into the room. Gray and black stones are characterized by increased strength and will last longer.
Additionally, to obtain a finely dispersed steam cloud, a steam generator or steam gun is installed.
Installation of the factory model takes less time. There is no need to additionally equip the foundation.
Step-by-step instructions for creating a stove
For work you will need the following materials:
- brick (210 pieces);
- clay, sand;
- 2.5 m of reinforcing rod for grates with a thickness of 30 mm;
- door for the combustion chamber, ash door;
- metal pipe with a diameter of 150 mm and a length of 120 cm;
- asbestos-cement pipe with a diameter of 80 to 130 mm, a length of 250 cm;
- water and gas pipe with a diameter of 300 to 400 mm, length 50 cm;
- steel sheets from 5 to 10 mm thick, 100 cm long;
- 1 sq. m of galvanized sheet metal 1 mm thick.
A small-sized brick heater stove for a bath with an overhead water tank.
Materials for laying a small-sized brick stove - heater:
- brick - 190 pieces;
- clay - 0.08 m3;
- sand - 0.1 m3;
- blower door size 13x14 cm;
- firebox door size 25x21 cm;
- grate measuring 30x20 cm;
- valve size 13x13 cm;
- cast iron or steel plate measuring 47x38 cm;
- water tank measuring 50x50x42 cm;
- steel plates measuring 25x13 cm - 4 pieces;
- steel plate measuring 38×13 cm – 1 piece;
- asbestos cardboard size 50x40 cm;
- pre-furnace metal sheet measuring 50×70 cm.
The construction of a small-sized stove - a heater with a water tank - begins with the construction of a foundation; a description of this stage of construction of the stove is in the entry “foundation for the stove”. Tank volume 35 - 40 liters. The tank is placed on a metal plate next to the stones. Instead of one slab, you can use two slabs measuring 47x38 cm. The thickness of the slabs must be at least 10 mm. The plate material must be heat-resistant. It is best to use cast iron stoves for kitchen stoves. You can use stoves with holes for burners. The slabs can also serve as lids for stone tanks. To quickly heat the stones, steel or cast iron scrap is poured underneath them. To regulate the heating time of water in the tank, asbestos cardboard is inserted between it and the stones. If you need the water to heat up faster, the cardboard is raised. The water tank can be covered with a lid made of roofing steel. In order for the bottom of the furnace to heat up, two channels are made in the rear part of the masonry (see rows 5-9 of the order). The channels are made using steel plates that fit tightly together. The plates are inserted between the masonry bricks. The plate in the 8th row of the masonry is bent and placed between the bricks of the side wall of the furnace. Buttresses are made in the upper part of the furnace. Buttresses serve as additional heat accumulators on the inner surface of chimneys. Buttresses are made in the form of vertical ribs running along the walls of the furnace. Typically, buttresses are made of a quarter of a brick. Flue gases flow from the firebox into the chimney, rise upward, and during their movement give off some of the heat to the walls of the furnace, buttresses and the roof of the furnace. When laying, the joints of bricks of one row must overlap with bricks of another row, that is, the rule of bandaging the seams must be observed. The firebox is made of refractory brick. The rules for laying the firebox are described in more detail in the entry “furnace firebox”. A prerequisite when laying a stove is to ensure that the joints are full and there should be no voids in them. The thickness of the joints should be no more than 5 mm for ordinary bricks, and no more than 3 mm for refractory and refractory bricks. The firebox door consists of a frame and the door itself. The frame usually has holes. Wire is inserted into these holes or legs made of soft steel strip are attached using rivets. Wire or paws are embedded in the masonry seams. Since metal expands when heated, the frame is wrapped with asbestos cord or fabric before installation. This technique will ensure the safety of the masonry. If you do not use asbestos, be sure to leave a gap of 3 - 4 mm wide between the door frame and the bricks. To ensure the strength of the masonry above the firebox door, the masonry in this place is done using the “lock” method.
The remaining doors and frames of the valves are secured in the joints of the masonry with wire with a diameter of 2 mm. The grate is installed with slits along the firebox. The edges of the grating must be at a distance of at least 5 mm from the masonry bricks. The gap is filled with sand. The same gap is left between the slab above the firebox and the masonry. An important part of the stove is the firebox. When using firewood, the minimum width of the firebox is 25 cm (in one brick), the minimum height is 35 cm. As the height of the firebox increases, the fuel combustion conditions improve. It is desirable that it be 40-60 cm depending on the size of the oven. In the lower part of the firebox wall, it is sloping towards the grate so that during combustion the coals settle on the grate. Under the firebox, place at least 1 brick below the firebox door frame, otherwise coals will fall out when the door is opened. It is advisable to make the bottom of the ash pan below the blower door.
Installation rules
The following points apply to installing a sauna stove with a closed heater:
- When planning the design, it is necessary that the door for the combustion chamber is directed towards the exit, and the heater flap - in the other direction.
- Installing a metal stove requires the construction of a concrete base up to 30 cm high. Two rows of bricks are laid on this foundation, which are held together with clay mortar.
- Installation of a metal furnace structure should be carried out on a previously prepared platform measuring 70x70 cm, 20 cm high.
- In the place of the brickwork of the furnace where the pipe will come out, we make a thickening measuring 12 cm.
- All nearby wooden elements and surfaces should be fenced off with thermal insulation material . Asbestos, felt or cardboard are suitable for this purpose. Then you need to apply a layer of clay on top. The pipe located between the ceiling and the roof is treated with plaster and lime mortar.
- The masonry for the pipe must be at least 50 cm high.
- Creating a brick casing - masonry around a metal stove structure - increases fire safety several times. This is especially true for baths built of wood.
DIY making
You can make a metal stove with a closed heater yourself. Making equipment from metal is easier than building a brick structure.
Preparation and design
To better understand how to properly assemble a homemade metal stove and accurately calculate the required amount of consumables, you need to create a drawing. It should indicate the dimensions, location of the water tank, firebox, ash pan and heater.
Materials and tools
Consumables, tools for assembly:
- shovels, concrete mixer;
- sheets of cast iron with a thickness of 10 mm;
- drill with metal drills;
- bolts, nuts, set of keys;
- metal corners;
- grinder with discs;
- set of files;
- boards, bars;
- roofing felt, reinforcement;
- fireclay brick;
- chimney pipes.
Sand and cement are also needed.
Site preparation and foundation construction
Stages of site preparation and foundation construction:
- It is necessary to build a foundation in the first stages of building a bathhouse. Mark the dimensions of the future foundation. It should be 15 cm larger than the stove equipment on each side.
- Use shovels to dig a pit to a depth of 50–80 cm (depending on the freezing point of the soil).
- Place a layer of sand 15–20 cm thick at the bottom of the hole and compact it.
- From boards and bars, put together formwork to a height up to the level of the finished floor in the bathhouse.
- Tie a reinforcing frame from the reinforcement and place it inside the pit.
- Mix the cement mortar and pour it into the hole along the upper level of the formwork.
Scheme of the foundation for the furnace
After 4 weeks, the formwork must be dismantled.
Construction of the foundation
After the cement has hardened, you can begin building the base and assembling the furnace. Main stages:
- Lay out two rows of fireclay bricks.
- Cut metal sheets and corners to the required sizes.
- Connect the cast iron sheets, securing them with bolts and nuts.
- Divide the interior of the oven into 3 compartments. The topmost, middle one is the firebox. It is separated from the heater by a solid cast iron sheet of great thickness. The lowest compartment is the ash pan. There should be a grate between the ash pan and the firebox.
- Secure the doors.
- Connect the chimney.
After assembly, the stove needs to be heated. It's better to do this outside.
Strengthening the base and performing masonry
The stove is a fairly heavy structure, weighing about 100 kilograms. If it is placed on the floor of the bathhouse (sometimes it is even placed on the ground - for this, a hole is made in the floor and a foundation is poured for the stove), then the floorboards require strengthening. For this purpose, metal concrete slabs or at least sheets of iron are used.
Structurally it consists of the following elements:
- chamber for firebox and ash;
- heater (place where stones lie);
- iron water tank;
- chimney base.
The laying is carried out as follows:
- lay the first row of bricks along the perimeter of the future structure;
- in the second row there is room for a door;
- at this stage, install the frame for the door and secure it with wire;
- the third row is erected under a place for the door;
- in the fourth row they place a grate - this is a grate through which air will penetrate;
- in the fifth - they make a chamber for the firebox;
- in the sixth, the door for the combustion chamber is strengthened;
- the seventh and eighth rows are placed taking into account the door;
- ninth - closes the doorway;
- in the tenth they provide space for water tanks;
- the eleventh–nineteenth rows increase the height of the stove;
- From rows 20 to 25 we lay bricks to form a smoke path and block the stove.
Other stove elements
The next stage of work is the construction of the firebox and ash pit. In this case, it is necessary to correctly calculate the dimensions of the firebox, taking into account various factors - fuel for the bath, the presence of a collector for heating water, and so on.
The ash pan, pan and ash pan are needed to collect remaining fuel; they also facilitate the flow of air into the firebox through the grate. To regulate the intensity of firewood combustion, you need a pan or valve. If the bath needs to be heated quickly, then the tray needs to be moved away and then put back in place.
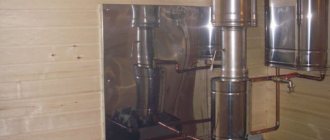
A mandatory element of a heater for a brick bath is a chimney. It first crosses a tank of stones and then goes through a tank of water to be heated. It can be made using ceramic blocks or sandwich pipes and then insulated. The lower part of the structure up to the ceiling is made of steel; when passing through the ceiling pipe, a gate is installed to adjust the draft and improve the degree of combustion.
If the structure is made of a sandwich pipe, then it has two walls, between which there is thermal insulation. Pipes can be installed from the ceiling to the fungus on the roof. To insulate a brick chimney, you need to cover it with basalt mats and secure them with wire. A fungus or umbrella is placed on the structure itself to protect it from precipitation.
Is finishing necessary?
The stove-heater does not require any finishing. But the color of the brick can be further enhanced with a solution of hydrochloric or sulfuric acid, and the stove can also be tiled or plastered.
The layer of plaster is up to 15 mm; for this purpose, compositions based on sand and asbestos with the addition of clay, cement, lime and other elements in different proportions are chosen.
Before finishing, the stove must be heated, then the first layer is wetted and applied to its surface. When it sets, a second one is applied. The wall needs to be rubbed down so that it is perfectly smooth, and when finished it can be painted.
How to choose stones
One of the features of a heater stove is that you need to take special stones for it. Before this they must undergo a special examination. The most acceptable options are porphyrite, crimson quartzite and others.
Many people believe that it is best to choose sea stones for a heater, but in practice it has been proven that river stones withstand high temperatures better, while sea stones are quickly destroyed due to poor strength.
It is necessary not only to choose the right stone itself, but also to choose it correctly in shape and size. The best option would be medium-sized pebbles with a smooth structure. There should be a lot of stones, this directly affects the quality of steam emission and heating of the bath.
When the stove is ready, you should not rush to light it for the first time. If it is not dried well, the masonry may crack. Opening the doors facilitates rapid warm-up. Then the draft is checked - ideally, the stove should not smoke when lighting.
It is quite possible to make a stove-heater with your own hands from bricks, and for experienced people it is not so difficult. Compared to a ready-made solution, this will allow you to feel the real spirit of a Russian bath with its characteristic features.
Do-it-yourself sauna heater stove can be made in 2 types:
- made of brick;
- metal.
Actually, such a stove is called a heater not because it is made of stone, but solely because of the method of pumping steam. The oven heats the stones and by pouring water over the hot stones, the temperature rises. Naturally, both brick and metal stoves have their pros and cons.
Brick oven
Scheme of a stove with a firebox in the dressing room.
Most Russian bath gourmets give their preference to stoves made of brick. Sauna heaters - folded with your own hands give their own unique warmth.
Some of the advantages include:
- These stoves provide even, gradual heating of the steam room.
- The heat lasts for a long time.
- From a fire safety point of view, this is the preferred option.
- Can warm up large rooms.
- The operation of the oven is simple and straightforward.
- A properly built stove will serve you for many years.
Let's talk about the cons:
- The stove has a decent weight and requires a decent foundation.
- May occupy a noticeable area.
- Preheating may require 3 – 4 hours.
We suggest you familiarize yourself with How to treat the inside of a timber bathhouse
Metal oven
Factory made metal heater.
- Takes up little space.
- It is lightweight and does not require a capital foundation.
- Warms up the steam room to the desired temperature in 1 hour.
- The price of the most budget samples is quite affordable.
Disadvantages of a metal heater.
- The heat is distributed chaotically and the structure quickly cools down.
- Used only for small steam rooms.
- The structures are considered fire hazardous.
When choosing a stove for a sauna heater built with your own hands, it is naturally better to give preference to the brick version, which is what we will talk about now.
One of the furnace design options.
Choosing the right stones
It is not enough to simply put the stones in the oven - in order for them to last really long, it is necessary to carry out minimal care.
To obtain soft, high-quality steam, it is important to choose not only the stove itself, but also the stones. The latter should heat up easily and evenly and not crack during sudden temperature changes. Another important indicator is heat capacity - the ability of a cooling stone to give off heat for a long time.
It is believed that it is better to choose dark shades of stones for a sauna stove; the optimal size is the size of a human fist. The rounded shape of the stones ensures unhindered exit of exhaust gases. The stones do not have to be the same size, but the largest ones should be placed at the bottom of the heater, and the smaller ones at the top.
The most budget-friendly and suitable option is river cobblestone polished with water. Stones from volcanic rocks, collected in environmentally friendly places and containing various substances beneficial to health, have also proven themselves to be excellent. They are characterized by a dense structure, have a high specific gravity, heat up evenly and quickly and are characterized by equal thermal expansion in all directions.
An excellent choice for a bath are the following types of stones:
- diabase and gabbro-diabase,
- crimson quartzite,
- quartzite,
- jade,
- blows,
- Soapstone chlorite
It is not enough to simply put the stones in the oven - in order for them to last really long, it is necessary to carry out minimal care. If you use the sauna intensively, you need to remove the stones at least once every few months, replace the ones with cracks and chips with intact ones, wash them thoroughly and dry them.
Features and model line of the Teplodar brand
Today, the Russian market offers a wide selection of sauna stoves, the design of which includes a closed firebox. The company's product range includes a variety of models of similar devices, the most popular being “Laguna” and “Kuban”.
Laguna series of stoves
Stove for baths and saunas Laguna 12 TK
The Laguna series includes several sauna stoves with a vertically positioned closed heater. Models differ from each other in such a parameter as the volume of the steam room for which they are intended to warm up. The greatest demand is for 12 TK, designed for heating steam rooms with a volume of 6-12 m3.
Firewood is used as fuel, and the size of the firebox allows the use of logs up to 40 cm long. The weight of 12 TK is only 58 kg, of which 17 kg weigh directly from the stones, so there is no need to equip the foundation.
The stove is equipped with a chimney with a pipe diameter of 11.5 cm. Water is supplied to the stones using a special device, which is very convenient and safe.
The body and firebox of such stoves are made of high-quality sheet steel, and the panoramic door is made of heat-resistant glass.
Series of stoves "Kuban"
Bath and sauna stove Kuban-Panorama 20L The
Kuban series of bath stoves includes combined models that operate not only on solid fuel, but also on gas. In addition, an equally important point is the combination of two types of heaters in one device - closed and open. As a result, the stoves in this line organically combine the advantages of the two varieties, minimizing some of their inherent disadvantages.
Among the wood-burning stoves of the Kuban series, the 20L model stands out, designed for a steam room of a fairly large volume - up to 20 cubic meters. m. Its design includes a convection heating mechanism, and the body is made of high-strength stainless steel. In the manufacture of the firebox, high-alloy steel is used, which contains up to 13% chromium, and for the parts of the furnace that are most exposed to thermal effects, steel is used, which contains up to 17% chromium. The warranty for this stove is 3 years.
The Kuban 20L gas stove differs from its wood-burning counterpart in the ability to install an automatic gas burner (AGG 26P). Otherwise, the design almost completely repeats the model described above. The main advantage of the Kuban 20L AGG 26P stove is the use of gas, which is quite rightly considered the most economical type of fuel. Other advantages of a gas stove are the simple and convenient control mode of the device, which automatically maintains the desired temperature, as well as the absence of ash generated during fuel combustion.
Other stove options
Some models combine open and closed heaters in their design and allow you to obtain light steam of excellent quality.
A distinctive feature of the Siesta series of stoves is that they can be used not only for a bath, but also as a home fireplace. A large panoramic glass makes it possible to observe the play of flames in the firebox, which creates a special atmosphere. This oven can also be used for barbecuing. Thanks to the “Anti-smoke” option, patented by the manufacturer in Russia, the stove does not smoke even when the door is open.
The device is highly powerful; with its help you can not only heat up the steam room, but also heat the rest room and even the second floor of the bathhouse building. Thus, one such stove is enough to heat the entire building.
The Kuzbass Optima series stoves combine open and closed heaters in their design and produce light steam of excellent quality. To supply water, a built-in dispenser is used, which is located on a decorative frame.
Characteristics of cast iron stoves
A cast iron stove is more productive, accumulates heat better, and lasts longer.
For a sauna, stoves made of cast iron are best suited. This alloy has the positive properties inherent in steel and brick. Cast iron hearths have high thermal conductivity and heat up quickly. Due to its thickness and crystalline structure, the metal is able to retain heat for a long time. It is not afraid of high temperatures when burning wood; there is no need to worry about the product melting and cracks appearing on it.
The disadvantage is that iron has a specific smell and you can get a severe burn from touching it. To make a cast-iron hearth safer, it is lined with decorative material in which vents are made. Only the top and the space to open the door are left open.
Brick products also have their own nuances, strengths and weaknesses. The material has low thermal conductivity, but accumulates heat well, distributing it evenly throughout the entire volume of the room. You may experience pain from touching a brick, but there will be no burn. The downside is that the masonry takes up a lot of space, which cannot be allocated in a small steam room.
The optimal solution is to combine materials. The metal can be embedded in an order, the brick is placed inside the firebox or outside the hearth.
Masonry mortar
For laying fireclay bricks, a mortar prepared from white fireclay clay is used. You can also purchase a ready-made composition for laying fireclay. You cannot place the entire oven on this solution. Why? This solution is sintered into a monolith at a temperature of 700–800°C. There are no such temperatures in external masonry. Therefore, after a short time it will crack and spill out, which will lead to the destruction of the masonry.
For external masonry, a solution of quartz sand and clay is used in a ratio of 1 (clay) : 5 (sand). The sand must be of river origin or quarry. River sand is somewhat worse, since its grains of sand are round and round, and the solution itself will have worse characteristics. Therefore, preference is given to quarry sand. The sand is sifted through a mesh with cells of 2–2.5 mm. This will prevent large particles from getting into the solution.
As for clay, it can also be obtained from a quarry from a depth of at least two meters. The quality of the clay should be checked. To do this, soak 200 g of clay in water for a day. Then roll the clay into a “bun” and leave it to dry under a canopy in the open air. After 2 days, drop it onto a stone slab from a height of 170 cm. If the “bun” has crumbled into several large parts, then clay is suitable.
Brick heater for a bath: materials
It is clear that for the construction of the stove the main materials will be brick and mortar . accessories are also required , which must be purchased in advance.
In particular, these will be:
- fire door;
- ash door;
- heater door;
- grate;
- sockets and vents (for trenches and heating pipes).
Separate publications are devoted to stoves made entirely of metal, in particular cast iron.
sealed doors on sale , but they are usually installed on stoves that use coal as fuel.
Since the dimensions of a standard brick are known, the height of the doors can be measured as a multiple of the height of one row, taking into account the seam - this is 7 cm . A regular furnace door is most often made equal to four rows - 28 cm, and a blower door - two rows - 14 cm. If the blower door is one and a half rows long, you will have unnecessary complications, take a 14 cm one.
Returning to the doors.
The best material for them remains cast iron . The fact is that steel “leads” under constant thermal load , it loses its shape, and this leads to the need to replace failed parts.
Cast iron is more resistant in this regard. But if you choose a combustion door based on design features, we advise you to pay attention to models that have an additional metal screen welded to the inside of the door - it is responsible for reducing the temperature outside the door.
The firebox door can also be glazed, which is fashionable these days (see here about fireplace stoves). But in this case, do not forget that without one or another glass self-cleaning system, it dooms you to a constant struggle with soot that blocks your view. It is also possible to improve the oven using a portal.
As for water tanks, it is not recommended to use materials such as black and galvanized steel . Instead, opt for either tinned copper or stainless steel .
What do stove makers say about brick ? They say that in our time there is no alternative to red, full-bodied, made by wet pressing . Of course - with the correct geometry, without changes in color, indicating non-uniform firing. And also loud, like metal, sounding when you hit it. Under-burning is manifested by pallor of color, and over-burning can only be seen at the fracture - there will be areas of blue-black color.
Sometimes you can read that the frost resistance of a brick is important only for a chimney. Not at all. For the firebox and for the pipe, you need to take material that has at least 30 cycles, and if it’s more, it’s better.
As for the pipe, from the moment it passes the roof, it is better to cover it with clinker bricks , but you also need to know how to choose it. The reason is increased frost resistance - 70 or more cycles.
Attention! Clinker is not suitable for laying the stove itself, because it has weak adhesion to the mortar - it does not take water.
Fireclay bricks are used only to construct the fuel core , which can also be considered as the lining of the firebox. In the case we described, the lining was also made for the heater.
Important! Red brick is placed on a regular mortar of clay and sand, and fireclay brick is placed on a mixture of fireclay with fireclay chips. Pipe above roof level - mortar without clay, cement-sand or cement, sand, lime.
For one part of clay, take from 1 to 6 parts of sand , but it all depends on the fat content of the clay itself; the more it crumbles when drying, the less sand it needs. Oily clay does not crumble, it cracks. A normal solution does not crack, and if it crumbles, it will only be along the edge. Usually, to calculate the proportion, samples are made with different proportions of sand and dried.
Advice! If possible, take quarry or mountain sand - it is the best.
The bricks are counted simply: according to the masonry drawings, and the height of one row with mortar is 7 cm. When lining a pipe, the number of bricks in a row is also multiplied by the number of rows in height, plus 50 pieces for fluff (fire expansion) and 70 for the head and otter. All that remains is to calculate the number of cubic meters, but this is also simple: we proceed from the fact that there are 420 bricks in one cube. When purchasing, you should add another 10% on top of the amount received.
Pros and cons of brick sauna stoves
In favor of a brick oven, it is worth highlighting the following:
- Environmentally friendly raw materials, which is safe for health.
- Long service life. It can last up to 100 years or more.
- Wear resistance and strength of the material.
- The ability to retain and release heat for a long time. The water in the tank, heated in the evening, will be warm until the morning.
- The steam produced is of good quality.
- Combustion products do not pass through the inner heater.
- The stove is capable of heating large rooms.
- Brick is a fireproof material.
Among the disadvantages, users note that:
- It will not be possible to build a structure quickly and without experience. Here you need to correctly draw up a drawing, carry out calculations, and understand the principles of brickwork.
- The oven is heavy. Therefore, a reliable foundation must be poured under it.
- The design takes a long time to heat up compared to its metal counterpart.
- Prolonged heating entails increased consumption of wood fuel.
- High cost of work (if ordered from a stove maker). Large amounts of money spent on purchasing materials.
Despite so many shortcomings, the advantages of the design are much more significant, which is why the demand for the construction of a brick oven with a water tank is only growing.
Covering a metal stove
How to cover a metal stove in a bathhouse? What can it be coated with? How to properly line a sauna stove? These questions certainly arise for those wishing to do this work. You can begin lining only after choosing a suitable material and preparing the bathhouse space for lining the installed iron stove with bricks. You can line the stove in the bathhouse with the remains of brick after finishing masonry work. This could be a brick:
Types of refractory bricks.
- silicate white;
- fireclay fireproof;
- hollow red;
- ceramic solid.
Sand-lime brick is quite suitable for work. Covering a sauna stove with it lasts a long time if the solution is mixed using slaked lime. But in bathhouse conditions there is a lot of dampness, from the influence of which this material quickly collapses.
Fireclay stone is suitable for constructing a heat shield. It is not afraid of high temperatures and weighs almost the same as its red counterpart. But its appearance leaves much to be desired.
It is better to use the ceramic option. The weight of a solid product ranges from 3.3-3.6 kg, a hollow one weighs 2.3-2.5 kg. The hollow version cools down much earlier than the solid one.
Figures 1, 2. Finishing of metal stoves with different types of bricks: red solid and ceramic solid.
An iron heating installation can be correctly lined with standard materials with dimensions of 250x120x65 cm. A one-and-a-half format with a thickness of 88 mm is allowed. The lining of a metal furnace is usually made of half a brick. You can use granite or marble slabs if you have them on the farm. With their help you can achieve a unique style in the interior of the bathhouse. But the installation of these slabs is more difficult; you need to invite a specialist.
It’s clear what kind of brick to line a sauna stove with. Red solid (Fig. 1) or ceramic solid (Fig. 2) bricks are most suitable for this purpose.
An ordinary solution based on clay and sand is recommended as a binder. It is allowed to add M400 cement in an amount of 20% of the total mass of the solution. This additive will not cause any harm to the masonry; it will only increase the strength of the wall. The clay needs to be clean. You can buy it in a store and soak it in clean water for several days. After complete soaking, it is rubbed through a special sieve. The sand is sifted and mixed with clay. Take 1 part sand for 1 part clay. Everything is thoroughly mixed and water is added. The solution is mixed to the consistency of thick sour cream. When working, it should roll well from the trowel.
The finishing of the stove significantly makes its structure heavier. It is recommended to make a brick foundation to remove the load from the floor. To do this, you will have to dismantle the stove and cut out the floor. A hole is dug in the ground, about 30 cm deep. It needs to be filled half with crushed stone, the rest of it needs to be concreted. After the foundation has completely hardened, its top is leveled. If the floor is good and lies on strong joists, you can mount everything directly on it. Only under the heating installation is placed a sheet of asbestos cardboard, on top of which is approximately the same sheet of steel. Under the sheets you need to lay waterproofing made of roofing felt. Sheets of steel or asbestos cardboard can easily replace 2 rows of bricks.
Figures 3-4. Options for lining a stove with bricks.
During work, the following rules should be followed:
- the sheathing is laid with bricks tied together;
- there should be no connection with the walls of the bathhouse;
- the thickness of the seams is 5-7 mm;
- in the lower rows several passages are made for cold air (2-3 pcs.);
- holes are made at the top of the masonry to allow hot air to escape;
- each row of bricks is checked with a plumb line and level;
- the remaining solution must be removed from the wall, especially from the inside;
- the convection hood (if included) should be removed.
After the finishing is completely done, you can cover the walls with tiles or tiles. The heater is sometimes left open (Fig. 3). This makes it possible to add or completely replace stones at any time. In other cases, they try to cover the entire structure with bricks along with the chimney (Fig. 4).
Test firing of the furnace
Test firing of the sauna stove from the dressing room is very important. It is at this stage that the results of your work and all the miscalculations that could come out are immediately visible.
For a test fire, you need to light the stove at full load for 2 hours. Then it is worth checking individual elements of the structure for heat resistance.
The following standards should be adhered to:
- all elements should not overheat, much less glow;
- the traction must be strong;
- the stove should not smoke much;
- The oven should heat up evenly.
If everything went well and you did not notice any failures, you can safely use the oven for its intended purpose.
Advantages and disadvantages of a brick kiln
No matter how profitable and easy to use metal stoves are, owners with worldly experience prefer proven brick structures. A brick sauna stove has the following advantages:
- Heat capacity
. The stove is capable of retaining heat for 6-8 hours and heating several rooms (depending on location).
- Energy independence
. A wood-burning stove is an ideal option if there is no gas supply and there are power outages.
- Operating savings
. There is no need to install a gas pipe or run wiring and then pay bills. Firewood will cost much less (especially if you prepare it yourself).
- Comfort
. Such stoves produce rich, but not scalding (light) steam and soft heat. The atmosphere of the steam room does not make breathing difficult and is ideal for those who like to steam frequently and tastefully.
Compact brick structureSource tproekt.com
- Environmental friendliness
. Both the brick from which the stove is made and the firewood are environmentally friendly materials that are safe for health.
- Design
. There are real masterpieces of stove art with stunning architecture and design.
- Fire safety
. Provided with design features that fully comply with SP 7.13130-2013.
Brick kilns are inferior to other designs due to disadvantages:
- Difficulties in execution
. The masonry process has nuances, and it is not easy to find a competent stove maker.
- Size
. A large stove eats up precious steam room space.
- Price
. The pleasure of making bricks is not cheap: you need to build a foundation, purchase high-quality bricks and pay for the services of a craftsman.
- Time
. The stove heats up, and the steam room takes a long time to heat up.
- Care
. Systematic cleaning of the ash pan and periodic cleaning of the chimney are required.
A brick oven emits soft heat, making it as comfortable as possible for a person. Source tutknow.ru
Oven screen options
It is recommended to line the sauna stove with half a brick; this is the best option. If the screen is made as thick as a brick, it will take a long time to heat up. In addition, a foundation will have to be built for such masonry. If you resort to a quarter-brick design, the bathhouse room will warm up quickly, but the radiation will be harsh. Regardless of the thickness of the masonry, the distance between the surface of the metal stove and the wall varies in the range of up to 10 cm.
The screens can be a solid structure with ventilation windows, while the chimney is often also made of brick. Another solution is possible: to cover only certain elements of the furnace.
As for decor, there are many different options. The neatly executed masonry itself looks quite beautiful. The color of the red brick contributes to the design of the stove structure. At the owner's request, the bath stove can be faced with porcelain stoneware, decorative brick, natural stone, and tiles. The choice is a matter of taste and the costs planned for these purposes.
How to build a stove with an open heater in a bathhouse
The design of a stove with an open type of heater is simple to implement. Its dimensions are 102 by 62 cm. This is enough to obtain a functional family steam room with steam and heat in nine square meters of bathhouse.
In this embodiment, lining is not performed, so the stove is built from high-quality M150 brick, achieving very thin seams.
This option is not expensive, but also short-lived - the seams are restored every two years, lubricating them with fresh mortar. The stones are placed on a slab located above the furnace firebox. The stove can be metal or cast iron.
This furnace has two design options:
- with a remote container or located at the top;
- with water heating from a pipe laid through the firebox.
Each construction process begins with preparatory work.
Since a brick stove weighs more than 500 kilograms, and during its operation the bathhouse floor may sag, it is necessary to build a foundation for the device.
Foundation
Step-by-step instructions for constructing a foundation for a furnace:
- Knowing the dimensions of the oven, they draw markings on the ground with a margin of half a brick.
- Dig a pit with a depth of 0.5 to one meter.
- Avoid being too close to the base of the bathhouse itself. If the ground moves, friction will become a destructive force for the stove and the bathhouse itself. A distance of 5 centimeters is allowed. Upon completion of the work, the gaps are sealed with river sand.
- The bottom of the pit is leveled and compacted.
- The choice of binding solution is dictated by the quality of the soil: if it is dry, then prepare a lime-cement mortar (6:1) with a certain amount of river sand. To prepare a lime binder mixture, sand and lime are mixed (2:1). Cement mortar is made by mixing sand and cement (3:1).
- 10 centimeters of sand and crushed stone are placed alternately at the bottom of the pit. Then they are compacted.
- Waterproofing material is placed on top, placing the film higher on the walls.
- Pour the mixture into the pit and leave until completely hardened. This will take about a week.
- After the surface has hardened, a freshly prepared liquid solution is poured onto it, which will spread strictly horizontally.
The stage of laying the furnace begins after 14 days, when the base of the furnace is completely dry. The solution is prepared from lime, clay and sand (1:1:4).
Building a brick oven with your own hands
The fuel part is lined with refractory bricks and equipped with a grate, the rest is made of ordinary red brick.
The masonry of all sauna stoves has the same technology, but in each case the seams are made responsibly. The tightness of the seams is the key to preventing harmful carbon monoxide from entering the room.
Work order:
- Before laying the furnace, a waterproofing sheet made of roofing material is placed on the prepared base in two layers measuring 5 centimeters larger than the dimensions of the foundation.
- To prevent the brick from drawing moisture out of the binder mixture, it is saturated with water before use, immersed in it for 1-3 minutes.
- Prepare a homogeneous and viscous masonry mortar from sand and clay, taken in equal quantities.
- The mortar is placed on the entire plane of the brick in a thin layer to create a sealed, filled joint of no more than 3 mm. Three-millimeter wire guides between the planes will ensure a high-quality seam. After pressing, the wire is removed and excess mixture is removed from both sides.
- When completing each row of the furnace, check the angle values.
- Bandaging (displacement) of bricks in the next new row is required.
Important! You cannot use heat-resistant and ordinary bricks next to each other, since the different heat capacities of these materials threaten the rapid destruction of the furnace.
Recommendations
Important points:
- Constantly monitor dressing rules.
- The thickness of the solution layer is about 10 mm.
- Seal the seams of the oven to ensure tightness.
- Check the horizontal and vertical levels every two rows.
- It is permissible to use a cement mixture when laying the bottom line; the temperature below is not too high, and the cement will strengthen the structure itself and protect the furnace from moisture.
- After laying two lines, install a blower and continue continuous laying.
- After erecting the walls of the blower, install the door and cover it with a grate, which will be the bottom of the firebox.
- Provide an ash pit (mobile or stationary).
- Build a combustion chamber 0.6 meters high. This is enough to create the highest possible temperature at the top of the flame.
- The required furnace firing depth is 80 cm.
- The dimensions of the space for stone backfill for the bathhouse are determined at the rate of 60 kg for each square meter of the steam room.
At the next stage, the fittings are installed: hinges, grilles, doors. When installing the doors, pieces of two-millimeter wire are placed in the seams. Continue laying from the door.
With or without a blower?
Now about the blower. If a brick stove is being built for a bathhouse, is there a need for a vent in it? Let us first explain what a blower is. This is a kind of channel that brings air under the grate, and through it into the firebox, supplying the fuel with the oxygen necessary for its combustion. A door is used to regulate the intensity of air flow (draft).
The draft exists when there are two openings - at the bottom of the stove and at the top of the chimney. Therefore, their sizes are related to each other. In addition, there is a certain relationship between the volume of the firebox and the draft - if the draft is too strong, the wood will burn quickly and at a higher temperature.
When installing a brick stove for a bathhouse, you can abandon the ash pan and lay out a blank floor. This doesn't mean you won't have any cravings at all. It will be due to the slightly open fire door. In principle, the stove will work, but the dimensions of the combustion door are large enough to allow fine adjustment of the air supply. At the same time, the efficiency of the stove becomes lower than it could be.
But this is not the only argument against a blind hearth. A big punishment for the owners will be the danger of burning coals falling out when the door is open, as well as the need to frequently work with a poker, because the firewood never burns out completely. Upon completion of the combustion process, you will still need to pull out the firebrands and immediately extinguish them in a bucket of water.
If we talk about the sufficient dimensions of the grate and the cross-section of the chimney pipe, then both can be approximately equal to the area of one standard brick. This is enough for normal traction.
A separate publication is devoted to tips on choosing the size of the oven.
By the way! The draft will be better if the blower is located low. For example, you can start laying it out from the second row.