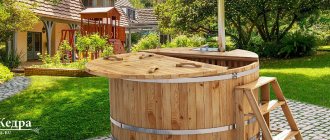
One of the most popular buildings in suburban areas is the bathhouse, which in our country has long been used not only for hygiene procedures, but also as a place of relaxation. The abundance of materials available on the construction market allows you to build a utility block with a bathhouse and toilet with your own hands. Moreover, such a structure will turn out to be much cheaper than when a bathhouse is built by specialists hired from outside. A distinctive feature of bathhouses with a terrace is the possibility of expanding their functionality through additional extensions.
Project of a utility block made of timber with a bathhouse and a woodshed under one roof
Under one roof there can be a garage, as well as a bathhouse with a utility room, which will serve as a utility room, warehouse or storage room.
Bathhouse projects
Number of projects 681
- 1 room
- 1 bathroom
Project of log bathhouse 4x6 m
- To favorites
- 60² Total area
- 6 x 4m Construction area
from 225,000 rub.
Construction time individually
- 1 room
- 2 bathrooms
Project Baths 5B-B
- To favorites
- 18.55² Total area
- 5 x 5m Building area
from RUB 300,159
Construction period 17 days
- 1 room
- 2 bathrooms
Project Baths Mercury
- To favorites
- 37² Total area
- 8 x 7m Construction area
from 499,500 rub.
Construction period 27 days
- 1 room
- 2 bathrooms
Bath Rafaella project
- To favorites
- 84² Total area
- 10 x 7m Construction area
from 1,134,000 rub.
Construction period 40 days
- 2 rooms
- 2 bathrooms
Project AS-2272
- To favorites
- 79² Total area
from 1,066,500 rub.
Construction time individually
Project of Log House Baths 4x5 m
- To favorites
- 20² Total area
- 4 x 5m Building area
from 245,000 rub.
Construction time individually
- 1 room
- 1 bathroom
Bani Anapa-5 project
- To favorites
- 30² Total area
- 6 x 6m Construction area
from 405,000 rub.
Construction time individually
- 1 room
- 1 bathroom
Antalya Baths Project
- To favorites
- 74.5² Total area
- 11 x 11m Construction area
from 1,005,750 rub.
Construction period 40 days
- 1 bathroom
Sanduny Baths-2 project
- To favorites
- 48² Total area
- 6 x 9m Construction area
from 587,012 rub.
Construction time individually
- 5 rooms
- 3 bathrooms
Bani Opus Project
- To favorites
- 159² Total area
- 13 x 10m Construction area
from 2,146,500 rub.
Construction time 82 days
Quad bathhouse project "Mega-2"
- To favorites
- 2 x 5m Building area
from 244,900 rub.
Construction time 1 day
- 1 room
- 1 bathroom
Bathhouse project No. 25-11
- To favorites
- 19.26² Total area
- 4 x 5m Building area
from 260,010 rub.
Construction time individually
- 1 room
- 2 bathrooms
Bathhouse project "Anthea"
- To favorites
- 43.2² Total area
- 8 x 7m Construction area
from 1,030,000 rub.
Construction time individually
- 1 room
- 1 bathroom
Bathhouse Ivanovo project
- To favorites
- 93² Total area
- 9 x 9m Construction area
from 1,255,500 rub.
Construction period 52 days
- 1 bathroom
Barrel sauna project 6m
- To favorites
- 13.2² Total area
- 6 x 2m Building area
from 259,000 rub.
Construction time individually
- 3 rooms
- 2 bathrooms
Bathhouse Parkhochevo project
- To favorites
- 146² Total area
- 9 x 12m Construction area
from 3,500,000 rub.
Construction time individually
- 1 room
- 1 bathroom
Project of a garden house-bath "Sanduny"
- To favorites
- 24.2² Total area
- 6 x 5m Construction area
from 326,700 rub.
Construction time individually
Project Hozblok made of timber “Light”
- To favorites
- 18² Total area
- 6 x 3m Building area
from RUB 143,550
Construction time 1 day
- 2 bathrooms
Bani South project
- To favorites
- 62² Total area
- 9 x 8m Construction area
from 994,000 rub.
Construction time individually
- 1 room
- 2 bathrooms
Bani Cricket 2 project
- To favorites
- 62.68² Total area
- 6 x 9m Construction area
from 846,180 rub.
Construction period 38 days
View all projects
Such a building at the dacha can combine the cost-effectiveness of using the territory of the dacha with the comfort of a high-quality bathhouse. There are projects in this area that require different amounts of costs. After reading this article, you will be able to reasonably choose a design for a bathhouse with a utility unit under one roof.
Bathhouse with utility room under one roof Source vladimir.cian.ru
Bathhouse and barn under one roof - combining business with pleasure
Bathhouse made of timber 6 by 6
A typical design of a 6x6m bathhouse made of profiled timber, with a 2x2m terrace. Convenient layout with a steam room, washing room and relaxation room of 12 square meters. The utility room can be used as a woodshed or workshop. Additionally, we install a stove and foundation. The price is indicated taking into account assembly at your site and taking into account delivery to Moscow and St. Petersburg.
Cost of the bath
- timber 100x150mm – RUB 365,300
- timber 150x150mm – 410,100 rub.
- timber 200x150mm – 463,000 rub.
To discuss order details
Your application is accepted. Expect a call.
Captcha entered incorrectly
3500r/per pile
6000r/per pile
3000r/per linear meter
The exact cost of the foundation is determined after our specialist visits the site to determine the composition of the soil!
- Delivery 30 km from Moscow or St. Petersburg,
- Assembly at your site,
Material of main walls and partitions:
- The main walls of the bathhouse are profiled timber (“straight”/“rounded”), natural humidity
- Sauna partitions – profiled timber, natural humidity
- The bathhouse frame is assembled using metal dowels (nail 200mm) in a warm corner
- Inter-crown flax-jute insulation is laid between the crowns of the main walls
- Height from floor to ceiling – 2.2 m (16 crowns)
Power structures:
- The base of the bathhouse is made of 150x150mm timber, in two rows
- The floor joists are made of 40x150mm timber, pitch – 600mm
- Rafter system made of 40x100mm timber. Rafter pitch – 600mm
- The subfloor is made from edged boards 20x100mm
- The roof sheathing is not continuous and is made from edged boards 20x100mm
Interior finishing:
- The floor and ceiling of the bathhouse are insulated with rolled mineral wool, 100 mm thick.
- Steam-waterproofing of floor and ceiling: “Isospan” film or analogues
- The ceiling is hemmed with coniferous lining, chamber drying
- Finishing nails are used for interior finishing
- The main walls and partitions of the bathhouse are not finished from the inside
- Floor (tongue and groove) board – 36mm, mounted on nails
- The corners of the bathhouse premises are finished with curved softwood plinths
All finishing materials are chamber dried!
Exterior finish:
- The walls of the log bathhouse are not finished from the outside
- The gables are upholstered with softwood lining, natural humidity
- The corners of the bathhouse, overhangs and cornices are finished with softwood lining
Finishing window and door openings:
- Wooden windows, double glazing
- Entrance door – metal
- Interior – wooden, installed on hinges, without fittings
- Window and door openings are trimmed with platband
- “Rock” casing bars are installed in all window and door openings
Finishing the terrace, if the project includes it:
- The ceiling is hemmed with coniferous lining, chamber drying
- Floor – flooring (tongue and groove) board, 36mm thick, chamber drying, mounted on nails, floors are installed with a gap of 0.5 cm, through each board
- Railings – planed timber 40x100mm
- Support columns made of planed timber with shrinkage compensators
Finishing of steam and washing compartments:
- Two-tier aspen shelves are installed in the steam room
- The steam room is lined with aspen lining around the entire perimeter
- Foil around the perimeter is used as a vapor barrier.
- In the washing compartment, the floors are installed at an angle to the drain with a corrugated hose for draining wastewater.
- Roofing – Ondulin, color to choose from – red, brown, green
- Waterproofing (wind protection) is installed under the roof - “Isospan A”
- Ventilation grilles are installed on the gables
- The passage has steps
It is possible to make any changes to the current configuration and layout of the bathhouse - the location of windows, doors and partitions, replacement of materials (roofing, windows, insulation, floor finishing, steam room, etc.). In our catalog there are many projects for baths made of timber on one floor, of different areas and sizes, ready-made solutions with a steam room, washing room, room (bedroom) on the first floor and projects for winter use with a warm toilet and vestibule.
Payment order
We accept cash or non-cash payments. The cost of construction is fixed in the contract and remains unchanged during the validity of the contract, payment is made in rubles, in stages.
- 70% – you pay when we start working (when the material is delivered and the builders arrive)
- 30% – upon completion of work upon signing the Acceptance Certificate
- Foundation and communications are paid separately, upon completion
Requirements for the construction site
- Accommodation for builders. If there is no accommodation, then it is possible to purchase a 2x3m change house from us; after construction, the change house remains with you. Price – 15,000 rubles
- Electricity – socket of at least 3.0 kW. If there is no electricity on the site, then it is possible to rent an electric generator for the entire construction period. Price – 8,000 rubles fuel and lubricants
- Drinking water and toilet for workers' living conditions.
A team of builders consisting of 2-3 people carries out the construction of a bathhouse within 15-20 days.
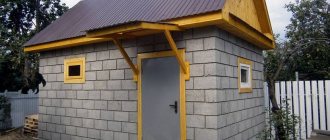
One-story bathhouse made of 6 by 6 timber (B-12) Project of a one-story timber bathhouse for a summer house with a utility room for firewood, equipment or tools from SK Drevo, we build without prepayment, order a wooden bathhouse with a guarantee, screw foundation and stove
A bathhouse combined with an outbuilding or a garage can often be found on country or garden plots.
Such a structure allows you to save the available free space of a small plot, combining the functions of a bathhouse, kitchen, pantry, garage and other indispensable premises in everyday life.
Today, there are many ready-made projects for bathhouses combined with utility units, differing in size, materials used in construction, number of interior spaces and, of course, cost. The most rational option for a small area is the corner location of the bathhouse, which allows you to combine both a utility block and a garage in one building. The combination of buildings with different purposes under one roof undoubtedly has its advantages.
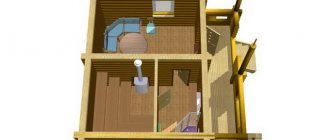
Typically, a construction project involves dividing a combined building into several rooms isolated from each other with separate entrances and is located in the letter G. On the short side of the structure there is the bathhouse itself with all the necessary premises - a relaxation room, a washing room, a steam room, a shower. The specific location of the rooms is determined individually, but in most cases, the window of the relaxation room and the entrance to the bathhouse overlook a kind of corner terrace.
On the long side of the building there is an entrance to a utility block, which can serve as a small home workshop, woodshed, summer kitchen or barn. Depending on the location and ease of entry to the site, two options for placing the garage are possible: at the end of the long side of the structure or next to the entrance to the utility block.
Developing an individual bathhouse project with a garage and utility unit is much more difficult than designing a regular bathhouse. The difficulties are explained by the fact that the project must provide for and take into account a huge number of requirements imposed simultaneously on all buildings for various purposes located under one roof. When combining a bathhouse and a utility room under one roof, the project includes:
- indoor passages,
- heat exchange networks,
- water supply system,
- roof structure,
- safety of using separate rooms.
To prevent atmospheric moisture from entering the premises, the occurrence of dampness and the appearance of fungi, the roof of a combined building must be common. The materials used for interior wall decoration must ensure the simultaneous safe use of both the bathhouse and the utility room. Entrances to rooms with different purposes must be provided separately, which does not exclude the possibility of creating internal passages.
Depending on the purpose of the utility department, it is necessary to provide a system for supplying cold water to the bathhouse premises and its drainage. If it is planned to have a toilet in the combined bathhouse, a septic tank should also be provided. When using a bathhouse in a dacha or garden in the winter, you cannot do without insulating sewer and water communications, building a heating system, which will also not be superfluous in the garage and in the utility room.
The issue of saving space in a small summer cottage is relevant, so the owners try not to overload it with unnecessary structures and utility rooms.
Most developers have their own transport, which they use to travel to the countryside. To have peace of mind about your car, you will need to build a garage. But why settle for a banal rectangular design.
The bathhouse garage will not only serve as a vehicle storage facility, but will also allow you to have a good time and enjoy relaxing in your own yard.
The construction of any premises begins with a design plan, and the construction of a bathhouse with a garage under one roof is no exception. When planning a combined room, you need to carefully consider all the nuances: the size of the bathhouse, the internal arrangement of the rooms, the placement of the structure on the site, the exact area of the territory being developed. These criteria play an important role in the functionality of the premises and the convenience of the constructed complex.
There are several options for executing the project plan:
- search for finished works in open Internet sources,
- purchasing a project from design bureaus,
- ordering an individual project plan from a qualified architect,
- independent drawing (subject to compliance with all architectural and construction standards and availability of basic skills).
If the choice is made on a finished drawing, but the owner does not like certain parameters, the project can always be corrected. With proper design of the building, a structure with minimal dimensions can be equipped with household premises, in particular, a barn with a utility block where firewood will be stored.
Regardless of the amount of space on the site, the layout of future construction takes into account the side of the gate through which entry from the road is made. Otherwise, the entrance to the new building will be on the wrong side, and the owner will have to constantly walk around the building, which is impractical.
What is a bathhouse with a utility block
First of all, you need to figure out what exactly we are talking about here.
When people talk about a bathhouse, they usually mean a room where you can wash yourself. In a minimal version, we can talk about one soul here. But in order to make a bathhouse in which it is convenient to wash, you will need to add a few more rooms:
- Often a steam room is installed along with a shower .
- It will be convenient if there is a toilet in the same building .
- You can relax after washing.
- Some provide a small swimming pool in a separate room of this building.
What a utility block is not formally defined. In most cases, we are talking about a room where various tools are stored. However, it is possible to arrange premises of a different type here, in accordance with the owner’s plans. For example, you can set up a workshop or equip a kitchen. Of course, it can also be used for other similar purposes.
When a private house is built on a site, there is a need to additionally build other buildings for it. It should be taken into account that space on the site is limited and it must be saved.
The ability to combine a bathhouse and a utility block will allow you to save to some extent not only the area of the site, but also the costs of its construction Source stroy-mart.ru
Woodshed attached to the bathhouse
A woodshed attached to a bathhouse is, of course, much easier to implement than a barn. This is a simple, ventilated (mandatory) structure, most often having only side walls (no front and back walls).
It is desirable that the side walls are not solid. The presence of gaps between the sheathing boards is welcome.
Thus, the classic extension to a bathhouse - a woodshed - looks like a deck for firewood with side walls and a roof. Flooring - so that they do not touch the ground .
The main purpose of the wood burner is to allow the logs to dry before use. Therefore, it must protect from precipitation, have gaps for air, and prevent the firewood from coming into contact with the ground.
Woodshed extension: necessary materials
The main material here will be boards. In general, it’s worth saying right away that what the woodcutter will be like depends only on your attitude. It can be made from scrap materials - pallets, for example, or unedged boards. Or you can take better quality material, put in more effort, and end up with a more aesthetically pleasing firewood storage.
Antiseptic (impregnated) edged board, pine. Photo Pilomaterialy.rf
You can simplify and remake it to fit the materials at your disposal. How to set the required dimensions. We will proceed from the fact that the entire woodshed can be made entirely from boards. In our case - edged ones.
Construction stages
The addition of a woodshed to the bathhouse begins with the manufacture of its bottom or floor. Because it doesn't need a foundation . A frame with a single cross member is assembled from the boards, but here it will go along the long side (not as in the picture for the barn). One cross board inside the frame.
“Legs” are placed on the corners of the frame from the outside. To do this, cut the board to the height of the frame plus a few centimeters for the protrusion of the leg. It is placed on the frame on both sides of its corner. This creates a stable corner. On the long side of each frame, nail the same piece of board in the middle outside, this will give more stability under the weight of the firewood.
ADVICE! Soak the woodshed boards in advance with an antiseptic so that bad weather and mushrooms do not spoil it.
On top of the frame, perpendicular to its long side, boards are placed at intervals of a couple of centimeters . As for pouring floors or shelves, in general. The flooring for firewood is ready.
All that remains is to equip it with walls and a roof. In our case, the size of the woodshed is small, so the frame for the side walls is completely simple, without intermediate posts. Just a frame with a bevel at the top of the rectangle equal to the slope of the roof. Boards are placed transversely on it at intervals of a couple of cm.
As for the roof, it is also made in the form of a frame. Two transverse strips are inserted into it for future fastening of the roof. The number of planks depends on the size of the future woodshed.
You can put a sheet of OSB on top of the roof frame, or you can simply stuff the boards in a herringbone pattern to prevent water from flowing into their joints. You can also use slate, ondulin, metal tiles or corrugated sheets. As mentioned above, it is better if the extension has the same roof as the bathhouse.
IMPORTANT! Don’t forget to connect the roof of the extension to the bathhouse with an apron - it will last longer!
Everything is held together with galvanized corners and the same self-tapping screws. Remember that black screws are not suitable .
How to combine a bathhouse with a utility room
If you build them in one building, it will be beneficial for the owner, however, in order to do this, you will need to solve certain problems:
- The bath creates high humidity. In order to cope with this, it is necessary to provide high-quality moisture insulation.
- Since hot water is required for washing, it will be necessary to provide appropriate communication to this house. In some cases, a stove may be installed to heat the water. Its installation will significantly increase the risk of fire. The structure must be made in such a way as to have high fire resistance.
- When choosing a location for the building in question, you need to remember that the risk of fire can pose a danger to houses and buildings on neighboring plots of land and locate the bathhouse along with the utility unit at a sufficient distance from them.
- Entrances to the utility block and to the bathhouse should be separated.
- For the bathhouse to operate, it is necessary to supply hot and cold water to the building.
The entrances to the utility block and the bathhouse should be separated Source karelpro.ru
Here are some more tips:
- Although heating is not required when used during the summer, this will allow the bathhouse to be used also in the cold season.
- It will be necessary to provide for the drainage of sewage. They must be separate for the bathhouse, toilet or utility room (if it has rooms where drains are provided - for example, a kitchen)
- If a recreation room is used here, then it can be equipped in such a way that it can be used as a living room in the future.
When choosing a suitable option, it is convenient to use the help of specialized companies that offer ready-made solutions Source yastroyu.ru
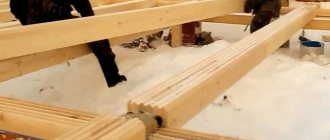
Erection of the building frame
Any foundation should be thoroughly waterproofed. For this, roofing felt, roofing felt, and bitumen mastic are used. They are laid on top of the supports so that the wooden structural elements do not have direct contact with them.
Now the bottom trim is made - a square of timber, with a cross-section of 15x15 centimeters. Wooden beams are laid on supports and secured with anchor bolts. Logs are laid on them - transverse beams to support the floor. For them, a beam measuring 10x10 cm is sufficient.
It is important to remember that all wooden elements must be thoroughly treated with antiseptic solutions and special impregnation against insects and mold. After all, the future gazebo with a utility block, built with your own hands, will be located in the open air and will feel the influence of weather conditions. The treatment should be done at the preparatory stage, before actual construction.
Thematic material:
- Bathhouse with a gazebo under one roof
- Gazebo with rest room
After installing the logs, the frame beams are fixed strictly vertically. They should be located in the corners of the structure and in places where the project involves openings for doors and windows. For beams, you need 2.5-3 meter pieces of timber with a cross section of 10x10 cm. Here it is better to use wooden bevels for greater rigidity of the entire structure. They are placed diagonally between the vertical posts.
The frame is completed with a top frame made of a 10×5 or 15×5 cm board. It is needed to stiffen the frame and to connect it to the roof. The rafters will rest on these boards.
Installation of a timber frame
Planning principles
If there are plans to build such a building, then this can be done in various ways:
- You can build a separate building in which the appropriate premises are planned.
- If there is already a bathhouse on the site, one of the possible solutions would be to make an extension to it and equip it with a utility block.
- Do the opposite - a bathhouse as an extension to an already existing utility unit.
- In some cases, the optimal solution would be to make a bathhouse with a utility block as an extension to a residential building.
It is important to understand that if you complete construction without a specific plan, “by eye,” then the resulting structure can be created with serious flaws. The risk of making violations related to the fire safety of the building is especially high.
The most convenient option is to use a ready-made project for construction Source deal.by
See also: Contacts of construction companies that offer construction services for small architectural forms.
Here are the advantages of this approach:
- If you act in this way, you can be confident in the high reliability of the building being constructed.
- Knowing exactly what is needed for construction will allow you to control the cost of the project at each stage.
- In the situation under consideration, it is possible to divide the complex construction process into separate stages. At the end of each of them you can see what has been done and control the quality of the work performed.
What to choose for interior decoration?
When it comes to walls, there are several options. The most popular is wood or clapboard paneling. Almost all projects of modern baths include internal wall cladding with coniferous wood; photos of the finishing can be viewed on specialized construction sites.
It is this material that, when in contact with moisture and high temperature, emits a very pleasant medicinal aroma. Among coniferous wood, pine is considered the most inexpensive material. At the same time, pine has a very beautiful structure and is easy to process. Although here one should also take into account the fact that pine is best used in the dressing room, since in the steam room itself it can release resin. But experts recommend upholstering the steam room with linden. By the way, it is also not very expensive and at the same time also has a wonderful aroma and many healing properties. Canadian cedar is considered a more expensive material. Many luxury modern bathhouse projects include interior wall lining with this particular material.
When it comes to flooring, it is also best to give preference to wood. Do not use linoleum or any other non-natural covering. Under the influence of high temperatures and constant moisture, it will begin to deteriorate and release toxic substances. But on tiles or granite you can easily slip and fall. As a result, you can get seriously injured.
You should also remember that the entire space should be as free as possible. The walls should not be cluttered with various shelves and cabinets; it is better to leave them empty. In general, to make the bathhouse look stylish and cozy, all you need is a good table, benches, or, in extreme cases, a soft ottoman.
In order to get a more original room design as a result, you can first look at the photos on the Internet, where you can find interesting modern bathhouse designs with or without a utility unit. And based on them, choose something suitable for yourself. Although, in general, the specialists who prepare the bathhouse project always give good advice on how to equip it from the inside.
How to choose the right project
First of all, you need to decide whether it is necessary to build a structure that simultaneously houses a bathhouse and a utility block. This solution is usually most in demand where the plot of land is small.
The combination of such different rooms, as a rule, increases the requirements for heat and moisture insulation, fire protection Source 1001sovet.com
If you decide to engage in such construction, then at the next stage you need to choose a layout of the premises that will suit the owner in the best way. The combination of a bathhouse and a utility room can be implemented in various ways; it is also necessary to determine the composition of the premises in the house. When planning, you need to take into account the available financial capabilities.
Once it has been determined which project is suitable, a cost estimate must be drawn up.
It is necessary to provide for communications. They can be roughly divided into those that cannot be avoided and those that are desirable to carry out for convenience.
The first group includes the need to ensure water drainage, as well as the importance of good ventilation.
In addition, you need to take into account that the shower and steam room will require heated water. To ensure this, you can act in two ways:
- It is possible to provide hot water supply from a residential building.
- Heat the water in the bath. To do this, you need a device to heat it.
The second group includes the presence of running water and electricity. noy-kryshey/
Electricity may be needed not only for indoor lighting, but also for outdoor lighting Source houzz.com
It is important to choose the right place for this building. Although it may seem that it is advisable to build next to a body of water, this is actually not the case - during a flood, the building can be flooded.
It is recommended to locate it close to utility lines that will subsequently need to be connected.
It is important that there is no well nearby. You also need to control the proximity of the building to the houses and auxiliary structures of neighbors.
If the distance is too close, the risk of fire will increase Source sxk.klub.ru.net
Sheds attached to the bathhouse
The canopy is an even more lightweight design. Because it doesn’t even have side walls, only pillars. In essence, it is just a roof on legs. (And if it is small, then there may be no legs.)
But that is why there are quite a lot of variations of adding a canopy to a bathhouse. The roof can be made simple, temporary, from scrap materials, or you can make a durable structure from high-quality material. The choice is up to the owner. Here the condition of the bathhouse must be taken into account, of course.
Materials
Metal structures or can be used as a construction material for a canopy attached to a bathhouse .
As for the roofing material, it can be anything: corrugated sheets, metal tiles, ondulin, slate, polycarbonate, boards, bitumen shingles. In addition, for seasonal canopies you can use fabric or banner canvas.
Bathhouse with a gable roof made of metal tiles. Photo StroyDom
The structures themselves can be single-pitched, gable, or arched in the shape of the roof. The angle of the roof and its size may vary.
Do not think that the angle of inclination is an arbitrary value. Still, wind and snow loads are significant things, and the wind will test the strength of the structure, trying to tear it off, and the snow will try to break the supports. In addition to this, there are also the forces of frost heaving, which also try to break the rigid connection of the canopy with the wall of the permanent structure, but more on that later.
How to do it?
First, you need to decide this question: are you going to rest the canopy on one side on the wall of the bathhouse? An alternative to this is to make it self-supporting, on four legs.
What determines the answer to this question? On the degree of heaving of the soil. In winter, heaving soils rise and lift what stands on them. Now imagine that you have one side rigidly fixed to the wall, and the other rising. What happens to the hard junction? He vomits.
To prevent this from happening, it is necessary to either make four supports, or a hinged connection, or a sliding connection.
For those whose soils are not heaving, but sandy, we can advise you to fix a beam on the wall of the bathhouse, and then rest the rafter legs of the canopy on it.
If you make a movable connection, then you can also use timber. But this works when the rafter legs of the canopy are perpendicular to the beam - in a pitched roof.
gable roof perpendicular to the bathhouse wall autonomous, it’s easier that way.
Metal trusses, replacing a single-pitch or gable rafter system, can also be made with two or four supports.
Regarding roofing: soft roofing materials, such as roofing felt or asphalt shingles, require continuous sheathing with plywood or OSB. This increases the cost.
For other roofing materials, conventional sheathing with timber is sufficient.
Fastening polycarbonate to an iron canopy requires specially designed profiles that hide the seam and securely hold the structure.
Examples of projects
When choosing the most suitable option, you need to choose the one that suits you for financial reasons and at the same time is suitable in terms of quality. Here are a few different examples of buildings of this type.
Simple option
If you want to choose a relatively inexpensive option, you need the walls to be made in the form of a wooden frame covered with clapboard. In most cases, the roof is made of a gable roof, common to both the bathhouse and the utility block. In this case, it is recommended to choose a project with a minimum number of premises.
One of the possible options could be a house with two doors, where in one room there is a steam room, a toilet and a relaxation room, and the other is intended for household purposes. Source anticafe-sandbox.ru
Unfortunately, apart from cheapness and simplicity, it is difficult to find advantages in this option. In this case, the walls are short-lived and will have to be replaced after a few years. Due to poor thermal insulation, it makes no sense to heat this house in winter.
Weak moisture insulation will lead to rust on metal objects in the utility room Source pinterest.com
Since in most cases it will be necessary to heat water using wood, the bathhouse with the barn must be supplemented with a woodshed.
Compact project
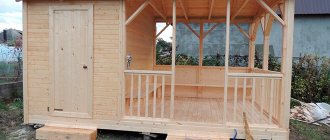
If a building is made of timber, this will give it durability and reliability. A project can be made by including the bare necessities. Here's what it might look like, for example.
Project of a utility block with a bathhouse and a relaxation room Source 2proraba.com
Construction of walls and roofs
Along the perimeter of the foundation, a frame of wooden blocks is laid on the waterproofing layer. The technology for constructing wooden walls varies depending on the type of bars, their sizes and the type of joints.
The main thing is not to fit them too tightly to each other at the joints; any gaps that appear should be filled with insulation. As the walls are erected, door and window blocks are immediately inserted. After installing the log house, they begin to work on the roof.
Installing a gable roof on a timber bathhouse
Like walls, the roof is built according to a standard scheme: first, a base is mounted along the contour of the building, then rafters are installed on it. If the chimney or ventilation duct in the bathhouse will not exit through the wall, but through the roof, it must be installed before installing the sheathing. The roof covering can be anything; here the choice, if at all, has limitations, then only financial ones.
Material for construction
It is generally accepted that if a bathhouse or barn is being built, it is most profitable to use wood.
Wood has a number of advantages Source market.sakh.com
It has a number of advantages:
- Because this material breathes, it is less vulnerable to moisture and fungal infestation.
- Wooden rooms provide better air circulation.
- Wooden beams and boards have their own pleasant odor when exposed to hot temperatures typical of a sauna room, this odor intensifies even more.
- If you use coniferous trees for wooden building materials, their aroma will have an additional healing effect.
The final stage of work
The technology for insulating ceilings is identical to the method for insulating walls. In addition, the ceiling can also be insulated under the roof from the attic side by filling expanded clay between the beams or laying a layer of mineral wool.
To insulate the bathhouse premises, it is important to install windows and doors correctly. There is no consensus on which windows retain heat best; a lot depends on the manufacturer.
Several options for bath insulation
It is important that both wooden and metal-plastic windows, as a rule, use the same double-glazed windows, so the technical characteristics of both types of windows are approximately the same. Of course, if the project plans to make a wooden bathhouse, then for a harmonious combination, it is best to install wooden doors and windows in it too.
Frame plus walls
The steam room was made from spruce beams and aspen boards 6 cm thick. I chose well-dried wood, it will last longer.
I built the frame of the walls and ceiling from the beams. The hardest part was attaching them to the floor. To do this, I drilled matching holes in the beams and floor, into which I then inserted large screws. A layer of waterproofing was placed between the beams and the floor.
The frame of the walls was first equipped with vapor-insulating boards, then covered with aspen boards. I made longitudinal grooves on the boards. They made it possible to firmly “grip” the structure. The bottom layer was also used here for waterproofing. I drove the nails with which I nailed the boards deeper into the wood so as not to get hurt or burned, because the temperature in the sauna reaches 100°.