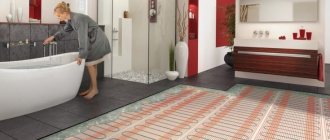
What kind of warm floor can be used under a parquet board?
The rich assortment presented on the specialized market is segmented into 3 basic categories - electric, water and infrared (film-based).
Each system is characterized by individual advantages, disadvantages and performance properties. It is important to analyze not only the effectiveness of their use, but also the features of combining with parquet boards
Water
This scheme boils down to heating the floor surface through interaction with water brought to a given temperature. The warm water floor under the parquet board is assembled from stable plastic pipes, they are installed according to the project and subsequently covered with a concrete screed. The coolant, moving through the pipes, heats up when the system is activated. This solution is optimal not only for creating a comfortable surface for walking barefoot, but also for achieving a favorable temperature in a small room.
Advantages of water heated floors:
- adapted for installation over a large area;
- characterized by economical energy consumption;
- thanks to it, the air throughout the entire volume of the room is heated evenly.
The disadvantage of this technology is the risk of leakage, which can damage the floor material.
To save the board in an emergency, it is important to eliminate the accident in a timely manner and insert new dies to replace the damaged ones. Another drawback is that it is more difficult to control temperature indicators when compared with electric and infrared options. You also need to remember that the structure can “eat up” the useful height of the walls - up to 13 cm
You also need to remember that the structure can “eat up” the useful height of the walls - up to 13 cm.
Electric
The solution belongs to the affordable segment, exhibits high performance, and has an acceptable level of security. When deciding which heated floor is better in the case of a parquet board, they often give preference to electric: it is universal and can be used not only in residential premises.
The main heating element here is an electric cable; it can be laid under the parquet using a spiral or parallel method. The wires responsible for the distribution of electricity can be separate or sealed in film. The latter solution is in demand when installing heating in areas with differences in height. Before laying the cable, carefully prepare the base, protect the cable with insulating material, and pour a concrete screed on top.
The main advantage of the solution is easy installation, as well as the absence of a negative impact on wooden dies. This technology is environmentally friendly and ensures uniform heating of rooms.
Infrared
When starting an infrared heated floor, energy is directed from the heating elements to the floor covering, and from it to objects and furniture standing on the surface. Air heating is caused by an increase in temperature not only of the floor, but also of surrounding and adjacent stationary objects. This is a key distinguishing feature that is the main advantage of an infrared system over an electrical one.
Advantages of the solution:
- Can be used with any type of floor finish;
- design flexibility, facilitating installation on surfaces with non-uniform levels (for example, on sloped areas);
- the bundle does not lose its functionality even if several heating elements fail;
- operational life is estimated in decades;
- the floor, like the air in the room, quickly warms up.
Infrared heated floors can be used with any type of floor finishing.
The technology is absolutely safe, including for pets, and is being actively implemented in rooms of different sizes and purposes.
This is interesting: TechnoNIKOL "Rocklight" - technical characteristics
Recommendations for carrying out work
Since the price of materials is high, as are the costs of underfloor heating, it is important to do everything correctly and choose the optimal materials. . Types of heating systems
Types of heating systems
First, let's figure out which warm floor under a parquet board is better, there are three main options on the market, we'll tell you more about each of them:
- Electrical systems are distinguished by factors such as low price and a fairly simple installation process (although there are certain nuances). But they have one property, which is a big disadvantage when using boards - the heating rate is too high, and as you know, sudden temperature changes cause cracks to appear on the surface, which is why this solution is the least preferable;
Electric underfloor heating is not suitable for our case
- Infrared systems are distinguished by the fact that they heat not the air, but all surrounding objects, their advantage is simple installation instructions, doing it yourself is as easy as shelling pears - you just need to lay out the sheets and connect power to them, the board can be laid directly on the surface. This solution is well suited in our case, since the nature of its operation implies a less aggressive effect on the material;
This option is good because the board can be placed directly on the film
- Water systems are the most difficult to install, but their properties and performance are much better than other options. This is why parquet boards are best suited for warm water floors; the main reason is that it heats up very slowly, which ensures minimal negative impact on the material, and a constant temperature is most often maintained during operation.
Water-heated floors under wooden boards also work very well
Tools and installation methods
To properly lay boards without plywood, tools are used that will not damage the material during installation:
- a hammer with a rubber tip or a mallet;
- tape measure at least 5 m long;
- two-meter level;
- jigsaw;
- wedges for leveling deviations in level and a bar for better joining of parts;
- carpenter's knife for adjusting the edges of panels;
- drill with a variety of cutting attachments.
Before laying, be sure to measure the humidity of the material and the base on which installation is being carried out. The results obtained should not exceed the parameters specified in the instructions. Before installation, you will need to make a project and determine how to correctly position the panels in the room. Thanks to the correct placement of the texture, you can visually align the room.
- In a square room, the boards are laid out in the direction of the light, that is, towards the window.
- When laying the coating diagonally, an original pattern is obtained, but the consumption of building materials increases.
- Usually the material is installed from the door in the direction of the step.
Laying diagonally
Types of floors
There are several types of heated floors that can be used in wooden houses, and the most popular of them today are water heated floors and infrared. Film or infrared heated floors are quite easy to install and require much less time for installation work. But unlike a water insulation system, this floor runs on electricity and heats the floor surface with too little intensity. You just need to unplug it from the electricity supply and it immediately becomes cold.
A water floor, unlike an electric one, retains heat longer.
Water heated floors, unlike infrared ones, take a little longer to warm up, but they provide any desired temperature. One of their main advantages is the ability to connect to a central heating system or to your own boiler and individual heating system. The main challenge faced by those wishing to install heating pipes in a wooden floor is the correct installation of warm floor coverings. There are several tips on how to make a warm floor.
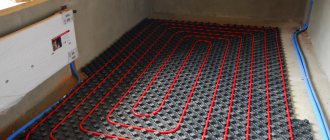
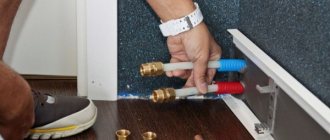
Installing a water system under parquet boards
Since this design has one significant drawback - the possibility of leaks cannot be completely excluded, its installation must be taken with great responsibility.
Stages of work:
Step 1. Insulation - polyethylene film - is laid on a flat base.
Lay down plastic film
Step 2. To minimize heat loss downwards, thermal insulation is laid. For this purpose, it is better to use polystyrene foam with a thickness of 5-10 mm.
Installing expanded polystyrene
Step 3. To compensate for the thermal expansion of the screed (which may cause it to crack), a damper tape made of foam polyethylene is attached around the perimeter of the room.
Installing a damper tape made of foamed polyethylene
Despite the fact that the tape is self-adhesive, it is recommended to secure it with mushroom dowels (you can attach it to drywall or wood with a stapler).
Step 4. You need to lay a reinforcing mesh on the thermal insulation (metal thickness - 4 mm). It will be needed not only to strengthen the structure, but also to secure the pipe.
Laying the reinforcing mesh
Step 5. Pipes are laid. To install a heated floor, a pipeline with a diameter of 1.6 cm is sufficient. The most popular methods of laying out the pipe are spiral or loop.
Laying pipes
Laying in a spiral allows for uniform heating of the floor. That's why it is used more often. Process diagram: first, the pipes are laid out around the perimeter, and gradually, in a spiral (in increments of 30 cm), they are wrapped towards the center. Having reached the center, work continues in the opposite direction. The pipe must be returned to its original point. As a result, there will be 15 cm between the pipes.
To fasten the pipes to the mesh, nylon ties are used (if mats with bosses are used as insulation, then the pipes are fixed between these protrusions).
Layout options for heated floor pipes
Step 6. The pipes are connected to the manifold. The system must be checked for operability and tightness. Before pouring the screed and installing the floor covering, testing (pressure testing) is carried out for two days.
Connecting the pipes to the collector
Step 7. A cement-sand screed is made (according to the beacons). For greater reliability of the structure, it is recommended to lay another reinforcing mesh on the pipes. The screed is made of concrete grades M200 or M300. Its thickness should be such that there is a distance of at least 5-8 cm from the pipes to the surface of the new floor.
Making a cement-sand screed
Step 8. Installation of the floor covering can be carried out 4 weeks after the concrete has gained strength.
Step 9. Plywood is laid on the concrete base. For fastening, it is better to use polyurethane glue rather than self-tapping screws, so as not to accidentally damage the pipeline.
Polyurethane adhesive for fastening plywood and parquet
Step 10. The parquet boards are laid using a floating method.
Gluing parquet onto a screed onto a heated floor
The first way to lay solid wood on a screed is by gluing the flooring directly to the screed using ms-glue.
These are adhesives that create a “rubber” layer between the array and the screed. That is, the array is glued to the base, but thanks to this glue it has the opportunity to “maneuver” - to expand and contract. Provided that the temperature in the room has risen, the humidity has dropped, the solid board or solid parquet dries out. But, if it is laid on “rubber” glue, then the wood has the opportunity to “move” and form small (micro) cracks. If the humidity in the room rises, the wood swells. But, the same “rubber” glue allows for “maneuver” and the wood expands, but does not form “boats”. This method of installation is both environmentally friendly and suitable, but only laying solid wood with glue requires increased attention to the screed. In addition to the fact that the screed must be level, it must also be strong. If the tree starts to move, and the screed is poorly done, the array will be torn off from the base. Unfortunately, this happened in practice; it was not pleasant.
Methods for laying parquet boards
The coating can be laid in three ways - adhesive, floating and using fasteners (nails, self-tapping screws).
Glue method
Laying the coating with adhesive requires a perfectly flat and dry base. If there are recesses or bumps left on the subfloor, this will lead to uneven wear of the finishing layer, the appearance of cracks, and deformations. It is also more difficult to restore such a floor, since more material is removed during sanding in protruding areas than necessary, and in recesses it is not removed at all. And the presence of moisture under the floor contributes to partial peeling of the coating, the appearance of fungus, swelling and heaving. To eliminate such risks, the parquet board is glued not to the screed itself, but to a backing made of plywood or chipboard. There must be waterproofing under the substrate; additionally, you can lay soundproofing material - cork, polyethylene foam and others.
Laying parquet with glue
This method is used less and less often because it has more disadvantages than advantages. Firstly, costs increase: in addition to parquet boards and waterproofing, you need to buy backing material, fasteners and special parquet glue, the cost of which is quite high. Secondly, installation takes more time, because you need to cut and fit the plywood, secure it correctly, and apply glue. You cannot walk on the floor until the glue is completely dry. In addition, it will be more difficult to replace accidentally damaged areas, and the dismantled floor is unsuitable for reuse.
Laying parquet boards with glue
Floating method
Laying of the covering is carried out without fixing the parquet board to the rough base. The lamellas are attached to each other using a tongue-and-groove system or a special locking connection. A small gap must be left around the perimeter of the room to prevent the floor from deforming during thermal expansion. There is a layer of waterproofing between the coating and the base; noise-absorbing materials can also be laid.
This method is considered the most convenient and fastest, therefore it is used by most craftsmen, and is also ideal for those who do not yet have construction experience. If the installation technology is followed, the coating can withstand changes in humidity and temperature, which means that the risk of deformation is reduced to zero. If individual slats are damaged, replacing them will not be difficult; the main thing is to choose the right boards based on tone and pattern. Complete dismantling of the coating will also not require much effort; in addition, the material can be reused.
Laying parquet boards using the floating method
Laying with fasteners
Fixing the parquet board with nails or self-tapping screws can be used in the case of laying the covering on logs or a solid wooden base, and not on a screed. Slats with a thickness of at least 20 mm are suitable for this, since thin boards can be easily damaged. The logs are laid in increments of no more than 60 cm and strictly in the same plane, since even small differences in height cause squeaks when walking. The space under the flooring must be well ventilated to avoid the accumulation of condensation and dampness.
When laying, the lamellas are positioned so that their ends meet only at the joists. The nails are driven into the grooves at an angle, and the heads are deepened with a hammer so that the fasteners do not interfere with the tight fit of adjacent boards. Such fasteners provide the necessary strength of the connection, but make it difficult to subsequently replace elements during repairs. If complete dismantling becomes necessary, the coating cannot be reused due to damaged edges.
Fixing the board with nails
To fasten individual parquet strips, nails are used, the length of which is 40 mm and the thickness is 1.6 - 1.8 mm
Warm floors under solid wood have a number of truly unique properties, such as
- Durability
- Resistance to scraping
- Excellent thermal and sound insulation
- Great looks
- No difficulty in installation and operation
Massive wide boards made of solid wood have a tongue-and-groove profile in their cross-section. This familiar type of flooring is very reliable and durable. Each floorboard has a tongue-and-groove system on four sides. Thanks to this system, installation is greatly facilitated, but despite this, laying solid floorboards remains a labor-intensive process that requires the involvement of professionals. High noise insulation and low thermal conductivity leave noise outside, warm air inside the room.
But, at the same time, the floor board has not only advantages, for example:
- Needs regular maintenance (from time to time the floor needs to be coated with a protective varnish, which means the cost of varnishing work and the smell of varnish, within one to three days)
- Wood, like any natural material, has the ability to “breathe”, i.e. It narrows in winter and expands in summer. As a result of these processes, over time, distances appear between the boards.
- It is recommended to eliminate this defect near the floor using putty, but everything can happen again after a certain period of time.
- Relatively high price of wooden floors. After all, the cost of the timber for laying the floor, the board itself, as well as the work on installing the floor and caring for it, to put it mildly, is not cheap.
But looking at the result, you realize that it was all worth it.
Conclusion.
If you like environmentally friendly materials and the look of a natural structure, then you without a doubt need a heated floor board, period!
With just one effort and spending your time and money installing a wooden floor, you will be very satisfied for a long period of time.
Choosing a heated floor technology
Before laying a heated floor, you need to decide on its type. It is best to use an electric heated floor under parquet, since in this case there is no danger of damaging the parquet board. When using water heating, in the event of an emergency, for example, a water leak, the parquet may swell and deteriorate.
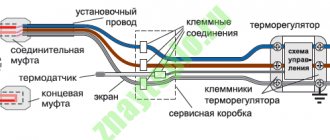
Scheme of installing a heated floor under parquet.
The work of laying parquet boards itself is quite lengthy, so if there is a problem with the heating system, you will have to remove this covering, which is quite problematic.
It is also of great importance that parquet boards can be considered good insulation materials and, if installed correctly, floor insulation may not be required. But still, if you install a warm floor under parquet, you need to remember that there must be a fireproof coating underneath.
Stages of installation of a warm electric floor
The most modern way to insulate a parquet board is with an electric cable. But in this case there is 1 drawback - fire safety
Because of this, it is important to properly organize insulation. At the first stage of work, the base is cleaned, all irregularities and debris are removed. You can use putty for leveling
Then a layer of waterproofing compound is applied. Support logs are installed on the base of the floor. They are made at a distance of 50-60 cm from each other. The surface between them is filled with waterproofing materials. Penofol or other sheet foam materials can be used
You can use putty for leveling. Then a layer of waterproofing compound is applied. Support logs are installed on the base of the floor. They are made at a distance of 50-60 cm from each other. The surface between them is filled with waterproofing materials. You can use penofol or other sheet foam materials.
Installation diagram of an infrared film heated floor under a parquet board.
Roll materials, such as mineral wool, for example, are also widely used. They need to be laid in stripes. Fasten with special glue or overlap them by at least 10 cm. After this, you need to make a finishing floor. For this you will need a parquet board. A galvanized mesh is placed on top. The electrical cable itself, in order to insulate the parquet board, is placed next to the beams at a distance of at least 1 cm from them. Cuts are made in the beams not to the full thickness, about 3 cm wide, foil is laid, and an electric cable is laid on it. The cable is secured using mounting tape. On top of the cable you will need to again make a layer of fireproof material. After this, it is necessary to organize the finishing floor. The warm floor under the board is ready. It is recommended to use plywood or wood-fiber materials (fibreboard) as a base for parquet boards, which are secured using self-tapping screws. In this case, a sheet of plywood 50 x 50 cm must be fixed in 8 places.
The main disadvantages of parquet insulation
As already mentioned, it is not at all necessary to insulate the parquet board. Before doing this, you need to know the possible negative consequences of the work. Firstly, the parquet itself does not allow cold air to pass through, thus, in the presence of a layer of insulation, the performance of the parquet board in heating the room deteriorates. The parquet flooring in the apartment does not require additional thermal insulation. Secondly, if there is a heating layer, the parquet can dry out and crack. Its appearance changes and aesthetics decreases. All this will ultimately require the residents to undergo major repairs, or they will have to periodically seal cracks and putty the floor with their own hands.
Underfloor heating systems are more suitable for tiles than planks. Therefore, it is advisable to insulate the floor in the bathroom, loggia, and toilet. Thirdly, the technical side of the process is also of great importance. In addition to the possibility of emergency situations, there is a possibility of damage to the insulation system itself: pipes or electrical wires. The thing is that the best option for insulating parquet is using plywood, which is attached with self-tapping screws to the screed. In this case, there is a possibility of damage to wires or pipes, and it will be very difficult to find this area. An alternative to perquet is laminate.
Installation technology for parquet
The easiest options for installation are electrical and infrared systems - they operate from the network, do not require piping, and can be installed under surfaces with a difference in height.
Infrared floor
Film products are attractive due to their ease of installation; all work can be completed in a short time. The first step is preparing the base with mandatory thermal insulation measures. The base for the heating elements must be clean and dry - this is the key to a long service life and safety of the heated floor.
It is necessary to completely remove the remains of the old floor covering; after dismantling, the wooden or concrete floor base should be exposed. Using a level, it is necessary to check the uniformity of the surface height, and if the slope was not initially planned, the differences should be no more than 3 mm. Next, they polish the base (if it is concrete) or organize sanding (if the house has a wooden floor). The resulting debris is removed without leaving any residue; the base must be thoroughly cleaned: a household or industrial vacuum cleaner will come in handy here. A waterproofing polyethylene film is laid, with thermal insulation material on top.
Infrared heated floor for parquet
The site is marked out, during which the location of insertion of the temperature sensor, the installation area of the temperature controller, and the path for connecting the device to the network are also determined. Infrared film is laid stripes down along the room and secured with construction tape. Bitumen insulation protects silver-plated contacts and cut lines crossing conductors.
After placing all the heating elements, a plywood base is installed (it is advisable to carefully fix it with self-tapping screws), and a parquet board is placed on this base.
Electric floor
This is a more common cable-based option. It is important to adhere to the installation technology recommended by the manufacturer to minimize the fire hazard of the solution.
Here you also need to pre-prepare the base: dismantle the old coating, clean the surface, remove debris, level using putty mixtures. When the area is completely dry, apply a layer of waterproofing material and leave it for the time necessary for the substance to set properly.
Next, a frame is constructed: support logs are installed in increments of at least 60 cm. Heat-insulating material, for example, mineral wool or penofol, is placed in the resulting cells. Waterproofing strips are laid on top; they need to be fixed with an overlap, joining with glue. The next layer is galvanized mesh.
The electric cable is placed at a distance of 1 cm from the logs, cuts are made in the beams through which the cable and foil are passed, and mounting tape is used for fastening. A second layer of thermal insulation materials is placed on top, a plywood base is formed, on which a finished parquet floor is subsequently installed.
Scheme for laying tiles under parquet
The choice of installation scheme is carried out in accordance with the design of the room and its features.
- Deck (parts are placed staggered).
- Straight herringbone is a classic for laying parquet. It can be easily imitated using tiles. The second option is a diagonal herringbone; if you vary 2 types of tiles of similar tones when executing it, the result will be amazing. A similar technique is used when laying a double or triple Christmas tree.
- Checkers (chess). Alternating squares, reminiscent of a chessboard.
- Pavlovsk weaving is formed from the same squares, but the squares themselves are created from elongated tiles, resulting in a weaving effect.
- Versailles is identical to Pavlovian wicker, but tiles of contrasting colors are inserted between the squares, creating a framing effect.
- The St. Petersburg method is similar to chess, only each square has a lighter-colored edging.
- The frames are chessboards of different sizes, framed by intersecting elements.
- The well is built on the frame of a square with rectangular parts.
These are the main methods. You can come up with styling schemes yourself by combining different elements and colors. This way you can become the owner of a unique floor, from which the palace spirit of chic will emanate, especially if you include jewelry made of gems and other semi-precious stones in the composition.
The simplest and most popular way of laying porcelain tiles under parquet. Creates a unique movement effect.
Porcelain tiles are laid staggered diagonally at an angle of 45 ℃.
The classic way to lay parquet. Porcelain tiles are laid diagonally with rotation in different directions.
A variation of the Christmas tree with diagonal placement.
Chevron and zigzag styling methods
Herringbone is sometimes referred to as a popular chevron pattern consisting of V-shaped elements or zigzag lines.
Chevron is one of the main trends in the design of finishing ceramics in 2016. A separate article on our blog is devoted to this extensive topic.
For laying with a chevron pattern, not only rectangular tiles are used, but also elements in the form of rhombuses and parallelograms, as well as tiles in the shape of the letter V.
Infrared heated floor for parquet
Infrared film heated floor - mats with graphite elements. During the heating process, thermal energy is transferred to the surface. This is the most ideal option for parquet. Its main feature is that it is produced with different power levels, so it is easy to choose a model suitable for wood. In addition, significantly less installation time will be required.
Film floors have the following advantages:
- the ability to independently set the required temperature;
- they can be used in any room, as the cake turns out thin;
- do not overheat, so they will not lead to drying out of the wood;
- safe;
- easy to install.
The film floor is installed on a heat-reflecting base, after which the decorative coating can be installed. Laying parquet tiles on film is done in the same way as on other types of heated floors.
A plywood substrate is mounted on the finished infrared system, which serves as the base for the parquet. The plywood is attached with self-tapping screws.
Warm parquet flooring, despite some disadvantages, is an excellent alternative for creating an excellent interior and a warm microclimate in the house, especially with an infrared system.
In addition, if desired, installation can be carried out independently, the main thing is to follow the rules for installing and operating the floor.
Laying features
How to lay parquet planks? The technology is presented in 3 methods:
- "floating" masonry;
- "glue" method;
- use of lag.
"Floating" installation
Parquet dies are connected using the tenon-to-base principle. Fastening to the base with self-tapping screws or glue is not intended.
The segments are fastened together using a locking connection. The material is laid out on the substrate.
Visual guide
Step-by-step DIY installation instructions include the following:
- Installation of a waterproofing layer. Film is used (thickness - 200 microns). The strips must be laid out overlapping. Reserve – 150-200 mm. Fastening is carried out using transparent adhesive tape.
- Performing an overlap against the wall. Width – up to 150 mm. The substrate is arranged using cork material. You can replace it with foamed polyethylene. It is laid out on a waterproofing film.
- Calculation of the number of rows of parquet boards.
- Ensuring tight contact of the material with the wall. A special tool is used to cut off the tenon, leave a gap (1-1.5 cm), and drive in a peg.
- Laying rows. The board is hammered through a block made of wood.
- Laying the baseboard. Fastening must be done using clamps. The indentation of the first ones is 150-200 mm from the corner, the remaining ones are in increments of 400-500 mm.
The main difficulty is installing the structure where the heating riser pipes are located. Pre-cut parquet segments are laid behind the pipes. The dies are fixed with glue. For aesthetic purposes, plugs are installed in pipe areas, the shade of which matches the color of the panel.
Installation with glue
The method is suitable for owners of concrete floors.
How to lay the covering? It is important to choose the right glue. It must be suitable for the specific type of coating
Technology of modern laying of parquet boards:
- Prime the base, impregnate with waterproofing (deep penetration), dry well.
- Provide compensation gap. Install wooden inserts at a distance of 40-50 cm from each other.
- Adjust the length of the last parquet board in the row.
- “Arm yourself” with a notched trowel and spread the glue over the floor.
- Lay the parquet material, joining it together with lock joints.
- Provide additional fixation with self-tapping screws. Drill holes (step – 30-35 cm).
- Install a parquet board in the second row (shifted by half or a third relative to the already installed row). Join along the length, connect with the elements of the first row, secure with self-tapping screws.
- Dry the coating for 48-72 hours, avoiding stress.
- Treat the seams with clear acrylic sealant.
- After the sealant has dried, remove the inserts, install the baseboard and interior thresholds.
Expansion gap
Laying on joists
Laying parquet boards is intended to create floors on an uneven base. The logs are installed aligned on one flat plane. Dry pine bars are used to make them. The thickness of the lag can vary within 5-10 cm.
How are logs used?
Step by step installation guide:
- Determine the direction of the lag location. They are not laid diagonally, but perpendicular to the parquet boards, which are placed in the direction of the light flow.
- Lay waterproofing and place it on the walls (200 mm). Glue the strips with tape.
- Lay the main, outer, logs, align them in all directions. Pull the cord, using it as a guide to place the remaining logs. The optimal distance between them is maintained at 35-40 cm, with a maximum of half a meter. They need to be laid using linings made of wood or plastic for leveling. If one of the lags protrudes above the general level, it must be processed at the level of the others, removing the required layer of wood with a plane.
- Place the parquet board with its ridge against the wall at a distance of 10 mm from it. Attach to the joist with nails. Nails are driven into the lower base at an angle of 45 degrees. “Arm yourself” with a doboynik and “drown” the caps. The permissible gap between the boards is 0.5 mm.
- Trim the last board to width. After installation, it should not reach the wall by about 10-15 mm.
- Place the plinth on the installed floor and secure it.
Laying solid boards on a heated floor - basic questions
Is it possible to lay Ecopol on a heated base?
Yes, solid Ecopol boards can be laid floating on water, electric and film heated floors. We do not recommend gluing to the base with heating, because the movement of the boards, and with them the load on the gluing, will be excessive, the glue dries out when heated, its aging accelerates, which weakens the gluing over time. In a compartment, this can lead to premature partial and even complete separation of the boards from the base.
Will a solid board really warm up on a warm floor?
Oak wood (density 700 kg/m3) is a material with an average thermal conductivity λ= 0.17 (W/m2*⁰C), this is about five times lower than that of tiles (λ=1.0-0.8), but also 5 times higher than that of mineral wool or polystyrene foam λ = 0.035-0.03. Considering that the thickness of the parquet is only 20-21 mm, its thermal conductivity is sufficient to ensure heat transfer into the room up to 100 W/m2, which, by the way, is only required during prolonged frosts of -25⁰C. The rest of the time, the heated floor operates in economical mode at 30-60% of the load. Parquet made of dense oak, ash, and merbau wood has been installed on heated floors for many years by well-known companies: Junckers, Parador, Berdhold and others. Using the same wood and board dimensions, Ecopol has the same thermal performance indicators and is an equivalent replacement for European brands on the Russian market.
λ oak = 0.171 (W/m2 °C)
λ substrate Penolon Premium 7002 2mm thick = 0.040 (W/m2 °C)
Is it possible to use Ecopol and a warm water floor as the only source of heating?
Yes, you can, if the heat loss of your home does not exceed 80-90 W/m2, which the warm floor should cover with some margin. With greater heat loss, it is reasonable to improve thermal insulation or have an additional heating source, which may be needed in extreme cold.
Types of parquet
Wood has been used for interior decoration for a long time. And this material is still in demand, despite the appearance of new products on the market. This is due to its environmental friendliness, strength, incredibly attractive appearance and durability. It is the beautiful texture (different for different species), so beloved by everyone, that encourages manufacturers to produce building materials whose surface imitates natural wood.
The rooms decorated with wood are simply pleasant to be in. Phytoncides released by trees have a beneficial effect on people's health, including their psycho-emotional state. The only thing that can in some cases serve as an obstacle to the use of wood in decoration is its sensitivity to various climatic influences. However, the surface treatment helps protect the material.
Types of parquet installation
Of course, the price of natural wood does not always allow the use of this material for cladding.
Parquet has always stood somewhat apart in the line of building materials. It belongs to the premium product segment. Back in the 18th century, noble people used rectangular planks to decorate houses.
What is most often used today in interior decoration:
- Piece parquet. Planks up to 500 mm long, up to 75 mm wide and 15-22 mm thick are made of hardwood. To fix them on the floor, a tongue/groove system has been developed. This type of parquet lasts a long time, it is durable, reliable, and various designs can be laid out on the floor from individual planks. However, laying this coating is a rather labor-intensive process. After installation, piece parquet must be sanded and treated with a protective compound (most often varnish). On average, its durability is about 50 years.
- Modular parquet. Modules, assembled from several individual wooden parts and fixed in a factory, belong to the elite category of materials. Thanks to the use of different types of wood (compatible in characteristics), which allows you to create compositions of varying complexity, such parquet is expensive. The price depends on the types of wood used to create the design, as well as its complexity.
- Parquet board. Today, this type of coating, which can also be classified as “parquet,” has become widespread. The boards are made from three layers of natural wood, and their fibers are arranged transversely to each other. Thanks to this, the material has increased resistance to moisture and temperature influences. Installation of boards is easy due to the presence of a locking connection. As a rule, valuable types of wood are chosen for the top (front) layer of parquet, and the bottom two are made of coniferous wood (spruce, pine or larch). The inner layer is most often made from grade 2 boards. The planks are produced in lengths of 1200-1270 mm, widths of 130-210 mm, thicknesses of 70-230 mm. The outer layer is made of one or more lamellas. In production, the board is treated with a protective coating, making the maintenance of the cladding easier.
A parquet board, properly installed and operated in accordance with the rules, lasts for about two decades.
It is better to lay the Ecopol array on a warm floor than a parquet board
Let's calculate the total heat transfer resistance for a parquet board 14 mm thick.
| Material | Thermal conductivity coefficient λ (W/m2 °C) | Thermal resistance coefficient R (m2 °C/W) |
| Solid oak (across the grain) 3.6 mm thick (top working layer) | 0,171 | 0,021 |
| Solid pine (across the grain) 10.4 mm thick | 0,095 | 0,109 |
| Substrate Penolon Premium 7002 2 mm thick | 0,040 | 0,050 |
The total heat transfer resistance for a parquet board consisting of a 10.4 mm pine base and 3.6 mm oak veneer and a 2 mm thick underlay will be:
Rpd 14= 0.18 (m2 °C/W).
Thus, the total heat transfer resistance of a solid board with a thickness of 21 mm R oak 21 = 0.173 (m2 °C/W) is less than that of a parquet board with a thickness of 14 mm.
Is it possible to put parquet or parquet boards on a warm floor?
We explained why parquet, parquet boards and solid floorboards are not the most suitable types of covering for heated floors. Suitable - ceramic and stone tiles, acceptable - laminate, non-insulated linoleum and low-pile carpet. So, is it possible to put parquet or parquet boards on a warm floor? We answer: it is impossible. But if you really want to, you can. You just need to understand that, firstly, this will negatively affect the efficiency of the heating system. Secondly, such a solution imposes a number of restrictions both on the functioning of the heating system and on the selection and installation of wooden floors. More about this:
Features of installing heated floors under natural wood coverings
To prevent cracks from appearing in parquet or parquet boards during the heating season, the heating of the floor should not be strong. If we remember about formaldehyde, heated floors under parquet boards should not heat up above 26 ºC. But that's not all. Manufacturers of solid parquet and parquet boards claim that in order to avoid deformation of the wood and to preserve its service life, the difference between the temperature of the coating and the air in the room should not exceed 2 ºC. If you adhere to the standard of +18 ºC for residential premises, the floor cannot be heated above 20 ºC. At this temperature, the floors will not feel cold and you can walk on them barefoot. But the heat they generate is not enough to warm the room during the cold season. Of course, if we are talking about Central Russia, and not about Sochi. No, in a super insulated, energy efficient passivehouse with forced recovery ventilation and such a small amount of thermal energy is enough for heating, but how many such buildings have we built? Therefore, in an ordinary house in a room with natural wood floors, the main heating devices should be radiators, and heated floors should only complement them, only slightly warming up the parquet.
A standard mixing module for warm water floors will not be able to provide accurate and smooth temperature control at such low values and in a narrow range. You will need additional equipment: a floor temperature sensor (namely the floor, not the air in the room) and a control valve servomotor.
And don’t forget that wood does not transmit heat well from heating pipes, so you need to increase the thickness of the thermal insulation layer underneath so as not to waste energy and money.
Features of the selection of parquet and plank coverings for heated floors
For heated floors, you should select parquet and parquet boards made from the most stable types of wood. Oak, ash and walnut are best suited. The hornbeam behaves well. It is better not to use exotic species other than teak and iroko. Beech and maple are absolutely not suitable; they are most susceptible to temperature and humidity expansion. It is advisable to use a larch floorboard.
You should choose a parquet board of medium thickness - 13-17 mm. A thin 10mm one may warp, and a thick one will transmit heat worse. It is better to choose parquet with a thickness of 16-18 mm, and a floorboard - 25 mm.
Features of installing parquet flooring over heated floors
If you maintain the above-mentioned temperature conditions for heating floors, you can use any type of wooden floor as a covering: solid parquet and parquet boards, glued multilayer parquet boards, solid floor boards. However, the coating installation technology should be taken into account:
Multilayer parquet boards are laid in a “floating” manner on the substrate without being fixed to the base. There will be no problems with careful installation of this floor; the recommended thickness of the substrate is 2-3 mm.
Solid parquet on a concrete screed should be laid on plywood, which, in turn, must be glued and fixed with dowels to the base. When laying heating pipes, it is necessary to make a very precise diagram of their location and, when drilling holes in the screed for dowels, be very careful not to damage the pipe.
Laying parquet on heated floors - all the pros and cons
Choosing a pump for heated floors
Professional builders and finishers still cannot come to a consensus on whether warm flooring under parquet boards is an acceptable option.
Each side has its own compelling arguments for and against laying natural wood flooring on a warm floor.
"Against"
Parquet boards do not conduct heat well
First, let's look at the arguments of those who are categorically against the use of parquet boards for heated floors.
- Poor thermal conductivity. Due to the fact that natural wood has a low thermal conductivity coefficient, the transfer of thermal energy from the heating elements to the air in the room will be significantly hampered. Accordingly, heated floors will lose one of their main advantages: higher efficiency compared to wall-mounted radiators. To maintain a comfortable temperature in the room, you will have to heat electrical wires or coolant fluid to higher temperatures. The cost-effectiveness and efficiency of ultra-modern heated floors will eventually be on par with the centuries-old “classics” - hanging heating radiators. The underlay under the parquet board, which is an integral element when installing the floor covering, will only aggravate the situation. If regularly exposed to high temperatures, the wood can become deformed
- The next argument against is related to the performance characteristics of natural wood. Using a parquet board as a conductor of thermal energy can negatively affect its condition. Under the influence of regular temperature changes, even a well-installed coating can soon take on an unpresentable appearance. Dry, creaking floorboards, cracks and deformation of wood, peeling varnish are possible consequences of exposure to high temperatures.
- For a warm water floor, there is another argument against laying parquet boards over it. It's all about the coolant circulating through plastic pipes. Despite years of warranty from hydronic flooring manufacturers, there is a possibility of water breaks or leaks. As a result of such, even purely hypothetical, accidents, your expensive flooring may become unusable: the fungus and rot that multiply underneath it will quickly do their job. For more information about using parquet on heated floors, watch this video:
"Behind"
Parquet boards are ideally combined with film flooring, which does not heat up
However, in spite of everything, a number of experts consider laying parquet boards over warm floors to be completely acceptable. To do this, you just need to follow certain rules and recommendations.
- Uniform heating of the entire surface of the floor covering. The ideal option that allows you to combine parquet and warm floors without conflict is IR heating elements. Infrared heated flooring under the parquet board ensures the most uniform heating of all floorboards. As a result, the risk of joint cracking or wood deformation is minimized.
- You should not purchase parquet boards made of natural maple and beech for laying warm floors. Their wood is very sensitive to temperature changes, which causes its deformation and cracking.
- The optimal thickness of the parquet board is 12 mm. Thinner options will become unusable too quickly under the influence of temperature changes, and too thick parquet will create an unnecessary obstacle to heat circulation.
- A damper tape should be secured along the perimeter of the walls at the level of the flooring. It will play the role of a shock absorber during the compression and expansion of parquet under the influence of temperature changes. For the same purpose, parquet should be laid in a “floating” version without a rigid connection to the base of the floors.
- Recently, special varieties have appeared on the construction market that can be combined with underfloor heating systems. They have individual markings, as well as recommendations for their operating mode.
Plywood is often used as an underlying layer under parquet boards. It should be attached to the screed of heated floors exclusively using adhesives.
Under no circumstances should you use self-tapping screws or dowel nails: the likelihood of damaging the water pipes or power cable embedded in the screed is too high. For more information about laying parquet on a film floor, see this video://www.youtube.com/embed/a_au-jrgeMQ
Having become familiar with the features of parquet flooring and underfloor heating systems, each owner can independently weigh the pros and cons, choosing the option that suits him best.
Important nuances
Since wood has low thermal conductivity, floorboards that are too thick will not transmit heat from the heating elements into the room.
What material is better to use for installing floors with a heating system? In many ways, the strength characteristics of parquet boards are determined by the type of wood that is used for the top layer. It is he who takes on the “thermal shock” from the underfloor heating system, which can lead to deformation of the coating.
According to the recommendations of experts, it is advisable to use parquet boards made of walnut or oak for arranging a base with heating elements. These types of wood experience the least thermal expansion or contraction, and therefore are not so susceptible to deformation. At the same time, laying beech or maple flooring on a heating system will inevitably lead to warping of the boards.
What points still need to be taken into account?
- Board thickness. Since wood has low thermal conductivity, floorboards that are too thick will not transmit heat from heating elements into the room. Therefore, it is advisable to purchase a parquet board whose thickness does not exceed 15 mm;
- Installation method. Wood experiences linear expansion not only when heated, but also when the humidity in the room increases. To prevent the floor from deforming, it is better to lay the slabs in a “floating” way;
- Type of heating elements. Wood is susceptible to burning, so when choosing heating elements, it is advisable to choose those that are safer.
Pros and cons of floor coverings for heated floors
Each of them has its own advantages and disadvantages or features. 1. tiles, natural stone; 2. linoleum, PVC tiles or quartz-vinyl; 3. laminate, parquet board; 4. engineered board, solid board glued to the base; 5. solid Ecopol board with floating installation on brackets.
Ceramic tiles, natural stone
If in bathrooms, hallways and kitchens tiles laid on a heated floor are a natural and familiar covering, then in residential premises it is completely unacceptable, especially for our geographical area. And the reason is not only aesthetics and taste. Tiles are produced in such a variety of types, including imitation of natural wood, that choosing something to your taste is not a very difficult task. At the same time, the tile quickly warms up and releases heat into the room. She is easy to care for. These are the undoubted advantages of the material.
The problem with its use in residential premises is different. Tiles and natural stone without heating are always cold, even in hot weather. And if it’s 40°C outside the window, then it’s most likely pleasant to walk on a cool surface. But we have such temperatures extremely rarely, and therefore in the summer you will have to turn on floor heating throughout the house, wear shoes, lay carpets, etc. You won't be able to sit on the floor and play with children or animals without heating. It turns out that you can feel the comfort of installing a heated floor only during the cold season or warm the floor all year round. Which in itself is a dubious pleasure. The floor cake will be 13-15 mm.
Linoleum, PVC tiles or quartz vinyl
These materials, like tiles, also quickly warm up on heated floors and are very cold during periods without heating, since they are too thin and are laid directly on the screed. Linoleum is perhaps the worst option of all three - it will certainly change greatly in size when heated. Quartz-vinyl tiles are more stable and are not afraid of temperature changes, but their price is quite high. During the period without heating, these coverings will have to be either heated, or covered with carpets, or walked in shoes. The floor cake will be 3-7 mm.
Laminate, parquet board
Laminate and premium parquet boards, actually designed by manufacturers for heated floors, lie well on heated floors. In this case, the maximum heating temperature of the screed is allowed within 26-27°C. Taking into account the fact that the surface of the laminate and boards will cool faster than it heats up, it will not be possible to use such a floor as the main heating. During the period without heating, the laminate will be cold, and the parquet board will be warm, because wood itself is a warm material. Laminate heats up faster than parquet boards because it is thinner and denser.
The disadvantages of installing laminate and parquet boards on heated floors lie in the specific structure of these coatings. Laminate, once warped, is no longer able to return to its original state - after all, it is made of a pressed board, simply cardboard. But a parquet board can. True, with a parquet board, the top veneer may come off (delamination). This happens all the time next to boards that are not actually intended for heated floors. Cheap adhesives used in manufacturing simply cannot withstand thermal expansion, quickly age, tear and no longer hold the veneer on pine boards. At the same time, pine and noble species react differently to temperature and humidity and aggravate the process.
Mainly for this reason, the vast majority of experienced parquet companies do not recommend or provide guarantees when laying laminate and economy class parquet boards on heated floors. And those that are guaranteed by the manufacturers are quite expensive - laminates cost over 2,500 rubles/m2, and parquet boards cost over 4,700 rubles/m2. The floor cake will be 10-16 mm.
Engineered board, solid board, parquet with gluing to the base
An engineered or solid board up to 16 mm thick is laid on the heated floor with full adhesion to the base. A two-component adhesive is applied to the base, then a multimol type substrate is glued, and a solid or engineered board or parquet is glued onto it. The adhesive must be recommended by the manufacturer for heated floors—this is very important. Such coatings warm up more slowly compared to tiles, linoleum or laminate, but then they transfer heat well into the room. You will not need to heat the floors in the summer, as they will already be warm and comfortable. Engineered board is more stable than solid board and reacts less to changes in humidity.
But it also has weaknesses. It consists of veneer glued to plywood. Plywood contains phenols and formaldehydes, which enter the air in large quantities when heated. This is dangerous for health and well-being. And the second problem, like with parquet boards, is veneer that does not withstand the regime and comes off. Often the veneer on an engineered board “goes in waves”, when on some boards it lies tightly, but on others it peels off and warps. Solid boards and parquet do not have such problems.
Moreover, during the heating period, cracks may appear between engineered or solid boards and parquet tiles, because each element is strictly fixed in a certain place. With constant heating, the glue quickly ages, bursts, loses its elastic properties and ultimately simply comes off the base. All these risks force experienced parquet companies not to provide guarantees when laying on heated floors. In case of repair or replacement of the coating, the base will have to be cleaned and leveled again. Turnkey price for engineered and solid boards from 5,000 rubles/m2. The floor cake will be 15-21 mm.