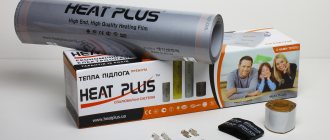
What is Penoplex, types, scope of application
Penoplex - under this brand back in 1998, extruded polystyrene foam boards - EPS - began to be produced in the Leningrad region. A little later, factories appeared in Perm and Novosibirsk, then in Taganrog, two factories in Kazakhstan, in the Tula region. So the geography of production sites is wide.
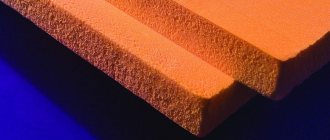
Penoplex insulation boards are orange in color
Brands for private construction
Currently, two types of Penoplex slabs are produced - for private and professional construction. For private there are three types: Comfort, Foundation and Wall. The names reflect the scope of application of the materials. They differ in density and compressive strength.
Penoplex Comfort and foundation are used for walls. What is the difference? Strength and density
The remaining characteristics are the same - they are produced from the same raw materials, using the same equipment. But their purpose is different: Comfort - sound and heat insulation, Foundation and Wall are more aimed specifically at thermal insulation. Although, according to the manufacturer, their noise reduction indices are the same. It’s just that in the Comfort category there is a larger selection of plate thicknesses: 20 mm, 30 mm, 40 mm, 50 mm and 100 mm. The rest have only two thicknesses - 50 mm and 100 mm.
Which Penoplex for flooring under the screed can be placed from this line? Penoplex Foundation. It fits all the criteria. Recommended for laying floors on the ground and on a concrete slab, above a ventilated underground, on a loggia or balcony. The only thing I'm not happy about is the thickness - there are only two options - 50 mm and 100 mm. This is inconvenient since the required/desired thickness is often different. This limits the use of this type of material in screed.
For professionals
Line for professionals - Base, Facade, Roof, Slope, GEO and 45. There are also blocks and shaped products. The blocks are used in heavy construction and private owners have not yet adapted them. Shaped products are a useful thing for insulating wells and solving other similar problems.
Of all the above, it is recommended to use GEO and Slope for floor screeding. The difference between them is in shape: GEO has a standard type of slabs, Slope - slabs with a longitudinal difference in height. They will come in handy if you need to create a floor slope. Their density and strength are higher than those of the materials of the previous category.
Characteristics of PENOPLEX, which can be placed under a screed
Penoplex GEO is convenient to use under screed because there are slabs of this category of different thicknesses - 40 mm, 50 mm, 60 mm, 80 mm and 100 mm. It is easy to dial the desired thickness.
Sometimes they think of using Penoplex 45 for the floor under a screed, but this strength is clearly excessive. This type of material is used in road construction. In any house there will not be even close to such a load. So this type of EPS should not be used.
Penoplex thickness for screed
The question often arises not only about the density or brand of Penoplex under the screed, but also about the thickness. To say for sure, it is necessary to carry out thermal calculations. After all, the thickness of the insulation depends on the heat loss that goes through the floor. If it is a floor on the ground, it is one thing; if it is a screed on a concrete slab in a high-rise building, it is quite another, even if they are in the same climatic zone.
And the thickness of Penoplex depends on where you are going to make the screed and how you will use it. In the case of laying a heated floor, the layer is made to the maximum - there will be less heat loss, lower heating costs.
What thickness of Penoplex should be placed under the screed - table of recommendations for the first floor and unheated rooms below
However, calculations are done very rarely; usually the principle “like everyone else” is used. Here are the average thickness values of Penoplex for floor screed:
- Screed on a concrete floor with a heated room from below - 20-40 mm. If you want to achieve a soundproofing effect, it is better to lay 50 mm thick.
- For concrete preparation (on the ground) and a slab with an unheated room below - from 100 mm and more - depends on the region. The table shows the manufacturer's recommendations for the thickness of Penoplex for the first floors or higher, but with an unheated room below.
If you plan to make a heated floor (water or electric), then add another 10-20 mm to the thickness.
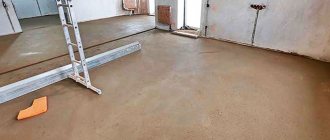
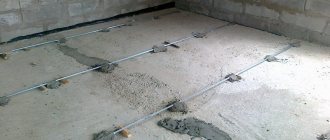
Penoplex screed: technology
Let's consider the simplest case - Penoplex for a floor under a screed on a concrete base. This can be concrete preparation in a floor structure on the ground, or a concrete floor in a high-rise building or private house. The procedure is as follows:
Local irregularities larger than 5 mm are leveled. The manufacturer does not specify the alignment principle. That is, it can be a leveling screed (if there are too many irregularities) or local filling of potholes and cracks with a solution. In the second option, it is necessary to trim/cut/knock down the strongly protruding fragments. Sometimes they even level it with sand. This method is also not excluded.
Standard scheme for using Penoplex under screed
You can level the base with sand, but do you really have a lot of unevenness
? Actually, the whole technology. All clear. Only questions may arise regarding the minimum thickness of the Penoplex screed. The manufacturer recommends at least 40 mm. When laying floors in wet rooms, it is advisable to cover the slab with waterproofing. Choose the type of waterproofing material yourself. The rest of the technology is the same.
Method of insulating the base under heated floors
The insulation of concrete floors with extruded penoplex foam has found worthy application in construction.
The operational and technical characteristics of the material make it possible to use the material for arranging floors with high mechanical loads.
But do-it-yourself insulation of the floor with penoplex under the screed is carried out in compliance with the technological process. Otherwise, a decent result cannot be achieved, and work with polystyrene foam will be in vain.
In order for a floor screed with penoplex to meet your expectations, in this article we will tell you how to insulate a floor in compliance with the recommendations and requirements of professionals.
Penoplex
Penoplex has pros and cons. But there is no doubt about the strength and reliability. They are provided with a closed cell structure. The peculiarity of the material is that its hardness allows it to be laid out on a solid and not entirely solid base, for example: sand or crushed stone.
Important! Penoplex under the floor screed is placed on any ceiling. Since the material can withstand powerful mechanical loads, but is slightly compressed under the weight, it is better to at least half level the base for installing the insulation.
Read more: Gas pipe in the kitchen: norms and rules for installing a utility network
Do-it-yourself insulation of the floor with penoplex under the screed as follows:
- Take measurements of the area for laying the material. Purchase the required quantity with a margin of 5-10%.
- Clean the rough base from dust, dirt and debris. Wash oiled and painted areas of the floor with solvent. The surface needs to be clean and durable.
Cleaning the surface for laying thermal insulation
- Use a level to check the height differences - no more than 1 cm. Otherwise, the flooring is filled with concrete screed for leveling. If the base is made of bulk materials, simply level it for evenness and uniformity. It is important to compact the coating.
- Select fastening method. On a loose surface, sheets of insulating material are simply laid out on the floor. When the flooring is hard, the thermal insulation is installed by gluing it with glue or foam.
Installation of foam boards
- Coat a solid base with a primer for better adhesion and additional cleaning of the surface from dust.
Coating the base with a primer
- Laying penoplex in floor sheets under the screed begins from the far corner of the room. In this case, individual sheets are mounted end to end. During the laying of the next row, the tiles are shifted by half. This creates something similar to brick laying.
Important! It is recommended to compact the insulating boards thoroughly to ensure a smooth surface.
- In the corners, cutting of building material is done with a regular knife. First glue a damper tape around the perimeter of the room so that the foam screed and the heat insulator itself do not touch the wall.
Installation of damper tape
- After laying the penoplex, do not touch the surface for a while to allow the floor to dry normally (within eight hours). If the thermal insulation material was installed on a loose surface, you can immediately begin pouring the concrete screed.
Important! To secure heat-insulating boards of the required thickness, you can additionally use spacers (umbrellas). In this case, first prepare a drill and a pobedite drill bit. After installing the first row, drill a hole in the center of each slab and in the seams so as to achieve pressing of two units of thermal insulation at the same time.
To achieve a better result, you need to not just put the plates next to each other, but also foam the joints of the heat insulator. This way, eliminate cold bridges.
Screed arrangement
Floor screed with penoplex is mounted from cement-sand mortar or self-leveling composition, which is sold ready-made in a hardware store. It is considered more durable and reliable, with better performance and technical characteristics.
First of all, a layer of vapor barrier is laid on the insulation. Then the beacons are placed according to the level, taking into account the width of the rule. Monitoring the correctness and evenness of the installation of beacons is mandatory. This is done with a flat plank by laying it simultaneously on three beacons. At the same time, the bar should not swing. If the work is done correctly, then the three points are located in the same plane.
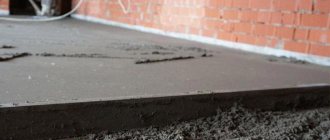
Filling the screed is performed as standard. The previously prepared solution is poured between the individual beacons and leveled using the rule. It is recommended to carry out manipulations quickly. After all, the composition must not be allowed to thicken. Move from the far corner to the exit.
The concrete screed is dried slowly and evenly. Do not allow drafts in the room or direct sunlight. The windows are closed. It is recommended to moisten the concrete screed several times a day for a week. This will eliminate the possibility of cracks and tears in the coating.
Drying of gypsum compositions occurs faster. After a week you can safely use the premises. Whereas a concrete screed takes a month to dry.
Screed thickness
There are no strict requirements for the thickness of the screed with penoplex. But professionals advise making the top layer no more than 4 cm, which will ensure reliable bonding of the surface, without shrinkage during use.
Important! If you plan to create self-leveling floors, it is better to make a classic leveling screed and then install insulating boards. This will ensure financial savings on the purchase of building materials.
Now we know how to insulate a floor with penoplex under a screed with your own hands. To perform the work you do not need professional training, specialized skills and abilities. It is important to study the technology for creating screeds, including the step-by-step execution of work. No difficulties are expected.
Installing thermal insulation is an opportunity to make your home more comfortable. The choice of insulation is an important component of the process. Mineral wool is being replaced by new materials: cork, expanded clay and others.
Many craftsmen prefer to use foam sheets for flooring under any screed. This option would be appropriate when assembling a floating structure or pouring a durable concrete surface.
The best method will be chosen by the craftsman himself, having received advice from a professional and viewing specialized resources.
When carrying out repair work, it is wise not only to level the surface, but also to carry out insulation measures. Different types of floor insulation under the screed will improve the quality of life: this could be an additional layer of special material or the installation of utilities intended for heating. Today, electrical systems, infrared bands, and water heating are popular.
Most craftsmen choose to install a simple functional insulating layer. Particularly important is the insulation of concrete floors: with or without a basement. The material must meet the basic criteria:
- Be moisture resistant and not covered with fungal plaque.
- Do not ignite (fire-resistant impregnations will help here).
- Be durable (it will have to withstand significant loads).
One of the selection criteria is cost-effectiveness and affordable cost. Demanding contemporaries attach great importance to the safety of the components of any coating. Insulation helps save energy - a cold floor can increase heat loss by 20%.
A smart and quick way to make a concrete floor pleasant to the touch is to use roll materials that can be easily laid on a flat, cleaned slab. The solution is poured according to the standard scheme: using a level, markings are made, beacons are set, and cement mixture or bulk filler is laid out along the landmarks.
The concrete base should be made warmer, because while it is absolutely practical and durable, it has a significant drawback: the surface is always cold, causing a feeling of discomfort upon any contact. The floor “delays” the warming up during the off-season and frosty winter days, and the feeling of calm comfort is lost.
The need to insulate the floor with loose expanded clay under the screed is one of the options for creating a microclimate in the room that meets sanitary standards.
Pebble material is accessible and effective - it has a porous structure, so it is used as backfill or added to the solution.
The average standards for mixing the composition, calculated per m2, are considered classic: 40 kg of cement-sand mixture plus 35 kg of filler (expanded clay). The ingredients are thoroughly mixed.
Dry granules can be distributed according to the height of the beacons - a mound 2 cm below the beacons. A layer height of 2 cm is 50 kg of material per m2. The filler is poured on top with cement “milk”, which is 2.5 times less dense than the main mixture. When the composition hardens, a film is formed that prevents subsidence of the dry backfill.
The final filling is carried out according to landmarks - the solution is distributed and leveled along the beacons. This method is in demand when finishing the floor in a private house, where there is a cold basement below.
Read more: Grouting tile joints. How to choose the right grout for tile joints
After a day, the beacons are removed and the screed is left to dry completely. The technique allows you to make the room warmer by reducing the weight of the concrete thickness. The technology is suitable for apartments or houses with lightweight foundations and wooden floors.
Polystyrene foam is a budget-friendly way to effectively insulate surfaces. It is a white (less often gray) slab consisting of granules formed by air bubbles in a light shell. The material is weightless, but has good insulating properties. Through special processing, blocks with different parameters are formed.
Polystyrene foam under floor screed is an inexpensive option with a number of advantages. He:
- Eco-friendly, inert in relation to other building materials.
- Does not cool down, having low thermal conductivity.
- Absorbs sounds and is moisture resistant.
- If necessary, covered with an antiseptic
- Easy to process and cut.
To insulate the floor with foam plastic under the screed, you will need sheets of different thicknesses. According to the principle: the closer to the foundation, the thicker it is. In private cottages and on the first floors it is possible to use centimeter material from 5 cm.
The placement of polystyrene foam for the floor under the screed is considered in two options - between:
- Concrete (cement) pouring and finishing floor (finishing layer).
- Modern type waterproofing and final screed. This method is good for further finishing with tiles treated with natural or artificial stone.
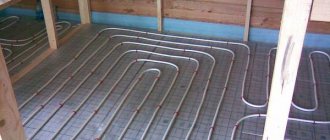
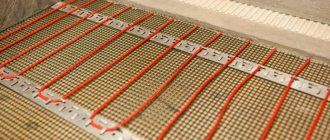
Laying heated floors on Penoplex
There are differences, but they only concern the laying of pipes or heating cables/mats. Preparation of the base, the first layers, including the waterproofing layer on Penoplex, were described above. A steel mesh is laid on the waterproofing film. It is needed to fix the cable or pipes in a given position. When using heating mats, they can be placed in a layer of tile adhesive - this is simpler and more effective, so this type of heating elements for the floor is rarely used at this stage (although no one prohibits it).
Which mesh should I use? Depends on the step at which you need to lay the pipe or cable. You can lay 50*50 mm, 100*100 mm or 150*150 mm. It is important that the chosen scheme can be implemented. What is the thickness of the wire in the mesh? Not less than 3 mm. In the case of a cable, perhaps 2 mm is possible. And before pouring the screed, the pipes will be filled with coolant and need to be held in place, so a mesh made of 3-4 mm wire is needed.
You can use Penoplex under a warm water floor without any problems
To prevent the mesh with coolant from moving when filled, it must be attached to the Penoplex. There are several options:
- Plastic clips that are driven into the insulation. But the thickness of the mesh rods is at least 4 mm.
- The metal tie is aimed at the insulation on both sides of the mesh cell.
- Special harpoon clamps.
- Special tires, but they are expensive.
- A mat with bosses is laid on top of the Penoplex. Then the grid is not needed. But these mats are also expensive.
After the mesh is secured, we attach the pipes or cable. The easiest way is with plastic ties, or knitting wire. But the wire can theoretically fray a pipe or cable as it increases or decreases in size (from heating and cooling) during operation. Therefore, if knitted with wire, it is in a plastic sheath. Manufacturers of pipes for heated floors have it.
Actually, that's all. Then they pour the screed, level it, and wait until the concrete gains strength.
Dry screed on Penoplex
Cement-sand or concrete screed is, of course, good. And it is the best solution if you want to make a warm floor from heating. But the mass of materials amounts to tons. Raising this to any level is already a problem. You also need to wait at least 28 days for the concrete to gain strength. It's faster and easier to make a dry screed. Not in the sense that from a solution that is called dry. And using sheet materials - plywood, OSB, gypsum board. This base will be suitable for any finishing coating. Even under tiles, but with certain reservations - glue is needed for complex unstable bases.
You can make a flat floor without concrete and mortar: lay Penoplex for the floor under a screed made of gypsum plasterboard, plywood or other sheet materials
How to make a dry floor screed using Penoplex? Just:
- Level the base.
- If necessary, we lay or apply waterproofing.
- We lay out Penoplex slabs, preferably in two layers with bandaging of the seams.
- We lay one layer of sheet material. Again, we move the seams.
- The second layer of sheet material is also staggered.
- We fasten through with suitable fasteners. It depends on the material that was laid on the insulation.
- Further on the technology of laying the flooring.
The thickness of gypsum boards for laying on Penoplex on the floor is 20 mm, plywood is better to take 10-12 mm, OSB can be smaller. You can also put GVL on Penoplex. The slabs lie flat, without differences, so the base is suitable for this material. But it does not have the disadvantages of gypsum plasterboard and OSB, and the cost is approximately the same as them.
Source
Using penoplex directly on the ground
Characteristics of penoplex
- High stability of the coating under intense mechanical loads.
- High moisture resistance.
- Heat resistance (the stove does not ignite).
- The absence of formaldehyde in the production of insulating sheets, which ensures a high environmental class of the material.
- Increased sound insulation properties.
- Laying penoplex does not require additional costs.
Combining the properties of plastic and foam, the material is produced in the form of slabs, with a length of 120 cm, with a standard width of 60 cm.
Thanks to the interspersed air cells formed during pressing of the material, the slab is lightweight with high surface rigidity.
Depending on the assortment, it is used to cover floors (grade 35 “Foundation”), walls, ceilings (grade 31 C “Comfort”). To insulate the floor, the material is most often laid on the following bases:
- priming;
- floor coverings;
- under the system heated floor;
- concrete floor.
The disadvantages of penoplex insulation include its susceptibility to ultraviolet radiation. When exposed to direct sunlight or reflective effects, the material is deformed. Some brands of insulation are not impregnated with antipyrine (type “Foundation”), therefore they do not have fireproof protection and ignite at high temperatures.
Before laying penoplex, the required performance characteristics and features of the floor are determined. But there are general rules when laying insulation, compliance with which will allow you to avoid wasting time and money.
Read more: Methods for connecting plumbing pipes using socket and collet pipes
Penoplex insulation options
Correct calculation of the square footage of the insulated floor and selection of the appropriate slab thickness. Penoplex is produced in widths from 2 to 10 cm, with a standard width (60 cm), sheet length from 120 to 240 cm. The material is sold in blocks of four to 20 sheets.
Insulation technology involves the use of only polyurethane adhesive mixtures; if any other adhesive composition is used, it is important that the adhesive does not contain toluene, acetone or formaldehyde components, since they destroy the cellular structure.
It is recommended to lay penoplex on a ground base, without main foundation slabs, using the following technology.
The standard insulation scheme assumes the presence of a vapor barrier layer under the foam sheet; in some cases this operation is skipped. The insulation layers are arranged as follows:
- priming;
- crushed stone (or gravel);
- sand;
- foam boards;
- waterproofing;
- reinforcing mesh;
- cement strainer;
- finished floor (laminate, parquet, linoleum, etc.).
The soil base is leveled, compacted and dried. A layer of crushed stone, about 40 cm high, is tightly laid and compacted. Sand is poured onto the crushed stone cushion in a layer of about 10 cm.
Granite chips, crushed stone or gravel are poured onto the ground. Then everything is watered generously and compacted. After this, the soil is dried.
It is recommended to use these rules during construction only in the warm season, so that the soil has the opportunity to dry out sufficiently. Then dry sand is poured.
Penoplex is placed on the resulting base; the seams can be glued with tape (or use an adhesive solution). Layers of waterproofing are applied to sheets laid in a checkerboard pattern, onto which a reinforcing mesh is mounted.
Thermal insulation process
For subsequent cement screed, metal cellular reinforcing mesh is used. The height of the mesh should not exceed 25 cm. Fill the floor with cement mortar, checking the level.
If you do the insulation of the floor on the ground floor of a private house yourself, you should pay attention to the fact that it may be necessary to cut holes in the foam slabs for communication pipes. This stage of work should be carried out after laying the sand, during the first measurements.
When laying building materials on concrete floor slabs, it is recommended to additionally insulate the surface. You should put penoplex on a layer of thermal insulation, using for this:
- cork sawdust;
- expanded polystyrene;
- foil-based insulation;
- liquid insulation.
For high-quality and fast flooring, a certain technology is used.
Concrete floor insulation scheme
- Preparatory work. The floor slabs are puttied, all irregularities are sanded, and checked with a level.
- The surface of the base is primed; two layers of primer can be used if no additional insulation has been carried out.
- In high-rise buildings, for thermal protection, sheets of material can be laid on a concrete base without additional coating primer.
- Penoplex sheets are laid.
- The sheets are laid on the floor, the seams can be treated with polyurethane foam or using tape.
- Installation of the thermal insulation layer.
- A cement screed is poured onto the reinforcing mesh. The order of work often changes; the reinforcing mesh may not be installed.
- The finished floor covering is being laid.
If penoplex is used for thermal protection of a balcony floor, it is recommended to additionally lay the concrete floor using foam plastic or mineral wool as insulation.
The technology of laying the finished floor directly onto the material, bypassing layers of reinforcing mesh and cement screed, is also widely used. This method is used if it is necessary to reduce the weight of the floor (when insulating the interfloor floors of a private house). And also if there is a risk that the load-bearing floors are not designed for the additional weight of the concrete screed or if additional insulation is not required.
Warm floor design
When installing a hydraulic or electric heated floor system, the system pipes are laid out on a reinforced mesh (thermal insulation) under a cement screed.
In this case, the material can be used using standard technology, similar to when laying slabs on a concrete floor.
For a hydraulic heated floor system, a sand-cement screed is used; the solution is prepared from equal shares of sand and cement, and it is also recommended to add a construction adhesive base to the solution.
Penoplex trimming
Two types of connecting edges of Penoplex insulation panels
If you need to lay insulation in non-standard rooms, or cut communication holes in sheets, use several methods of cutting the material.
Use any sharp knife. This trimming ensures relatively even edges of the sheet.
Trimming using a jigsaw. The cutting edge is very uneven; construction foam is used to tie sheets cut in this way.
Using hot wire. In this way, you can quickly cut a thick slab; for cutting, a nichrome string is heated with electric current and communication holes are easily cut out.
Being a universal insulation material, the material can also be used as thermal protection on wooden floors and on joists. The technology of laying sheets on a wooden base technically has few differences from covering a concrete base.
As an additional insulation element, mineral wool (as an additional thermal layer), construction foam (to fill possible gaps and for sealing), and mounting nails are used.
Important! Remember that the screed must be strictly horizontal, otherwise you may encounter serious difficulties when laying the flooring.
- parquet board;
- laminate;
- linoleum;
- any type of ceramic tile;
- polymer coating;
- wooden boards;
Installing a floor in a bathhouse has its own specific features. So it is necessary to insulate the walls from the side flush with the floor, the concrete screed is installed at a certain angle, this is necessary for the unhindered flow of water, while the drain must also be isolated from air from the outside. Sanded boards are used as flooring in the baths; they are installed on logs in increments of fifty centimeters. When installing the floor in a bathhouse, the boards are laid with a gap of 5 millimeters to allow water to drain.
Peculiarities
The main purpose of the screed is to level the floor for the finishing coating. Most often, floor screeds are made on a cement basis. The base for the flooring may be different.
Its type, thickness and composition depend on factors such as:
- room flooring material (wooden flooring, concrete slab);
- type of building (domestic, residential, industrial);
- floor operating conditions (loads, temperature conditions);
- type of soil (when laying the screed directly on the ground);
- the need to lay an additional layer of sound or heat insulation;
- floor heating system equipment.
In each specific case, the screed will have a different thickness. According to the height of the concrete layer, screeds are divided into:
- Minimum thin. Their thickness is less than 20 mm. A thin screed is obtained using self-leveling mixtures. The small thickness does not allow for the laying of reinforcement.
- Medium thickness. This screed reaches 70 mm in height. It can be reinforced with steel mesh or fiberglass
- As thick as possible. The concrete layer can reach up to 150 mm. A monolithic slab must be reinforced. This option can act as a foundation for buildings located on soils with low bearing capacity
The thickness of the cement or concrete layer directly depends on the building materials used for its preparation. For example, it is impossible to ensure the minimum thickness when pouring concrete with crushed stone filler. The crushed stone itself is quite large. In addition, it has sharp edges.
Introducing foam granules into the solution
Introducing foam granules into the solution
To create a concrete screed with foam plastic, slab material is not always used, because the surface can be given additional performance properties by introducing granules into the cement mortar. Foam granules will create an air layer, thereby ensuring good thermal insulation performance of the screed. This process is carried out in several stages.
Foam chips with cement
- A solution is prepared consisting of a small amount of water and the volume of cement required to obtain a mixture of creamy consistency. The mixing process becomes much faster and more efficient when using a drill with a suitable attachment.
- Continuing mixing, foam granules are added to the mixture. The ratio of ingredients varies: one part of concrete can contain three, four or even six parts of granular material.
The higher the percentage of granules in the solution, the better the thermal insulation properties of the screed. However, at the same time, it will be less durable, and when pressed it may even crumble, therefore, it will lose the lion’s share of its performance characteristics.
Foam chips are a material that solves the most pressing problems, being an ideal insulation material that is resistant to fires, severe fires and other types of damage, and at the same time economical and high quality
The choice of the desired proportion largely depends on how durable and rigid the finishing floor covering will be. For example, if you plan to use linoleum, then the volume of granules in the solution should be minimal, parquet - vice versa.
foam granules
Video - Polystyrene foam granules. Mixing with cement
What should it be: requirements
According to building codes and regulations (SNiP), the minimum thickness of the floor screed is 20 mm. In everyday life, such a minimum is rarely installed. It increases significantly if you need to hide equipment located on the subfloor. Thus, the thickness of the screed when installing a warm water floor should be determined taking into account the basic parameters of the pipes.
Typically, pipes of small diameter, reaching a maximum of 25 mm, are used for the heating system.
It is well known that the layer of mortar above the heating system should not exceed 40 mm. With a greater thickness, the installation of a heated floor is ineffective, since the bulk of the heat received simply will not reach the consumer. The internal layers of the screed will heat up, and the floor covering will receive virtually no thermal energy. The simplest calculations show that the thickness of the screed for a pipe diameter of 25 mm should be in the range of 50-70 mm. A standard screed consists of several components or layers.
The order of installation from bottom to top is as follows:
- waterproofing;
- thermal insulation;
- fittings;
- warm floor;
- screed
Different heated floor designs require different screed layers.
In some cases, the subfloor is first leveled with a thin screed; sometimes the solution is laid directly on the insulation. Its thickness should not be less than 2 cm. The layer is given 1 month to dry, and only after it has completely dried can you begin installing the heated floor, subsequently covering the installed communications with another screed.
An electric heated floor requires a low screed, especially if film heating was chosen. Infrared film is ideal for installation under laminate, carpet and linoleum.
If you plan to cover the floor with tiles, you should use a heating cable. In this case, you will need a less thick screed than when creating a water floor.
Pouring a concrete screed onto any heated floor is carried out only after it has been securely fastened, connected to the main communications and fully checked for functionality.
Types and materials
The term “screed” combines a lot of different types. The composition of the screed can be:
- cement-sand;
- concrete. Concrete, in turn, differs in fillers:
- crushed stone;
- expanded clay;
- gravel;
- bulk.
The screed layer, depending on the interaction with the base, is:
- Related. Lays directly on the base;
- Floating. The layer of mortar does not come into contact with either the base or the walls of the room.
According to their design, screeds are divided into:
- Solid;
- Prefabricated. They can be single-layer or multi-layer. Here the screed is laid in separate layers, each of which has adhesion to the previous one.
Most often, screeds consist of a mixture of sand and cement - sand concrete.
Less commonly used materials are:
- gypsum and polymer mixtures;
- sheet materials;
- dry bulk materials.
The screed can be reinforced, self-leveling, or contain special additives that affect density, strength, fluidity and other characteristics.
Based on the water content, screeds are divided into:
- Dry. This type requires a dry base. A wet subfloor (flooring or slab) must first be dried. The prepared base is covered with a vapor barrier to prevent moisture penetration. Guides are mounted on the film, between which the dry mixture is poured and leveled. The bulk material is covered on top with a covering that prevents the penetration of dust particles.
In residential premises, a dry appearance is unacceptable.
- Semi-dry screeds are concrete and cement-sand. They contain plasticizers and fiber fillers. The former impart elasticity to the mixture, while the latter increase the strength of the screed. Semi-dry screed is good because it dries much faster than wet screed, is suitable for residential and office premises, and can also be installed under any floor covering.
- The wet version has fluidity. With its help, you can correct even large unevenness, since this type fills recesses and cavities on floor slabs. The self-leveling effect is achieved due to the free spreading of the solution.
The main disadvantages of this type are the impossibility of use in apartment buildings on floors above the first and the long hardening time.
Characteristics and properties of insulation
Penoplex can withstand heavy loads and high pressure. Extruded polystyrene consists of a huge number of small cells with a diameter of 0.1-0.2 mm.
They are isolated from each other and evenly distributed in the material. Such structural features have the best effect on thermal insulation and strength. Extruded polystyrene foam has the following properties:
- Weak water absorption.
One of the key features of a material that is constantly forced to interact with vapors and condensate. However, it absorbs water exclusively on the cuts of the slabs, i.e. in places where cells are open.
- High level of strength.
The material can withstand heavy loads and high pressure. Strength: 0.2-0.5 MPa with linear deformation of 10%.
- Low vapor permeability.
Vapor permeability coefficient 0.008. This indicator of penoplex may well compete in terms of quality even with the vapor permeability of roofing material.
- Environmentally friendly.
Although freons were used in the manufacturing process of the material, the end result is not toxic and does not destroy the ozone layer of the atmosphere.
- Low thermal conductivity.
The low level of thermal conductivity (0.03 W*m*0C) paired with high moisture resistance has a decisive influence on the choice of insulation. It is not surprising that extruded polystyrene foam is used to protect not only walls, but also basements and roofs.
This material does not lose its positive properties even after repeated freezing and thawing
- Minimal chemical activity.
The construction craft uses a huge list of various substances and only some of them are able to interact with penoplex.
- Long-term operation.
This material does not lose its positive properties even after repeated freezing and thawing. According to scientists, it can last for more than half a century, even in adverse conditions.
- Easy installation.
The slabs can be cut with a knife; the material does not split or crumble. Working with it is a pleasure, because extruded polystyrene foam is not afraid of humidity and sun.
Despite all the positive features of penoplex, there are a number of compounds that can destroy its structure:
- Ketone substances;
- Kerosene, gasoline and diesel fuel;
- Oil paints;
- Aromatic hydrocarbons;
- Esters (complex and simple);
- Tar from coal;
- Formaldehyde and formaldehyde;
- Some polyesters.
Penoplex is actively used for insulating foundations.
There are not many aggressive compounds. Chemicals for the most part do not react with extruded polystyrene foam. These include the following compositions:
- Salt solutions;
- Alcohol (even in paints);
- Lime;
- Oils and paraffins;
- Freons;
- Alkaline compounds;
- Propane, ammonia, butane;
- Organic and inorganic acids;
- Water and water paints;
- Mixtures with concrete and cement.
Penoplex is extremely resistant to influence. It is virtually not subject to rotting and decomposition. To increase its service life, the most favorable conditions are created for the material.
The strength of penoplex is almost 4 times higher than that of polystyrene foam.
Penoplex is often confused with polystyrene foam. However, there are a number of differences between these materials. Let's compare them according to some parameters:
- Strength.
When comparing materials of the same thickness and density, it was found that the strength of penoplex exceeds that of polystyrene foam by almost 4 times. For this reason, it is the first material that is used for insulating floors in garages, constructing skating rinks and runways. Polystyrene foam is not very dense and crumbles easily when operating conditions change.
- Moisture permeability.
The moisture absorption of polystyrene foam exceeds the permeability of its competitor by 10 times (due to the structural features). The minimum level of water absorption of penoplex contributed to the spread of the practice of insulating premises without the use of vapor barrier.
- Density.
The increased density of penoplex makes it indispensable for floor insulation.
- Thermal conductivity.
The indicators are almost the same, but penoplex, nevertheless, retains heat better.
- Flammability.
Penoplex has a low level of flammability, unlike polystyrene foam, but it is more prone to fire. To avoid the latter, the material is treated with fire retardants.
From the above it follows that extruded polystyrene foam is much better than polystyrene foam, but its cost is also an order of magnitude higher.
The main criterion when choosing thermal insulation for a floor is the thermal conductivity coefficient. The low value of this indicator for penoplex is due to the fine-cell structure of the material, which is formed thanks to a special production technology. It allows you to reduce thermal energy losses by up to 20%.
Laying penoplex under a concrete screed has other advantages, since it is characterized by the following properties:
- strength;
- good sound insulation;
- environmentally friendly, so insulation with its help can also be performed in residential premises;
- durability;
- low degree of moisture absorption;
- resistance to fire and immunity to the appearance and spread of mold and mildew.
Penoplex is lightweight and easy to process. Using it to insulate screeds with your own hands, you can do without complex tools and special equipment.
To install a floor based on a concrete screed, you need a set of tools and accessories, which includes:
- container for preparing concrete mortar, with a volume of at least 20 liters;
- a construction mixer that ensures homogeneity of the mixture;
- the rule necessary to level the floor surface;
- level and tape measure for control and marking;
- stationery knife;
- spatula and needle roller.
The list of additional equipment is determined by the type of finishing floor covering.
In rooms located above the first floor, it is advisable to use penoplex comfort for insulation. It combines a low density structure with strength and the ability to withstand significant temperature differences from -50 to 75 °C. Which penoplex to choose for the screed? This depends on the location of the thermal insulation work and further operating conditions.